
Sync with Salesforce Using Customer.io Webhooks
Salesforce is a popular tool that sales teams use to manage customer relationships. Frequently, there is a need to sync information between Salesforce and Customer.io – that way, sales teams, and marketing teams can benefit from a complete view of their users. In this guide, you will learn how to authenticate into Salesforce, and then update a specific record in Salesforce, all through Customer.io’s intuitive workflow builder and webhook editor.
Salesforce Setup
Before you can build the connection to Salesforce in Customer.io, you will need to create a new user and a new Connected App in your Salesforce instance.
To create a new user, go to Setup > Administer > Manage Users > Users and then follow the in app steps to create a new user. Be sure to use an email address you have access to for this new user. Once created, go through the steps listed here to reset your security token, as you will need this, as well as the username and password, later in this guide to authenticate into Salesforce.
To create a new connected app, go to Setup > Build > Create > Apps, and then follow the in app steps to create a new Connected App. Additionally…
- Be sure to check the box for “Enable OAuth Settings”.
- For the “Callback URL”, just enter the URL of your website.
- In “Available OAuth Scopes”, select “Full access (full)” and click the “Add >” button to add the scope to “Selected OAuth Scopes”.
Once your Connected App is created, go to Setup > Build > Create > Apps, and click the name of the new Connected App you’ve just created. On this page find and record your Consumer Key and Consumer Secret as you will need these later in the flow.
Finally, go to Administer > Manage Apps > Connected Apps, and click on your Connected App. At the top of the Connected App page, click the “Edit Policies” button. From there, find the “Permitted Users” dropdown and select “All users may self-authorize” and click the “save” button.
Create your Customer.io Campaign
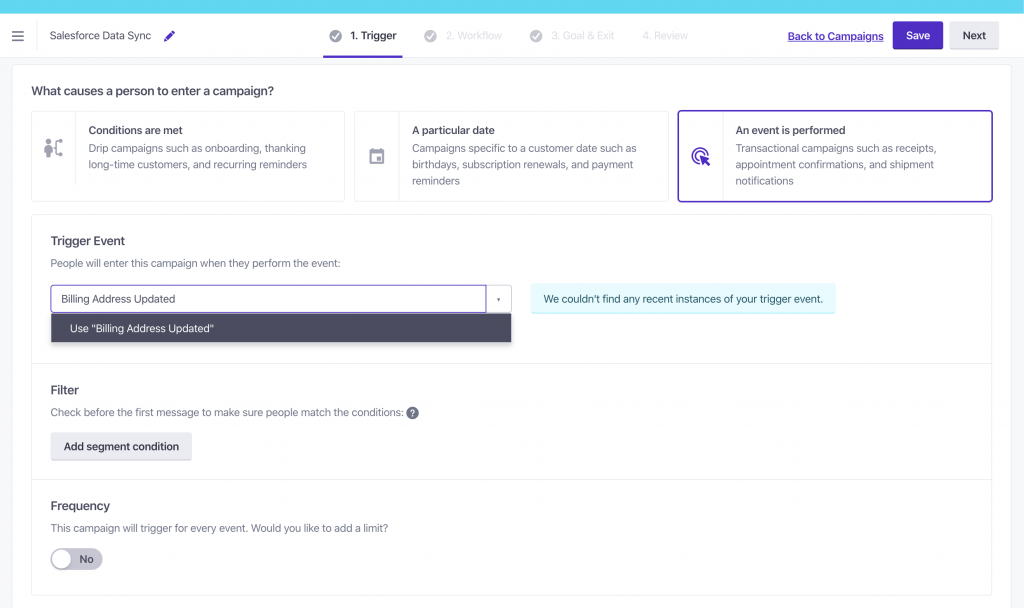
Once you’ve created your user and Connected App in Salesforce, you are ready to begin working in Customer.io. The data sync with Salesforce is a workflow action in Customer.io in a campaign – to start, pick the condition that will trigger your campaign and the data sync. In this guide, we’ll trigger our campaign on the event ‘Billing Address Updated’ which fires whenever a user changes their billing address, information you’d like collect in Customer.io and would want to update that users record in Salesforce.
Authenticating with Salesforce
Next, you’ll enter the workflow builder where you will add several Webhook actions. The first webhook will ping Salesforce to receive an Authorization token that you will use later in the workflow. Set the request to POST and use the following URL endpoint:
https://login.salesforce.com/services/oauth2/token?grant_type=password&client_id={{Your Connected Apps Consumer Key}}&client_secret={{Your Connected Apps Consumer Secret}}&username={{Your Username}}&password={{Your Password and Security Token}}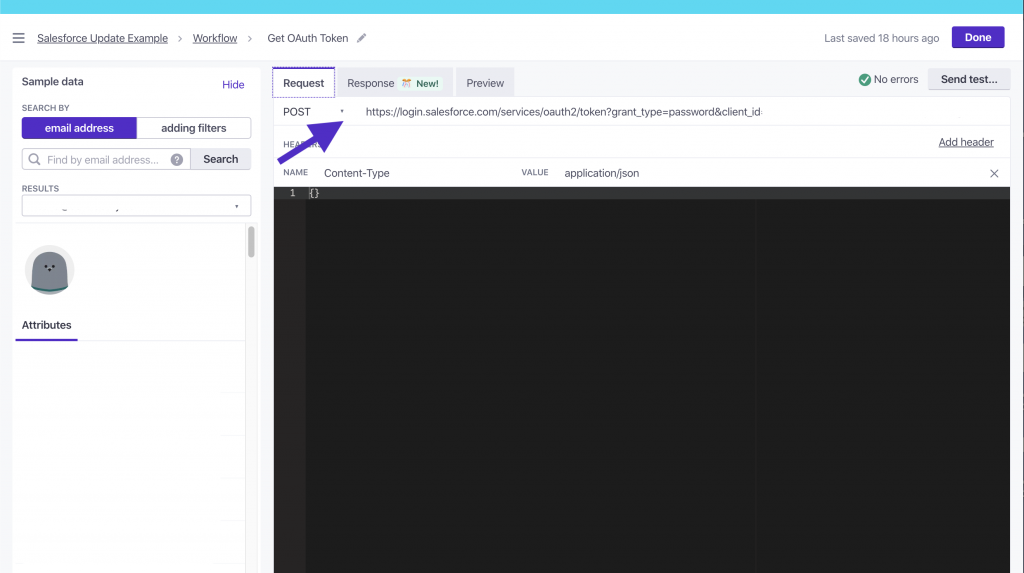
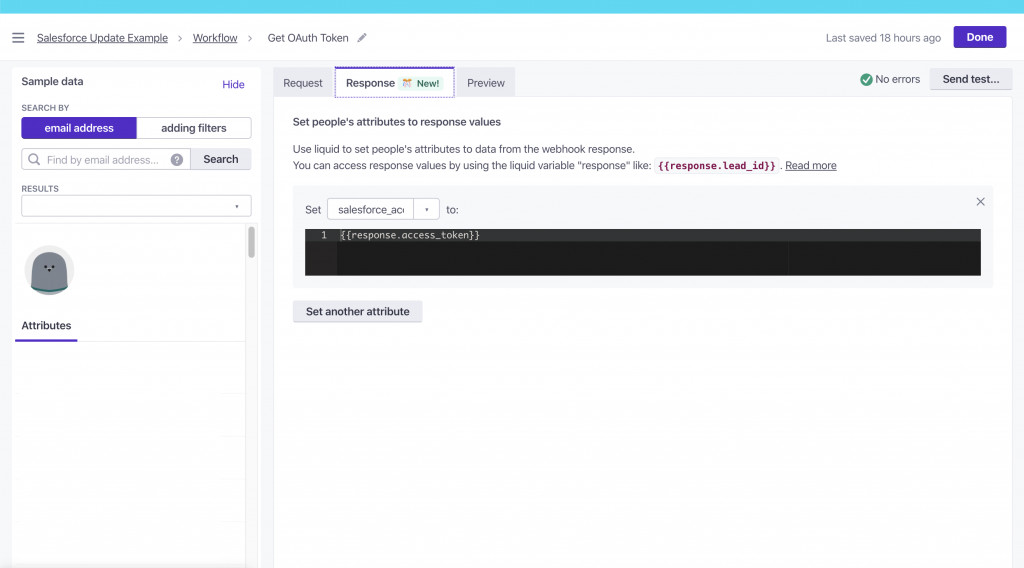
Post request to Salesforce to create an Authorization TokenIn the Response tab, create a new attribute against the user – in this example, salesforce_access_token – with the value of {{response.access_token}}. You’ll use this later in the workflow.
For more information on the authorization method we’re using for Salesforce, see their documentation here.
Updating a Record
Once you have your Authorization token, you can start interacting with the Salesforce API to search and update records. This guide will show you how to update a Lead object in Salesforce, but her methods are similar for Accounts and Contacts.
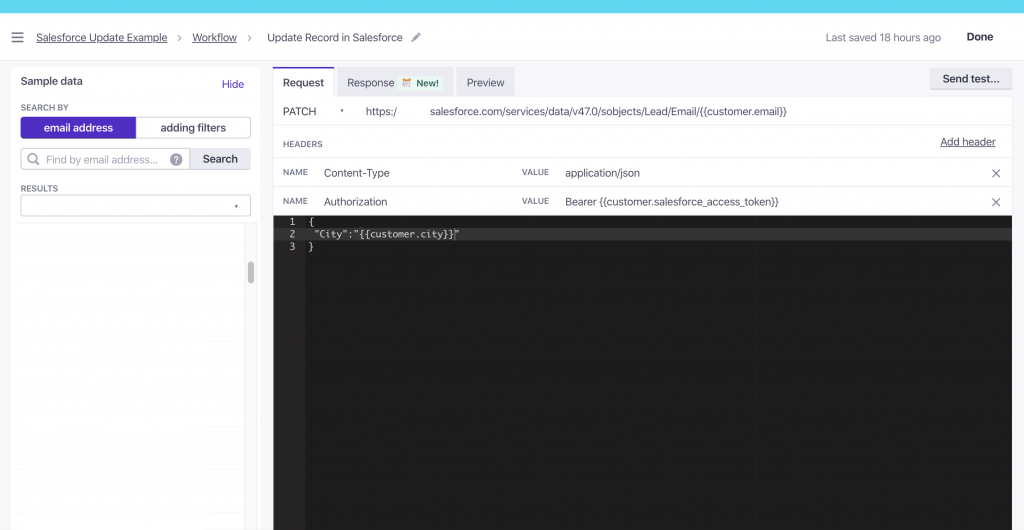
Using the user’s email address in Customer.io we can ping Salesforce to update the lead record associated with that email address. Create a new webhook action in your campaign, and set the webhook request to PATCH with the following URL endpoint:
https://{{Your Salesforce Instance}}.salesforce.com/services/data/v47.0/sobjects/Lead/Email/{{customer.email}}. Add two headers to your webhook – Content-Type set to application/json and Authorization set to Bearer {{customer.salesforce_access_token}} which will pull in the Authorization token from the set before.
In the body of your webhook, enter the data you’d like to update in Salesforce. In this example, the user has updated their Billing Address, so here theCity column in Salesforce is being updated to match the customer attribute city in Customer.io.
For more information on updating records in Salesforce see their documentation here. For a list of columns available for the Leads object in Salesforce, see their documentation here.
That’s one example of how to update your Salesforce records with data from Customer.io. Have other use cases? Email us at marketing@customer.io.