Set up push notifications
Our Flutter SDK supports push notifications over FCM—including rich push messages with links and images. Use this page to add support for your push provider and set your app up to receive push notifications.
This page is part of a setup flow for the SDK. Before you continue, make sure you've implemented previous features—i.e. you can't receive push notifications before you identify people!
How it works
Under the hood, our Flutter SDK takes advantage of our native Android and iOS SDKs. This helps us keep the Flutter SDK up to date. But, for now, it also means you’ll need to add a bit of code to support your iOS users. For Android, you’re ready to go if you followed our getting started instructions.
Before a device can receive a push notification, you must:
- (iOS) Register a device token for the device; code samples on this page help you do that.
- Identify a person. This associates a token with the person; you can’t send push notifications to a device until you identify the recipient.
- (for both iOS and Android) Check for notification permissions. If your app user doesn’t grant permission, notifications will not appear in the system tray.
- (Optional) Set up your app to report push metrics back to Customer.io.
Did you already set up your push providers?
To send, test, and receive push notifications, you’ll need to set up your push notification service(s) in Customer.io. If you haven’t already, set up Firebase Cloud Messaging (FCM).
Set up push on Android
If you followed our Getting Started instructions, you’re already set up to send standard push notifications to Android devices. Next, you can set up deep links if you want your notifications to link into your app. You can also move on to set up iOS.
Set up push on iOS
You’ll need to add some additional code to support push notifications for iOS. You’ll need to add push capabilities in XCode and integrate push capabilities in your app.
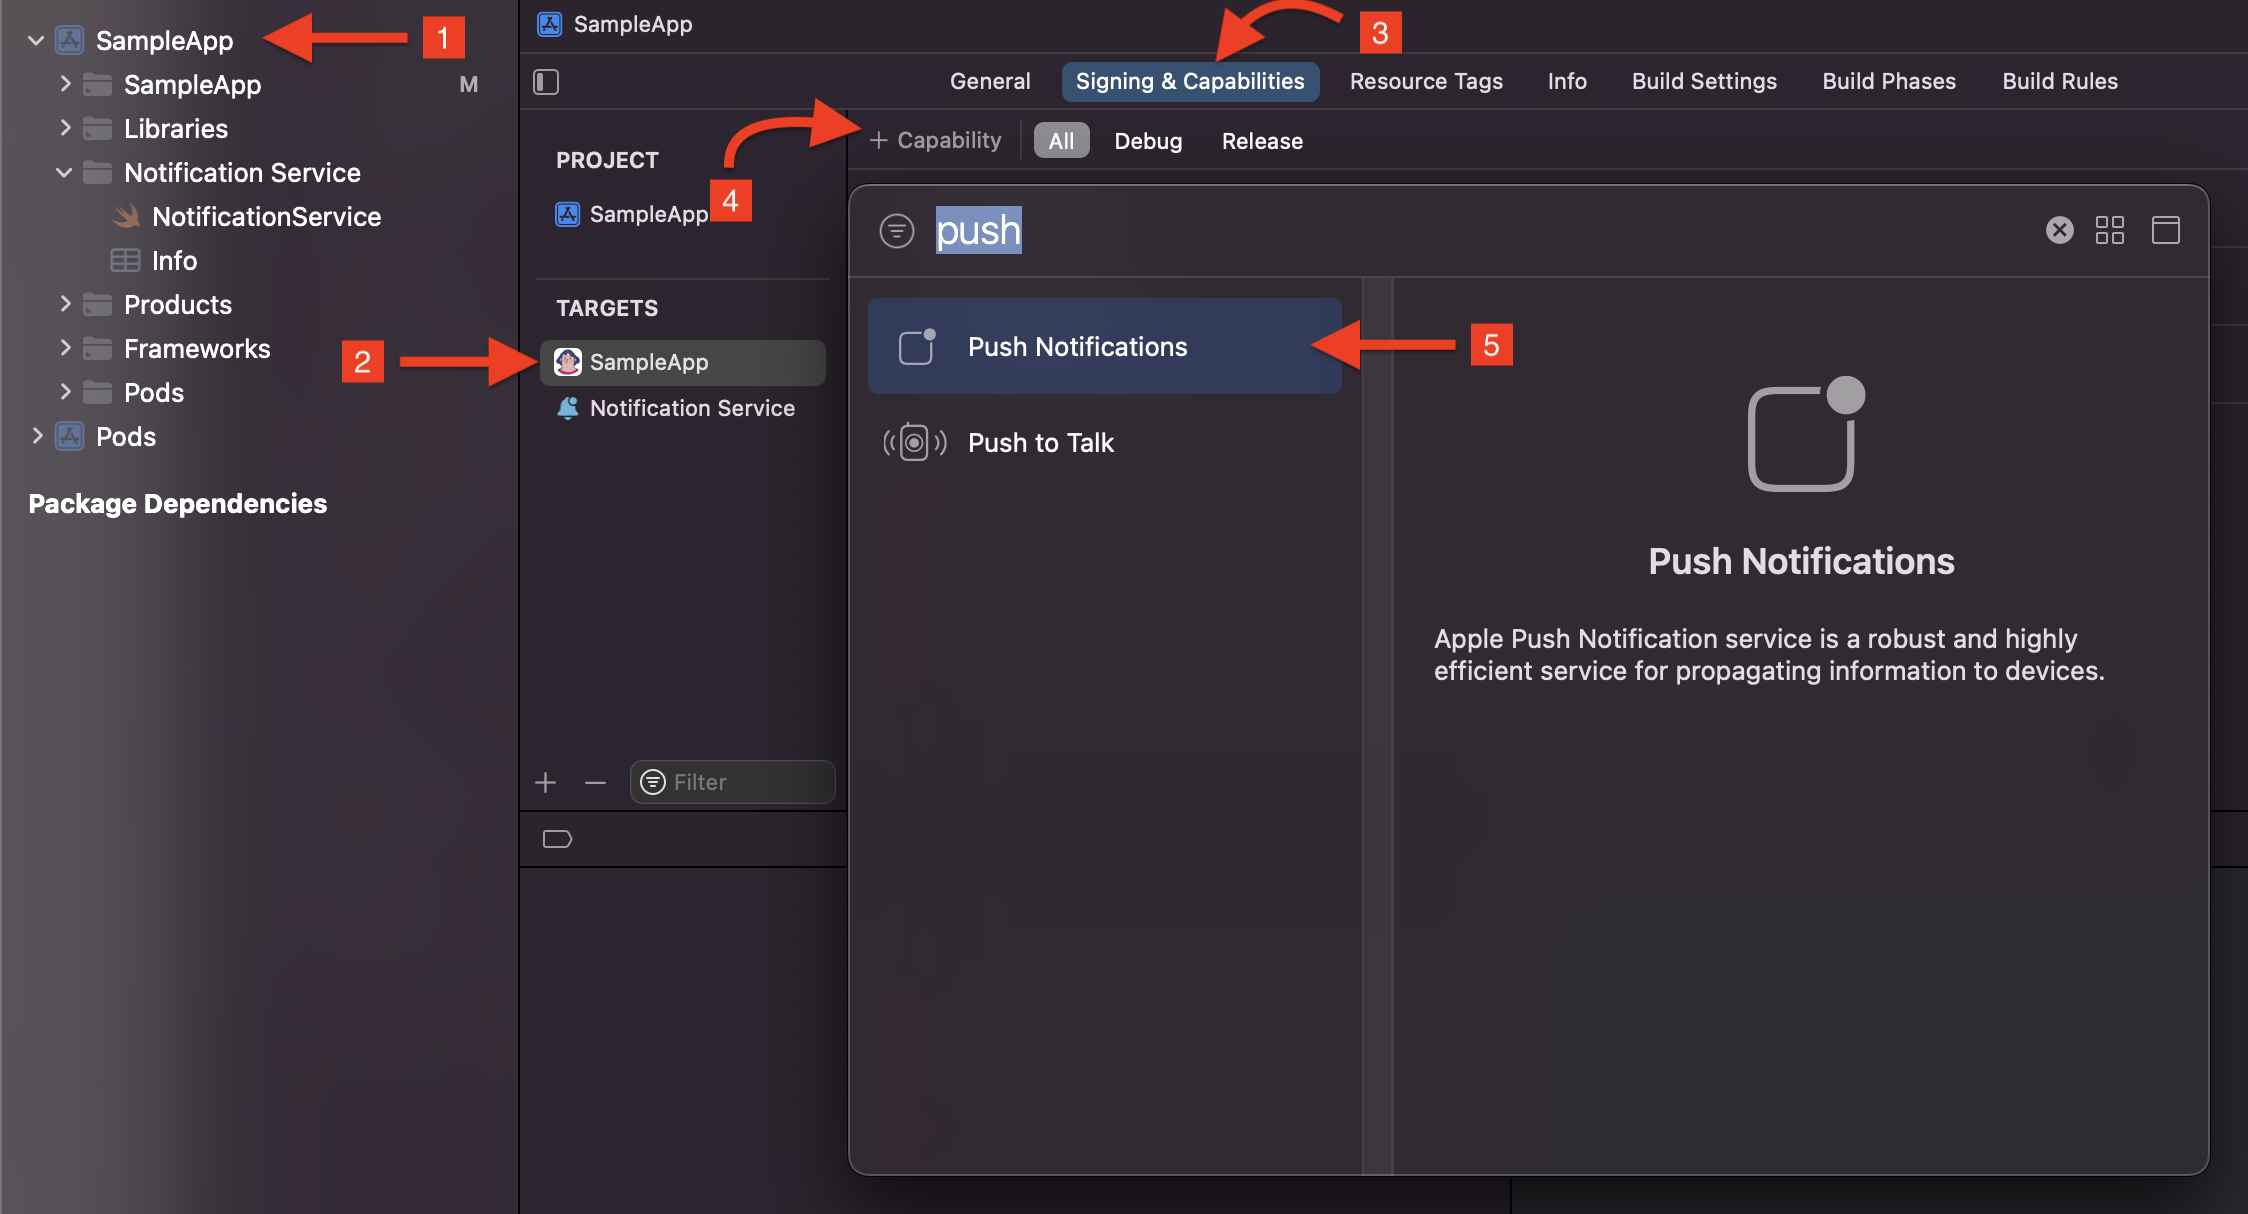
Add push capabilities in Xcode
Before you can work with push notifications, you need to add Push Notification capabilities to your project in XCode.
In your Flutter project, go to the
iossubfolder and open<yourAppName>.xcworkspace.Select your project. Under Targets, select your main app.
Click the Signing & Capabilities tab.
Click Capability.
Add Push Notifications to your app.
Select File > New > Target.
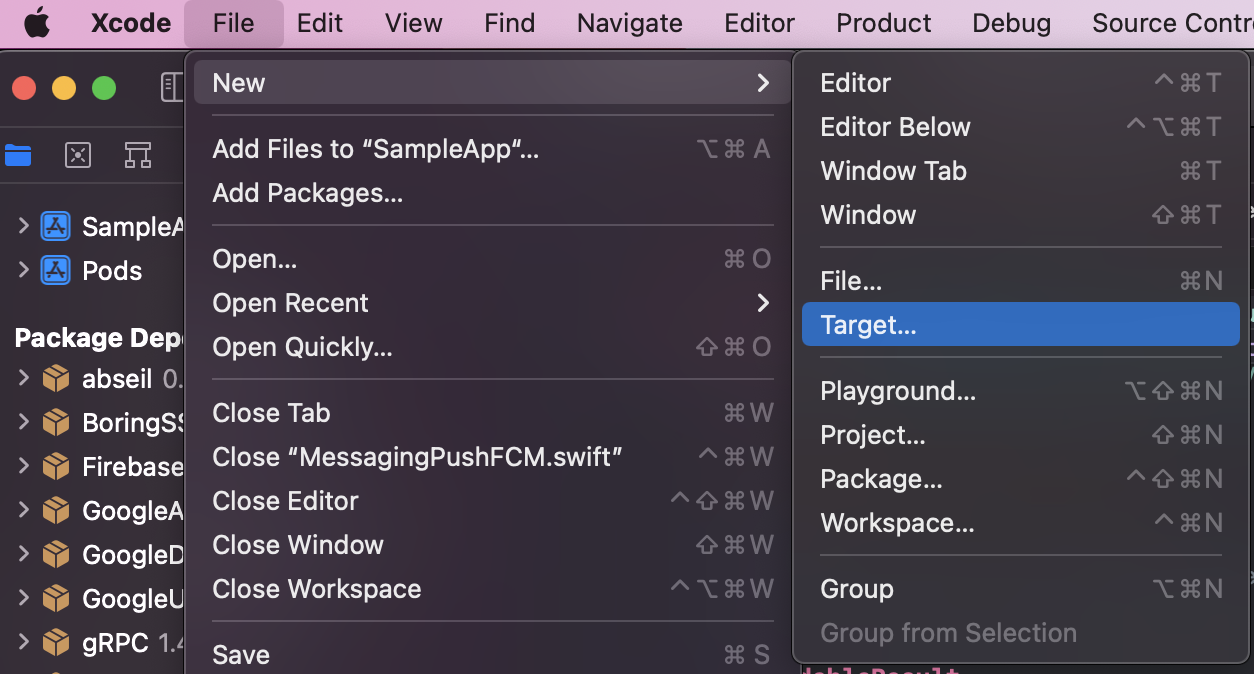
Select Notification Service Extension and click Next.

You should see a window such as this:
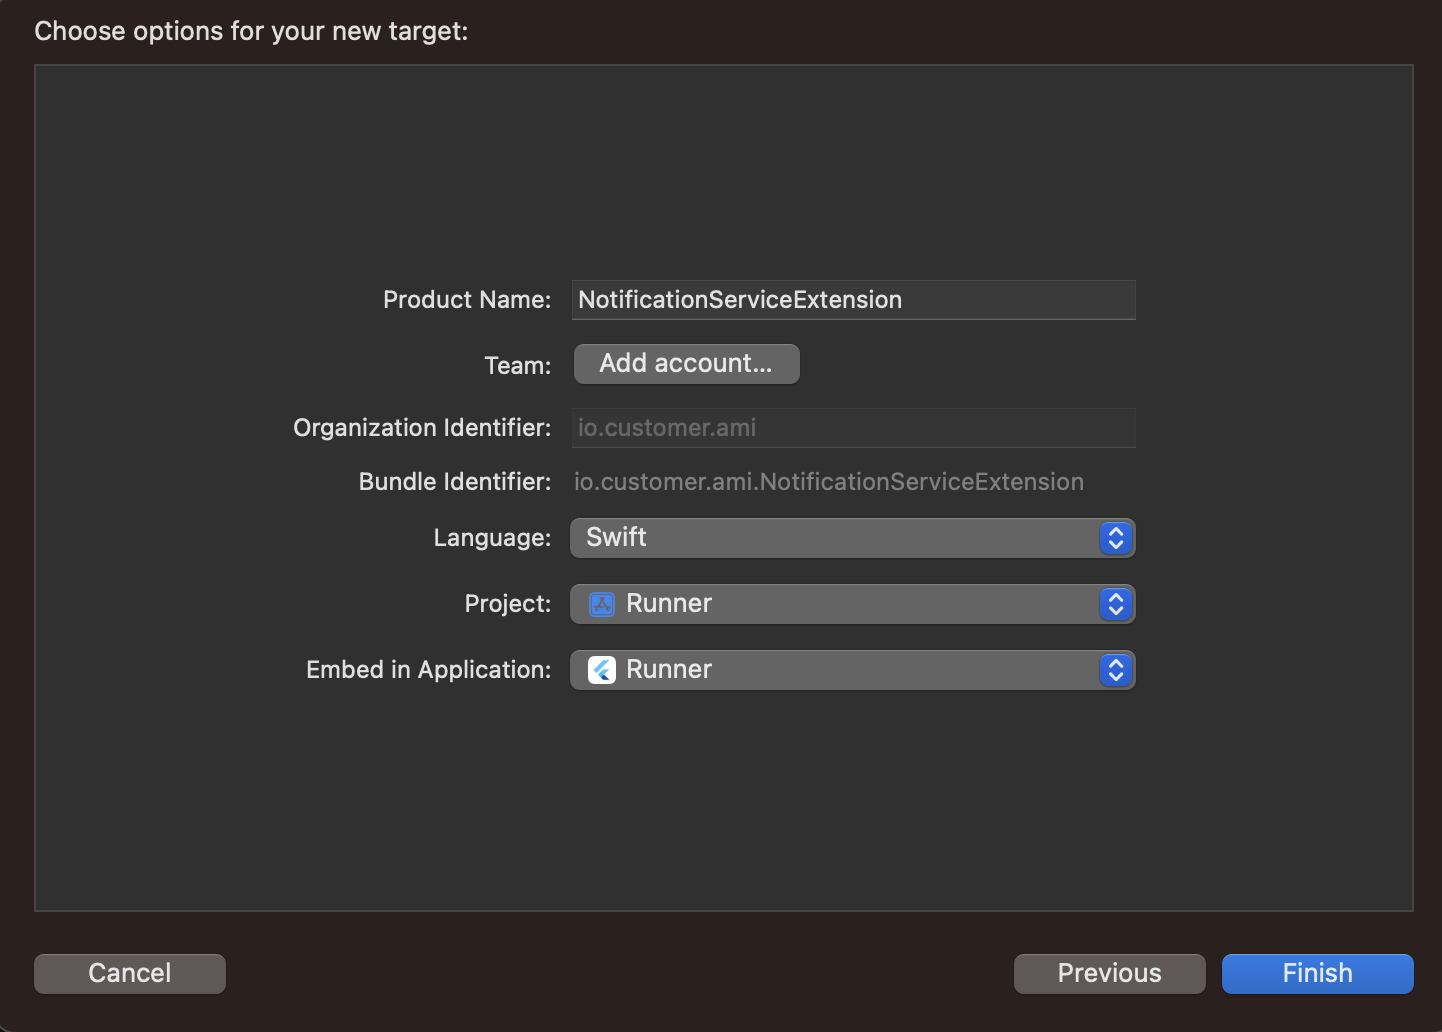
You can leave many of the options in this window as their defaults, but you should:
- Enter a product name, like NotificationServiceExtension (which we use in our examples on this page)
- Confirm that your main app is selected in the Embed in Application drop-down menu
After you have completed this, click Finish.
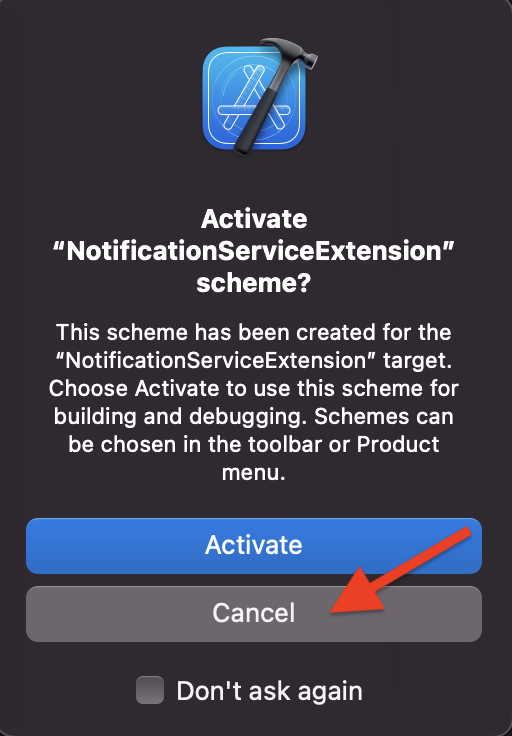
When presented with the dialog below, click Cancel. This will help Xcode continue debugging your app and not just the extension you just added.
Now you have another target in your project navigator named NotificationServiceExtension. We’ll configure this extension when we Integrate Push Notifications in the following section.
Integrate push capabilities in your app
Open the file
ios/Podfileand make the following modifications:# Note: You may need to add this line, as required by FCM, to the top of your Podfile if you encounter errors during 'pod install' use_frameworks! :linkage => :static target 'YourApp' do # Look for the main app target. # Make all file modifications after this line: config = use_native_modules! # Add the following line to add the Customer.io native dependency: pod 'CustomerIO/MessagingPushFCM', '~> 2.13.2' end # Next, copy and paste the code below to the bottom of your Podfile: target 'NotificationServiceExtension' do pod 'CustomerIO/MessagingPushFCM', '~> 2.13.2' endWant to automatically get the latest versions?
The example above includes the full version number. If you remove the patch and/or minor version numbers, you’ll always get the latest minor release when you run
pod update --repo-update --project-directory=ios. See Updating iOS Dependencies for information about updating your Podfile.Are you trying to update the Customer.io SDK in the
Podfile?See our update guide for full instructions on how to update the Flutter SDK, including how to update the
Podfile.Run
pod install --repo-update --project-directory=iosfrom the root directory of your Flutter project. When dependencies finish installing, you should see a message like this:Pod installation complete! There are X dependencies from the Podfile and Y total pods installed.Update your
🎉Updated in version 2.11 of the native iOS SDK.AppDelegate.swiftfile to handle push notifications.Using an older version of the native iOS SDK in your app?
As of version 2.11, the iOS SDK automatically handles push clicks. Follow our upgrade guide to remove unnecessary code and increase compatibility with 3rd party SDKs in your app.
 import Flutter
 import CioMessagingPushFCM
 import CioTracking
 import FirebaseMessaging
 import FirebaseCore

 @UIApplicationMain
 @objc class AppDelegate: FlutterAppDelegate {
     override func application(
         _ application: UIApplication,
         didFinishLaunchingWithOptions launchOptions: [UIApplication.LaunchOptionsKey: Any]?
     ) -> Bool {
         GeneratedPluginRegistrant.register(with: self)

         FirebaseApp.configure()

         // Set FCM messaging delegate
         Messaging.messaging().delegate = self

         // This line of code is required in order for the Customer.io SDK to handle push notification click events.
         // We are working on removing this requirement in a future release.
         // Remember to modify the siteId and apiKey with your own values.
         // let siteId = "YOUR SITE ID HERE"
         // let apiKey = "YOUR API KEY HERE"
         CustomerIO.initialize(siteId: "YourSiteID", apiKey: "YourAPIKey", region: Region.US) { config in
             // To confirm that `delivered` push metrics are tracked, set this to true.
             config.autoTrackPushEvents = true
         }
         // Initialize Customer.io push features after you initialize the SDK:
         MessagingPushFCM.initialize { config in
             // Automatically register push device tokens to the Customer.io SDK
             config.autoFetchDeviceToken = true
             // When your app is in the foreground and a push is delivered, show the push
             config.showPushAppInForeground = true
         }

         return super.application(application, didFinishLaunchingWithOptions: launchOptions)
     }

     override func application(_ application: UIApplication,
                     didRegisterForRemoteNotificationsWithDeviceToken deviceToken: Data) {
         Messaging.messaging().setAPNSToken(deviceToken, type: .unknown);
     }

     override func application(_ application: UIApplication, didFailToRegisterForRemoteNotificationsWithError error: Error) {
         MessagingPush.shared.application(application, didFailToRegisterForRemoteNotificationsWithError: error)
     }
 }

 extension AppDelegate: MessagingDelegate {
     func messaging(_ messaging: Messaging, didReceiveRegistrationToken fcmToken: String?) {
         MessagingPush.shared.messaging(messaging, didReceiveRegistrationToken: fcmToken)
     }
 }
Look in Xcode for a file:
NotificationService.swift. It should look similar to this:import UserNotifications class NotificationService: UNNotificationServiceExtension { override func didReceive(_ request: UNNotificationRequest, withContentHandler contentHandler: @escaping (UNNotificationContent) -> Void) { ... } override func serviceExtensionTimeWillExpire() { ... } }Modify this file to look like the following:
import UserNotifications
import CioMessagingPushFCM
import CioTracking

class NotificationService: UNNotificationServiceExtension {

  override func didReceive(_ request: UNNotificationRequest,
                          withContentHandler contentHandler:
                          @escaping (UNNotificationContent) -> Void) {
    // It's required that you initialize the Customer.io SDK in this file, even though you also did so in your app.
    CustomerIO.initialize(siteId: "YourSiteID", apiKey: "YourAPIKey", region: .US) { config in
      // To confirm that `delivered` push metrics are tracked, set this to true.
      config.autoTrackPushEvents = true
    }

    MessagingPush.shared.didReceive(request, withContentHandler: contentHandler)
  }

  override func serviceExtensionTimeWillExpire() {
    MessagingPush.shared.serviceExtensionTimeWillExpire()
  }

}
Now you can run your app on a physical device and send yourself a push notification with images and deep links to test your implementation. You’ll have to use a physical device because simulators can’t receive push notifications.
Sound in push notifications (iOS Only)
When you send a push notification to iOS devices that uses our SDK, you can opt to send the Default system sound or no sound at all. If your audience’s phone is set to vibrate, or they’ve disabled sound permissions for your app, the Default setting will cause the device to vibrate rather than playing a sound.
In most cases, you should use the Default sound setting to make sure your audience hears (or feels) your message. But, before you send sound, you should understand:
- Your app needs permission from your users to play sounds. This is done by your app, not our SDKs. Here’s an example from our iOS sample app showing how to request sound permissions.
- iOS users can go into System Settings and disable sound permissions for your app. Enabling the Default setting doesn’t guarantee that your audience hears a sound when your message is delivered!
We don’t support custom sounds yet
If you want to send a custom sound, you’ll need to handle it on your own, outside the SDK and use a custom payload when you set up your push notifications.
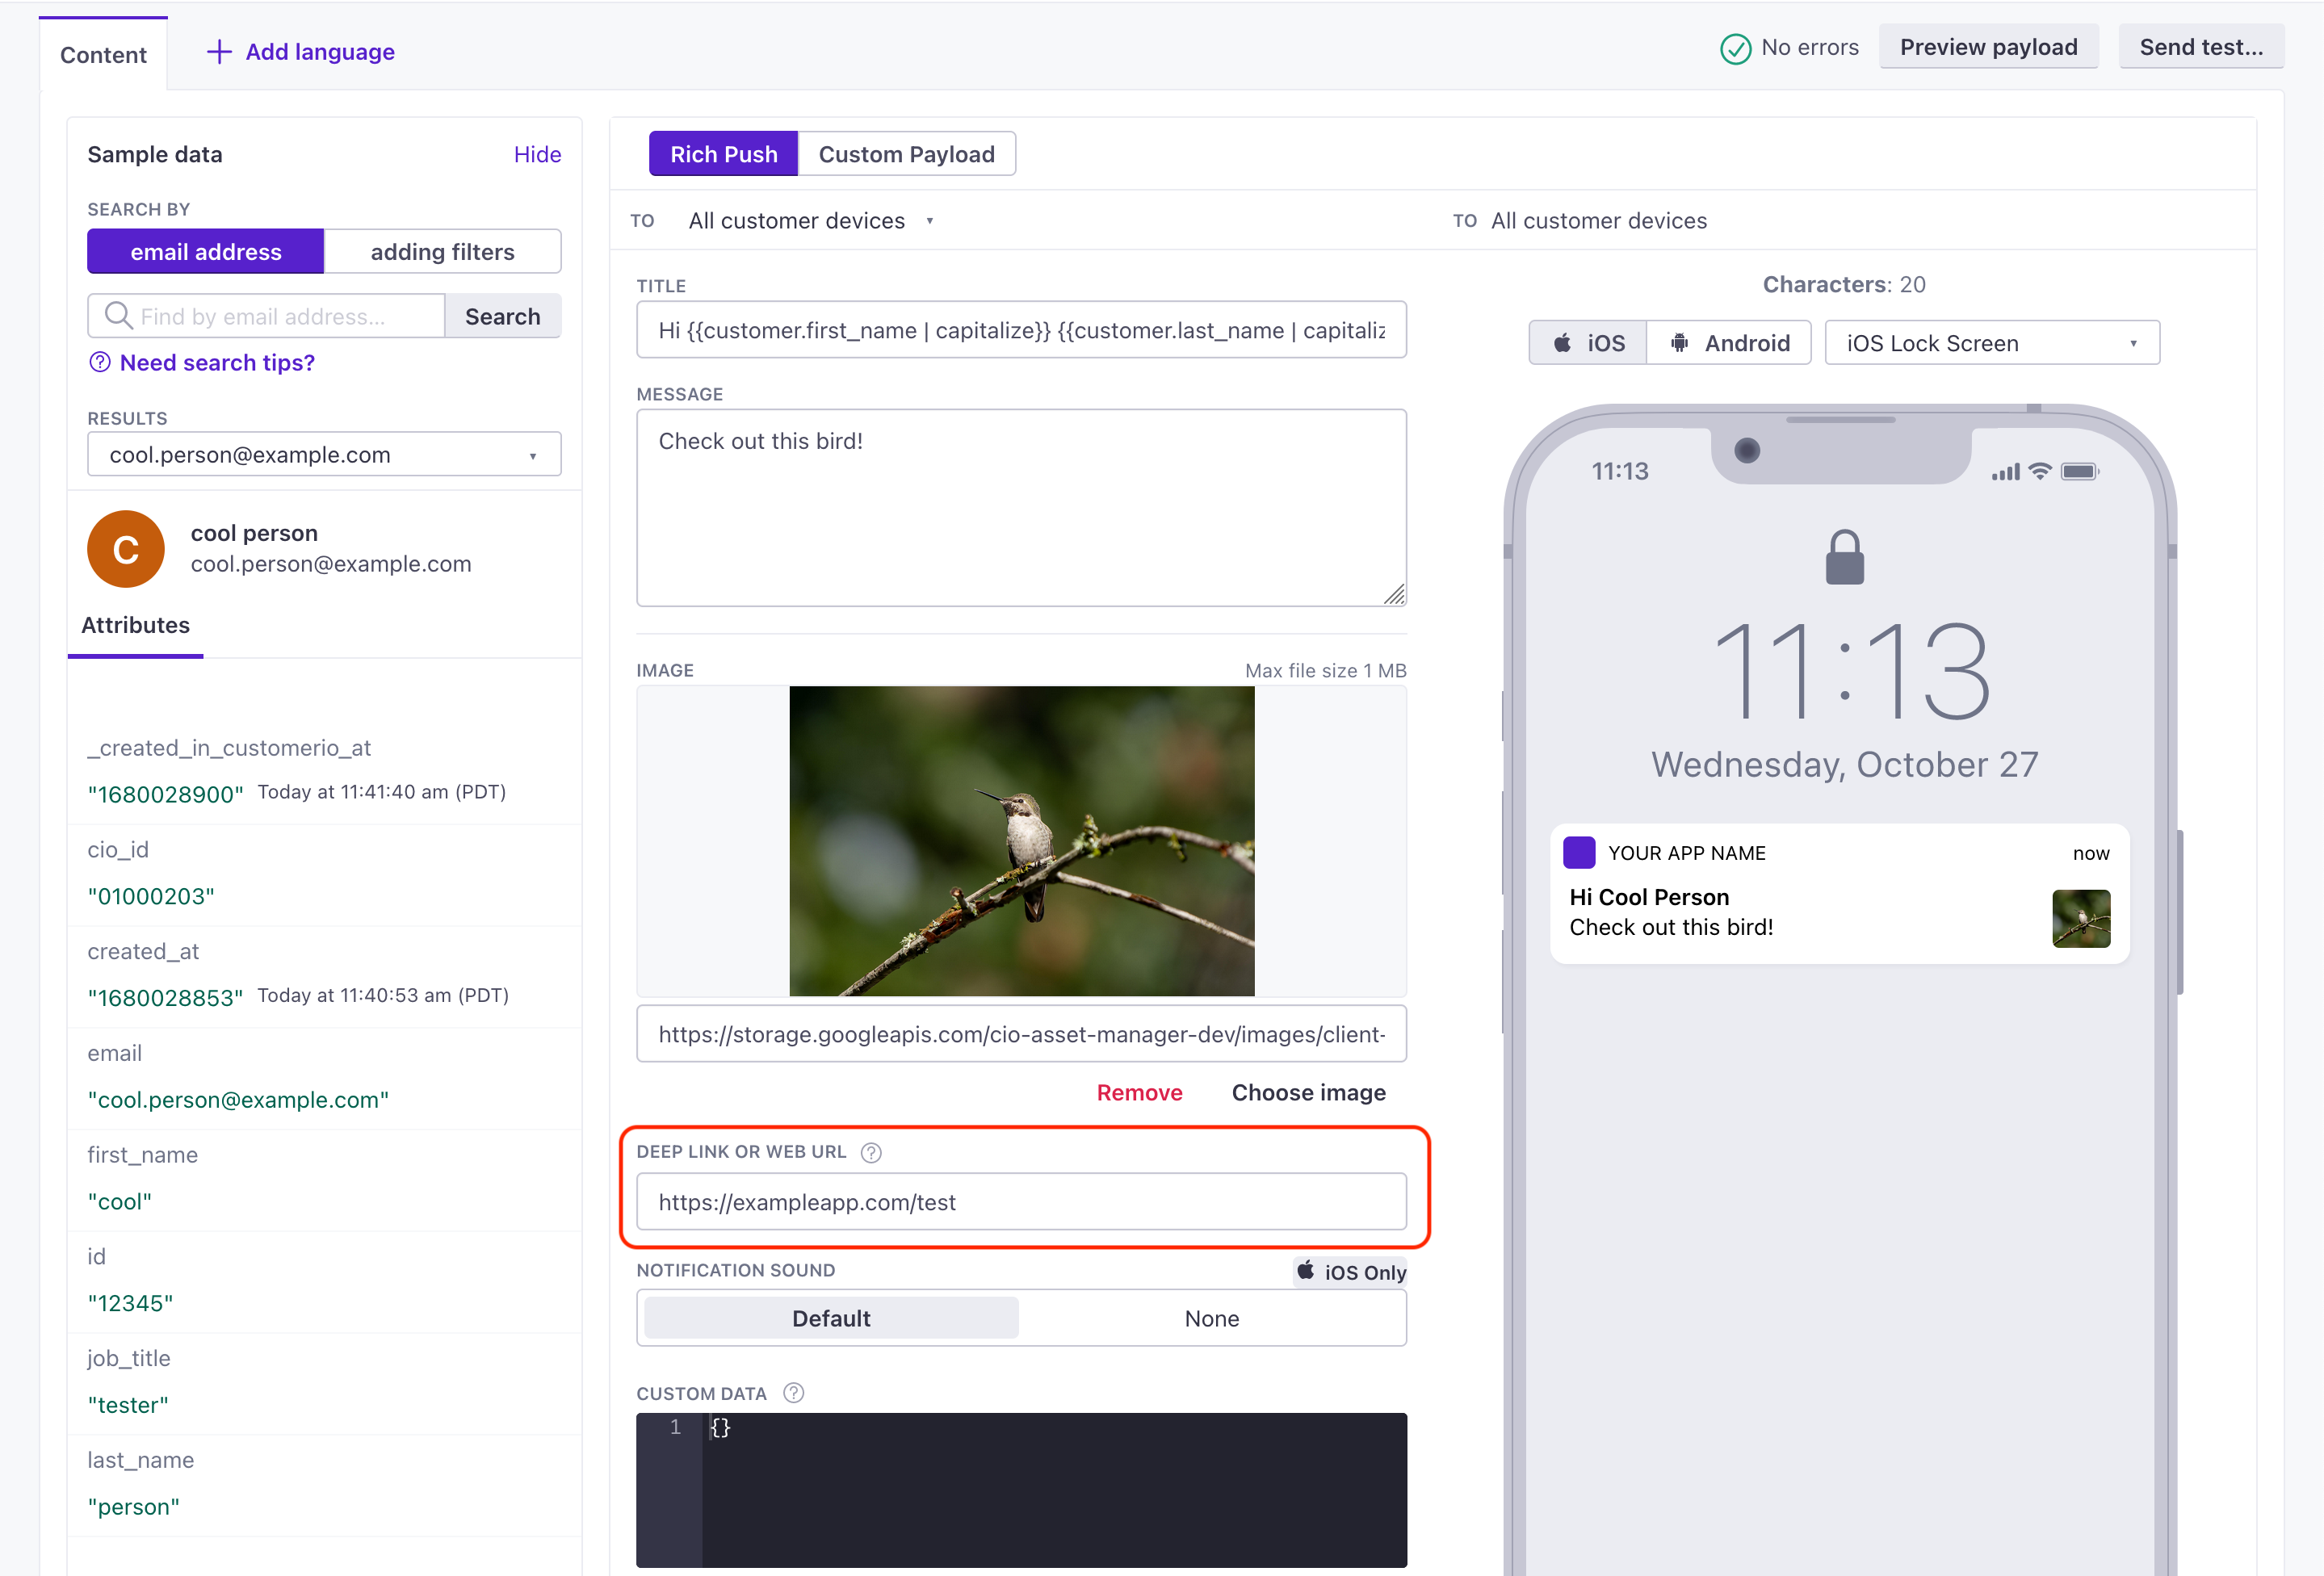
Test your implementation
After you set up rich push, you should test your implementation. Below, we show the payload structure we use for iOS and Android. In general, you can use our regular rich push editor; it’s set up to send messages using the JSON structure we outline below.
If you want to fashion your own payload, you can use our custom payload.
{
  "message": {
    "apns": {
      "payload": {
        "aps": {
          // basic iOS message and options go here
          "mutable-content": 1,
          "alert": {
            "title": "string", //(optional) The title of the notification.
            "body": "string" //(optional) The message you want to send.
           }
        },
        "CIO": {
          "push": {
            "link": "string", //generally a deep link, i.e. my-app://... or https://yourwebsite.com/...
            "image": "string" //HTTPS URL of your image, including file extension
          }
        }
      },
      "headers": {
        // (optional) headers to send to the Apple Push Notification Service.
        "apns-priority": 10
      }
    }
  }
}
-
-
-
-
-
- body stringThe body of your push notification.
- image stringThe URL of an HTTPS image that you want to use for your message.
- link stringA deep link (to a page in your app), or a link to a web page.
- title stringThe title of your push notification.
-
-
- alertstringA simple alert message.
- badge integerThe number you want to display on your app’s icon. Set to 0 to remove the current badge, if any.
- category stringThe notification’s type. This string must correspond to the identifier of one of the
UNNotificationCategoryobjects you register at launch time. - content-available integerThe background notification flag. Use
1without analertto perform a silent update.0indicates a normal push notification. - interruption-level stringIndicates the importance and delivery timing of a notification.
Accepted values:
passive,active,time-sensitive,critical - mutable-content integerIf you use the Customer.io SDK, you must set this value to
1to support images and “delivered” metrics from your push notifications. When the value is 1, your notification is passed to your notification service app extension before delivery. Use your extension to modify the notification’s content. - relevance-score numberA number between 0 and 1. The highest score is considered the “most relevant” and is featured in the notification summary.
- soundstringThe name of a sound file in your app’s main bundle or in the Library/Sounds folder of your app’s container directory. Use “default” to play the system sound. For critical alerts, you’ll pass an object instead.
- target-content-id stringThe identifier of the window brought forward.
- thread-id stringAn identifier to group related notifications.
- Custom key-value pairs* any typeAdditional properties that you've set up your app to interpret outside of the Customer.io SDK.
-
-
{
  "message": {
    "data": {
      "title": "string", //(optional) The title of the notification.
      "body": "string", //The message you want to send.
      "image": "string", //https URL to an image you want to include in the notification
      "link": "string" //Deep link in the format remote-habits://deep?message=hello&message2=world
    }
  }
}
- messageRequired The parent object for all push payloads.
-
-
- body_loc_arg stringVariable string values used in place of the format specifiers in
body_loc_keyto localize the body text to the user’s current localization. See Formatting and Styling for more information. - body_loc_key stringThe key to the body string in the app’s string resources that you want to use to localize the body text to the user’s current localization. See String Resources for more information.
- click_action stringThe action that occurs when a user taps on the notification. Launches an activity with a matching intent filter when a person taps the notification.
- color stringThe notification’s icon color in
#rrggbbformat. - icon stringSets the notification icon to
myiconfor drawable resourcemyicon. If you don’t send this key, FCM displays the launcher icon from your app manifest. - sound stringThe sound that plays when the device receives the notification. Supports
"default"or the filename of a sound resource bundled in your app. Sound files must reside in/res/raw/. - tag string
Identifier to replace existing notifications in the notification drawer. If empty, each request creates a new notification.
If you specify a tag, and a notification with the same tag is already being shown, the new notification replaces the existing one in the notification drawer.
- title_loc_arg stringVariable string values used in place of the format specifiers in
title_loc_keyto localize the title text to the user’s current localization. See Formatting and Styling for more information. - title_loc_key stringThe key to the title string in the app’s string resources that you want to use to localize the title text to the user’s current localization. See String Resources for more information.
-
-
- body stringThe body of your push notification.
- image stringThe URL of an HTTPS image that you want to use for your message.
- link stringA deep link (to a page in your app), or a link to a web page.
- title stringThe title of your push notification.
-

