Send and receive data with webhooks
The Send and receive data action represents a webhook. Webhooks let you pass data to, and return data from, just about any public API on the internet. You can use it to send a message, update a person’s attributes in Customer.io, update CRM, or take just about any action on a customer that you’d want to do.
Here’s James, a Senior Solutions Architect at Customer.io, with a quick explanation to help you understand webhook actions and how you can use them to personalize messages for your audience.
You can trigger webhooks without a campaign
Our shortcuts feature lets you manually trigger external APIs for anybody on your People page without entering that person into a campaign. You might do this to manually activate or deactivate a person’s account, to open a help desk ticket, etc.
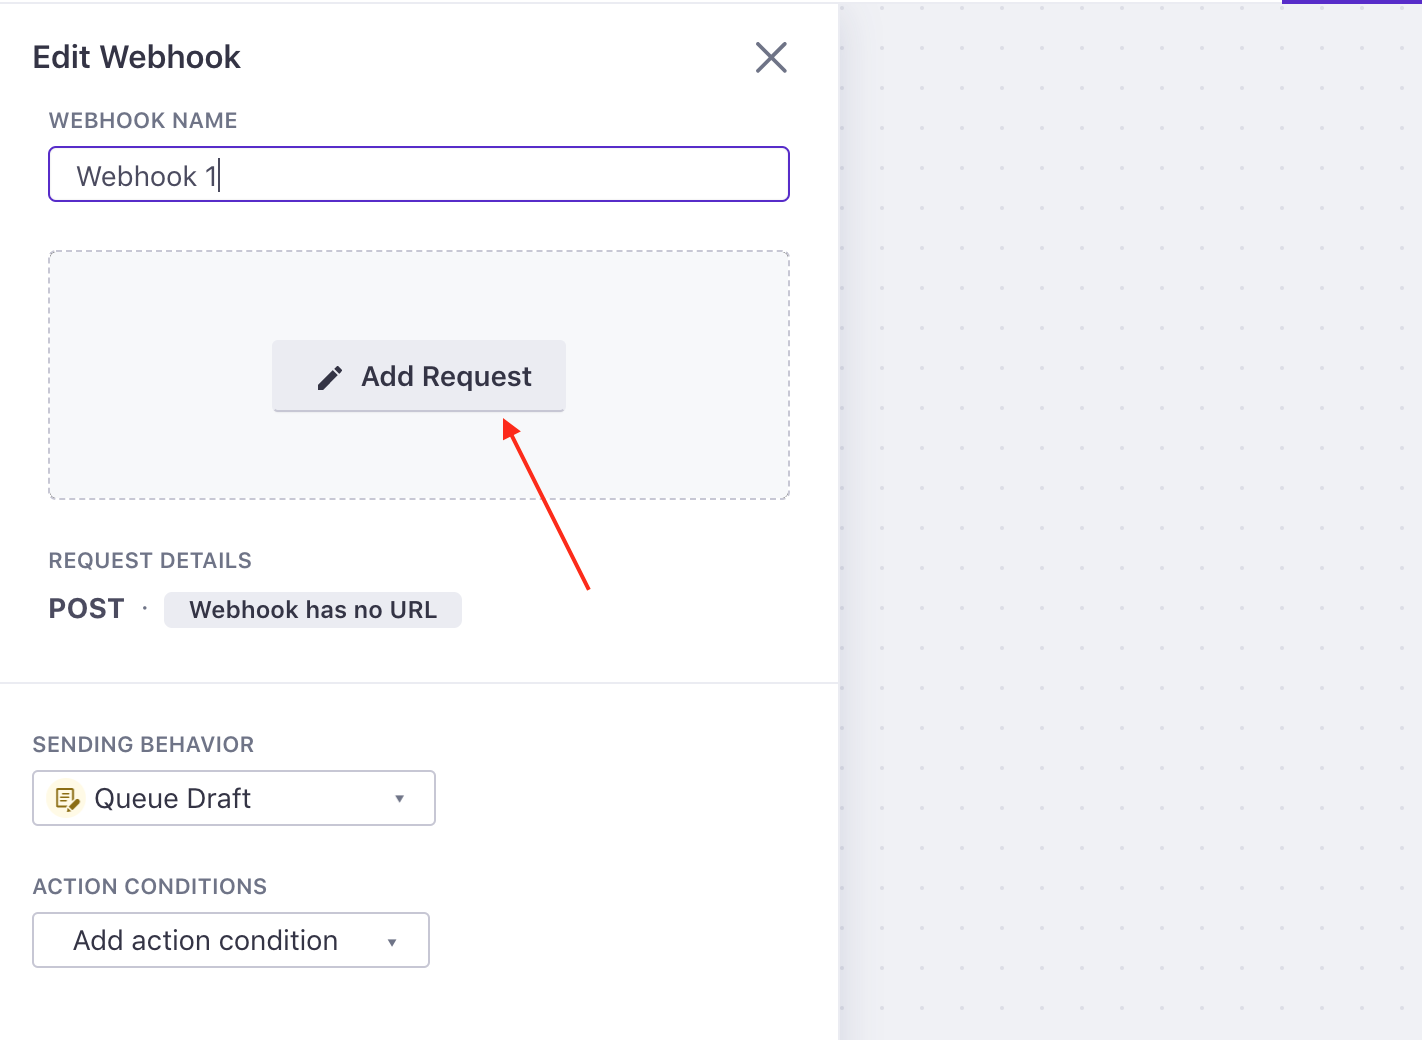
Creating a webhook action
In the workflow, drag Send and receive data—the webhook action block—into your campaign. Then click it and click Add Request to go into the message composer.
Track webhook-based conversions
If you want your webhook to count towards conversion metrics, you can allow conversions when you create a webhook action. By default, we don’t track conversions based on webhooks because they are often internal or used for analytics purposes; they don’t always send messages to end-users.
To allow conversions for a webhook action:
Within a workflow, select your webhook action.
On the left hand pane, scroll until you see Conversion.
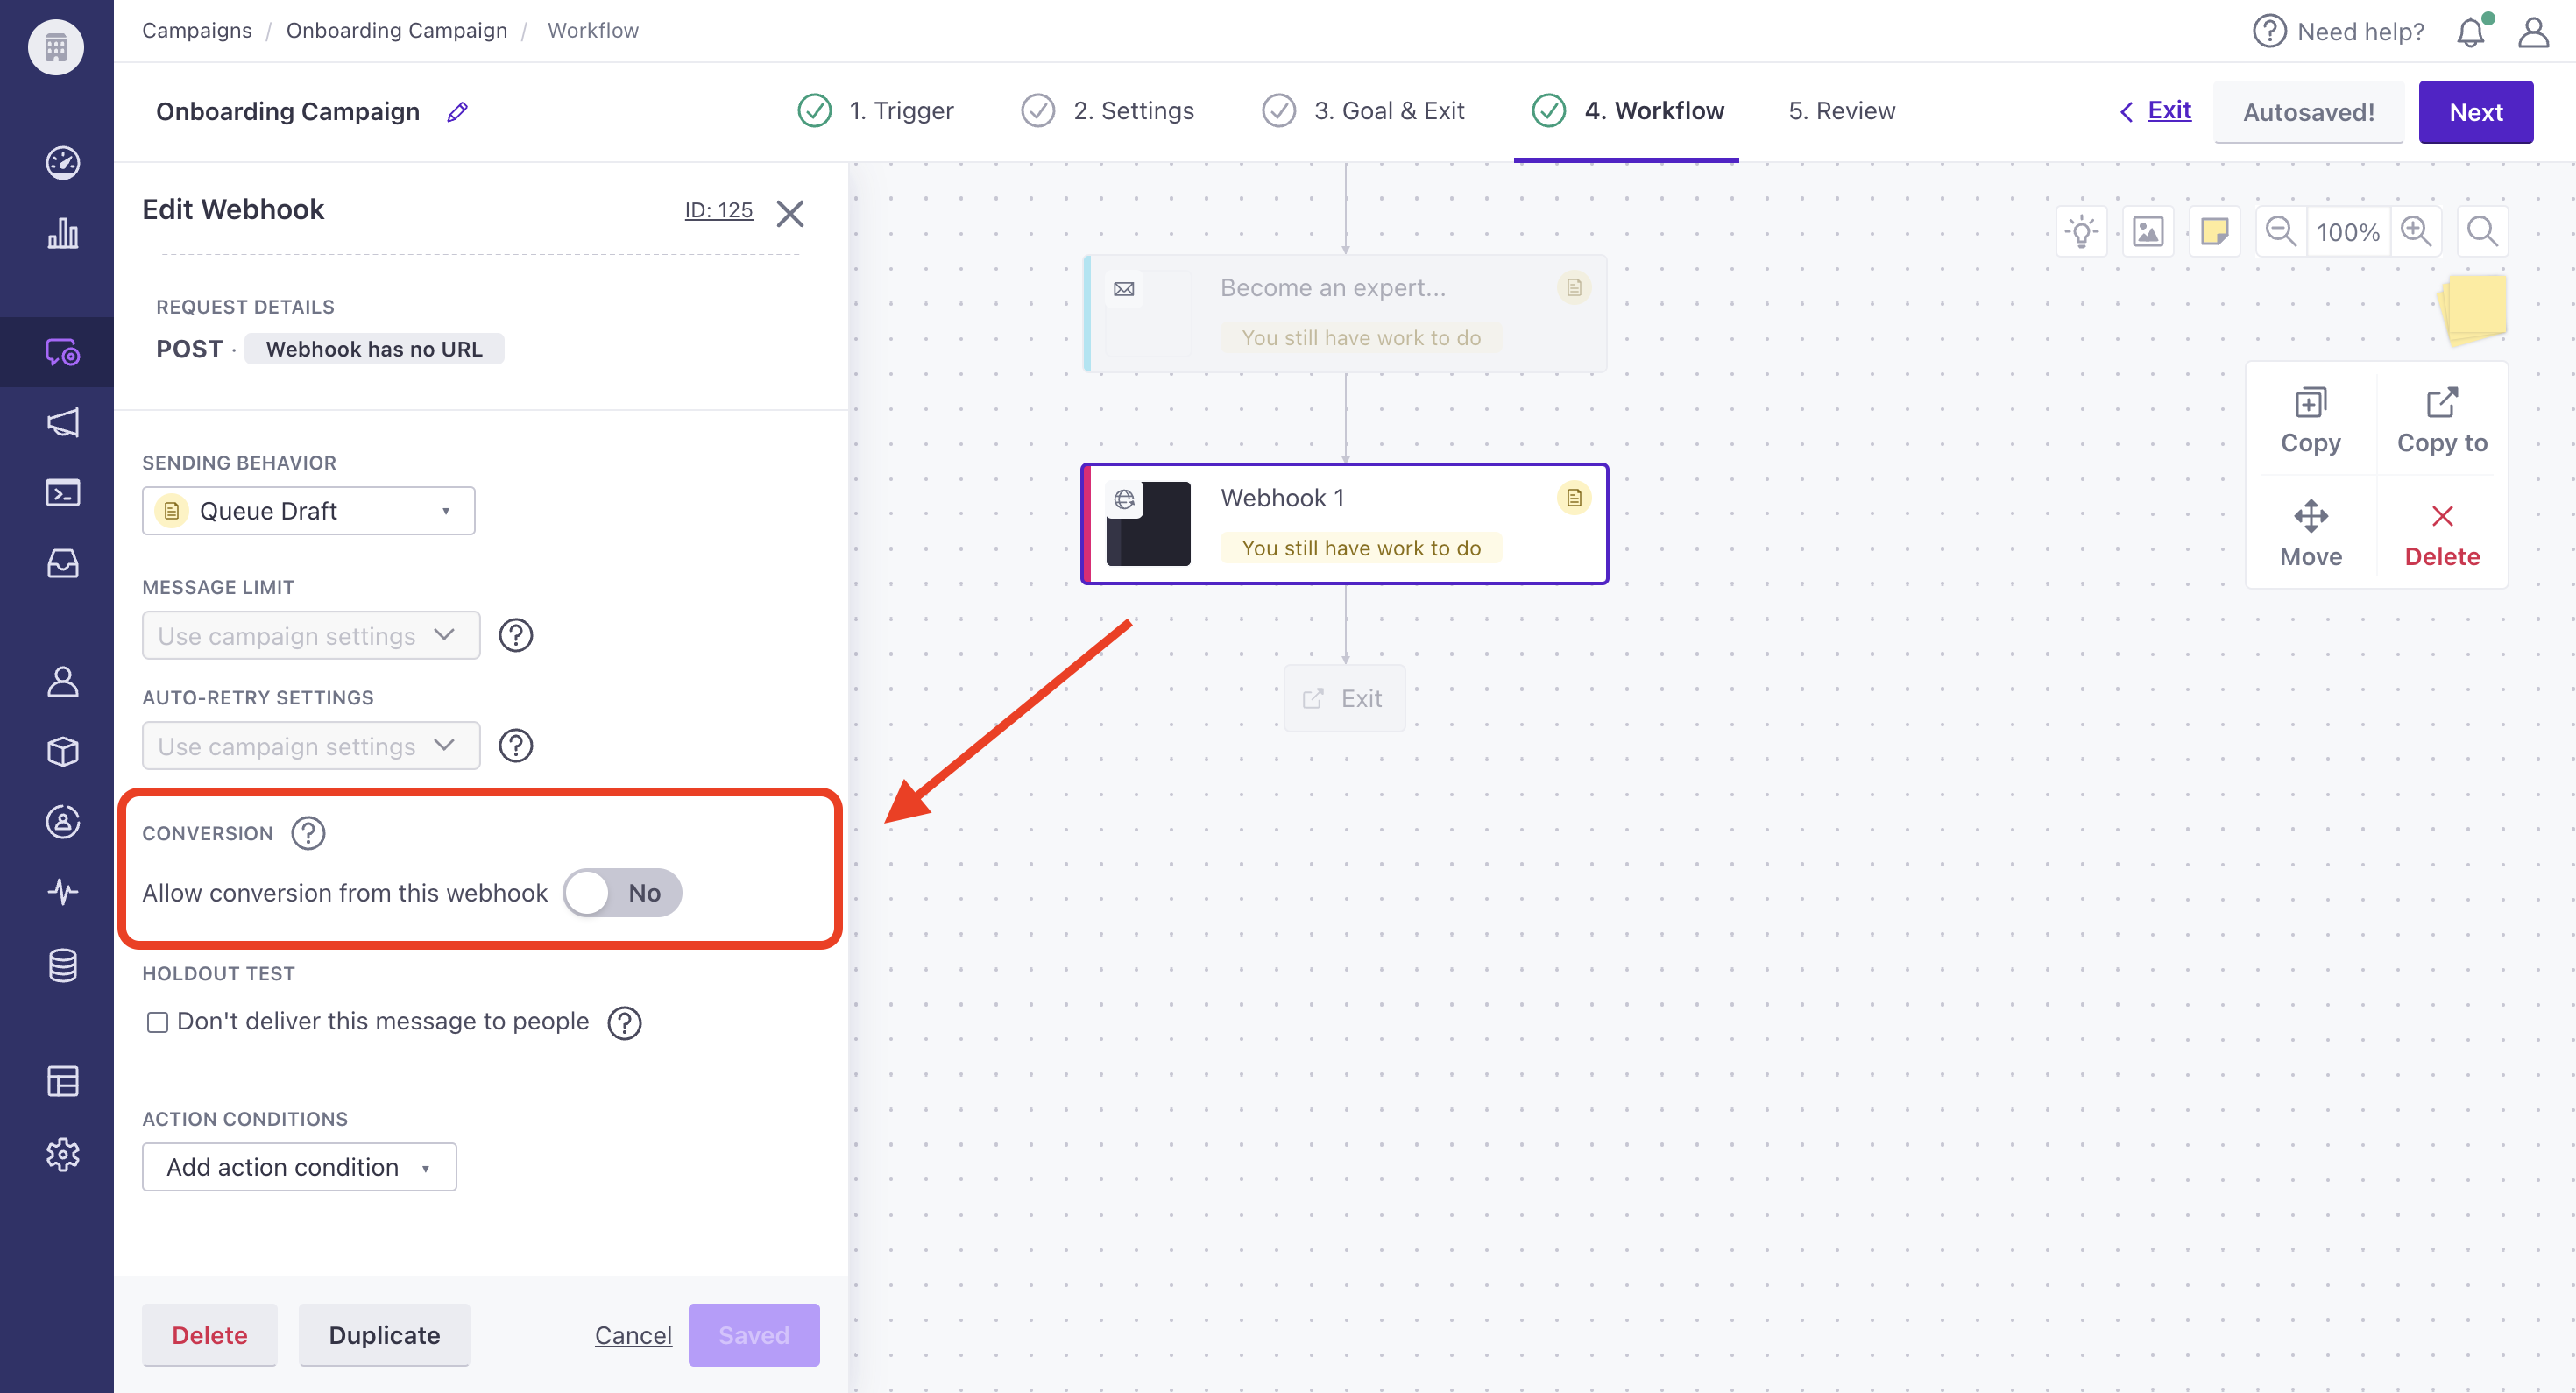
Toggle the feature on.
Save your changes.
This setting is specific to the individual webhook action; you cannot globally enable webhook conversions, so remember to enable this setting for any action that you might want to count toward your conversion goal.
HTTP Request Types
Customer.io webhook actions support 5 common HTTP request types for RESTful APIs:
- GET
- POST
- PUT
- DELETE
- PATCH
The one you use is dependent on what the API you’re using is expecting. POST is most likely to be used and is the default.
Request URL
Next to your request type you will add the request URL that you want us to send the data to.
If your API requires Basic Authentication, you’ll add the username and password to the request like: https://user:pass@api.example.com
(Optional) Allowlist our IP addresses
If you have firewalls or rules in place that only allow connections from specific IPs, add Customer.io IP addresses to your allowlist so your systems can receive connections from us.
Make sure you use the correct IP addresses for your account region.
| US IP addresses | EU IP addresses |
|---|---|
|
|
Headers
You can customize the headers that Customer.io sends with each request in order to support things like:
- Specifying the Content-Type
- Supporting other types of Authentication
- Setting other specific headers required for a specific API
Content-Type
By default, we pre-fill: Content-Type: application/json
Other example Content-Type values are:
- x-www-form-urlencoded
- text/plain
- text/xml
We recommend working with APIs using Content-Type: application/json for readability whenever possible.
Idempotency
By default, we provide X-CIO-Idempotency-Key in the header. This is useful for preventing duplicate requests from creating multiple records in a system. This means that if the same request is sent multiple times, the result will be the same as if it were only sent once.
You may see the value more than once if:
- your server doesn’t respond with a 20x, but still accepts the request, so we automatically retry the action or
- you manually re-send the webhook within the UI
Structuring content for a webhook (JSON)
If you’re using Content-Type: application/json, you’ll want to make sure you’re using fully formed JSON.
A good place to test this is:
A simple example for valid JSON is:
{
    "id":"1",
    "email":"win@customer.io"
}
You’d create something like that by putting this text into the editor:
{
    "id":"{{customer.id}}",
    "email":"{{customer.email}}"
}

A slightly more advanced example is:
{
    "customer":
    {{ customer | replace: "=>", ":"}}
}
That will output the entire customer object in JSON format.
Structuring content for a webhook (Form encoded)
If you want to send a form encoded webhook, you’ll set the Content-Type header as: x-www-form-urlencoded
Then, the body needs to be valid form encoded text like:
id=1&email=win@customer.io&custom_attribute=value
You’d create something like that by putting this text into the editor:
id={{customer.id}}&email={{customer.email}}&custom_attribute={{customer.another_attribute}}
The downside of form encoded is that it’s a bit harder to structure and read since there are no line breaks and separation other than the “&” characters that join everything together.
Securely verify requests
For security purposes, webhooks are delivered with an X-CIO-Signature header. This signature is generated by combining your webhook signing key with the body of webhook request using a standard HMAC-SHA256 hash.
For reporting webhooks, you can find the signing key on the same page you enter your webhook endpoint: Data & Integrations > Integrations > Reporting webhooks. For webhook actions, you can find the signing key in Settings > Workspace Settings > API & Webhook Credentials under the Webhook Signing Key tab.
To validate a signed request you’ll first need to retrieve the X-CIO-Timestamp header sent with the webhook request and the body of the request. Combine the version number, timestamp, and body—delimited by colons—to form a string like v0:<timestamp>:<body> (the version number is always v0). Using HMAC SHA256, hash the string using your webhook signing secret as the hash key. Compare this value to the value of the X-CIO-Signature header sent with the request to confirm that the request originated with Customer.io.
Important note:
Always use the request’s raw body when constructing the hash. Do not use any transformations such as JSON.stringify() (Node.js) or json.dumps() (Python) as there are subtle differences between parsing libraries.
Here’s an example of a validation function in Golang.
import (
	"encoding/hex"
	"crypto/hmac"
	"crypto/sha256"
	"strconv"
	"fmt"
)

func CheckSignature(WebhookSigningSecret, XCIOSignature string, XCIOTimestamp int, RequestBody []byte) (bool, error) {
  signature, err := hex.DecodeString(XCIOSignature)
  if err != nil {
    return false, err
  }

  mac := hmac.New(sha256.New, []byte(WebhookSigningSecret))

  if _, err := mac.Write([]byte("v0:" + strconv.Itoa(XCIOTimestamp) + ":")); err != nil {
    return false, err
  }
  if _, err := mac.Write(RequestBody); err != nil {
    return false, err
  }

  computed := mac.Sum(nil)

  if !hmac.Equal(computed, signature) {
    fmt.Println("Signature didn't match")
    return false, nil
  }

  fmt.Println("Signature matched!")
  return true, nil
}
Response
When sending requests to an endpoint, you can choose to set attributes on people based on the response data. This allows you to retrieve data from an endpoint to then use in the content of your messages down the road. To do this, while editing the request in the composer, go to the ‘Response’ tab and click Set up an attribute.
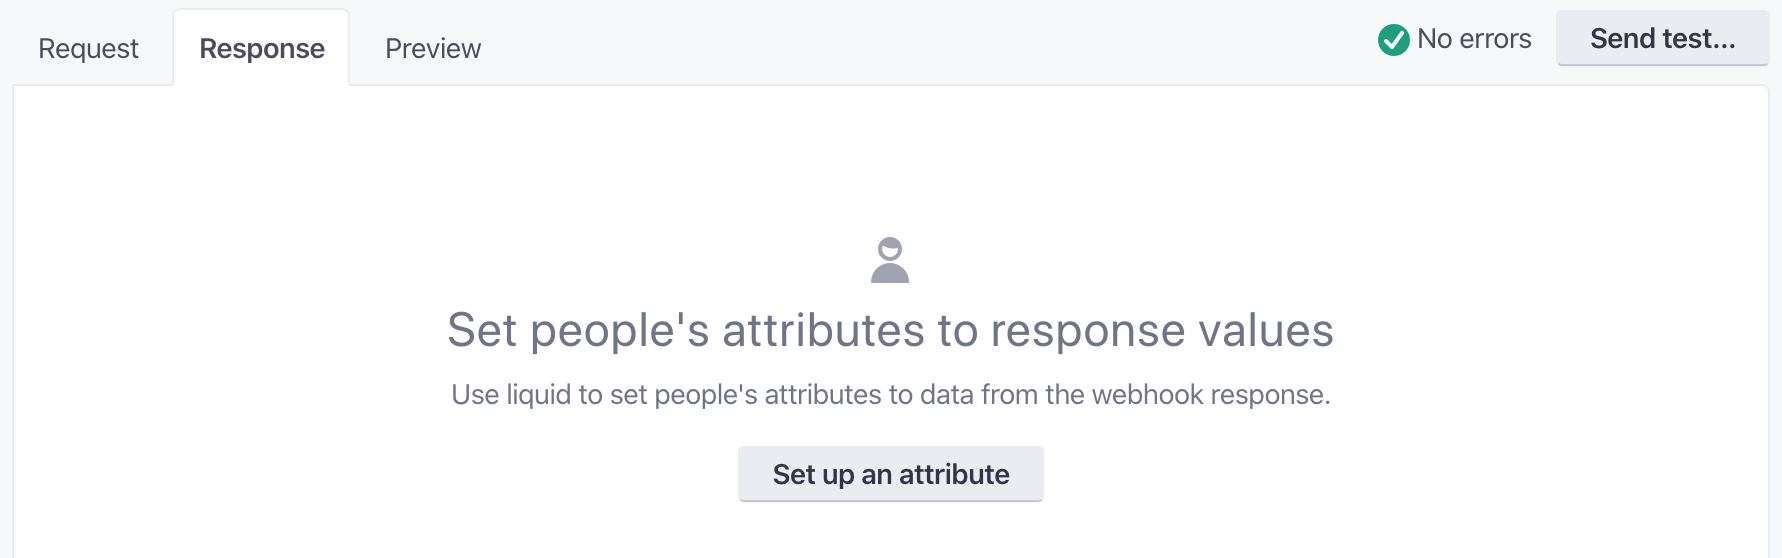
From here, select the attribute that you’d like to set a new value for using the dropdown. Then, use the response variable and Liquid to define the value in the code editing component. Here are a few examples of things you might do with the webhook response:
After creating a new lead in your CRM, sync the lead_id returned in the response with your Customer.io lead.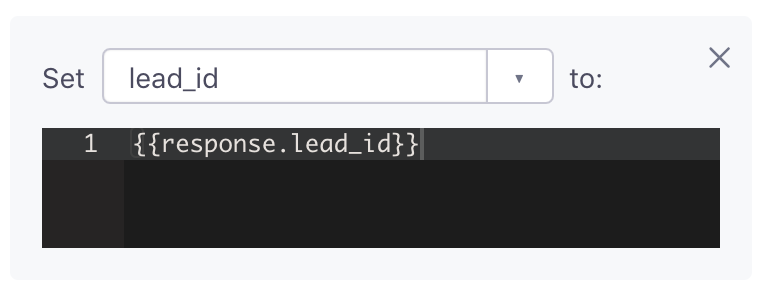
Increment the lifetime_value of a person based on their purchases.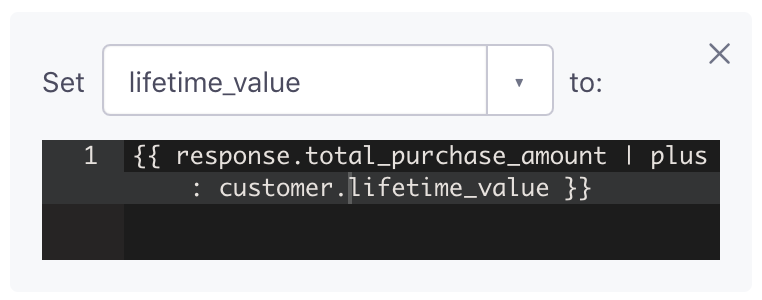
Draft webhooks can hold people in your workflow
If you configure a webhook to set attributes with the response and set the webhook to “draft” instead of “send automatically”, a person will not move to the next step of the workflow until you send the draft. This ensures that the attribute update completes successfully before a person continues the campaign.
Timeouts and Failures
We have a 4 second timeout and if we get a 408, 409, 429, or 5xx response code in that period, Customer.io will retry sending the notification several times with exponential backoff. We will retry your request up to 10 times over a period of approximately 3 hours. If all retries fail, the Attribute Update will not execute, and the profile will move to the next step of the workflow.
If you wish to temporarily block our servers, you can look up the current set of IP addresses we use via this API endpoint.
People progress through failed webhooks in your workflow
If you configure a webhook to set attributes with the response, and the call fails, we won’t update that person’s attributes and they will move to the next step of the workflow.
Testing your requests
If you’d like to test the format of your requests before pointing them at the correct API, you could use a service like Webhook.site. A URL is automatically generated on Webhook.site which you then paste in to Customer.io as the request URL. We strongly recommend only using test data with any third-party service you do not have a trusted relationship with.
More ideas & examples
For all of the following examples, you must create an account at the partner’s site first in order to use them in a webhook request.
Create a Zendesk Ticket
With webhooks, you can create a ticket in Zendesk. Here’s an example where someone canceled their account and provided feedback. We use the event and feedback to create a ticket in Zendesk.
Request Header: https://[YOUR-EMAIL-ADDRESS]:[YOUR-PASSWORD]@[YOUR-ZENDESK-SUBDOMAIN].zendesk.com/api/v2/tickets.json
Request Body:
{
    "ticket": {
        "subject": "{{customer.company_name}} has canceled their account.",
        "comment": { "body":"{{event.feedback}}" },
        "requester": { "name":"{{customer.firstName"}} {{customer.lastName"}},"email":"{{customer.email}}"
        }
    }
}
You can find more Zendesk webhooks and available fields here.
Send Data to Zapier
Zapier is one of the most flexible integrations we have and you might want to use it to do things like:
- Add data to a Google sheet
- Follow a person on Twitter when they enter the segment “Has twitter name”
- Add a ticket in Jira when a user performs the event “bug_reported”
- Send new, paid accounts an invitation to review your service on Trustpilot
To start, go to your Zapier account:
- Create a new Zap.
- Choose the “Webhooks” Trigger App and then select Catch Hook. You don’t need to set any options, so continue past this screen.
- Copy the Webhook URL.
Then head over to your Customer.io workspace:
- Navigate to or create your webhook action.
- Add the Zapier Webhook URL.
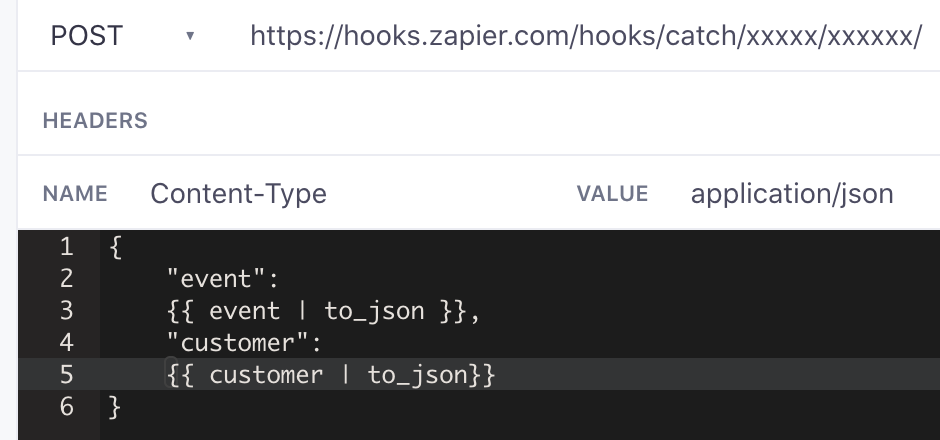
- Send the customer and/or event to Zapier as JSON.
Now that your data is flowing in to Zapier, you can complete the rest of their process and connect Customer.io data to any one of their integrations.
Create a Trello Card with Customer.io
Use webhooks to create a Trello card. In this example, we create a task to schedule a call with a new user.
Request Header: https://api.trello.com/1/cards?idList=[ID-OF-THE-LIST-YOU'RE-ADDING TO]&key=[YOUR-API-KEY]&token=[YOUR-TOKEN]
Request Body:
{
    "name": "Schedule call with {{customer.name}}",
    "due":"null",
    "desc":"The customer can be reached at {{customer.email}}."
}
You can find more Trello endpoints and available fields here.
Send an NPS survey with Medallia (formerly Promoter.io) and Customer.io
Use Medallia (fka Promoter.io) to send an NPS survey to customers based on attributes and events stored in Customer.io. For instance, you could use a webhook to trigger a Medallia survey to customers after their third purchase. For a more comprehensive list of endpoints and attributes, you can view their API Docs.
Start mailing Lob postcards with Customer.io
Send a postcard to customers with a Lob webhook!
Request Header: https://[API-KEY]:@api.lob.com/v1/postcards
Request Body:
{
    "description":          "What a fancy postcard",
    "to": {
        "name":             "{{ customer.first_name }} {{ customer.last_name }}",
        "address_line1":    "{{ customer.address_1 }}",
        "address_line2":    "{{ customer.address_2 }}",
        "address_city":     "{{ customer.city }}",
        "address_state":    "{{ customer.State }}",
        "address_zip":      "{{ customer.zip }}",
        "address_country":  "US"
    },
    "from": {
        "name":             "Your Company",
        "address_line1":    "123 Main St",
        "address_line2":    "Ste 300",
        "address_city":     "Portland",
        "address_state":    "OR",
        "address_zip":      "97205",
        "address_country":  "US"
    },
    "front":                "http://userimg.customeriomail.com/WimaKyKwRvusmPIsxsUm_Ian1.jpg",
    "back":                 "<html style='padding: 1in; font-size: 18;'>Hi {{ customer.first_name }}, Thanks for being our customer!</html>"
}
If you’re trying to send a letter or a check, more endpoints are in the Lob documentation.
Start sending data with IFTTT
IFTTT is a great option for connecting to devices, web apps, or services for things like:
- Turning on a light in your office when you get a new “plan_enterprise” user
- Creating a calendar event to follow up with users who enter the “Signed Up” segment
- Emailing your success team when a user triggers “payment_failed”
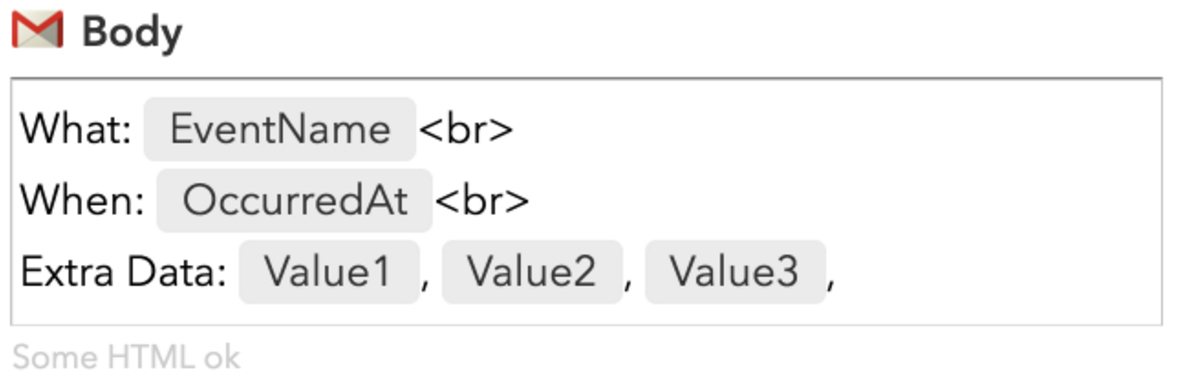
An example request that sends an email based on an event would look like this:

The event in the request header and the value1, value2, and value3 in the request body would then populate the email you had drafted in IFTTT.
Create a Help Scout conversation
Easily create Help Scout conversations from Customer.io:
Request Header: https://[API-KEY]:@api.helpscout.net/v1/conversations.json
Request Body:
{
    "type": "email",
    "customer": {
        "email": "{{customer.email}}",
        "firstName":"{{customer.firstName}}",
        "lastName":"{{customer.lastName}}"
    },
    "subject": "Low NPS rating from customer {{customer.firstName}} {{customer.lastName}}",
    "mailbox": {
        "id": MAILBOX-ID
    },
    "tags": [
        "Customer.io"
    ],
    "status": "active",
    "createdAt": "{% assign current_time = 'now' %}{{current_time | date: "%F"}}",
    "threads": [
        {
            "type": "customer",
            "createdBy": {
                "email": "{{customer.email}}",
                "type": "customer",
                "firstName":"{{customer.firstName}}",
                "lastName":"{{customer.lastName}}"
            },
            "body": "{{customer.comment}} \n \n Rating: {{customer.NPS_rating}}",
            "status": "active",
            "createdAt": "{% assign current_time = 'now' %}{{current_time | date: "%F"}}"
        }
    ]
}
Replace MAILBOX-ID with your own and adapt any attributes to your own data. customer, subject, mailbox, and threads are mandatory fields.
Please be aware that free plans don’t allow API access, and only owners and administrators are able to create API keys.
Create a Lead in Close
Close is a streamlined sales platform that helps you close more deals. With built-in calling and automatic email tracking, you can focus on selling rather than data entry. In our example, we’ll show you how to send leads from Customer.io to Close, using our segment triggers. If you don’t already have an account, you can create one at Close. At any point, you can read all about adding a lead to Close via their API. Their docs include details on custom fields, give you example data, and more.
The simplest case is to push a lead into Close for every signup that enters Customer.io.
Request Header: https://YOUR-API-KEY@api.close.com/api/v1/lead/
Request Body:
{
  "name": "{{customer.company}}",
  "url": "{% if customer.company_url.size > 0 %}{{customer.company_url}}{%else %}mycompany.com{% endif %}",
  "description": "{{customer.bio}}",
  "contacts": [
    {
      "name": "{{customer.first_name}} {{customer.last_name}}",
      "title": "{{customer.jobTitle}}",
      "emails": [
        {
          "type": "office",
          "email": "{{customer.email}}"
        }
      ],
      "phones": [
        {
          "type": "office",
          "phone": "{{customer.phone}}"
        }
      ]
    }
  ],
  "custom": {
    "Source": "{% if customer.source.size > 0 %}{{customer.source}}{%else %}Unknown{% endif %}"
  },
  "addresses": [
    "{{customer.address}}"
  ]
}
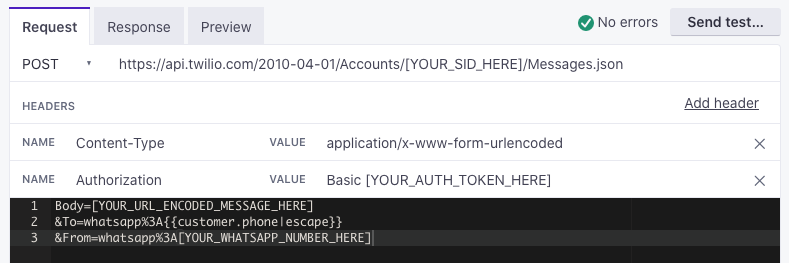
Send a WhatsApp Message through Twilio
It’s now easier to send WhatsApp messages!
You no longer need to set up a webhook to send WhatsApp messages. Learn how to enable WhatsApp support for your account.
You can send Twilio SMS messages and WhatsApp messages in campaigns with the SMS workflow action.
In the past, to send a WhatsApp message through Twilio in Customer.io, you had to use a webhook.
Before you’re able to send a WhatsApp message, you will need to create a new template in Twilio and have it approved as described in their documentation. Once you’re approved, you can build a webhook that looks like the following:
Request Header: https://api.twilio.com/2010-04-01/Accounts/[YOUR_SID_HERE]/Messages.json
Content-Type: application/x-www-form-urlencoded
Authorization: Basic [YOUR_AUTH_TOKEN_HERE]
Request Body:
Body=[YOUR_URL_ENCODED_MESSAGE_HERE]
&To=whatsapp%3A{{customer.phone|escape}}
&From=whatsapp%3A[YOUR_WHATSAPP_NUMBER_HERE]
For more real world examples, take a look at some of our recipes.

