Import people or events via CSV
How it works
You can upload CSVs or Google Sheets to add people, update people, and send events to Customer.io outside your normal integration path. When you upload a CSV of people or events, each row in your CSV represents a person or an event respectively; each column in your CSV represents an attribute or event property respectively.
When you go to upload a CSV, you’ll select People or Events. The option you choose determines the format of the CSV you upload.
- People: You can add new people and update existing people. Each column in the sheet represents an attributeA key-value pair that you associate with a person or an object—like a person’s name, the date they were created in your workspace, or a company’s billing date etc. Use attributes to target people and personalize messages. Attributes are analogous to traits in Data Pipelines. you want to set on your audience.
- Events: You can upload events for existing people, but you cannot add new people when you upload events. Each column in your sheet represents an event property.
To import relationships between people and objectsNot to be confused with a JSON object, an object in Customer.io is a non-person entity that you can associate with one or more people—like a company, account, or online course. You can use objects to message people based on changes to their company, account, or course itinerary., check out Add/update objects via CSV.
Import a Google Sheet
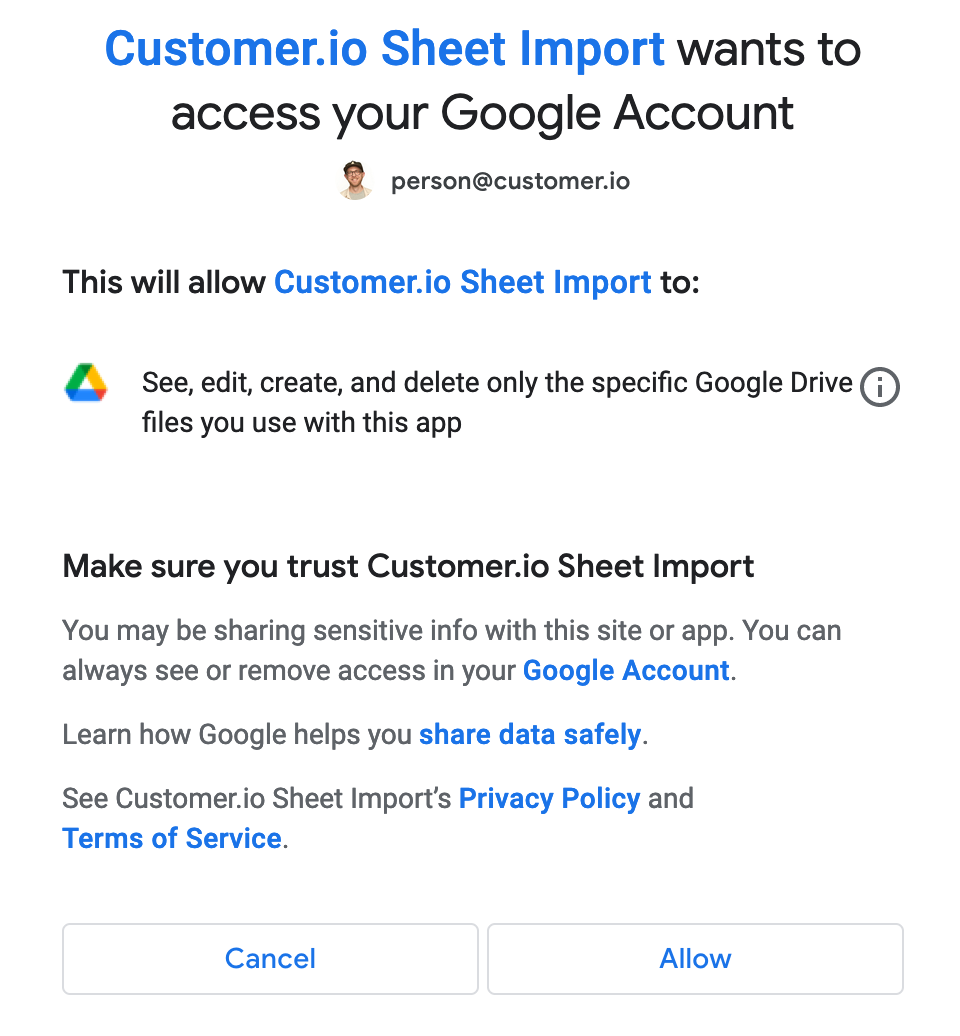
If you want to import Google Sheets, you must login to your Google account and allow us access to your sheets. You’ll see this includes the ability for us to read, edit, create, and delete the specific files that you share with us. However, we will only ever read files; we don’t write changes to your documents.
After you grant access, you can select the individual sheets that you want to share with Customer.io.
Import people from a CSV file
Before you import people, make sure that your CSV file is ready to import. It must contain a column that maps to id or email. If you want to import a Google sheet, you must grant Customer.io access to sheets in your Google account.
Go to People > Add People and click Import a CSV.
Select People. See import events from a CSV file if you want to upload events for people in your workspace.
Select the file you want to import. If your CSV does not validate, it may not meet our CSV requirements.
Looking for the email option?
If you want to identify people by
emailbut you don’t see that option, you can enable email as an identifier in your workspace settings.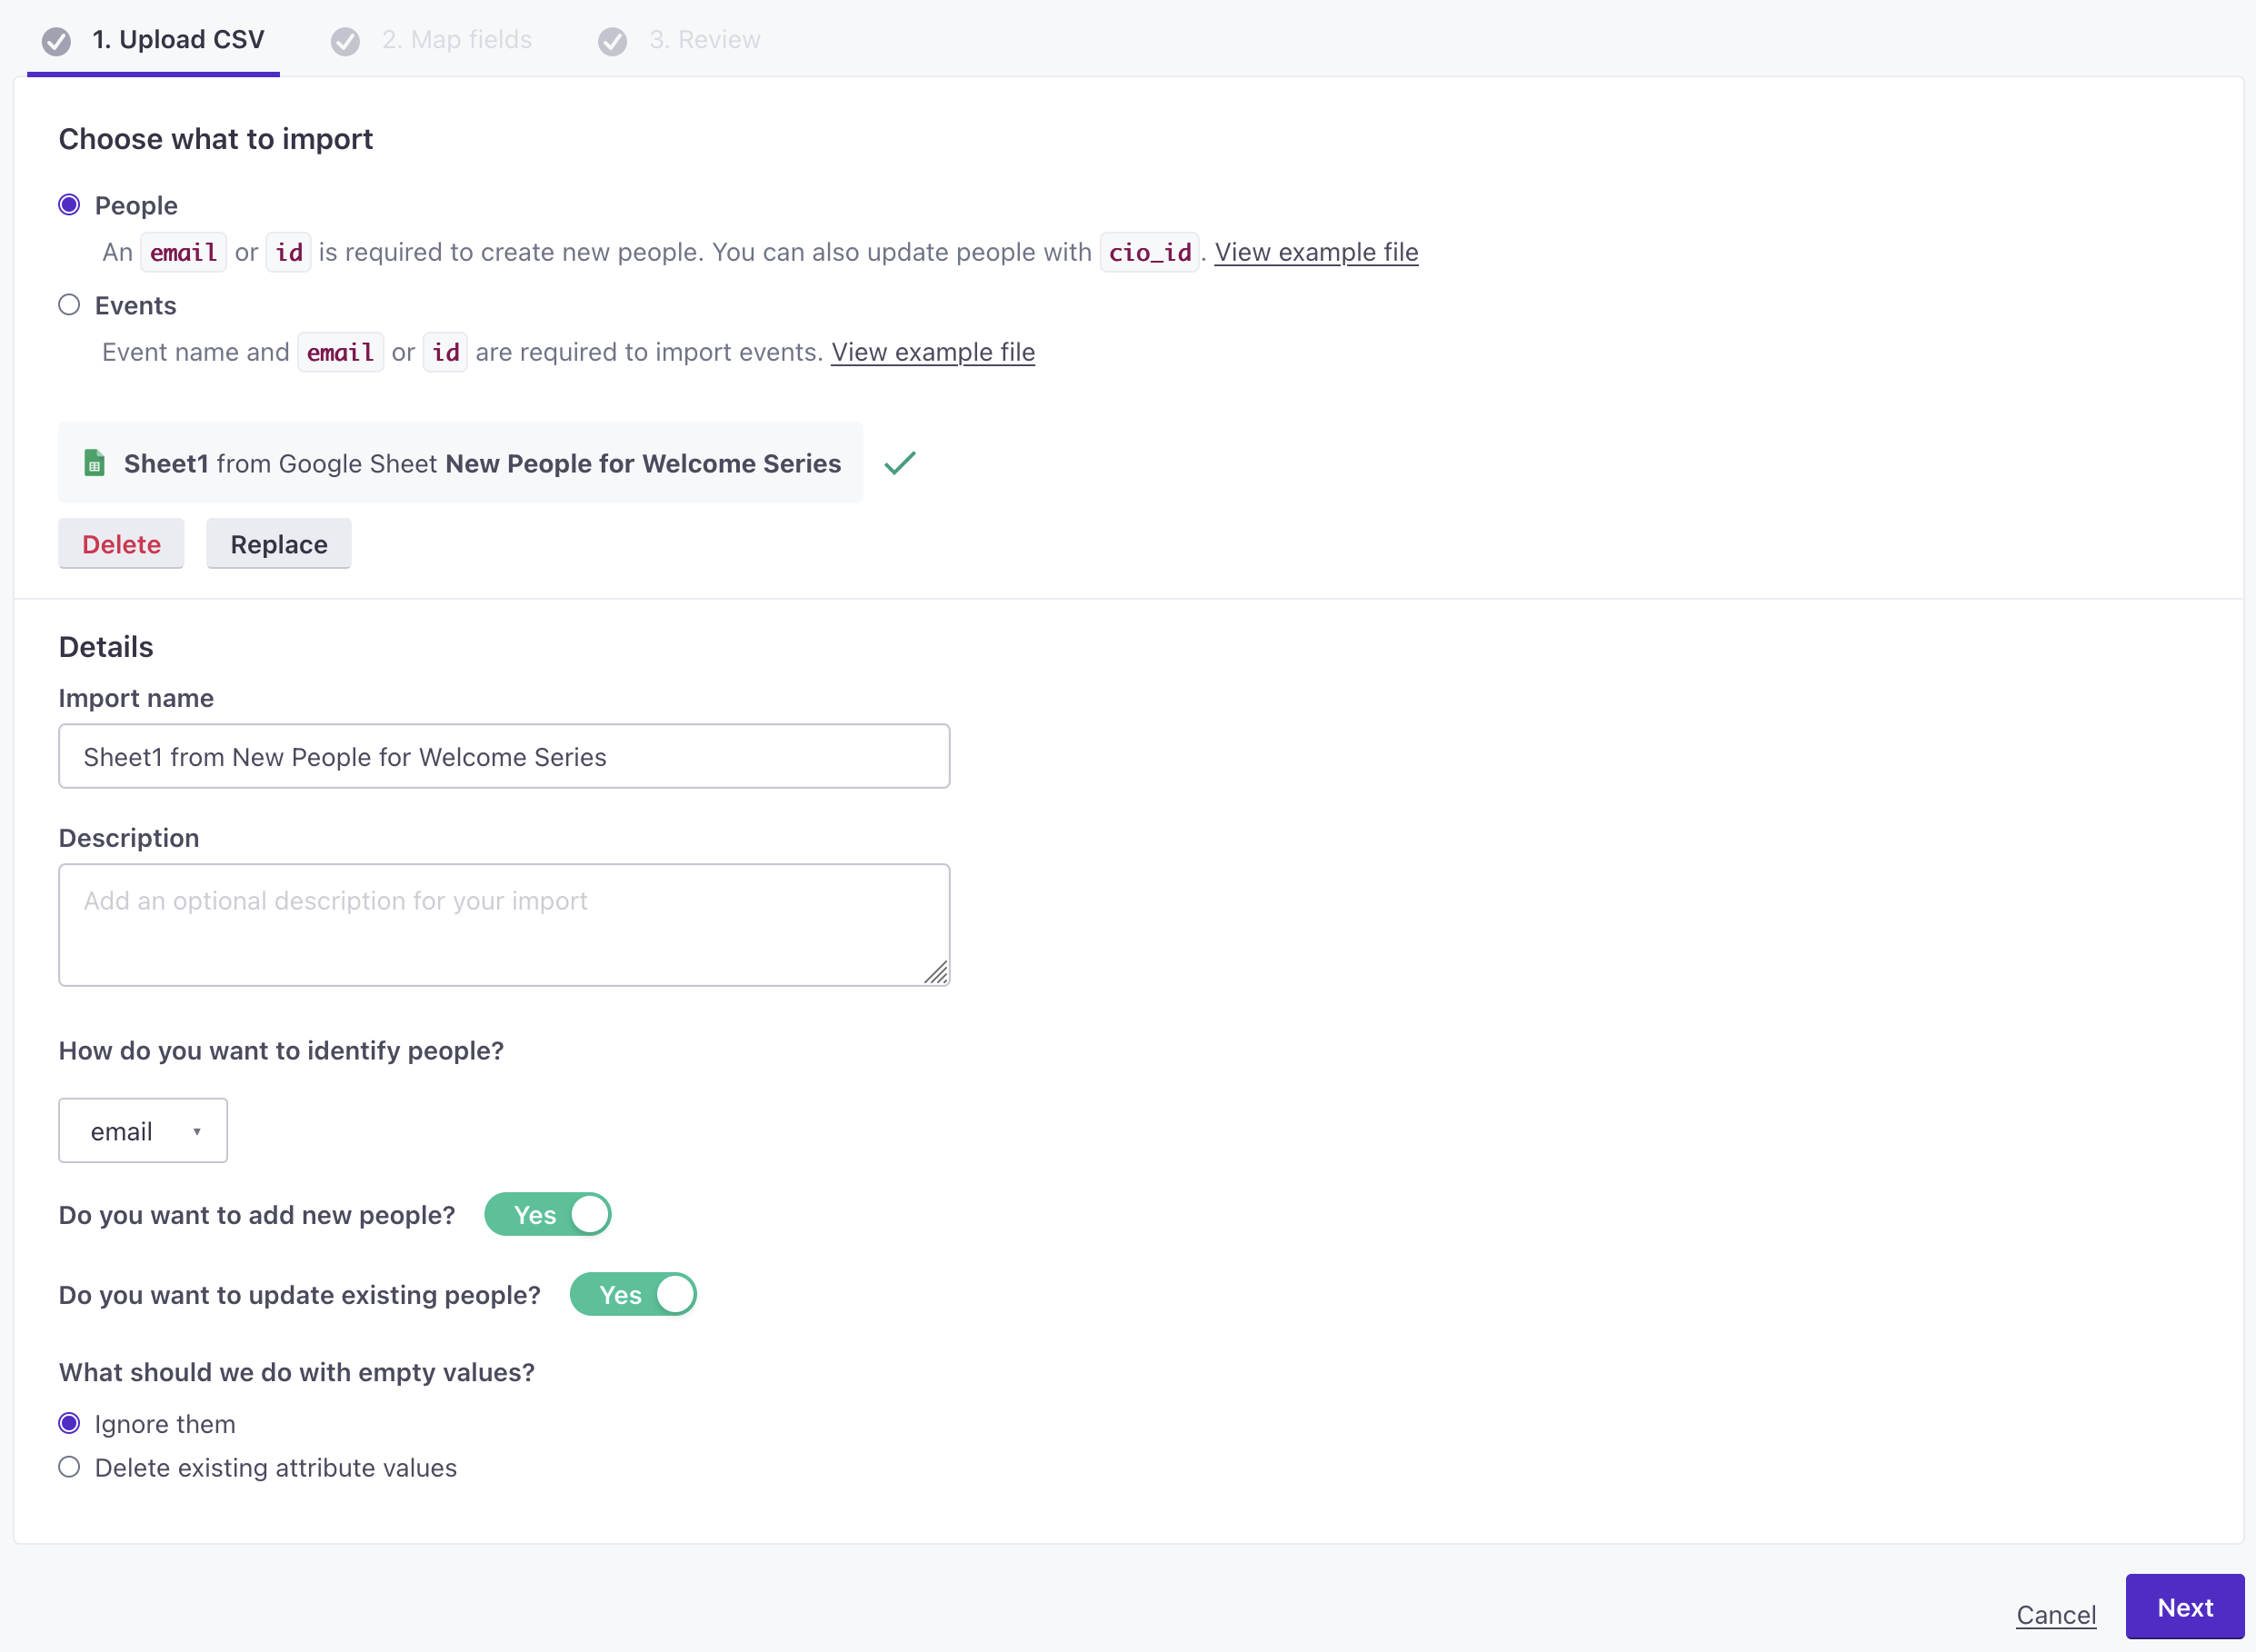
Each row in your CSV can trigger a campaign
Customer.io processes imports row-by-row. Segment-triggered campaigns may fire as we create new people or change attributes, so review your import carefully!
Click Complete import to begin importing people. The import process takes approximately one minute per 20-30 thousand rows. You can navigate away from the page, and we will send you an email when your import is complete.
Go to Data & Integrations > Imports to revisit this import or see your previous imports. On the table, you’ll see how many rows were imported. Hover over the count to check how many people were updated or created.
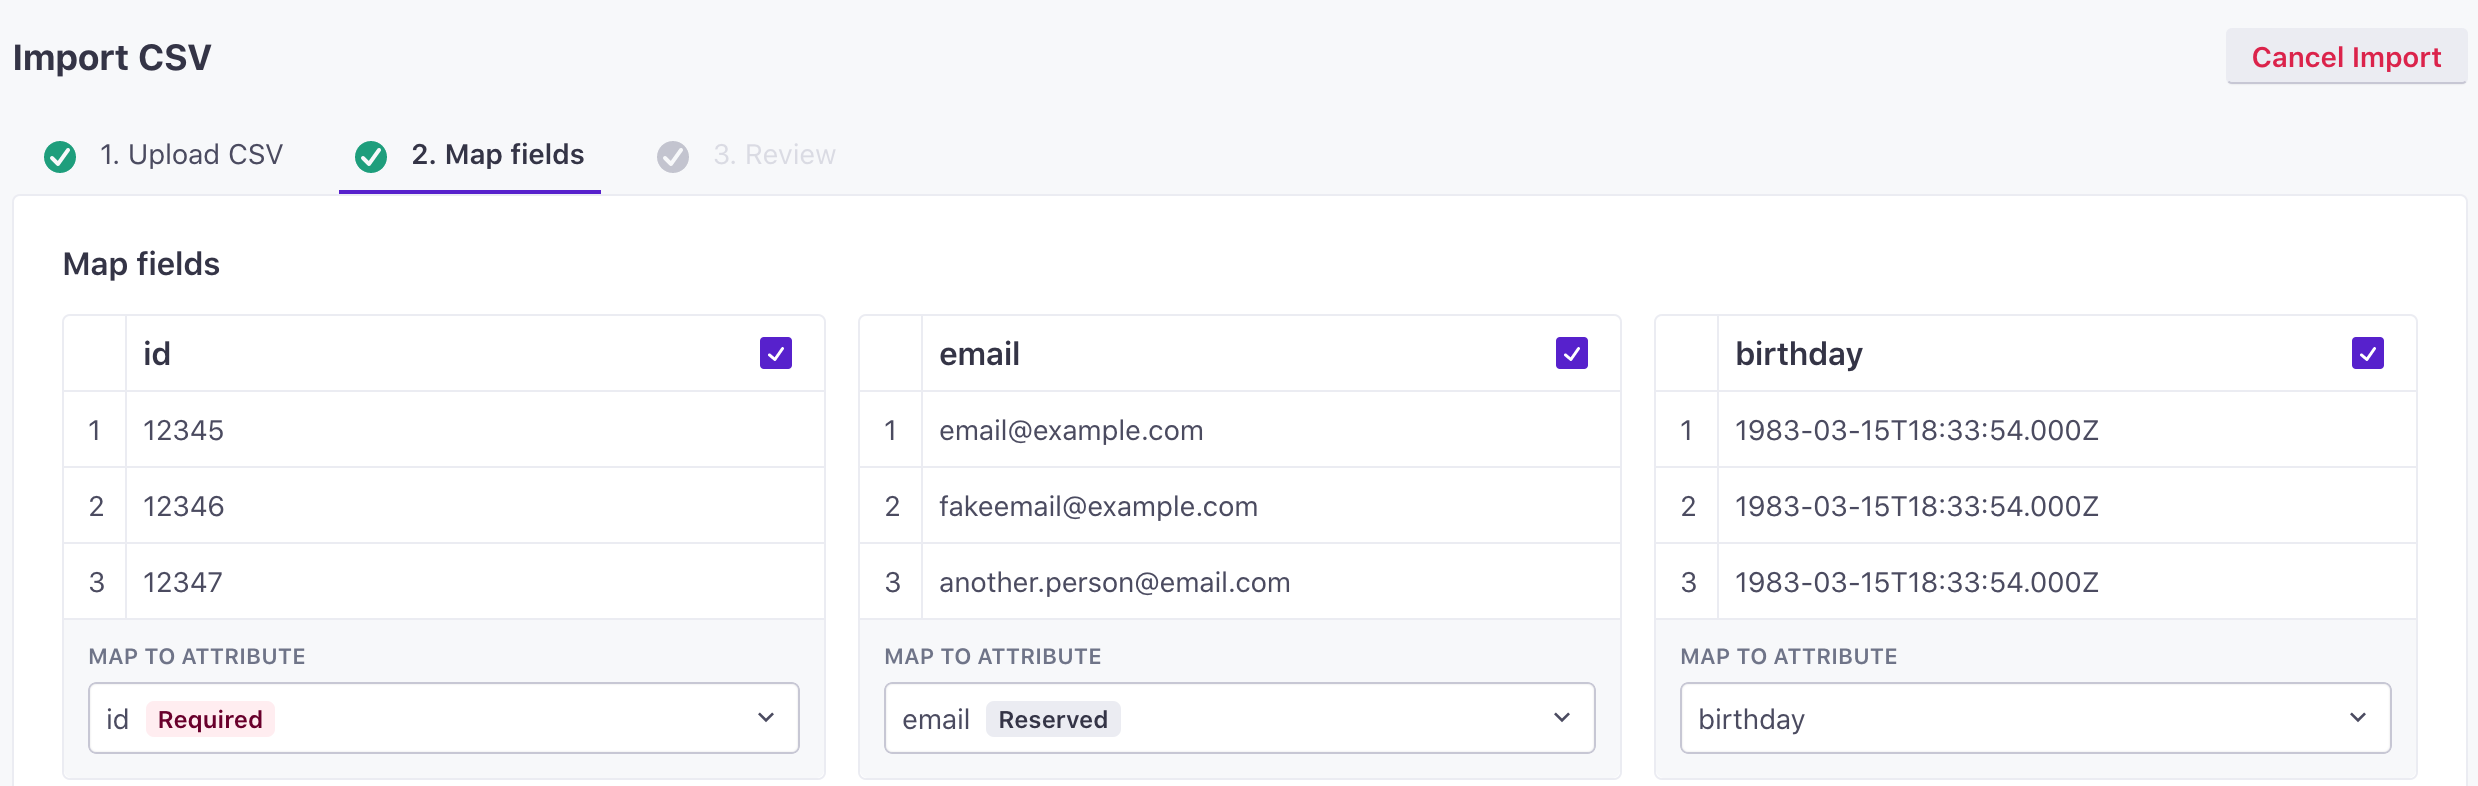
Map CSV headers to attributes
When you import a CSV, you match the headers in your CSV to attributes for people in Customer.io, at least one of which represents the identifier for the people you want to update (ID or email). If your column names match attributes in Customer.io, we try to map them automatically. Otherwise, you can re-map columns in your attribute to existing attributes or create new attributes.
We sample the first three rows of your data for each column, helping you understand the data that you’re mapping to each attribute. Use Import as: to select the attribute that you want to map a column to. If you do not want to import the values in a column, select Skip.
Customer.io has some reserved attributes: id, email, created_at, and unsubscribed. These attributes have a defined purpose in Customer.io and expect certain types of values.
You can create your own attributes for similar, non-reserved purposes. For example, if you want to import a column representing an email address, but you don’t want to map that to the reserved Customer.io email attribute, you can change the column name and import it as a different attribute. You cannot have multiple columns called email, nor can an email cell contain multiple values.
Mapping warnings
You may see some warnings when mapping attributes. These generally represent best practices and recommendations, and are not issues that you need to fix. For example, we may recommend that you remove spaces from your column names because spaces in attributes can make things difficult when using Liquid in your messages.
People CSV Requirements
You can upload a CSV directly to Customer. io, or link us to a Google Sheet. Take a look at an example CSV. Each row in your CSV represents a person you want to add to, or update in, your workspace, and each column represents an attribute that you want to assign to that person.
Your file must:
- be in CSV format OR a Google Sheet
- not exceed 100MB in size
- not contain more than 100 columns
- contain at least one column that maps to an identifierThe attributes you use to add, modify, and target people. Each unique identifier value represents an individual person in your workspace. in your workspace—
id,email, orcio_id(when updating people). This requirement changes based on the identifiers used in your workspace and whether you want to add or update people. See the section below for more information. - To share Google Sheets, you must login to your google account and grant Customer.io access to your sheets.
Identifiers and Required Columns in your CSV
Your CSV generally needs to include at least one identifierThe attributes you use to add, modify, and target people. Each unique identifier value represents an individual person in your workspace.. However, the identifier(s) your sheet can include depend on whether you want to add or update people and your workspace settings—whether you identify people by id, email, or both.
For Email and ID workspaces, your CSV must include at least one of id or email but may include both.
- When you update people: if a person does not already have an
idor anemailattribute, your CSV can update these values for that person. For example, if you add a person byemailand then want to assign anidlater, you can do that. If ID or email values are not empty, you cannot change them unless you identify people bycio_id. Attempting to change identifiers without usingcio_idresults in a Failed Attribute Change error.
For ID only (classic) workspaces:
- When you add people: your sheet must include an
idcolumn (or a column that you map toid). - When you update people: you can update people by
email(without anidcolumn). But, if multiple people in your workspace have the sameemailaddress, the row produces an error; in this case, we don’t know which person you want to update.
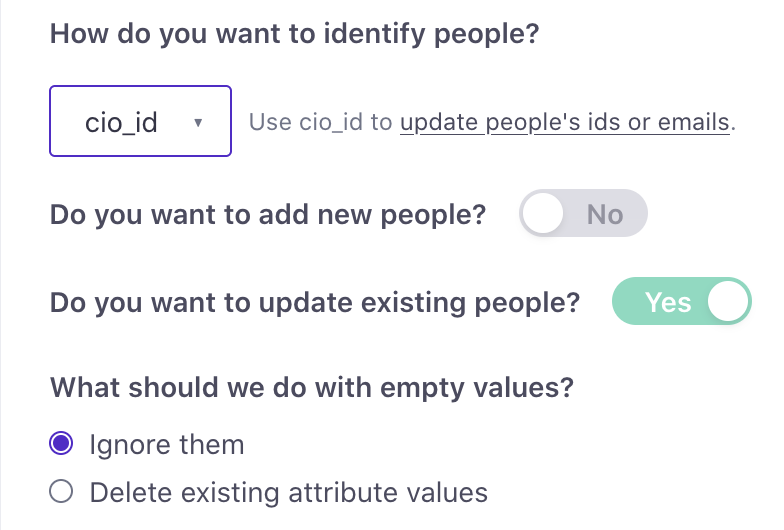
Use cio_id to update people’s identifiers
If you want to update a person’s email or ID, you must identify them by cio_id—an identifier assigned by Customer.io. See the section below for more information.
| Workspace type | Add | Update | Required in CSV | Notes |
|---|---|---|---|---|
| ID-only/Classic | ✅ | id | ||
| ✅ | id or email | email is not a unique identifier. If you update by email, and multiple people have the same
email address, the row produces an error. | ||
| ✅ | ✅ | id | ||
| email or ID | ✅ | at least one of id or email | ||
| ✅ | at least one of id or email | Your request cannot change existing id or email values | ||
| ✅ | ✅ | at least one of id or email | Your request cannot change existing id or email values |
There are other reserved attributes
See our Attributes page for a description of attributes with specific uses in Customer.io.
Updating people identifiers (email or ID)
If you want to update a person’s email or ID, and those identifiersThe attributes you use to add, modify, and target people. Each unique identifier value represents an individual person in your workspace. are already set, your sheet must identify people by their cio_idAn identifier for a person that is automatically generated by Customer.io and cannot be changed. This identifier provides a complete, unbroken record of a person across changes to their other identifiers (id, email, etc).. Otherwise, trying to change a person’s email or ID value (after it was already set) results in an Failed Attribute Change error. You can find people’s cio_id values by performing an export, or on the People page.
When you import people, select the option to Update people, and use cio_id as the identifier. Identifying people by their canonical, CIO ID lets you change their other identifiers.
You cannot add people when you identify people by cio_id; this value is reserved and assigned by Customer.io automatically when you add someone using an email or ID.
Upload subscription preferences via CSV
If you use our subscription center feature, you can set or backfill subscription preferences when you upload people.
You can set some or all subscription topic preferences for people by importing a CSV in the People tab.
Set one or more topic preferences for a person
You can use this method to update any and all subscription preferences for people without overwriting preferences for topics not specified in the CSV.
Add each subscription center topic name you want to set as its own column header. Upon upload, you’ll map each header to the attribute cio_subscription_preferences.topics.topic_<topic ID> where the topic ID corresponds to the topic name. You can find this on your subscription center landing page or by retrieving subscription center topics in our App API.
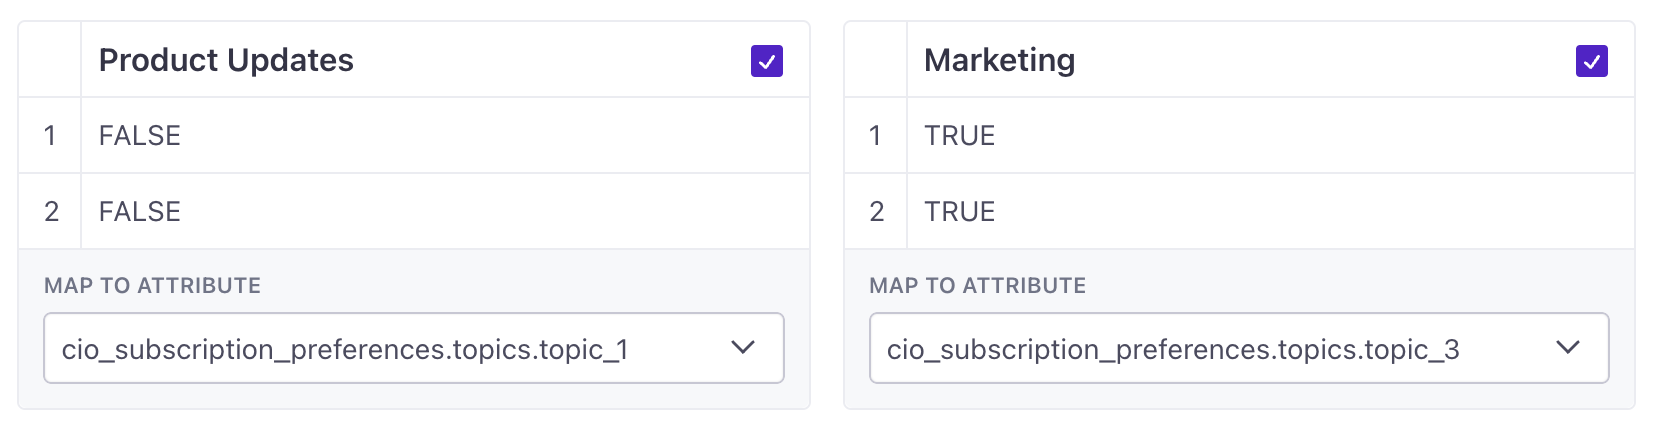
After you complete the import, you’ll see that only the topic preferences you specified in the CSV show changes on the person’s profile.
Before uploading, another option is to add a column header that already matches the JSON dot notation above. When you go to map fields, the correct attribute name automatically populates.
Set all topic preferences for a person
You can use this method to update ALL topic preferences per person, not a selection of topic preferences.
Include every topic and value per person
If you do not include all topic preferences for each person using this method, the person’s preferences that are not specified in the import will be overwritten to match the default opt-in/out status of the topic.
You can import subscription preferences for a person by adding a column header cio_subscription_preferences and including the same JSON structure that our API expects. The contents of this column are topics objects, as follows:
email,first_name,cio_subscription_preferences
person@example.com,person,{"topics":{"topic_1":true,"topic_2":false}}
another.person@example.com,another,{"topics":{"topic_1":true,"topic_2":true}}
See this spreadsheet for an example.
Upload people via the API
You can upload a CSV of people via our App API by providing the URL of your CSV file. CSVs that you import this way conform to the same rules as a CSV that you upload via the UI. The main difference is that we’ll automatically map columns to attributesA key-value pair that you associate with a person or an object—like a person’s name, the date they were created in your workspace, or a company’s billing date etc. Use attributes to target people and personalize messages. Attributes are analogous to traits in Data Pipelines., so you should make sure that your CSV’s column names match attribute names in your workspace before you upload a CSV.
This means that your CSV must contain a column titled id or email—an identifierThe attributes you use to add, modify, and target people. Each unique identifier value represents an individual person in your workspace. we can use to add or update people.
We recommend that you host your CSV from a short-lived URLs. Ideally, your URLs will expire 2 hours after you initiate imports. We have to be able to reach your files, but you probably don’t want files containing your customers’ information to remain publicly available after you’ve uploaded them to us.
The response from a CSV upload contains a result.id. You can use this value with a companion endpoint to return the results of your import—including whether the import is complete and how many rows we were able to import.
curl --request POST \
  --url https://api.customer.io/v1/imports \
  --header 'Authorization: Bearer REPLACE_BEARER_TOKEN' \
  --header 'content-type: application/json' \
  --data-raw
   '{
      "import": {
        "name":"my upload",
        "data_file_url":"https://www.example.com/myfile.csv",
        "type":"people",
        "identifier":"id",
        "data_to_process": "all",
        "description":"uploading people"
      }
}'- data_file_url stringRequired The URL or path to the CSV file you want to import.
- data_to_process string
Determines whether your import operation performs
alladd/update operations, only adds items (only_new), or only updates existing items (only_existing). Defaults toall. Ifimport_typeisevent, you can only usealloronly_existing.This field was previously called
people_to_process- we still support it but will deprecate it soon.Accepted values:
all,only_new,only_existing - description stringA helpful description that can help you find and recognize your import operation.
- identifier stringRequired The type of identifier you want to use to identify people in your sheet—
idoremail. At least one column in the CSV must contain an identifier.Accepted values:
id,email - name stringRequired A friendly name for your import. This helps you identify your import.
- type stringRequired The type of import.
Accepted values:
people
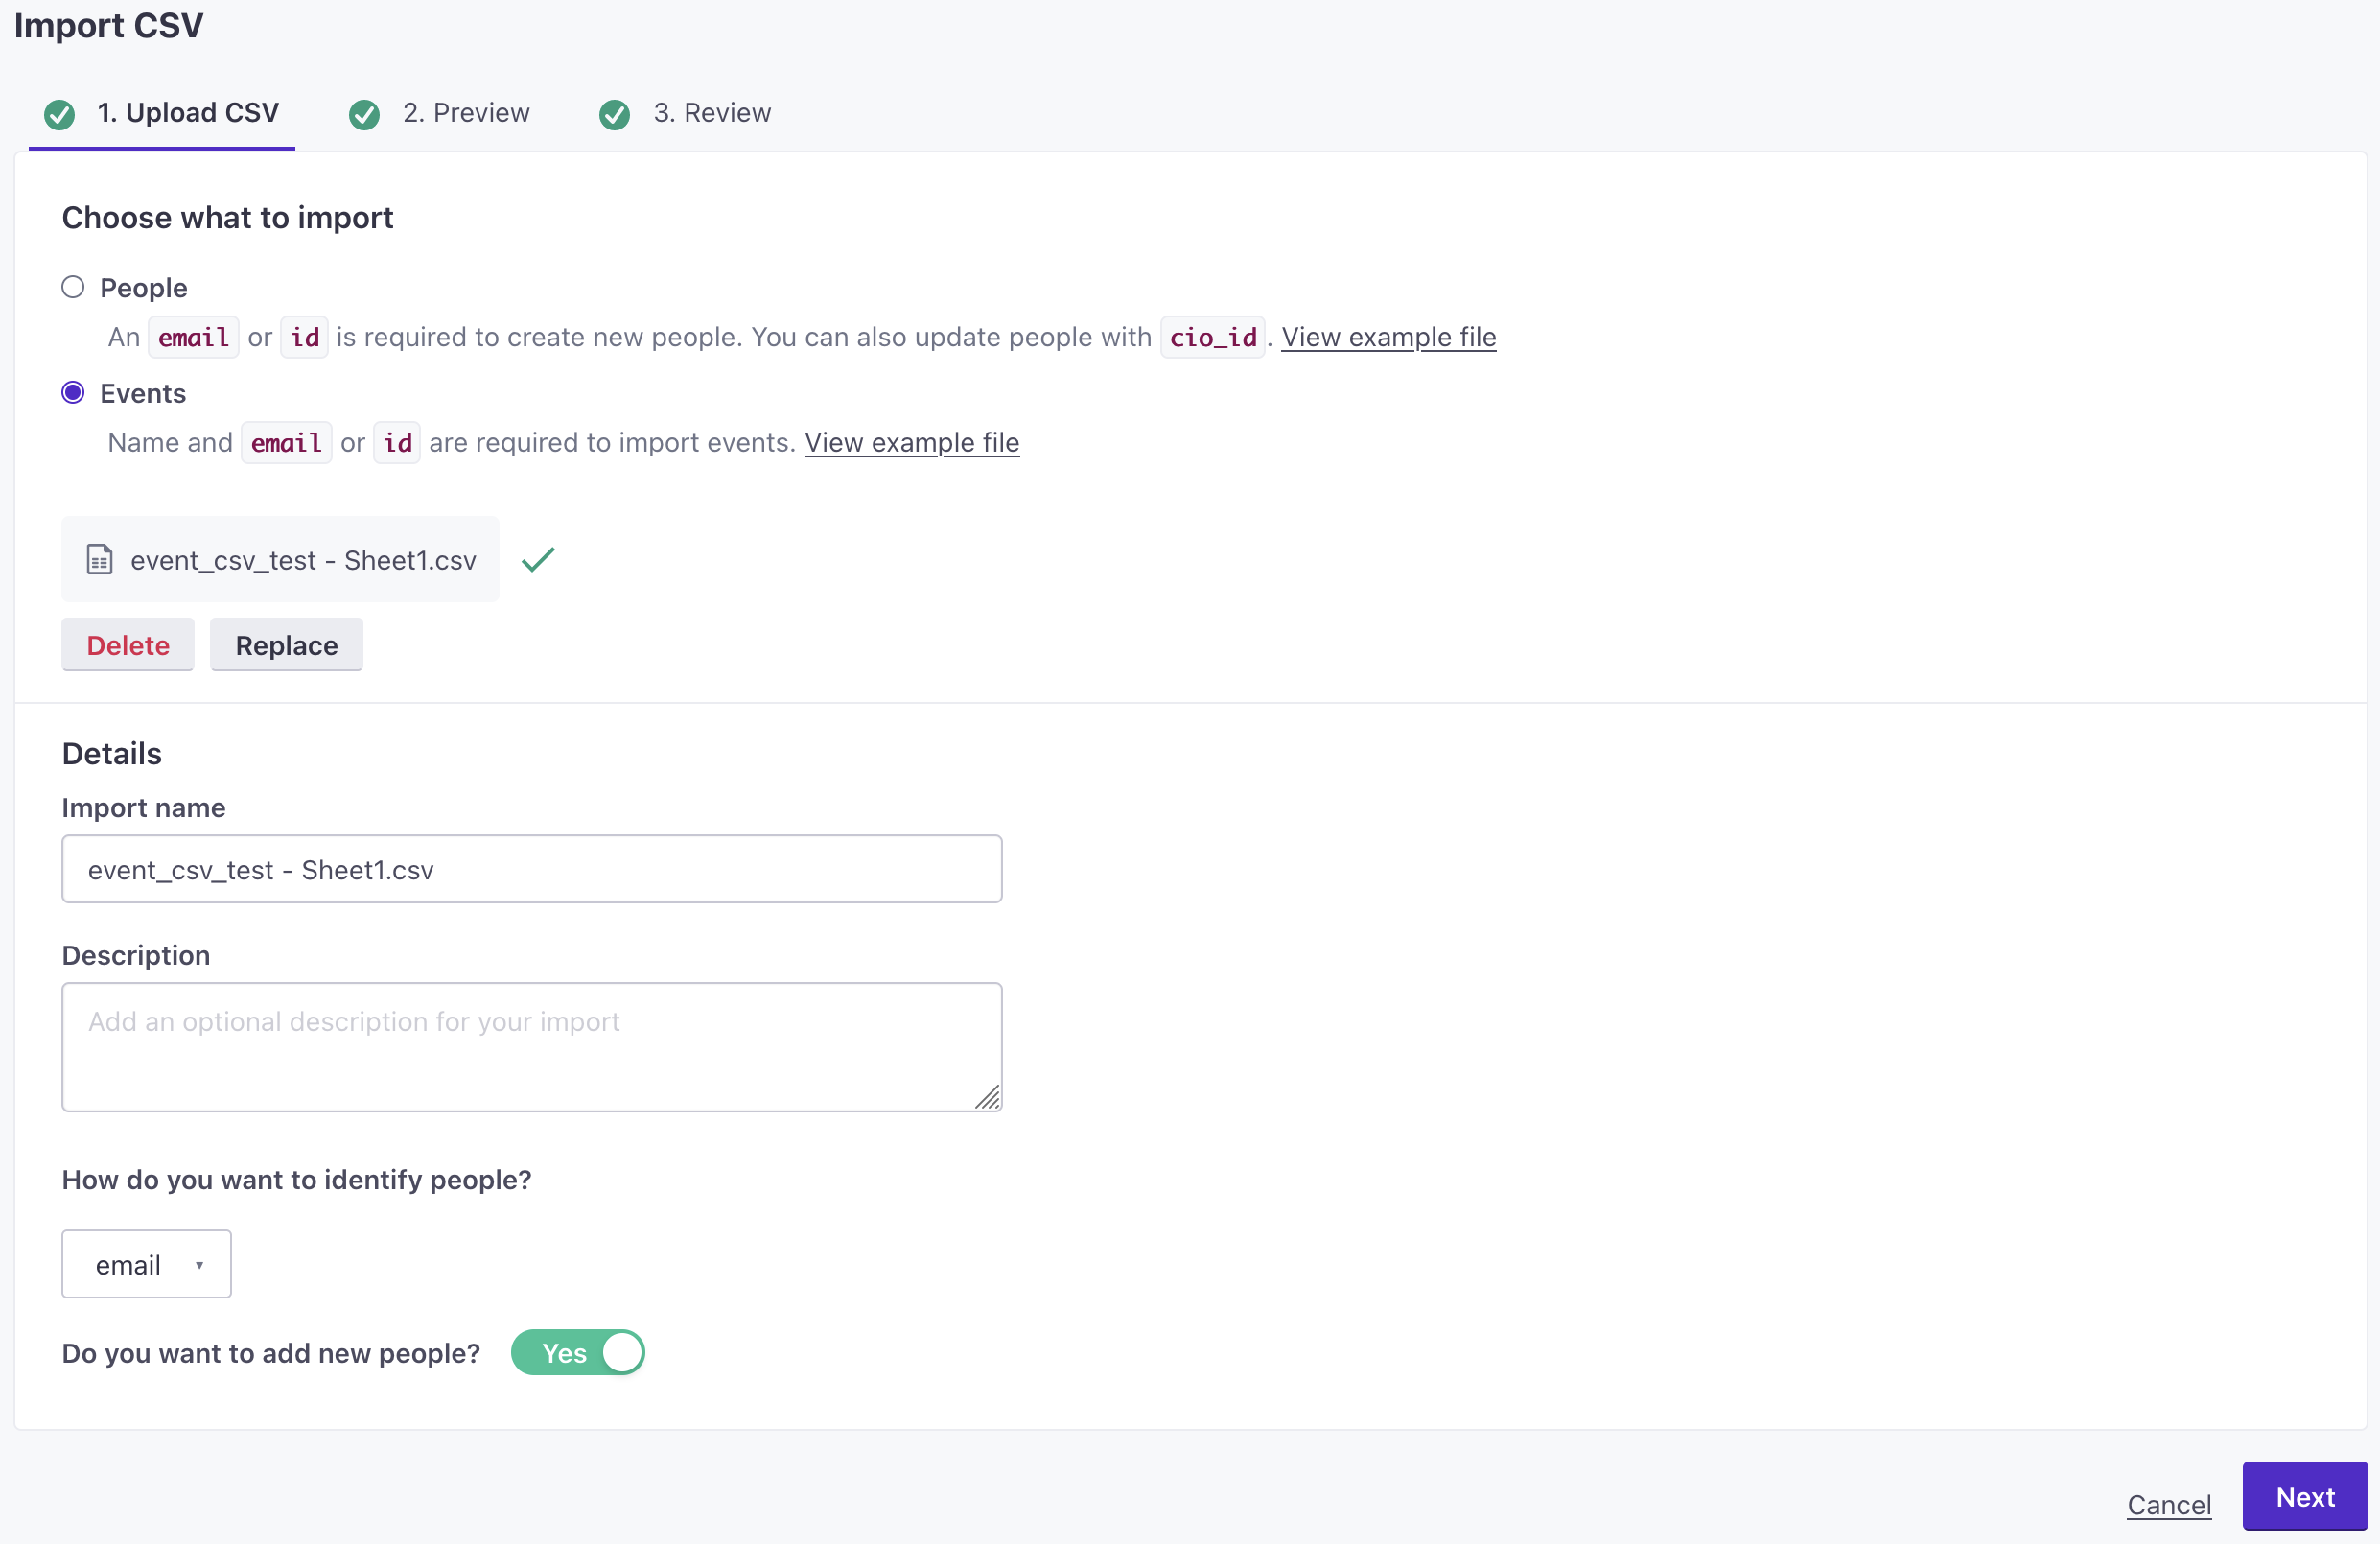
Import events from a CSV
When you upload a list of people, you can upload events rather than attributes! You might do this if you need to backfill events that your audience performed outside of your normal integration path—things your audience did before you integrate with Customer.io.
Before you import people, make sure that your CSV file is ready to import. The first column must be _cio_name and contain the event name; the second column must be _cio_customer_id. See Event CSV requirements for more information.
Go to People > Add People and click Import a CSV.
Select Events. See import people from a CSV file if you want to add or update people.
Select the file you want to import. If your CSV does not validate, it may not meet our CSV requirements.
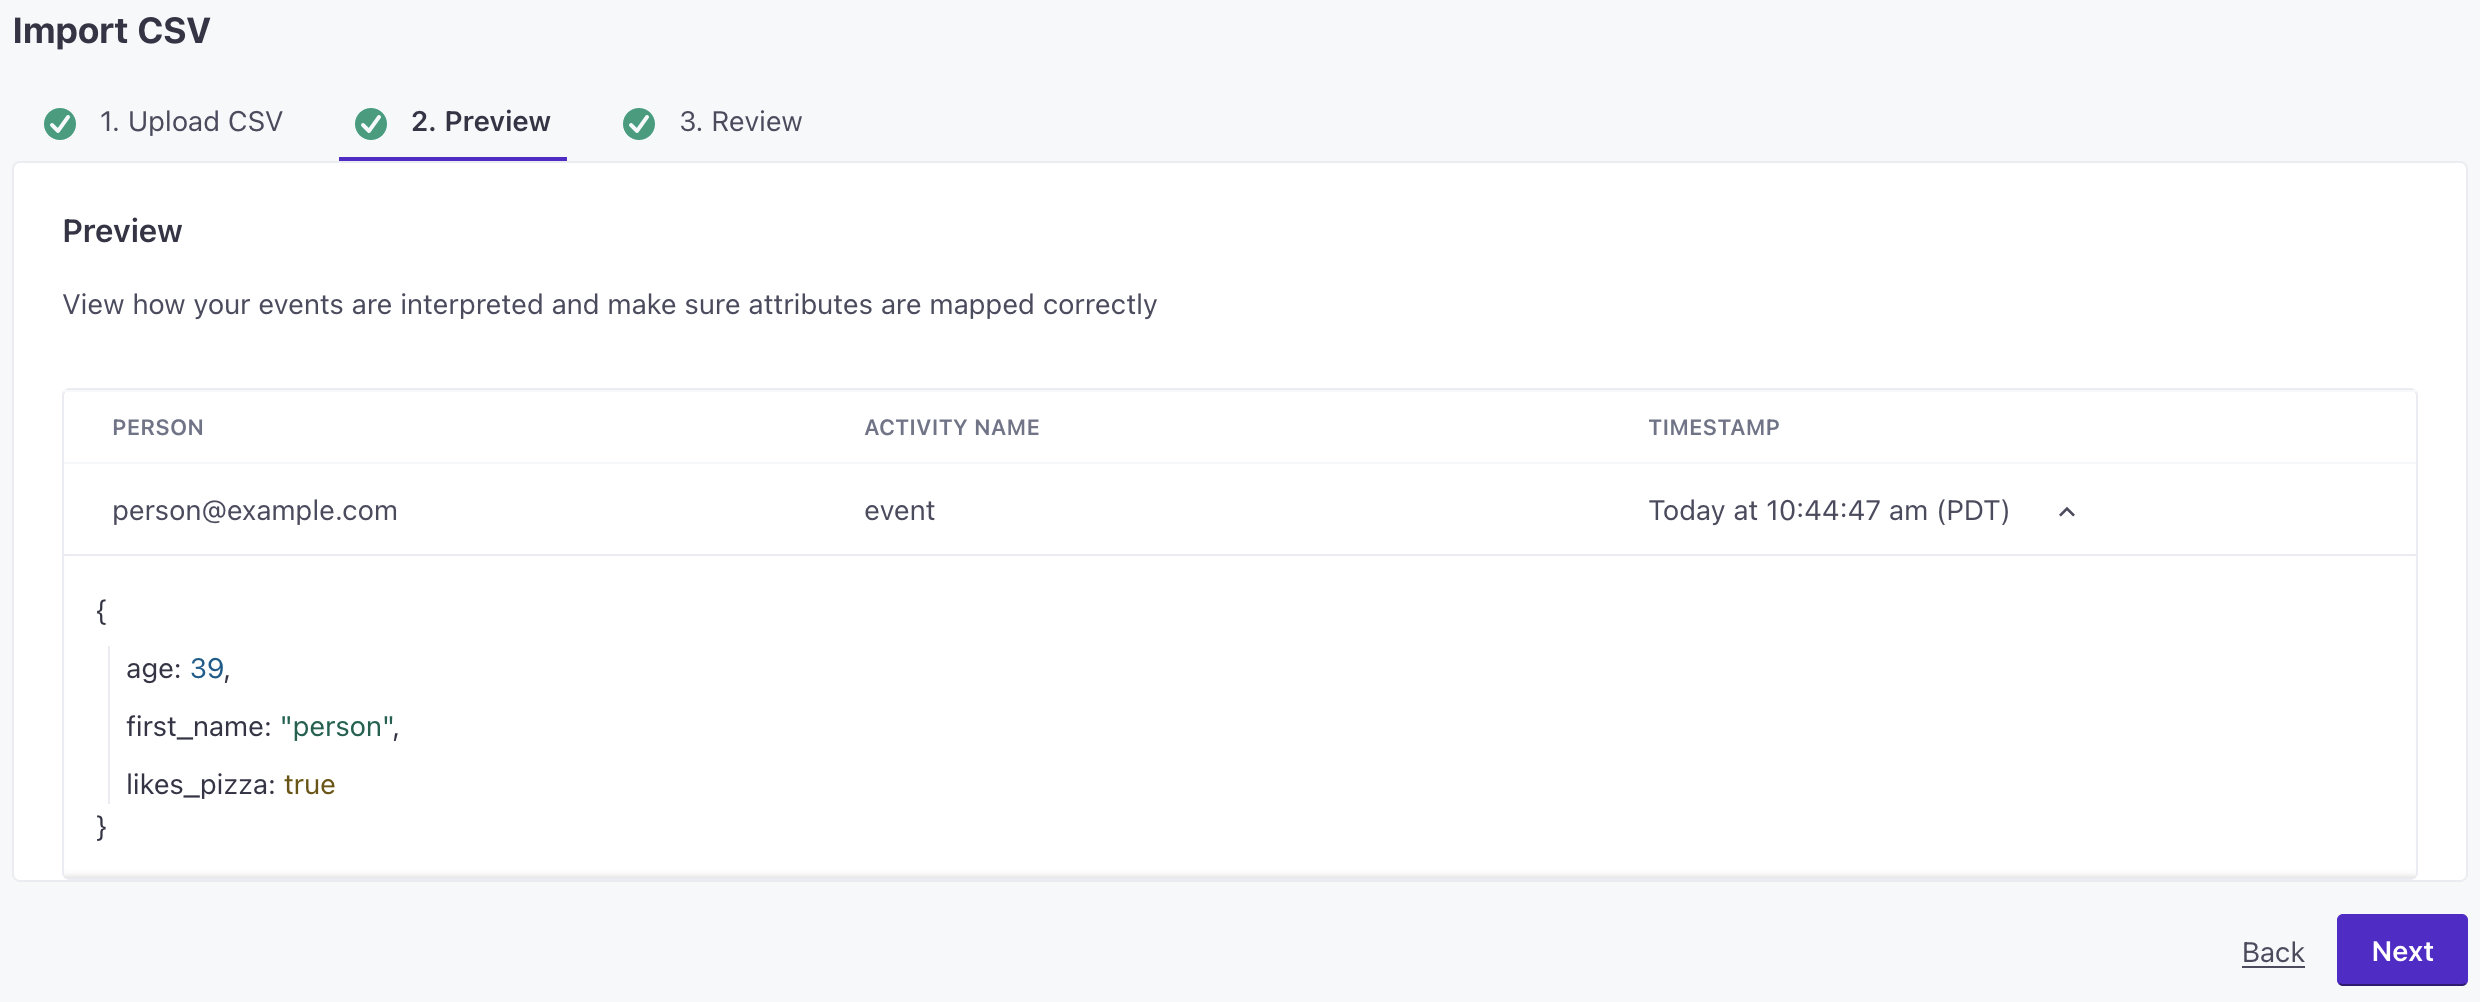
In the Preview step, check that event properties are mapped properly. Click any row in the preview to see the JSON representation of your event.
Review your import.
- Check out our section about import for errors and warnings for help reviewing your CSV.
- (Optional) Click Preview Import to download a CSV file that reflects your final import, including all data mappings, skipped attributes, etc. Make sure that your import is correct. You cannot stop the import process after you click Import.
Events can trigger campaigns!
If your sheet doesn’t contain a
_cio_timestampfield, or your timestamps are within the past 72 hours, your events can trigger campaigns. Make sure that you understand the impact of your events before you finish your upload.Click Complete import to import your events. The import process takes approximately one minute per 20-30 thousand rows. You can navigate away from the page. We’ll send you an email when your import is complete.
Go to Data & Integrations > Imports to revisit this import or see your previous imports. On the table, you’ll see how many rows were imported. Hover over the count to check how many events were added and how many people were updated or created.
Import events via the API
You can upload a CSV of events via our App API by providing the URL of your CSV file. CSVs that you import this way conform to the same rules as a CSV that you upload via the UI. The main difference is that we’ll automatically map columns to event data properties, so you should make sure that your CSV’s column names match event properties that you might use in segmentsA group of people who match a series of conditions. People enter and exit the segment automatically when they match or stop matching conditions. and other assets.
Your CSV must contain a column titled _cio_customer_id—the id or email address of your audience, so we can identify who performed each event. You must use the same identifier for everybody in the sheet.
We recommend that you host your CSV from a short-lived URLs. Ideally, your URLs will expire 2 hours after you initiate imports. We have to be able to reach your files, but you probably don’t want files containing your customers’ information to remain publicly available after you’ve uploaded them to us.
The response from a CSV upload contains a result.id. You can use this value with a companion endpoint to return the results of your import—including whether the import is complete and how many rows we were able to import.
curl --request POST \
  --url https://api.customer.io/v1/imports \
  --header 'Authorization: Bearer REPLACE_BEARER_TOKEN' \
  --header 'content-type: application/json' \
  --data-raw
   '{
        "name":"my event upload",
        "data_file_url":"https://www.example.com/events.csv",
        "type":"events",
        "identifier":"id",
        "description":"uploading people"
}'- data_file_url stringRequired The URL or path to the CSV file you want to import.
- data_to_process string
Determines whether your import operation performs
alladd/update operations, only adds items (only_new), or only updates existing items (only_existing). Defaults toall. Ifimport_typeisevent, you can only usealloronly_existing.This field was previously called
people_to_process- we still support it but will deprecate it soon.Accepted values:
all,only_new,only_existing - description stringA helpful description that can help you find and recognize your import operation.
- identifier stringRequired The type of identifier you want to use to identify people in your sheet—
idoremail. At least one column in the CSV must contain an identifier.Accepted values:
id,email - name stringRequired A friendly name for your import. This helps you identify your import.
- type stringRequired The type of import.
Accepted values:
people
Event CSV requirements
The first two columns in your CSV must be _cio_name, _cio_customer_id. Take a look at an example CSV. You can also include a third _cio_timestamp column representing the date-time when the event occurred if you want to back-date your event. If you don’t include this column, we’ll use time that we process the event as the event’s timestamp. Additional columns are event data attributes that you want to associate with the person.
Event data provided via CSV (columns 4 and greater) is flattened and cannot contain nested JSON. For example, a column called property.subproperty will simply become a stringified key called "property.subproperty".
| col | col name | required | description |
|---|---|---|---|
| 1 | _cio_name | The name of the event. | |
| 2 | _cio_customer_id | The identifier for a person. Depending on your workspace settings, this can be the person's id or email. You must use the same identifier for the entire CSV—you cannot mix IDs and email addresses. | |
| 3 | _cio_timestamp | The date-time when the event occurred. | |
| 4+ | Subsequent columns contain additional attributes for the data object in the event; one column per event property. These are properties you'll use in liquidA syntax that supports variables, letting you personalize messages for your audience. For example, if you want to reference a person’s first name, you might use the variable {{customer.first_name}}.—i.e. {{event.column_name}}. These columns can have any name, though you may want to make sure your column names don't contain spaces or special characters that might make them hard to use in Customer.io |
Review import errors and warnings

On the final Review step, we validate your import and return errors and warnings for rows in your CSV file. Rows with errors will not be imported, but rows with warnings will. Depending on the size of your CSV file, it may take a moment for us to validate your import.
If there are no errors or warnings, you can continue importing your file as normal. If there are issues, you may want to correct your CSV file so you import all items.
- Errors are issues that prevent us from importing a row:
- The row is missing a value in the “id” column.
- “object_id” is empty.
- The specified Person does not exist.
- The specified Object does not exist.
- Warnings are issues that do not prevent us from importing a row, but that you may want to address to make sure your data is well formed and consistent:
- Same “id” paired with multiple “email” values.
- Multiple rows have the same “email” value.
Click Preview Import to see which rows would successfully import.
You can also click Export errors file or Export warnings file to download a CSV containing the issues found. Each file contains the rows from your original CSV file that resulted in errors or warnings respectively, including 2 new columns:
- _row: contains the row number from your original file that contained an error or warning.
- _errors or _warnings: lists errors/warnings for a row.
Re-import your error CSV
You can import users directly from an error or warning CSV file after you correct the errors. Make sure you remove the “_row”, “_errors” and/or “_warnings” columns.
Export files from an import
You can export files that you uploaded, or were otherwise generated as a part of the upload process (like errors and warnings), for up to 30 days after your import. After 30 days, these files expire and are no longer available to download.

