Transactional messages
Transactional messages are email or push notifications that your audience implicitly opts-into, like a transaction receipt or a password reset request. You can send transactional messages programmatically through Customer.io.
How it works
A transactional message is a message your audience implicitly opts into, regardless of whether they’ve opted out of marketing messages or not—like purchase receipts, password reset requests, shipping updates, etc.
The Transactional API makes it easy to trigger transactional messages based on things your audience do in your app or website. You can either create a transactional template in Customer.io—a message that you’ll populate with data from an API call, or you can send your entire message body through the API.
In general, we recommend that you use the template option, because it’s easier to design a message in Customer.io, reduces the size of the payload you need to store on your end, and it makes it easy to track engagement with your transactional messages. We aggregate metrics for all messages that don’t call a specific transactional_message_id—the template you create in Customer.io—as “uncategorized messages”; so, if you send three different message bodies through our API without a transactional_message_id template, we’ll count the metrics for all three messages together.
Moving from another provider and need help? Try our Agency Partners page.
Go to our Agency Partners page, click Get Matched, and fill out the form; we’ll pair you with an agency that can help you create a transactional migration plan.
API request c->>c: generate delivery c->>a: send password reset request
Use cases
Our transactional APIs help you separate transactional and marketing messages, while still being able to see and manage both types of messages in the same platform. We don’t charge extra for this service! Common use cases for transactional messages include:
- Purchase receipts
- Registration confirmations (invites and opt-in confirmations)
- Password resets
- Trial expiration reminders
- Comment notifications
- Event reminders
- Shipping updates
- Support and feedback requests
Identifying your recipients
When you trigger a transactional message, you’ll specify an identifierThe attributes you use to add, modify, and target people. Each unique identifier value represents an individual person in your workspace. for a person—one of id, email, or cio_id (depending on the identifiers allowed by your workspace). If a person matching the id or email in your request doesn’t exist, we’ll create a new person.
Transactional Emails
Before you begin
Before you can send transactional emails you need to:
- Confirm your registration email and verify your account.
- Authenticate your sending domain. If you configured a custom SMTP server, contact us to manually authenticate your sending domain.
- Get your App API key. This is the bearer token that you’ll use when calling the transactional API. App API keys are not the same as the Tracking API keys that you use to update profiles and trigger events. CIO does not store App API keys (only a hashed version) and you can restrict App API keys to specific IP addresses for extra security.
We also recommend that you use a different, specialized domain or subdomain for transactional messages. A sending domain is the domain of the “From email address” when you send emails, and you can request that we add your transactional domain to our specialized, transactional IP pool. Email providers like Gmail monitor the sending domain for unusual behavior and spam complaints. Separating your transactional domain from your marketing domain—something like marketing.example.com and transactional.example.com—prevents your marketing messages from affecting your critical transactional messages. Learn more about domain reputation.
Create a transactional email
Try our Postman collection!
You can use our Postman collection and associated environment to get started with the Customer.io API. Our environment is based on our US endpoints; if you’re in our EU region, you’ll need to add -eu to track_api_url and app_api_url variables.
Go to the Transactional page and click Send your first message or Create message—depending on whether there are already transactional messages in your workspace.
Name your message and provide a description. These fields help your team members understand what kind of message this is (like “Password Reset Instructions”). You can also use the Name of your message instead of the
transactional_message_idwhen you send your message.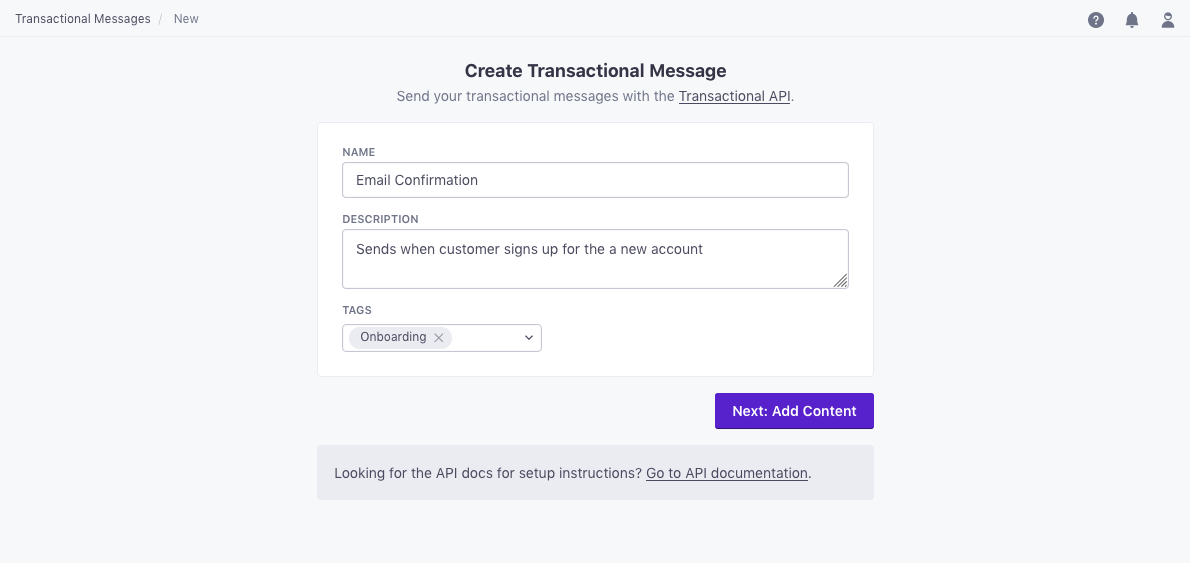
Click Add Content to create and manage your message template in Customer.io. This generates the
transactional_message_idthat you’ll refer to when you send your message.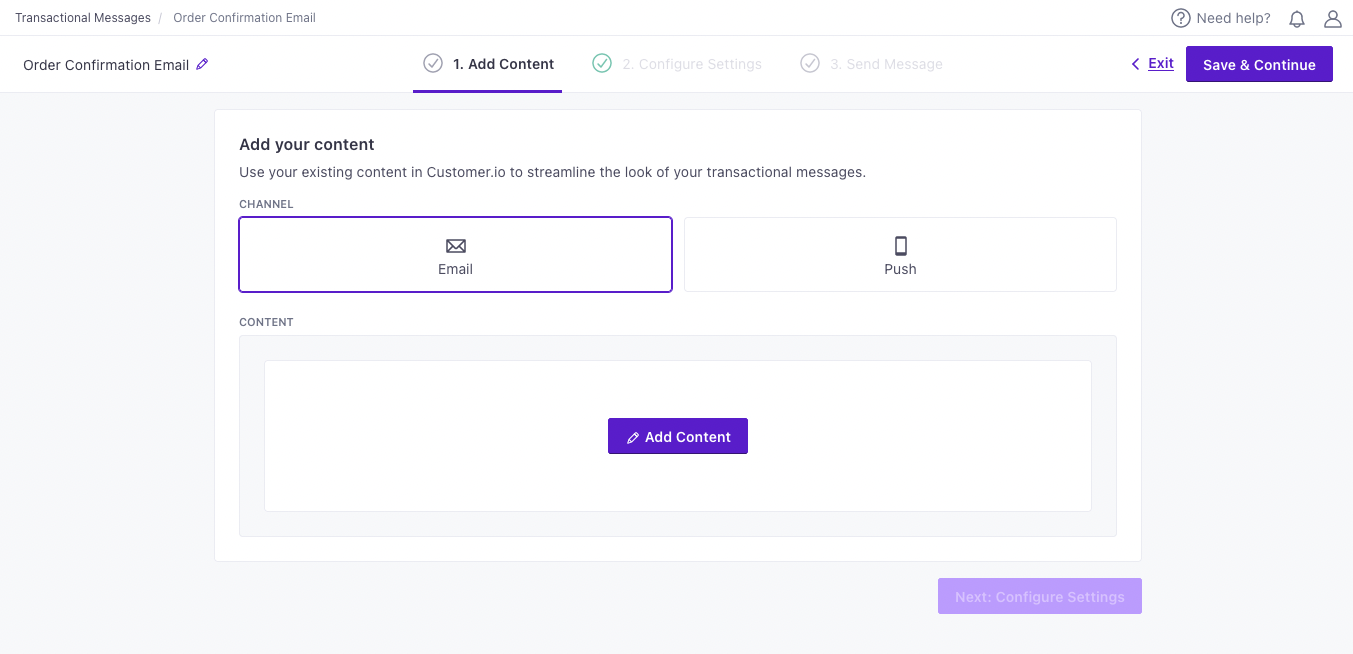
Add your content. Choose your editor, or start from an existing email. When you build your email, you can personalize messages using attributes (
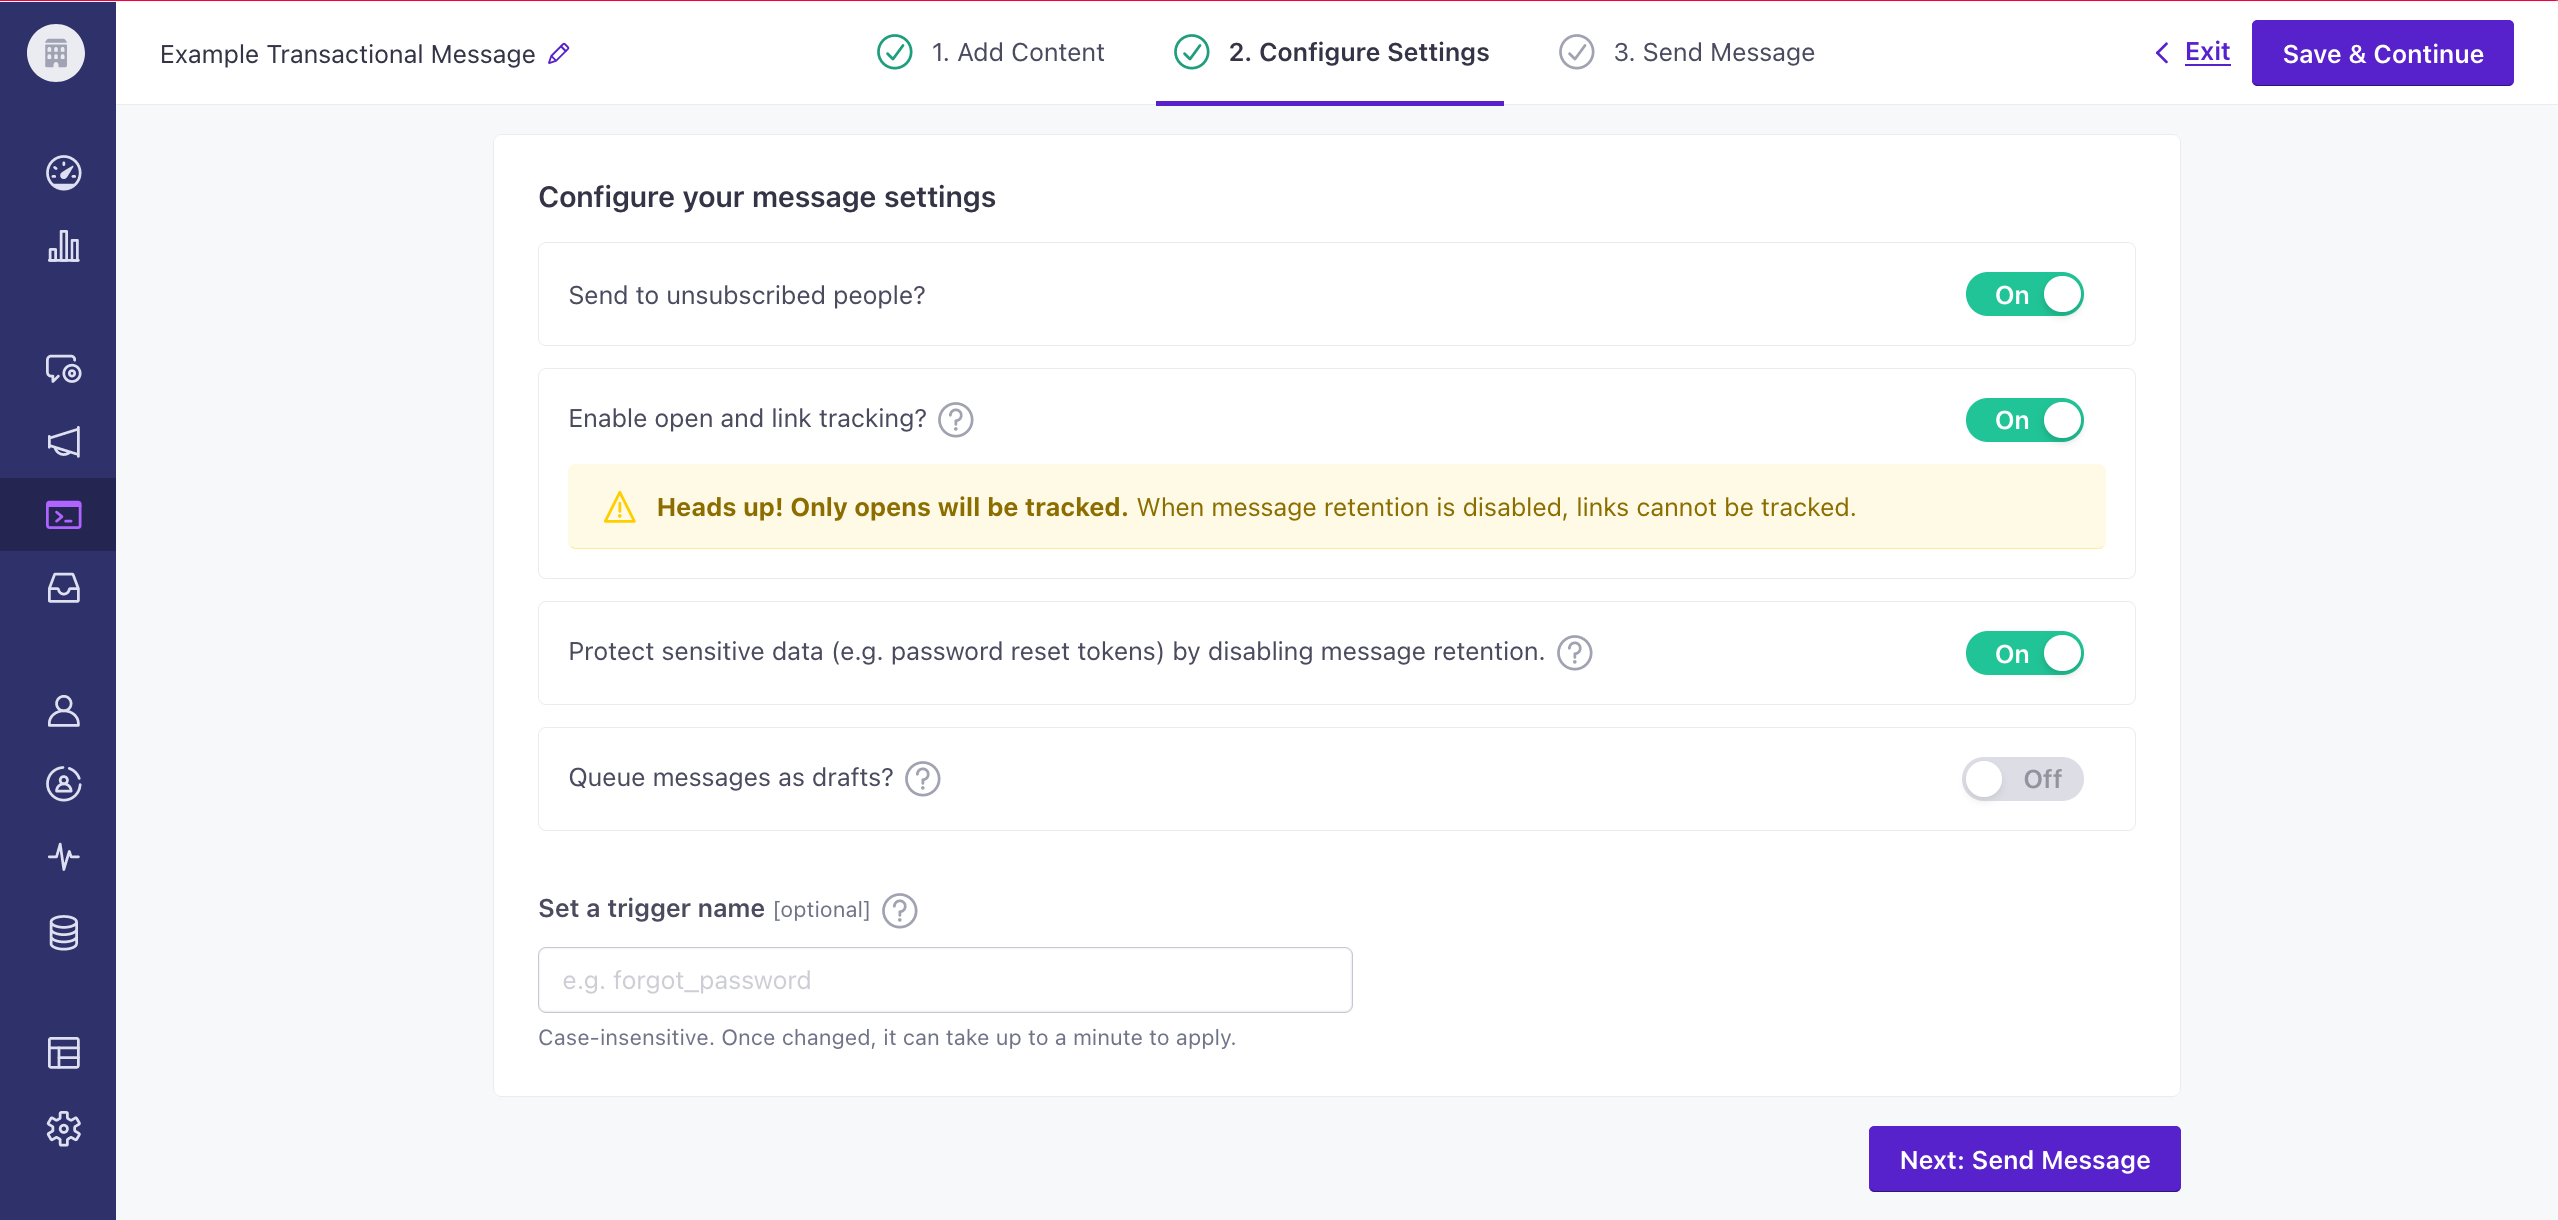
customer.<attribute>) or API trigger data (trigger.<data-object-property>) to customize your message.Configure your message settings.
Enable open and link tracking? Enable this setting if you need to know if people open or click links in your transactional messages.
Protect sensitive data by disabling message retention? This setting prevents Customer.io from retaining your message content in delivery history and associated API calls. You might want to do this to conceal sensitive content, like password reset tokens.
Queue messages as drafts? This setting generates a draft for every message you trigger, rather than sending them automatically. You can review these messages under the “Drafts” tab and decide whether to send or delete them.
Set a Trigger Name: This is a friendly name for your message that you can use instead of the
transactional_message_idwhen you send your message. It may help make your integration more human-readable if you use triggers that represent the kinds of messages you send—likepassword resetororder confirmation.
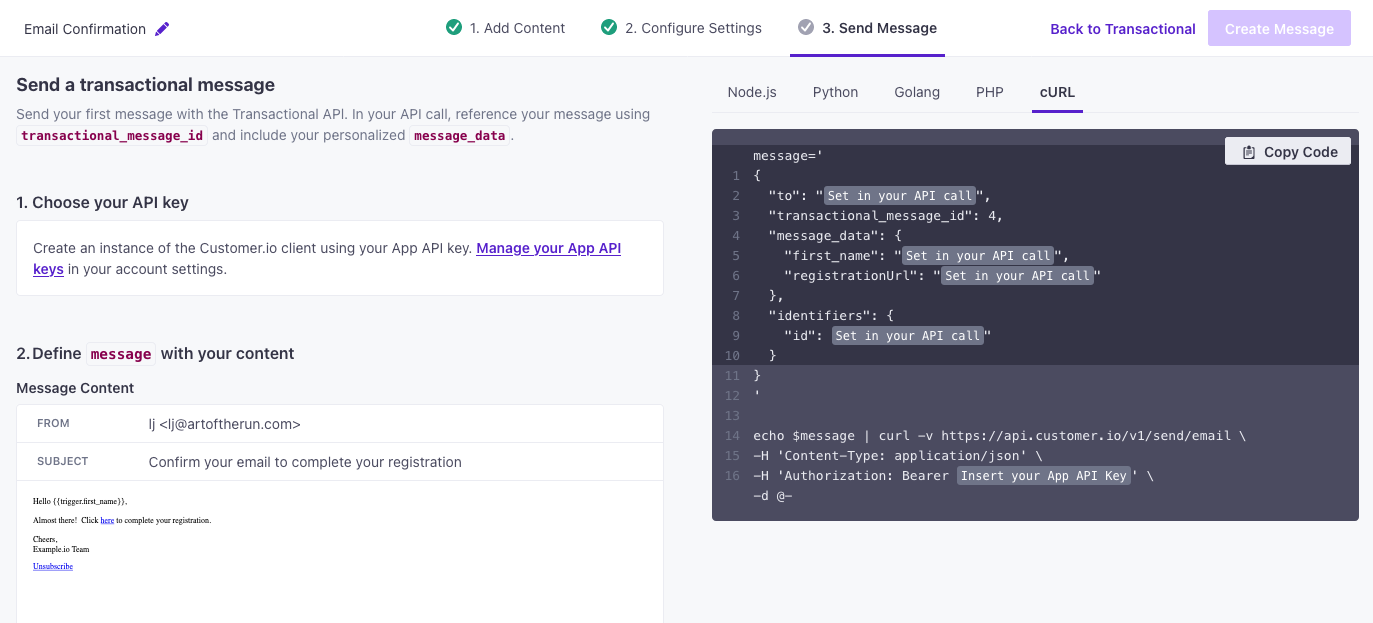
To complete the setup, you need to call the API and trigger a message. If you’re not yet ready to send a message directly from your code, you can use an HTTP client like Postman or send a cURL request from your terminal to test your message and complete the setup process.
Parameters supported by the transactional email API
This is a list of parameters for transactional message payloads. Your payload changes based on whether you reference a transactional_message_id (a template) or not. See our REST API documentation for more information.
- transactional_message_idRequired The transactional message template that you want to use for your message. You can call the template by its numerical ID or by the Trigger Name that you assigned the template (case insensitive).integerThe ID of the transactional message you want to send.
- body stringThe HTML body of your message. This overrides the body of the transactional template (referenced by
transactional_message_id). If you send an AMP-enabled email (withbody_amp), and the recipient’s email client doesn’t support AMP, this is the fallback email. - body_amp stringIf your message is an email, this is the AMP-enabled body of your message. If your recipient’s email client doesn’t support AMP, the
bodyrepresents your fallback message. - body_plain stringThe plaintext body of your message. This overrides the body of your transactional template (referenced by
transactional_message_id). - from stringThe address that your email is from. This address must be verified by Customer.io. This overrides the from address set within the transactional template (referenced by
transactional_message_id). You can include a display/friendly name in your from address, but we recommend that you use quotation marks around the friendly name to avoid potential issues with special characters, e.g.\"Person\" <person@example.com>. - language stringOverrides language preferences for the person you want to send your transactional message to. Use one of our supported two- or four-letter language codes.
- subject stringThe subject line for your message. This overrides the subject of the transactional template (referenced by
transactional_message_id). - disable_message_retention booleanIf true, the message body is not retained in delivery history. Setting this value overrides the value set in the settings of your
transactional_message_id. - identifiersRequired Identifies the person represented by your transactional message by one of, and only one of,
id,email, orcio_id.- id stringRequired The identifier for the person represented by the transactional message. NOTE: If your workspace identifies people by email, use the
emailidentifier instead.
-
- Liquid Data* any typeInsert key-values that you want to reference in your message here.
- queue_draft booleanIf true, your transactional message is held as a draft in Customer.io and not sent directly to your audience. You must go to the Deliveries and Drafts page to send your message.
- send_at integerA unix timestamp (seconds since epoch) determining when the message will be sent. The timestamp can be up to 90 days in the future. If this value is in the past, your message is sent immediately.
- send_to_unsubscribed boolean
Default:
If false, your message is not sent to unsubscribed recipients. Setting this value overrides the value set in the settings of yourtruetransactional_message_id. - attachments array of [ objects ]A dictionary of attachments where the filename is the key and the value is the base64-encoded contents. The total size of all attachments must be less than 2 MB. Some filetype extensions are restricted.
- bcc stringBlind copy message recipients. Supports multiple addresses separated by commas. Your request can contain up to 15 total recipients between the
toandbcckeys. - body_plain stringBy default, we generate a plaintext version of your message body for each delivery. Use this key to override the default plain text body.
- disable_css_preprocessing booleanSet to
trueto disable CSS preprocessing. This setting overrides the CSS preprocessing setting on thetransactional_message_idas set in the user interface. Transactional emails have CSS preprocessing enabled by default. - fake_bcc booleanIf true, rather than sending true copies to BCC addresses, Customer.io sends a copy of the message with the subject line containing the recipient address(es).
-
- name stringname of header
- value stringvalue of header
- preheader stringAlso known as “preview text”, this is the block block of text that users see next to, or underneath, the subject line in their inbox.
- reply_to stringThe address that recipients can reply to, if different from the
fromaddress. - to string
The message recipient(s). Supports multiple addresses separated by commas. Your request can contain up to 15 total recipients between the
toandbcckeys.You can include a display or “friendly” name in “to” address, but we recommend that you use quotation marks around the friendly name to avoid potential issues with special characters, e.g.
\"Person\" <person@example.com>. - tracked boolean
Default:
If true, Customer.io tracks opens and link clicks in your message.true
Update the content of your email
You can update the contents of your message through our user interface or API.
We’ve exposed an API endpoint so you can manage your message contents programmatically. This request takes a body, which represents the complete HTML content of your message.
You’ll reference the message you want to update by transactional_id and content_id. You can find both in the URL when you look at the content of a message in the format https://fly.customer.io/journeys/env/last/composer/transactional/:transactional_message_id/templates/:content_id. For example, if I look at a transactional message with this URL: https://fly.customer.io/journeys/env/last/composer/transactional/3/templates/139, then the transactional_id is 3 and where the content_id is 139.
curl --request PUT \
  --url https://api.customer.io/v1/transactional/{transactional_id}/content/{content_id} \
  --header 'Authorization: Bearer REPLACE_BEARER_TOKEN' \
  --header 'content-type: application/json' \
  --data '{"body":"string"}'
It can take a few minutes for us to process changes to your snippet.
This means your customers may receive outdated content if, for instance, your campaign is active, you update a snippet in an email, then 30 seconds later we send that email. This could also happen if the message is at the beginning of your workflow, you update a snippet in the message, then immediately activate a campaign or trigger a broadcast, newsletter, or transactional message that contains it.
Transactional push notifications
Before you begin
Before you can send transactional push notifications you need to:
- Enable Push Notifications in your workspace for Android and/or iOS.
- Set up your app to receive push notifications from Customer.io. We strongly recommend that you use our SDKs. If this isn’t an option, you can follow the instructions here to configure push without our SDKs.
Create a transactional push notification
Try our Postman collection!
You can use our Postman collection and associated environment to get started with the Customer.io API. Our environment is based on our US endpoints; if you’re in our EU region, you’ll need to add -eu to track_api_url and app_api_url variables.
Go to the Transactional page and click Send your first message or Create message—depending on whether there are already transactional messages in your workspace.
Name your message and provide a description. These fields help your team members understand what kind of message this is (like “Password Reset Instructions”). You can also use the Name of your message instead of the
transactional_message_idwhen you send your message.Click Next: Add Content to go to the next step. Select Push to create a transactional push notification.
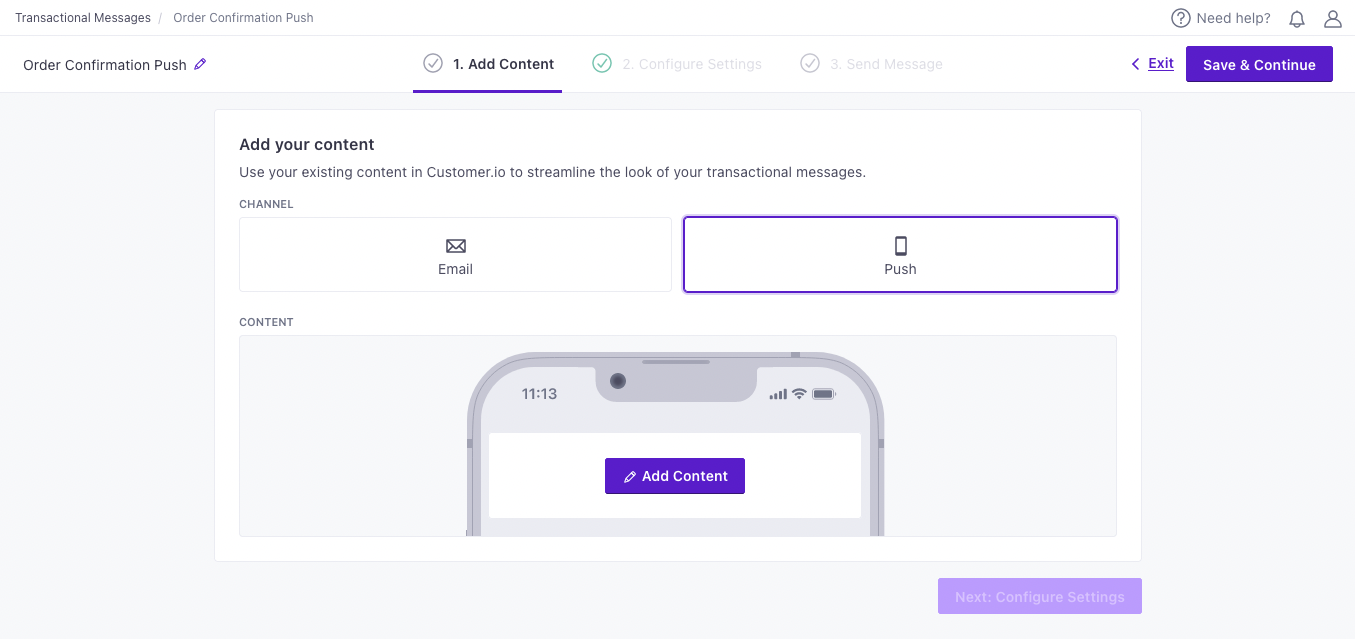
Click Add Content and compose your push notification. Add images, deeplinks and custom data through the editor, or provide these values in the API request. You can also use attributes (
customer.<attribute>) or API trigger data (trigger.<data-object-property>) to customize your message.Need to track personalized links?
Add the
data-cio-tagattribute to your links. This lets you track different individualized links in the same category, so you can gather useful metrics about clicks to things like personalized product recommendations, password reset links, customer dashboards, etc. Thedata-cio-tagtakes a string representing the “group” you want to track—<a href="http://mydomain.com?token=123abc" data-cio-tag="YOUR-LINK-GROUP-NAME">CLICK HERE</a>Configure your message settings.
Send to unsubscribed people? Unsubscribed people usually still want to receive your important transactional messages.
Protect sensitive data by disabling message retention? This setting prevents Customer.io from retaining your message content in delivery history and associated API calls. You might want to do this to conceal sensitive content, like password reset tokens.
Queue messages as drafts? This setting generates a draft for every message you trigger, rather than sending them automatically. You can review these messages under the “Drafts” tab and decide whether to send or delete them.
Set a Trigger Name: This is a friendly name for your message that you can use instead of the
transactional_message_idwhen you send your message. It may help make your integration more human-readable if you use triggers that represent the kinds of messages you send—likepassword resetororder confirmation.
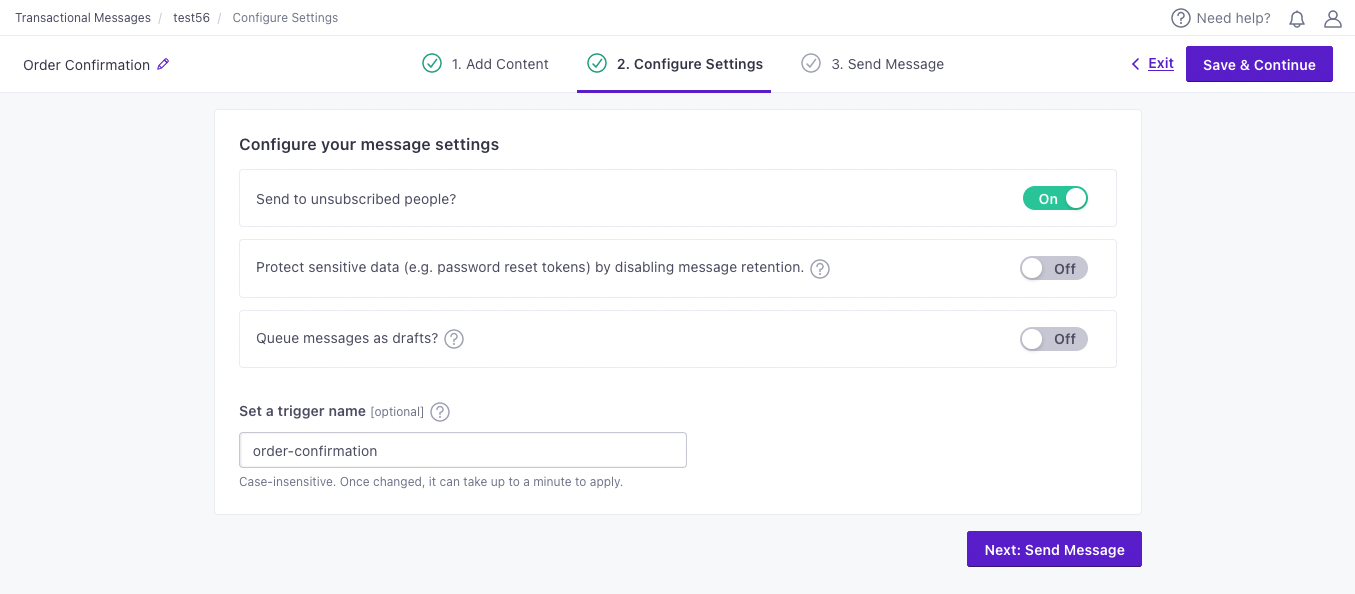
To complete the setup, you need to call the API and trigger a message. If you’re not yet ready to send a message directly from your code, you can use an HTTP client like Postman or send a cURL request from your terminal to test your message and complete the setup process.
It can take a few minutes for us to process changes to your snippet.
This means your customers may receive outdated content if, for instance, your campaign is active, you update a snippet in an email, then 30 seconds later we send that email. This could also happen if the message is at the beginning of your workflow, you update a snippet in the message, then immediately activate a campaign or trigger a broadcast, newsletter, or transactional message that contains it.
Parameters supported by the transactional push API
This is a list of parameters for transactional message payloads. Your payload changes based on whether you reference a transactional_message_id (a template) or not. See our REST API documentation for more information.
- transactional_message_idRequired The transactional message template that you want to use for your message. You can call the template by its numerical ID or by the Trigger Name that you assigned the template (case insensitive).integerThe ID of the transactional message you want to send.
-
- token stringRequired The device token.
-
- _last_status stringThe delivery status of the last message sent to the device—sent, bounced, or suppressed. An empty string indicates that that the device hasn’t received a push yet.
Accepted values:
,bounced,sent,suppressed - app_version stringThe version of your app that a customer uses. You might target app versions to let people know when they need to update, or expose them to new features when they do.
- cio_sdk_version stringThe version of the Customer.io SDK in the app.
- device_locale stringThe four-letter IETF language code for the device. For example,
en-MX(indicating an app in Spanish formatted for a user in Mexico) ores-ES(indicating an app in Spanish formatted for a user in Spain). - device_model stringThe model of the device a person uses.
- device_os stringThe operating system, including the version, on the device.
- push_enabled stringIf
"true", the device is opted-in and can receive push notifications.Accepted values:
true,false - Custom Device Attributes* stringCustom properties that you want to associate with the device.
- last_used integer (unix timestamp)The
timestampwhen you last identified this device. If you don’t pass a timestamp when you add or update a device, we use the time of the request itself. Our SDKs identify a device when a person launches their app. - platform stringRequired The device/messaging platform.
Accepted values:
ios,android
-
-
-
-
-
- body_loc_arg stringVariable string values used in place of the format specifiers in
body_loc_keyto localize the body text to the user’s current localization. See Formatting and Styling for more information. - body_loc_key stringThe key to the body string in the app’s string resources that you want to use to localize the body text to the user’s current localization. See String Resources for more information.
- click_action stringThe action that occurs when a user taps on the notification. Launches an activity with a matching intent filter when a person taps the notification.
- color stringThe notification’s icon color in
#rrggbbformat. - icon stringSets the notification icon to
myiconfor drawable resourcemyicon. If you don’t send this key, FCM displays the launcher icon from your app manifest. - sound stringThe sound that plays when the device receives the notification. Supports
"default"or the filename of a sound resource bundled in your app. Sound files must reside in/res/raw/. - tag string
Identifier to replace existing notifications in the notification drawer. If empty, each request creates a new notification.
If you specify a tag, and a notification with the same tag is already being shown, the new notification replaces the existing one in the notification drawer.
- title_loc_arg stringVariable string values used in place of the format specifiers in
title_loc_keyto localize the title text to the user’s current localization. See Formatting and Styling for more information. - title_loc_key stringThe key to the title string in the app’s string resources that you want to use to localize the title text to the user’s current localization. See String Resources for more information.
-
-
- body stringThe body of your push notification.
- title stringThe title of your push notification.
-
-
- iosYour payload changes depending on whether you send to iOS devices through Google’s Firebase Cloud Messaging (FCM) or Apple’s Push Notification service (APNs).
-
-
-
-
-
- body stringThe body of your push notification.
- image stringThe URL of an HTTPS image that you want to use for your message.
- link stringA deep link (to a page in your app), or a link to a web page.
- title stringThe title of your push notification.
-
-
- alertstringA simple alert message.
- badge integerThe number you want to display on your app’s icon. Set to 0 to remove the current badge, if any.
- category stringThe notification’s type. This string must correspond to the identifier of one of the
UNNotificationCategoryobjects you register at launch time. - content-available integerThe background notification flag. Use
1without analertto perform a silent update.0indicates a normal push notification. - interruption-level stringIndicates the importance and delivery timing of a notification.
Accepted values:
passive,active,time-sensitive,critical - mutable-content integerIf you use the Customer.io SDK, you must set this value to
1to support images and “delivered” metrics from your push notifications. When the value is 1, your notification is passed to your notification service app extension before delivery. Use your extension to modify the notification’s content. - relevance-score numberA number between 0 and 1. The highest score is considered the “most relevant” and is featured in the notification summary.
- soundstringThe name of a sound file in your app’s main bundle or in the Library/Sounds folder of your app’s container directory. Use “default” to play the system sound. For critical alerts, you’ll pass an object instead.
- target-content-id stringThe identifier of the window brought forward.
- thread-id stringAn identifier to group related notifications.
- Custom key-value pairs* any typeAdditional properties that you've set up your app to interpret outside of the Customer.io SDK.
-
-
-
-
- image_url stringAn image URL to show in the push. This overrides Image from the transactional template (referenced by
transactional_message_id). - language stringOverrides language preferences for the person you want to send your transactional message to. Use one of our supported two- or four-letter language codes.
- link stringA deep link to open when the push is tapped. This overrides Link from the transactional template (referenced by
transactional_message_id). - message stringThe message body for your notification. This overrides the notification body of the transactional template (referenced by
transactional_message_id). - sound string
Default:
For iOS Only: your notification can alert users with the device’s default notification sound or play no sound at all.defaultAccepted values:
default,none - title stringThe title for your notification. This overrides the title of the transactional template (referenced by
transactional_message_id). - to string
Default:
The person’s device(s) you want to send this push to. One ofallall,last_used, or a custom device token which belongs to the profile from the Identifiers block. Defaults to ‘all’. This overrides To from the transactional template (referenced bytransactional_message_id).Accepted values:
all,last_used,$device_token - disable_message_retention booleanIf true, the message body is not retained in delivery history. Setting this value overrides the value set in the settings of your
transactional_message_id. - identifiersRequired Identifies the person represented by your transactional message by one of, and only one of,
id,email, orcio_id.- id stringRequired The identifier for the person represented by the transactional message. NOTE: If your workspace identifies people by email, use the
emailidentifier instead.
-
- Liquid Data* any typeInsert key-values that you want to reference in your message here.
- queue_draft booleanIf true, your transactional message is held as a draft in Customer.io and not sent directly to your audience. You must go to the Deliveries and Drafts page to send your message.
- send_at integerA unix timestamp (seconds since epoch) determining when the message will be sent. The timestamp can be up to 90 days in the future. If this value is in the past, your message is sent immediately.
- send_to_unsubscribed boolean
Default:
If false, your message is not sent to unsubscribed recipients. Setting this value overrides the value set in the settings of yourtruetransactional_message_id.
Localize a transactional message
When you add content to your message, you can click Add language to select the languages you want to support. Then you can populate your languages, and we’ll automatically send your audience the language matching their language attributeA key-value pair that you associate with a person or an object—like a person’s name, the date they were created in your workspace, or a company’s billing date etc. Use attributes to target people and personalize messages. Attributes are analogous to traits in Data Pipelines..
You can override languages when you send your message
If you don’t manage your audience’s language preferences in Customer.io, or you need to override your audience’s language preference for any reason, you can set a language property in your transactional message request. Learn more
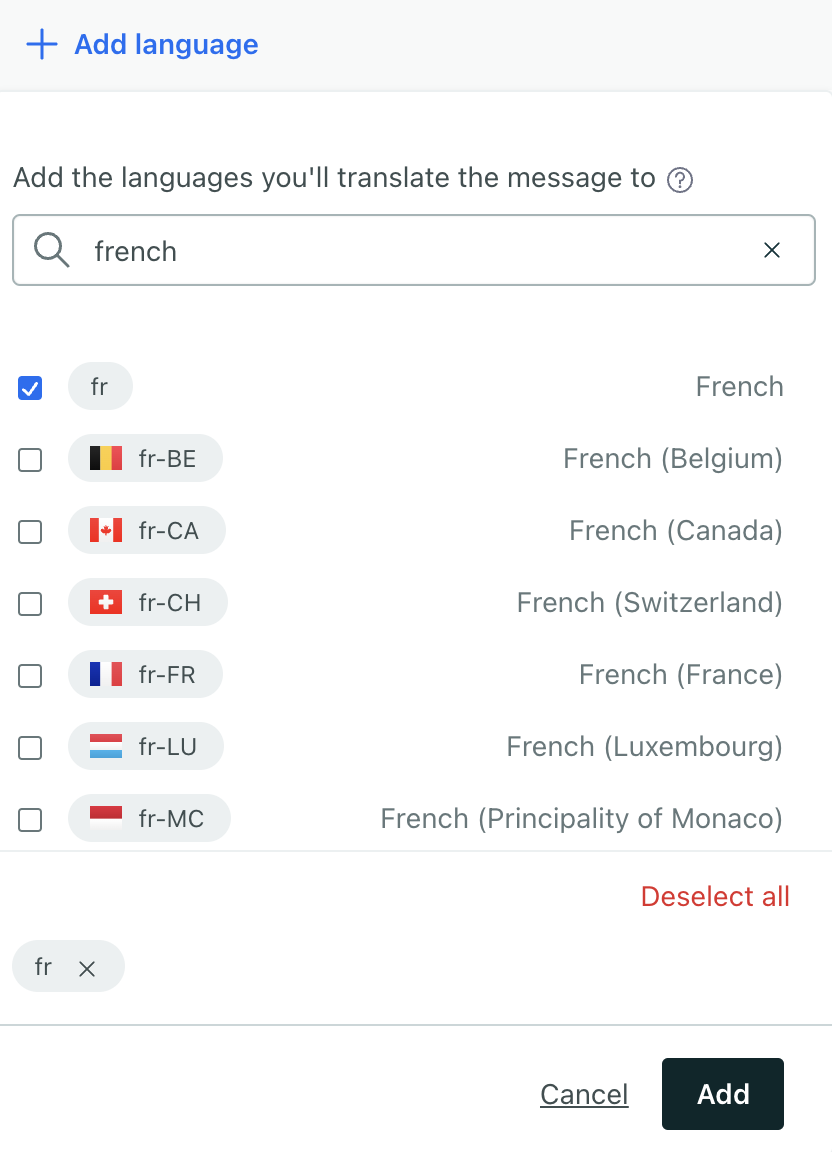
To take advantage of our localization feature, you must have set up an attribute to capture your audience’s language preference. See our localization section for more information about setting up multi-language messages.
When you send your message, we’ll match your audience’s language attributeA key-value pair that you associate with a person or an object—like a person’s name, the date they were created in your workspace, or a company’s billing date etc. Use attributes to target people and personalize messages. Attributes are analogous to traits in Data Pipelines.—their preferred language—with the languages in your transactional message. If a person’s language attribute matches a language in your transactional message, we’ll send them the appropriate language. If their language attribute does not match a language in your template, they’ll receive the default message.
a transaction] --> B[Send transactional
api call] B --> D{Does a person's language
attribute match a message?} D -->|no| H[Person gets
default message] D -->|yes, lang=es| E[Person gets
Spanish message] D -->|yes, lang=fr| F[Person gets
French message] D -->|yes, lang=de| G[Person gets
German message]
Override your audience’s language
If you don’t manage your audience’s language preferences in Customer.io, or you need to override your audience’s language preference for any reason, you can set a language property in your transactional message request. This value represents the language variant that you want to send to the recipient.
If the language doesn’t match one of your message’s languages, we’ll use the recipient’s language attributeA key-value pair that you associate with a person or an object—like a person’s name, the date they were created in your workspace, or a company’s billing date etc. Use attributes to target people and personalize messages. Attributes are analogous to traits in Data Pipelines.. If the language doesn’t match one of your message’s languages, and your audience doesn’t have a language attribute that matches one of your message’s languages, we’ll send the default message.
| |
Copy transactional messages to another workspace
You can copy a transactional email to another workspace to save yourself time creating similar messages.
Go to Transactional in the left hand navigation to get started. Filter or scroll to find the transactional message you want to copy. Then select the three dots to the right of the message and click Copy to.
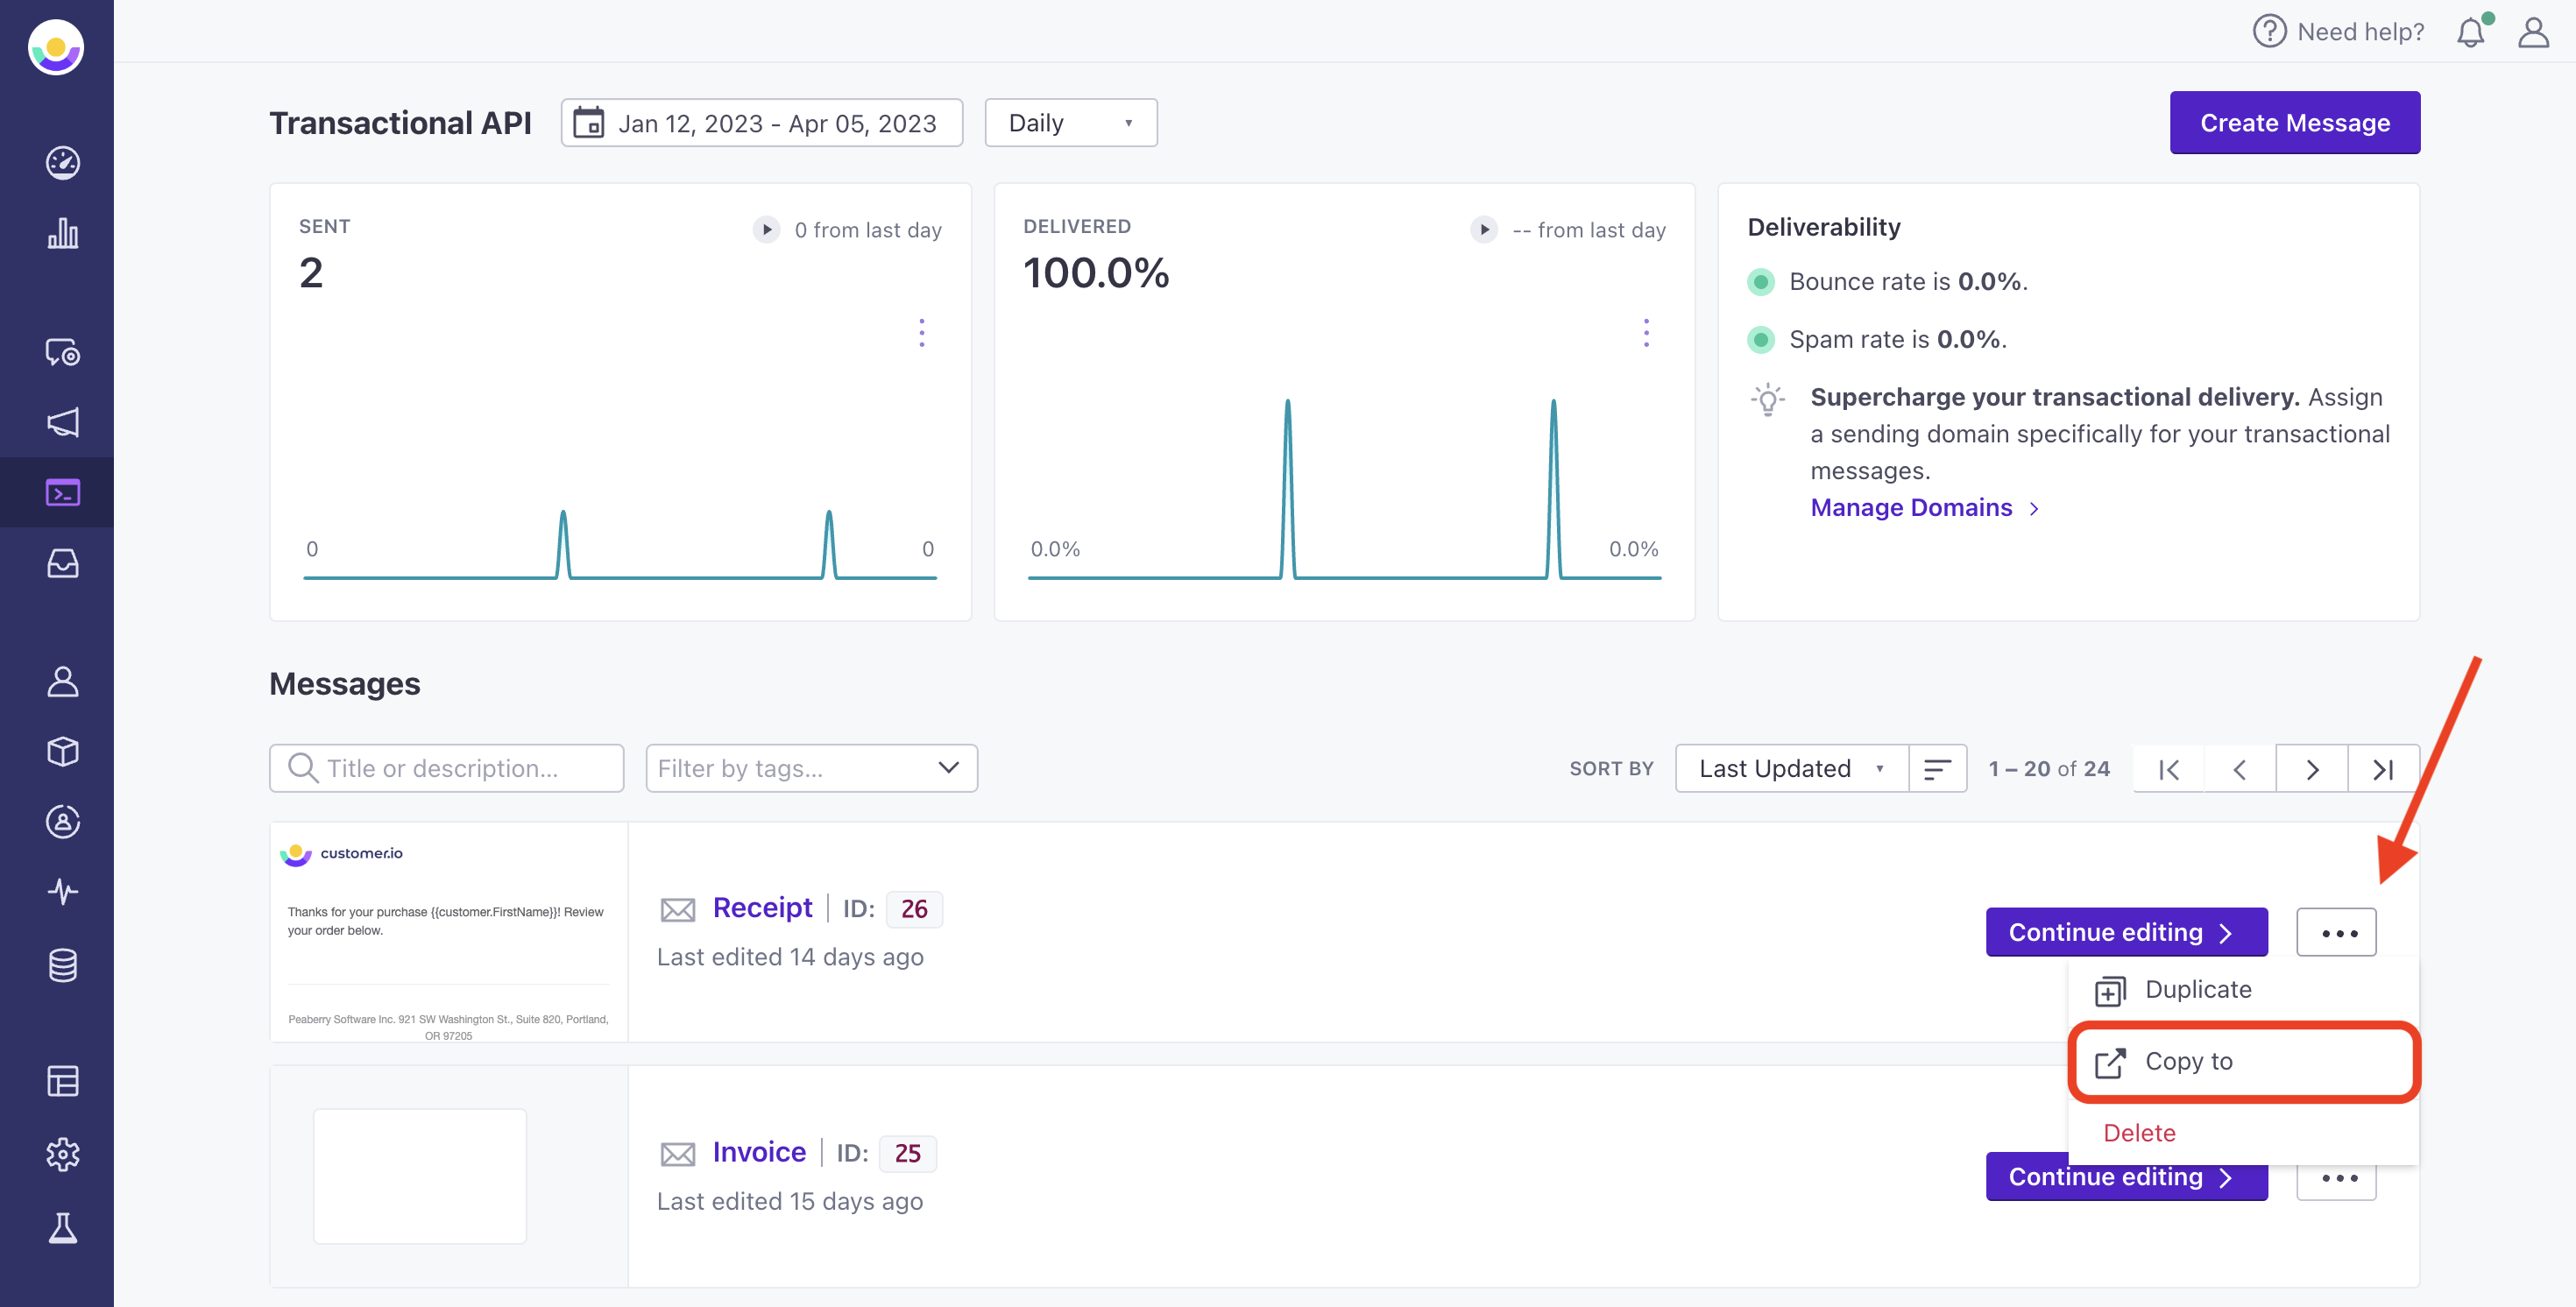
On the modal, select the workspace you want to copy your items to then click Continue.
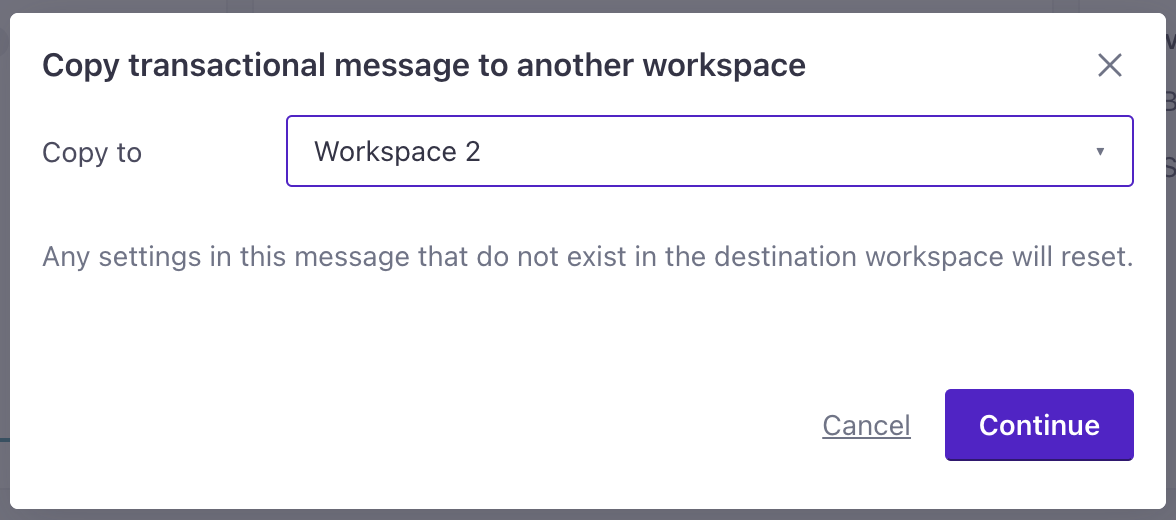
Note that when you copy transactional messages, we’ll reset settings that don’t exist in the destination workspace—like layout, audience, etc. You should also check your liquidA syntax that supports variables, letting you personalize messages for your audience. For example, if you want to reference a person’s first name, you might use the variable {{customer.first_name}}. syntax in your destination workspace. You may not have the same attributes or other variables in your destination, so you may need to update liquid statements to make sure that your messages render and send properly.

