Subscription center
A subscription center helps you differentiate between the different types of messages you send and lets your audience decide what kinds of campaigns and messages they want to receive.
If your looking for information on global subscriptions or the unsubscribed attribute, check out our overview on subscription options.
How it works
Out-of-the-box, you can manage whether your customers receive email, SMS, and push through our global unsubscribe functionality. You can also set up subscription topics to give your customers more control over what kinds of messages they receive. This is where the subscription center comes in.
This is how it works:
- In Workspace Settings > Subscription Center, you add one or more topicsA category of message, set within your workspace’s subscription center, that people can subscribe to or unsubscribe from. Topics let your audience determine the kinds of messages they want to get from you. and decide whether people are automatically subscribed or unsubscribed from them.
- Then you assign a subscription preference in campaign, broadcast, and message-level settings to target the appropriate audience.
- Next, you add our subscription links to your messages so your recipients can opt in or out of topics.
{% unsubscribe %}and{% unsubscribe_url %}generate links to pages that ask a person to unsubscribe from the topic of the message. This page also links to their subscription preferences page where they can manage all topics and unsubscribe globally.{% manage_subscription_preferences_url %}generates a link right to the subscription preferences page.
- When people update their subscription preferences, we’ll save them. This will influence the messages people receive from your campaigns and broadcasts moving forward.
- If they globally unsubscribe, they’ll stop receiving emails, SMS, and push notifications.
- If they unsubscribe from a topic, they’ll stop receiving emails, SMS, and push notifications for that topic.
Subscription preference settings do not filter customers out of campaigns or broadcasts.
If a person meets trigger and filter criteria for a campaign or broadcast, they will begin a journey regardless of their subscription preferences. If they opted out of the subscription topic assigned in settings, they will not, however, receive email, SMS, or push notifications. Subscription preference settings only apply to message sending, not starting/stopping a journey or other actions in a workflow.
campaign trigger
and filter]-->b[person moves through
campaign until they
get to an email, SMS,
or push notification] b-->c{is
unsubscribed true?}
c-.->|yes|f[person does notreceive email, SMS, or push] c-->|no|d{is the person
subscribed to the topic?} d-->|yes|e[person receives
email, SMS, or push] d-.->|no|h[person does not
receive email, SMS, or push]
To learn how unsubscribes work for all message types, check out our overview on subscription options.
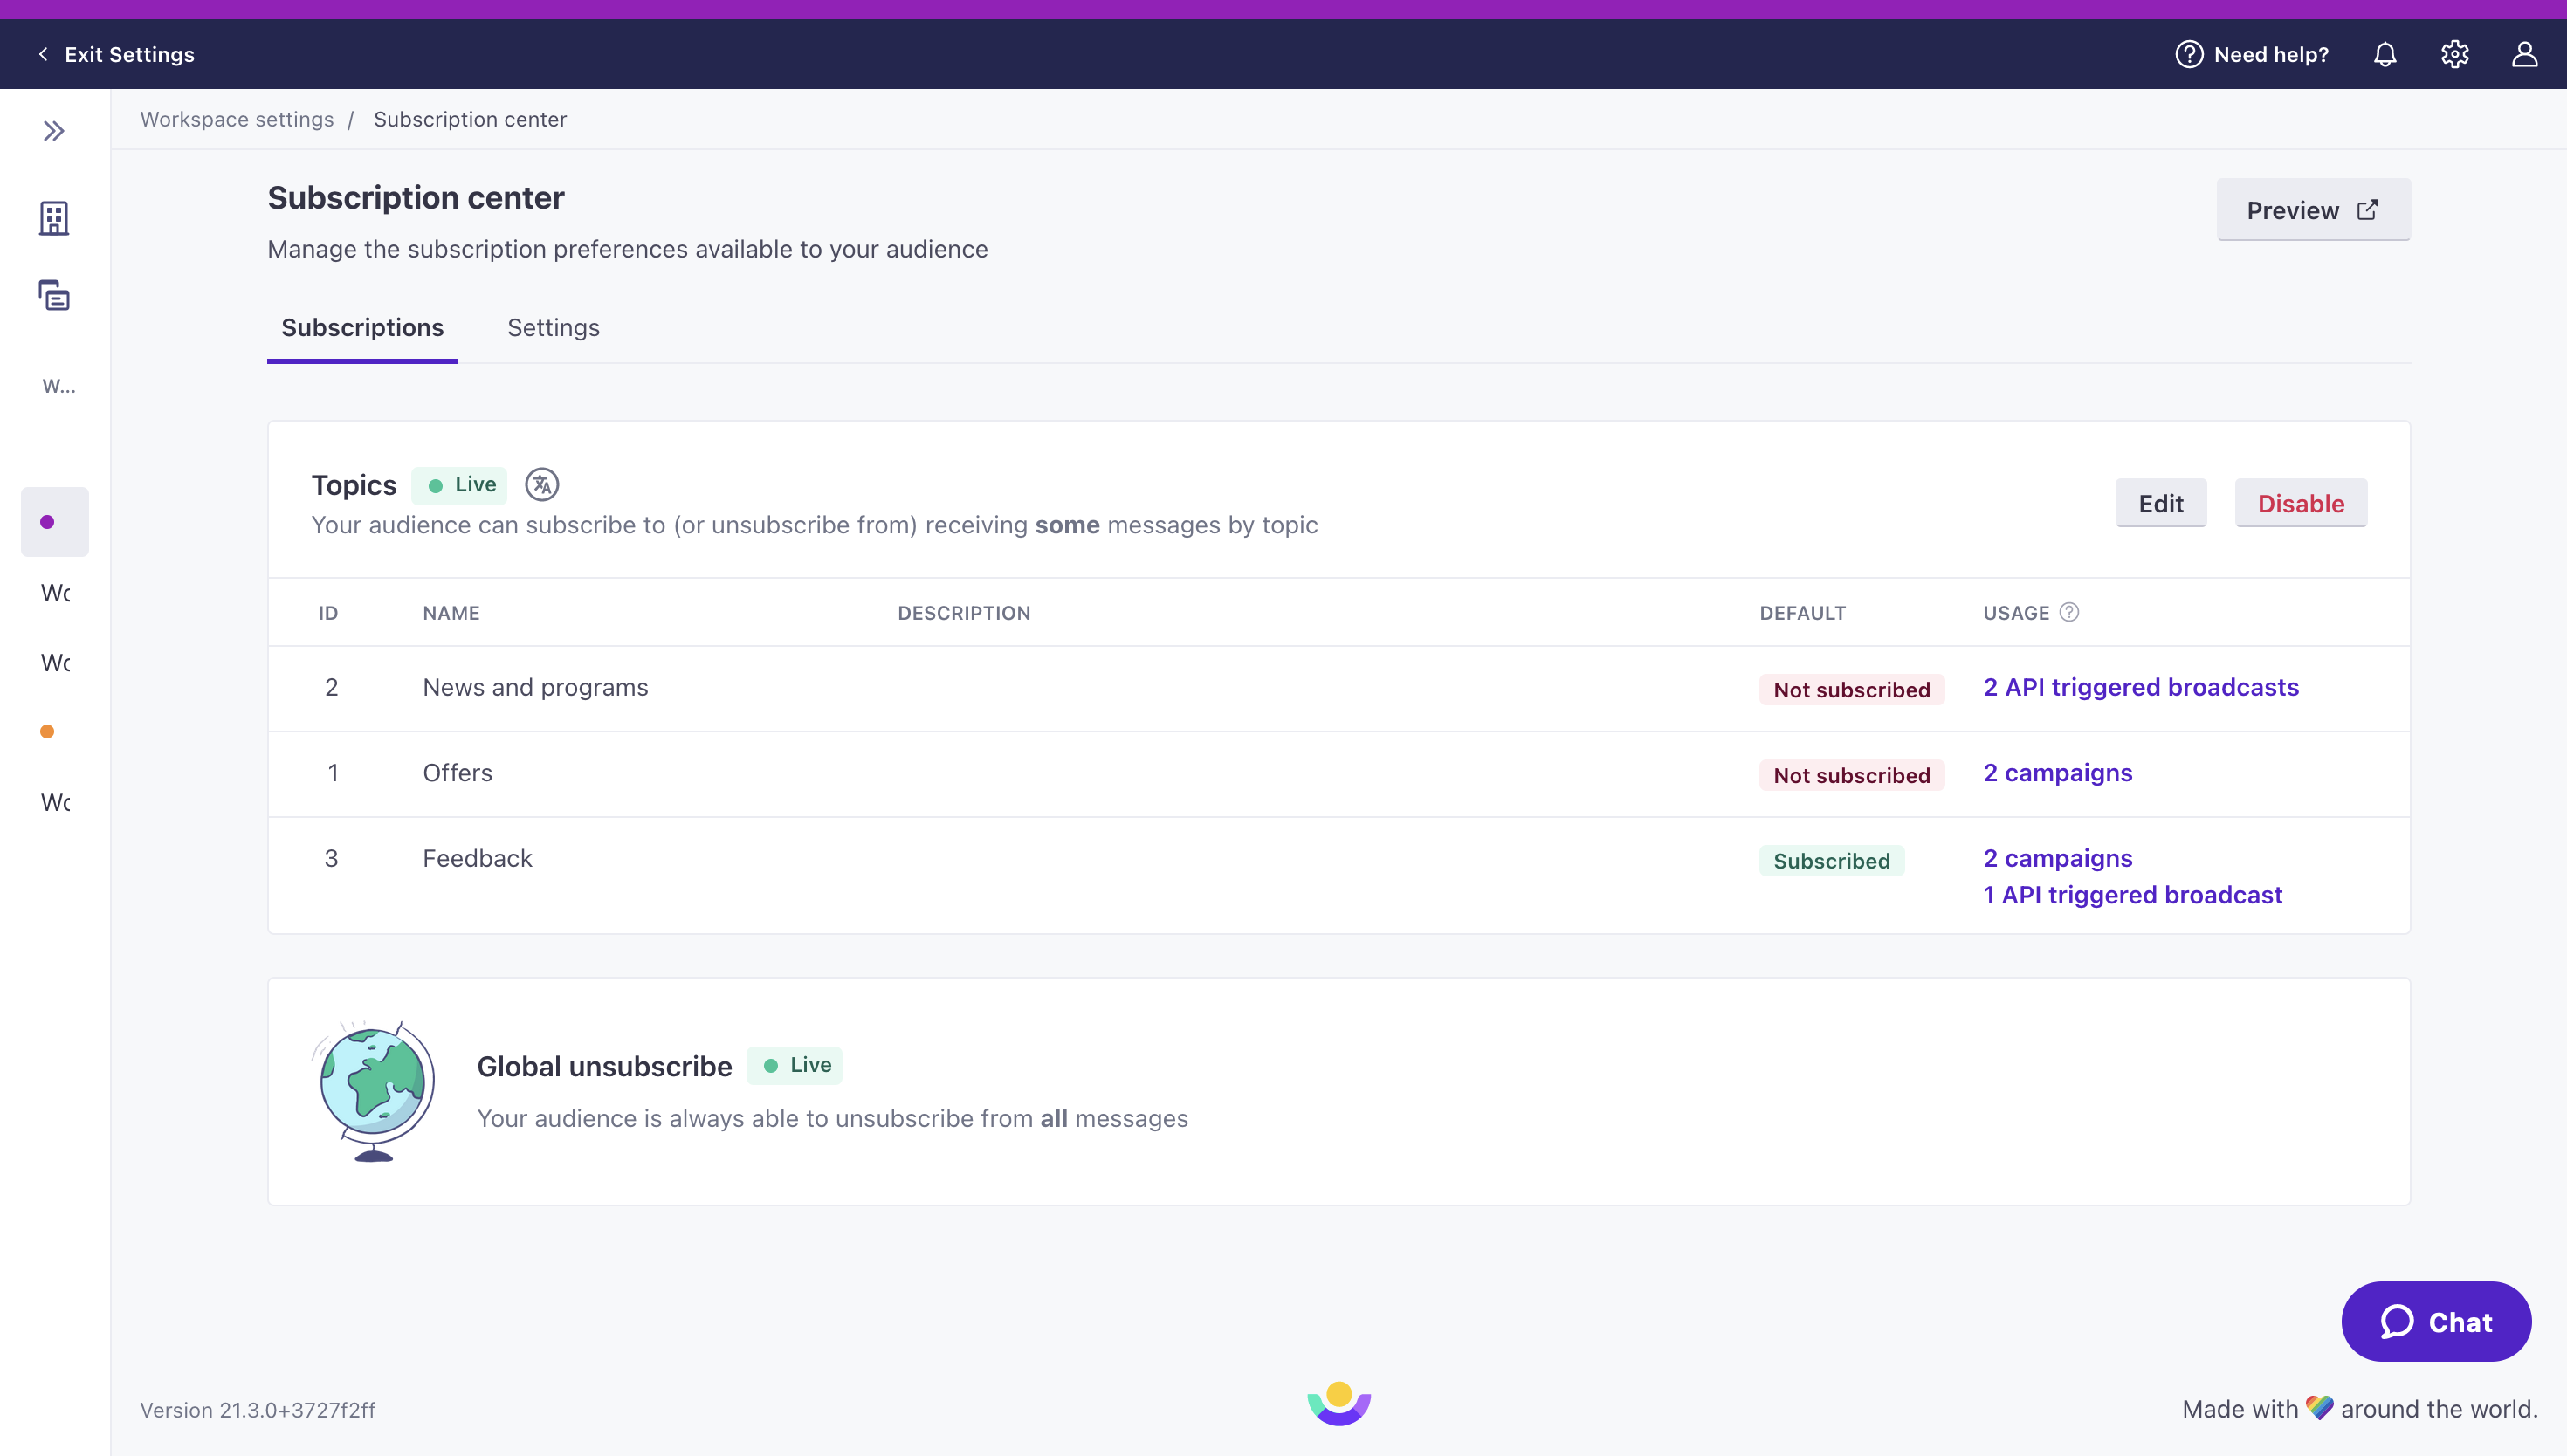
Default subscription status
When you create topics, you decide whether people are automatically opted in or opted out of a topic. You can always check your subscription center in workspace settings to remind yourself of the default status of each topic:
Default status options:
- Not subscribed: people must explicitly subscribe before they’ll receive messages for this topic
- Subscribed: people receive messages by default and must unsubscribe if they don’t want messages from this topic
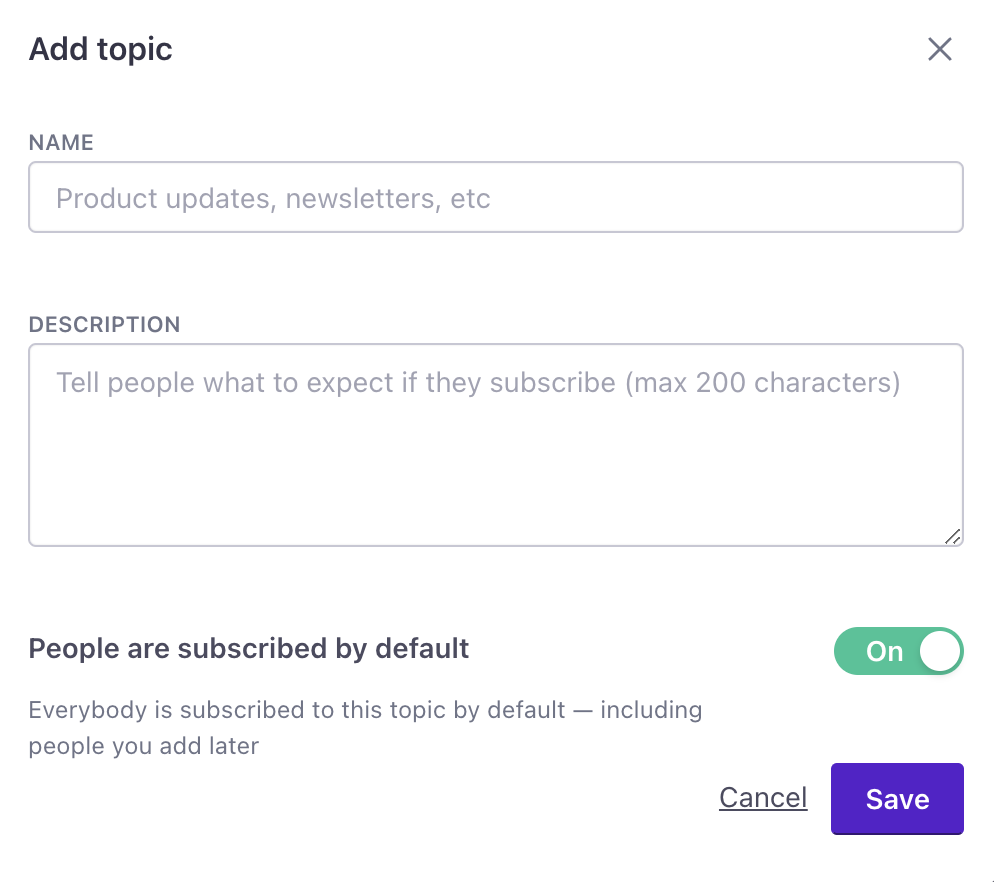
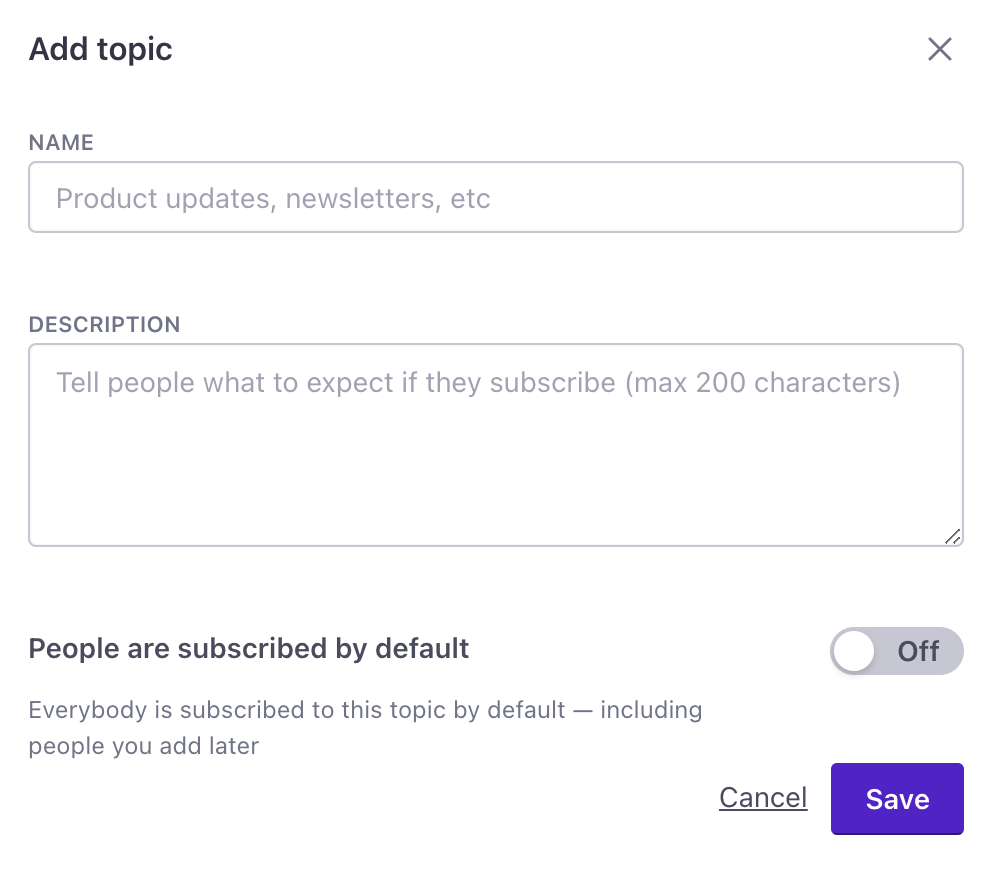
You can change the default setting only when first creating the topic. Toggle People are subscribed by default on or off depending on your needs. If you enable the setting, people are Subscribed and will receive messages related to this topic. If you disable this setting, people are Not subscribed and will not receive messages for the topic unless they subscribe.
| People will receive messages until they unsubscribe | People won't receive messages until they subscribe |
|---|---|
 |  |
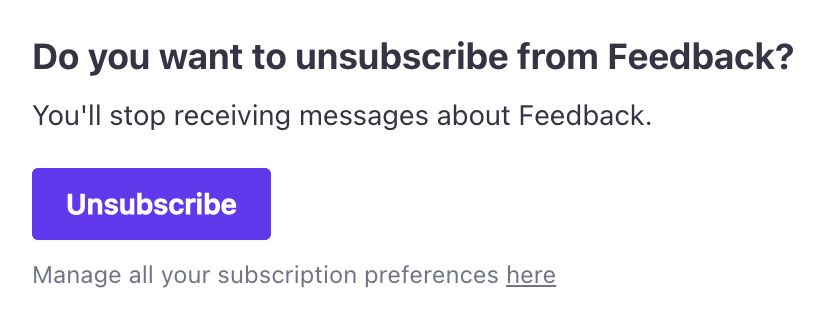
What people see when they click Unsubscribe
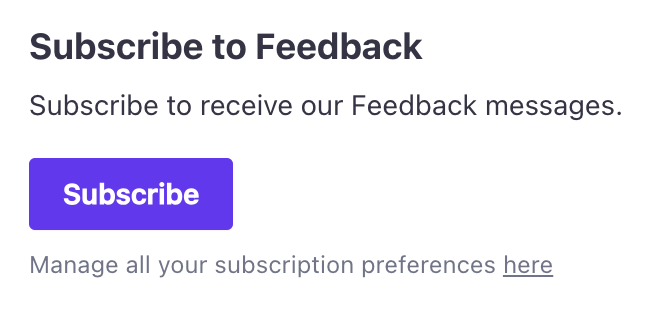
After you enable subscription center topics, the unsubscribe links in your emails will send people to a page where they can unsubscribe from the message’s topic, not all messages. From there, they can go to the subscription preferences page and subscribe to, or unsubscribe from, any topic.
| When people click unsubscribe, they can unsubscribe from the topic: | When people click "here" to manage preferences, they can check/uncheck their preferences: |
|---|---|
 | 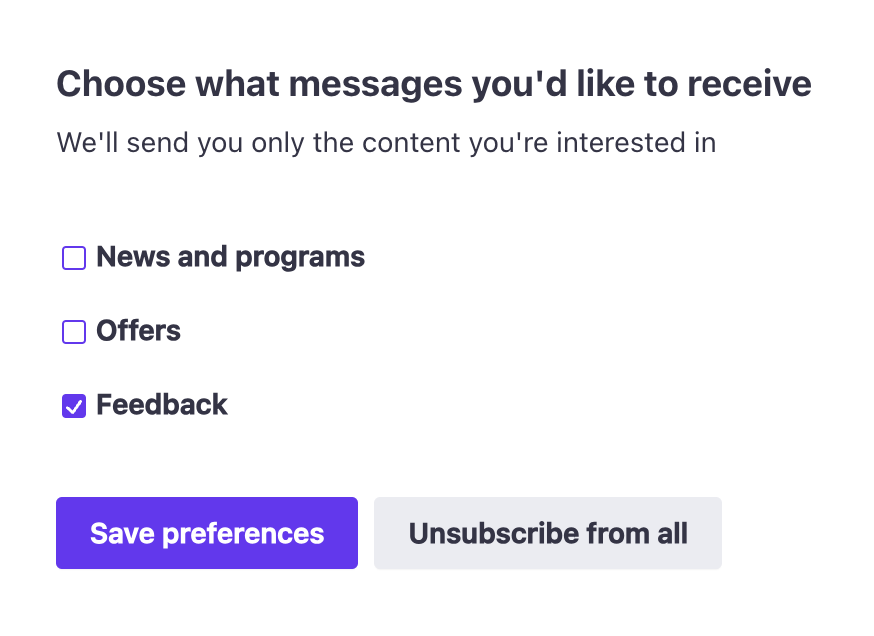 |
unsubscribe
in email] a-.->|person clicks
unsubscribe|c[person is
unsubscribed from topic] a-->|person clicks here
and goes to
subscription center|d{Subscription preferences
page} d-.->|person clicks
Save Preferences|f[person's subscription
preferences are updated] d-.->|person clicks
Unsubscribe from all|g[Person is globally
unsubscribed from email, SMS, and push]
If you use {% unsubscribe %} or {% unsubscribe_url %} as your unsubscribe links, a person will follow this flow. You can also link people directly to your subscription preferences page using {% manage_subscription_preferences_url %}. Considering the example above, they would bypass the first page and go straight to the second.
You can preview the subscription preferences page in Workspace Settings > Subscription Center by clicking Preview.
Set up your subscription center
To take advantage of the subscription center, you must determine the topic or Audience for running campaigns and broadcasts; you can’t enable topics until you’ve applied the Audience setting to active workflows.
Before you enable topics:
- Customize your subscription center language.
- Add topics.
- Change the header text and description as you see fit.
- Add branding to your subscription preferences page
- Apply topics to your campaigns and broadcasts.
Map out your topics before you start
You need to apply topics to campaigns and broadcasts before you can enable the subscription center. It may help to map out and/or tag campaigns and broadcasts before you create topics to help you get a handle on the topics you want to create and the things they apply to.
- Translate your topics and other custom copy to fit your audiences’ needs.
- (Optional) Backfill your audience’s subscription preferences using the
cio_subscription_preferencesattribute. - Enable subscription center topics.
Add topics and custom headers
When you add a topic, you can determine whether your audience must opt into it or opt out of it. By default, a new topic requires people to opt out; workflows using a new topic with default settings will send messages to everybody (who isn’t globally unsubscribed) until they opt out-of the topic.
After you add at least one topic, you can set your subscription center’s brand color and logo and translate your topics.
- In Customer.io, go Settings > Workspace Settings.
- Go to Subscription Center, and click Edit. If this is your first topic, click Get Started. Then click Add.
- Set a Name and a Description. The name is how you’ll select your topic in the Audience setting. Your audience will see both the Name and Description when they set their subscription preferences.
- Determine whether People are subscribed by default.
- Off: People must opt-into the topic to get messages.
- On: (Default) People will get messages for this topic unless they change their subscription preferences to opt out. Before you use the On setting, make sure that you have your audience’s consent or won’t otherwise violate their message preferences and send them messages that they might consider spam!
- Click Save.
From this page, you can also customize the header and description of your subscription preferences page. You can translate this from the same area you localize topics.
Now you can set your topic in the Audience setting for your campaigns and broadcasts. You can also reference the name of your subscription topic in your emails with liquid. For instance, you could use it to make a footer like, “Not interested in {% subscription_topic_name %}?” followed by the liquid that renders a link to unsubscribe: {% unsubscribe_url %}.
Order topics
You can change the order of topics on the subscription preferences page through Workspace Settings > Subscription center > Edit on the Topics table.
Drag and drop each topic in the desired order.
Preview your changes on the right panel. After you save, the topics table and Preview URL will reflect your changes.
The next time your customers open the subscription preferences page, they will see the new order.
Edit a topic
You can update the Name or Description for your topic. This does not affect your Audience settings or people’s subscription preferences. It only affects what people see when they change preferences using the subscription center.
- In Customer.io, go Settings > Workspace Settings.
- Go to Subscription Center, click Edit, and select the topic you want to change.
- Change the Name or Description for your topic.
- When you’re done, click Save.
Delete a topic
You can’t delete a topic that’s in use. You’ll need to change the Audience setting for any running campaigns and broadcasts that use the topic you want to delete before you can delete it. You don’t need to worry about draft or stopped workflows.
- In Customer.io, go to Settings > Workspace Settings.
- Go to Subscription Center and hover over the topic you want to delete. On the right, you’ll see a trash can icon appear. Click this to delete the topic.
Set a topic in a campaign or broadcast
To enable subscription center topics, you must assign an audience to all running campaigns and broadcasts - both API-triggered broadcasts and scheduled newsletters. Set any one of your subscription center topics as the audience. This determines who will receive messages from your campaign or broadcast, not whether they enter into a journey. Only the trigger settings determine whether someone enters a journey; the audience determines who will receive messaging of those that enter a journey.
For example, let’s say you have a segment-triggered campaign. The segment is anyone who has purchased a product in the last 30 days. The audience is set to people subscribed to Product Updates. People who are subscribed to Product Updates will receive messages from the campaign. People who are not subscribed to Product Updates will not receive messages from the campaign, but they will still enter the campaign if they meet the trigger criteria.
You can also override the topic at the message level should the campaign audience settings not fit for all messages.
Campaigns and broadcasts will not take your topic audience into account until you’ve clicked Enable in your subscription center. After you finish assigning audiences to live campaigns and broadcasts, continue to enable topics.
Set a topic in a campaign
In your campaign’s Settings step, select the topic for your campaign from the Audience dropdown. Only people subscribed to this topic will receive messages from the campaign, unless you override the topic at the message level.

Set a topic in a broadcast
In the broadcast’s Recipients step, determine Who should receive this? Then select the topic for your newsletter or API-triggered broadcast from the Subscription preference dropdown. Only people subscribed to the selected topic will receive your newsletter or messages in your API-triggered broadcast, unless you override the topic at the message level.

Bulk update topics for running campaigns and broadcasts
To expedite enabling your subscription center, you can assign a topic to multiple campaigns, broadcasts, and newsletters at once through Workspace Settings > Subscription center.
On the Topics table, select Review. Under the Pending tab is a list of all campaigns and broadcasts that are running or newsletters that are scheduled to run and need a topic assigned.
- Select the box next to each one you want to update.
- Select which topic you want to assign as the audience from the dropdown.
- Click Apply.
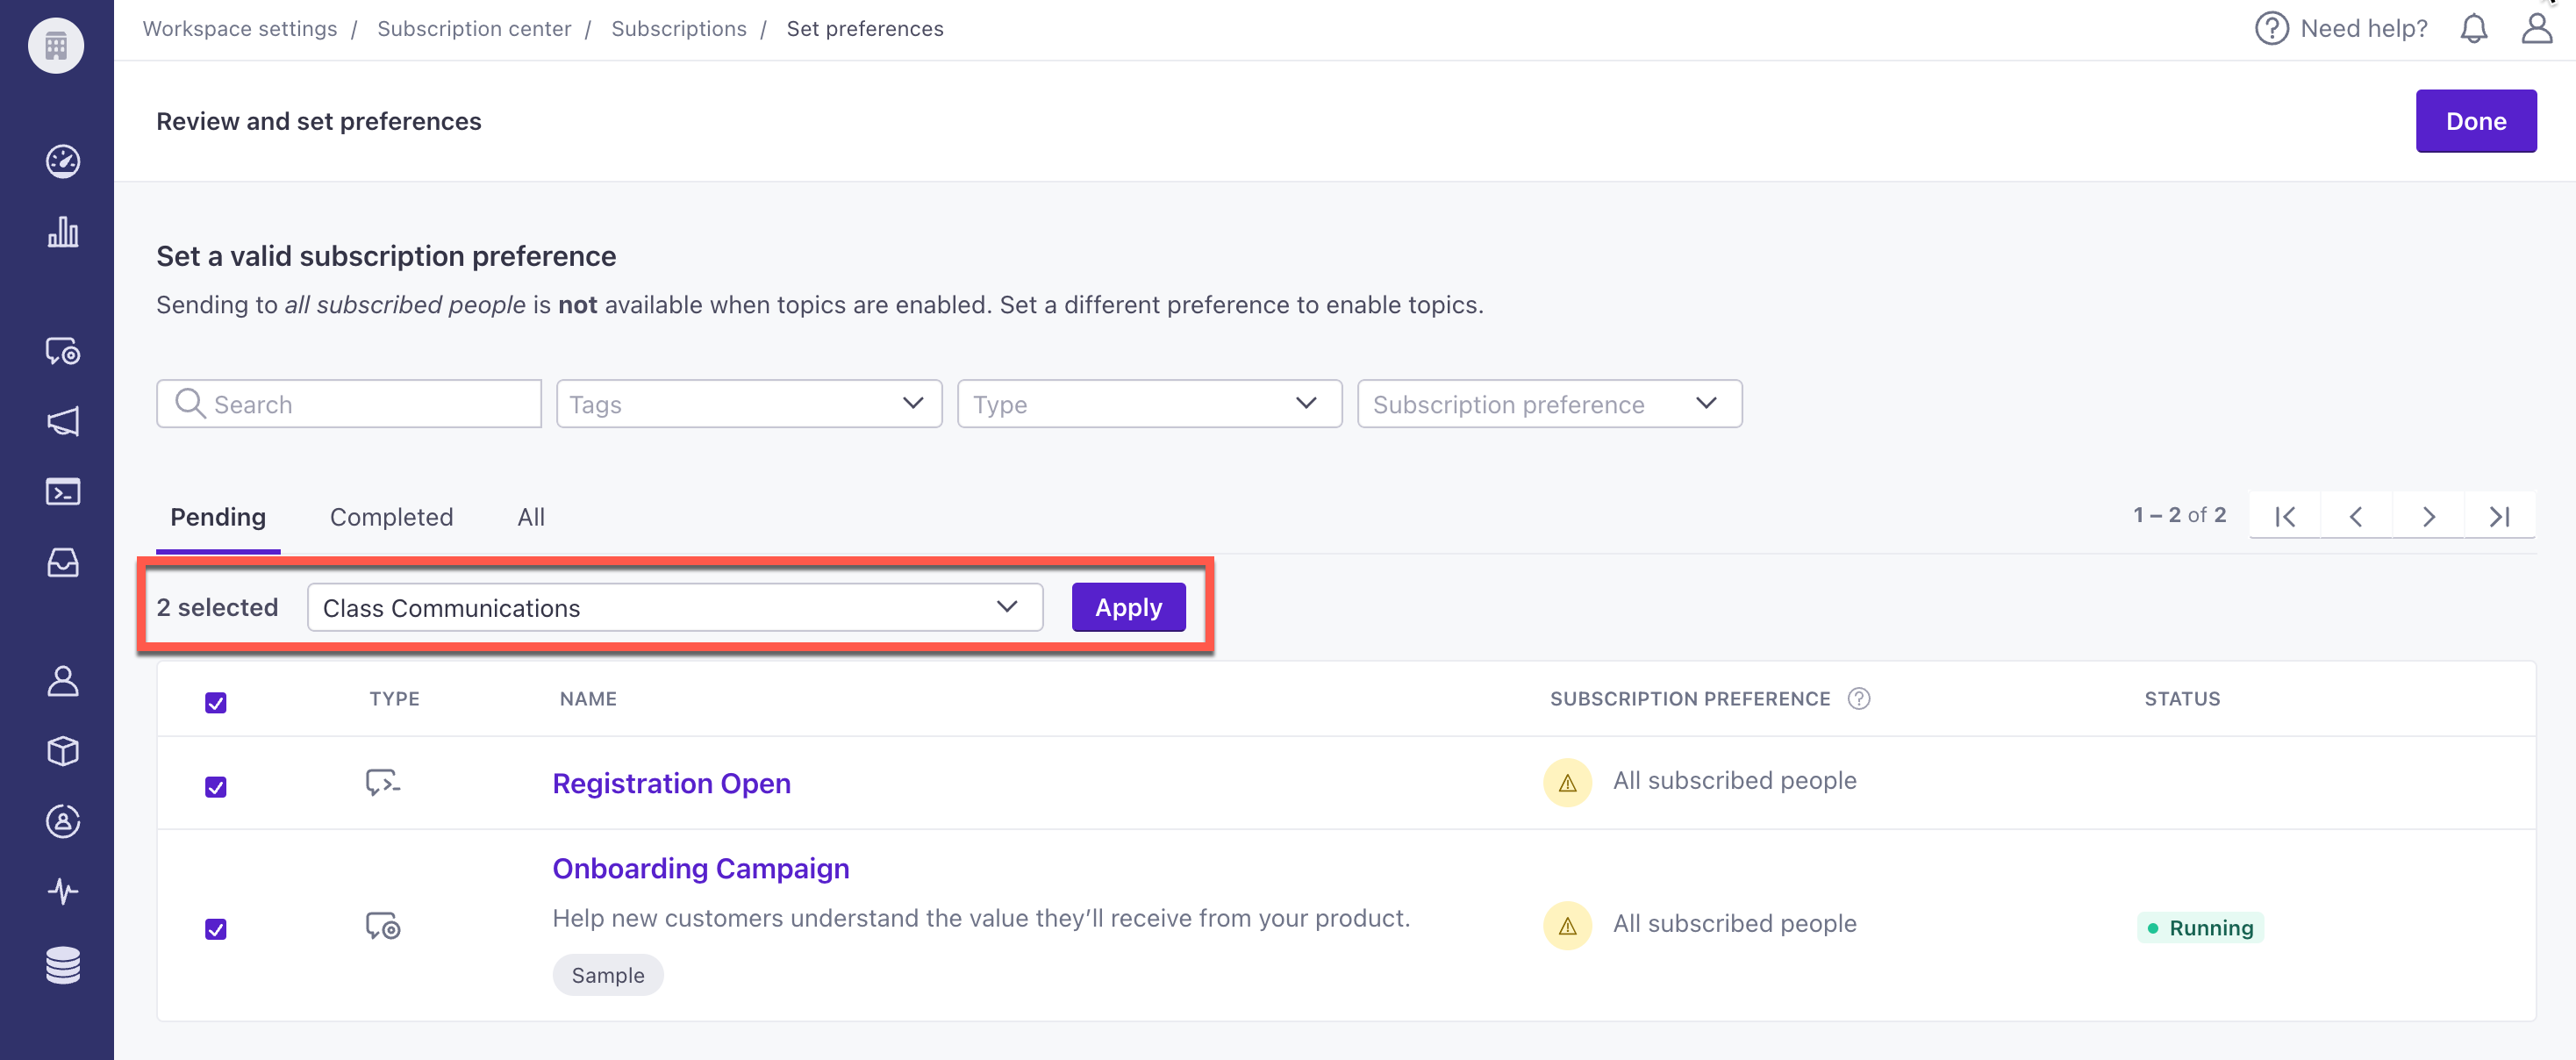
The checked campaigns, broadcasts, or newsletters will move to the Completed column. The All tab shows both Pending and Completed items.
Use the filters at the top to search by name or description, tags, type of campaign or broadcast, and subscription preference.
Override a topic for a message
After creating at least one topic in your workspace’s subscription center, you can assign an audience to your campaigns. You also have the option to override the audience for each email, push notification, or SMS in the campaign.
To override the audience:
- Select the message in your campaign.
- On the left-hand pane, scroll to Override Campaign Settings.
- Select the Subscription Preference dropdown and choose to send based on a different topic preference or global subscription setting. By default, we send messages based on campaign settings.
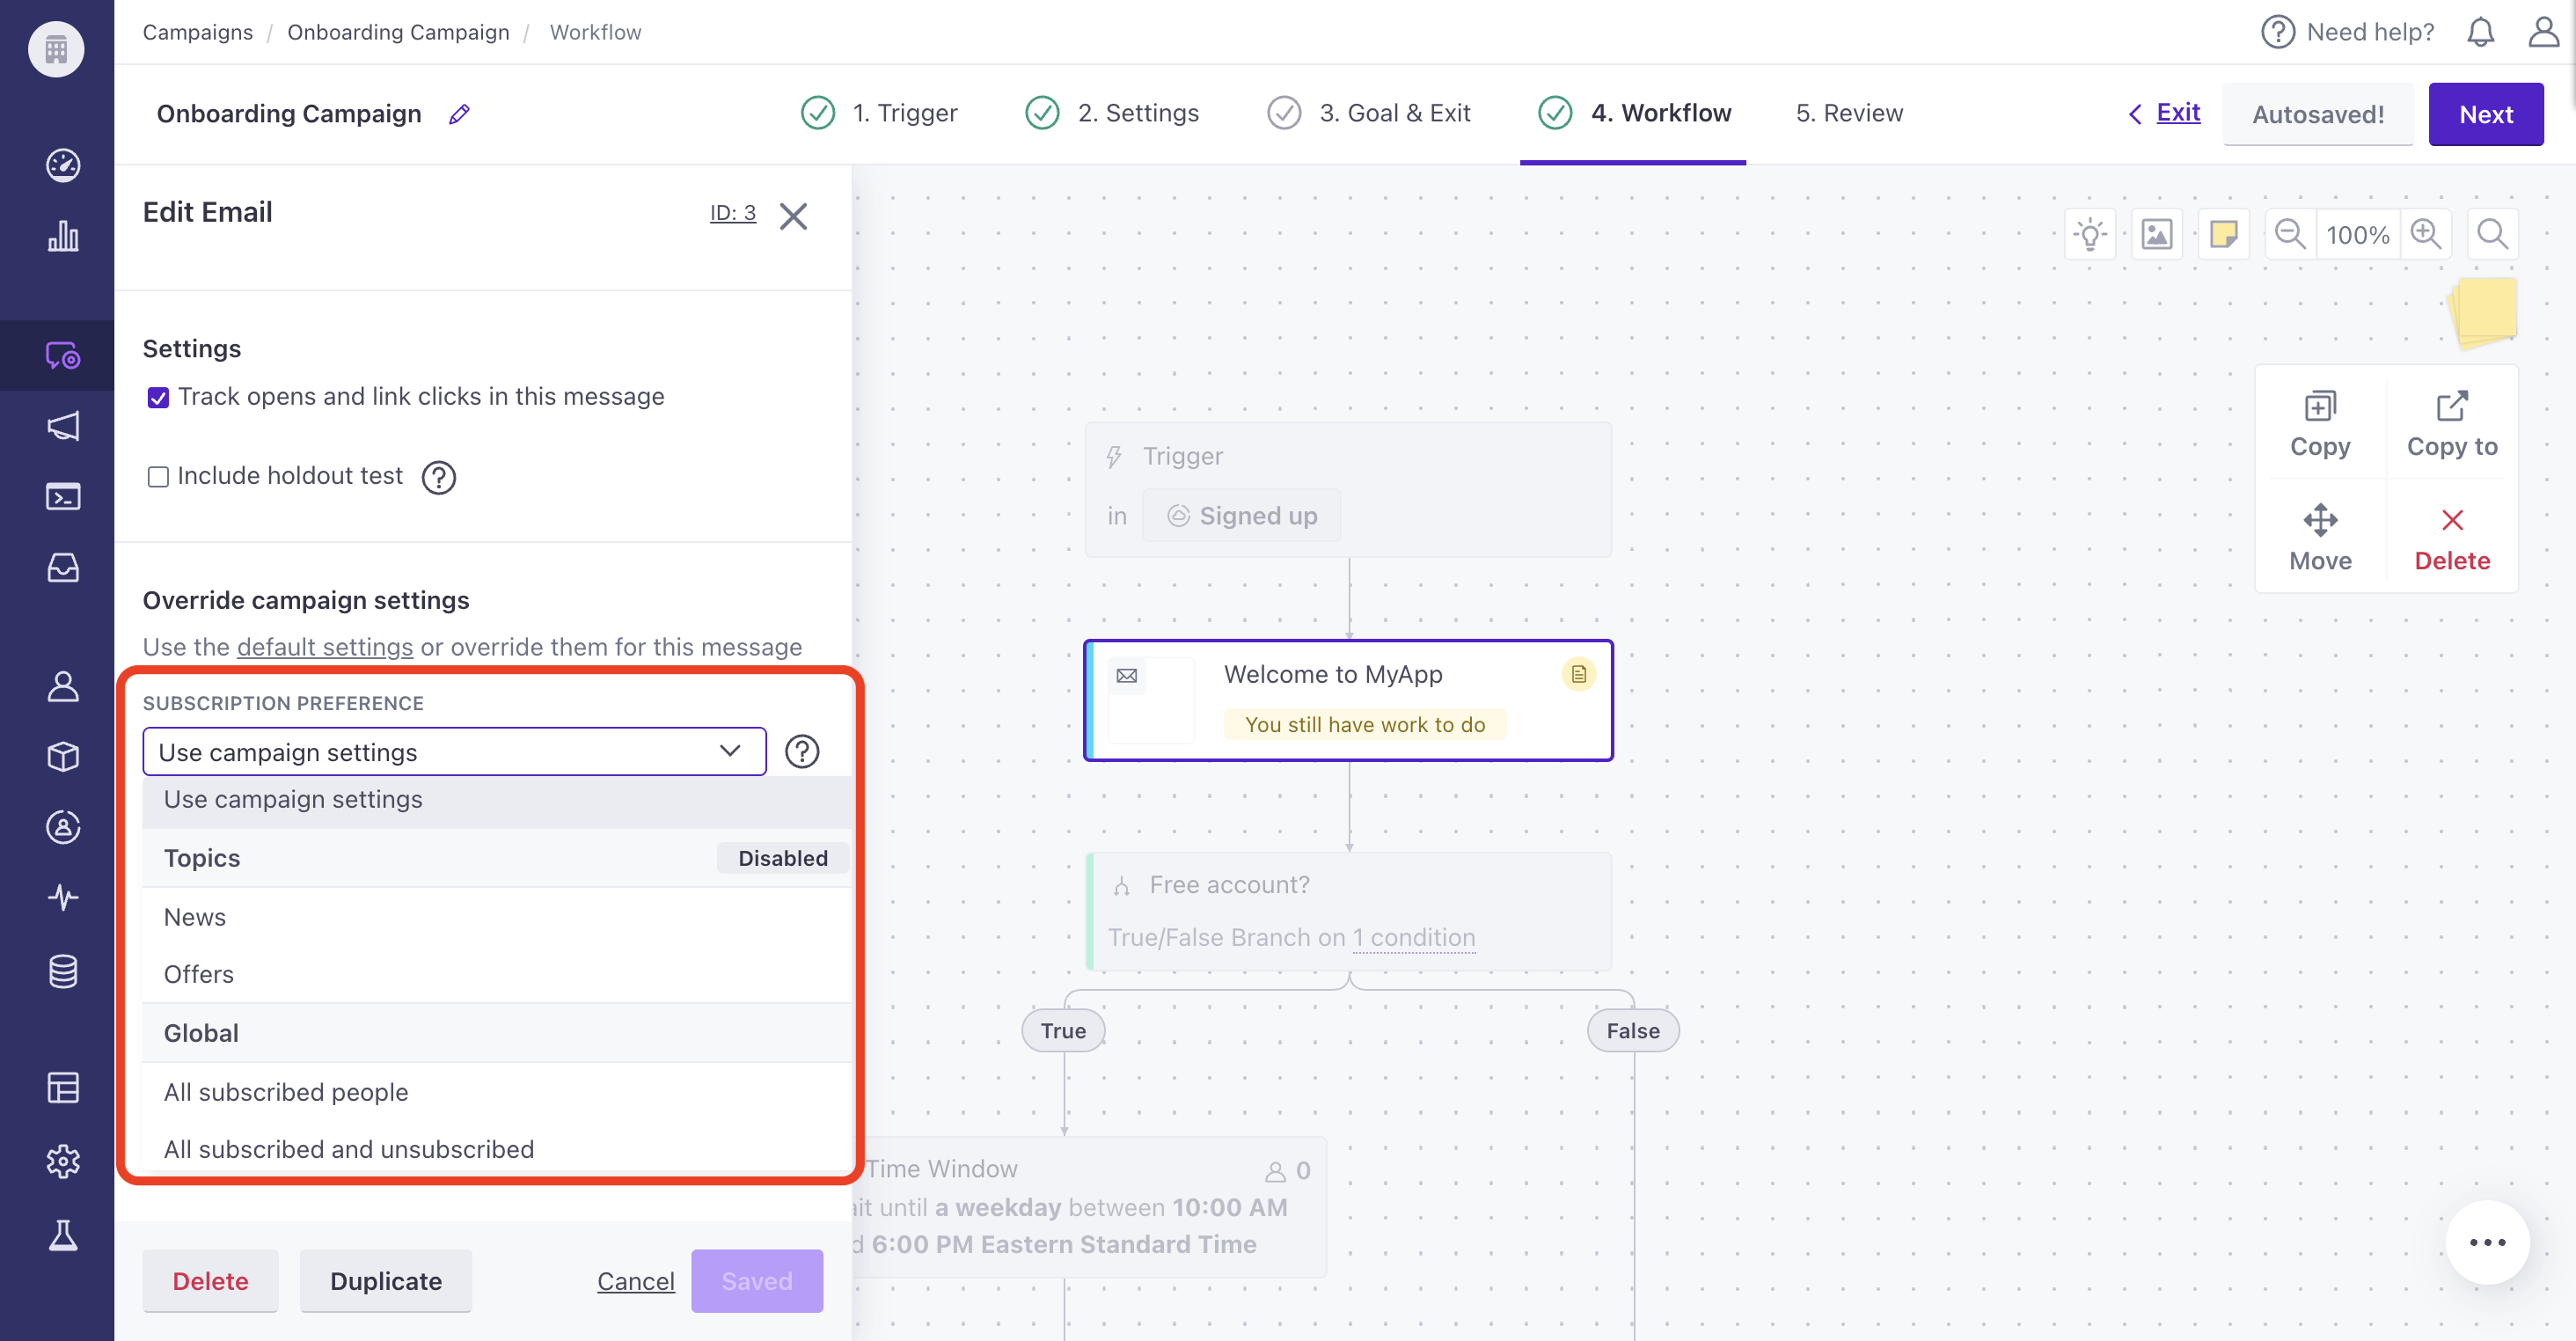
- Click Save.
Moving forward, Customer.io will draft or send this message based on the message-level override of the subscription preference.
Set subscription preferences per channel
While we don’t have an out-of-the-box solution for setting up multiple channels (email, SMS, push) for each subscription topic, you can accomplish this by creating a subscription topic for each channel alongside overriding topics for an individual message in a workflow.
For instance, if you have a topic “Marketing Updates,” you could split this based on the communication channels you offer:
- Marketing Updates - Push
- Marketing Updates - Email
- Marketing Updates - SMS
At the campaign level, let’s say you target the audience “Marketing Updates - Email.” Within the campaign, you could create three different marketing messages - one push, one email and one SMS - where each message had a different audience that matched the channel the customer had subscribed to. The email would have the audience that matched the campaign settings. For the push notification, you would override the audience by choosing “Marketing Updates - Push” from the dropdown, and so on.
A customer could visit their subscription preferences page at any time to adjust which topics + channels were best for them.
Subscription preferences do not apply to in-app messages.
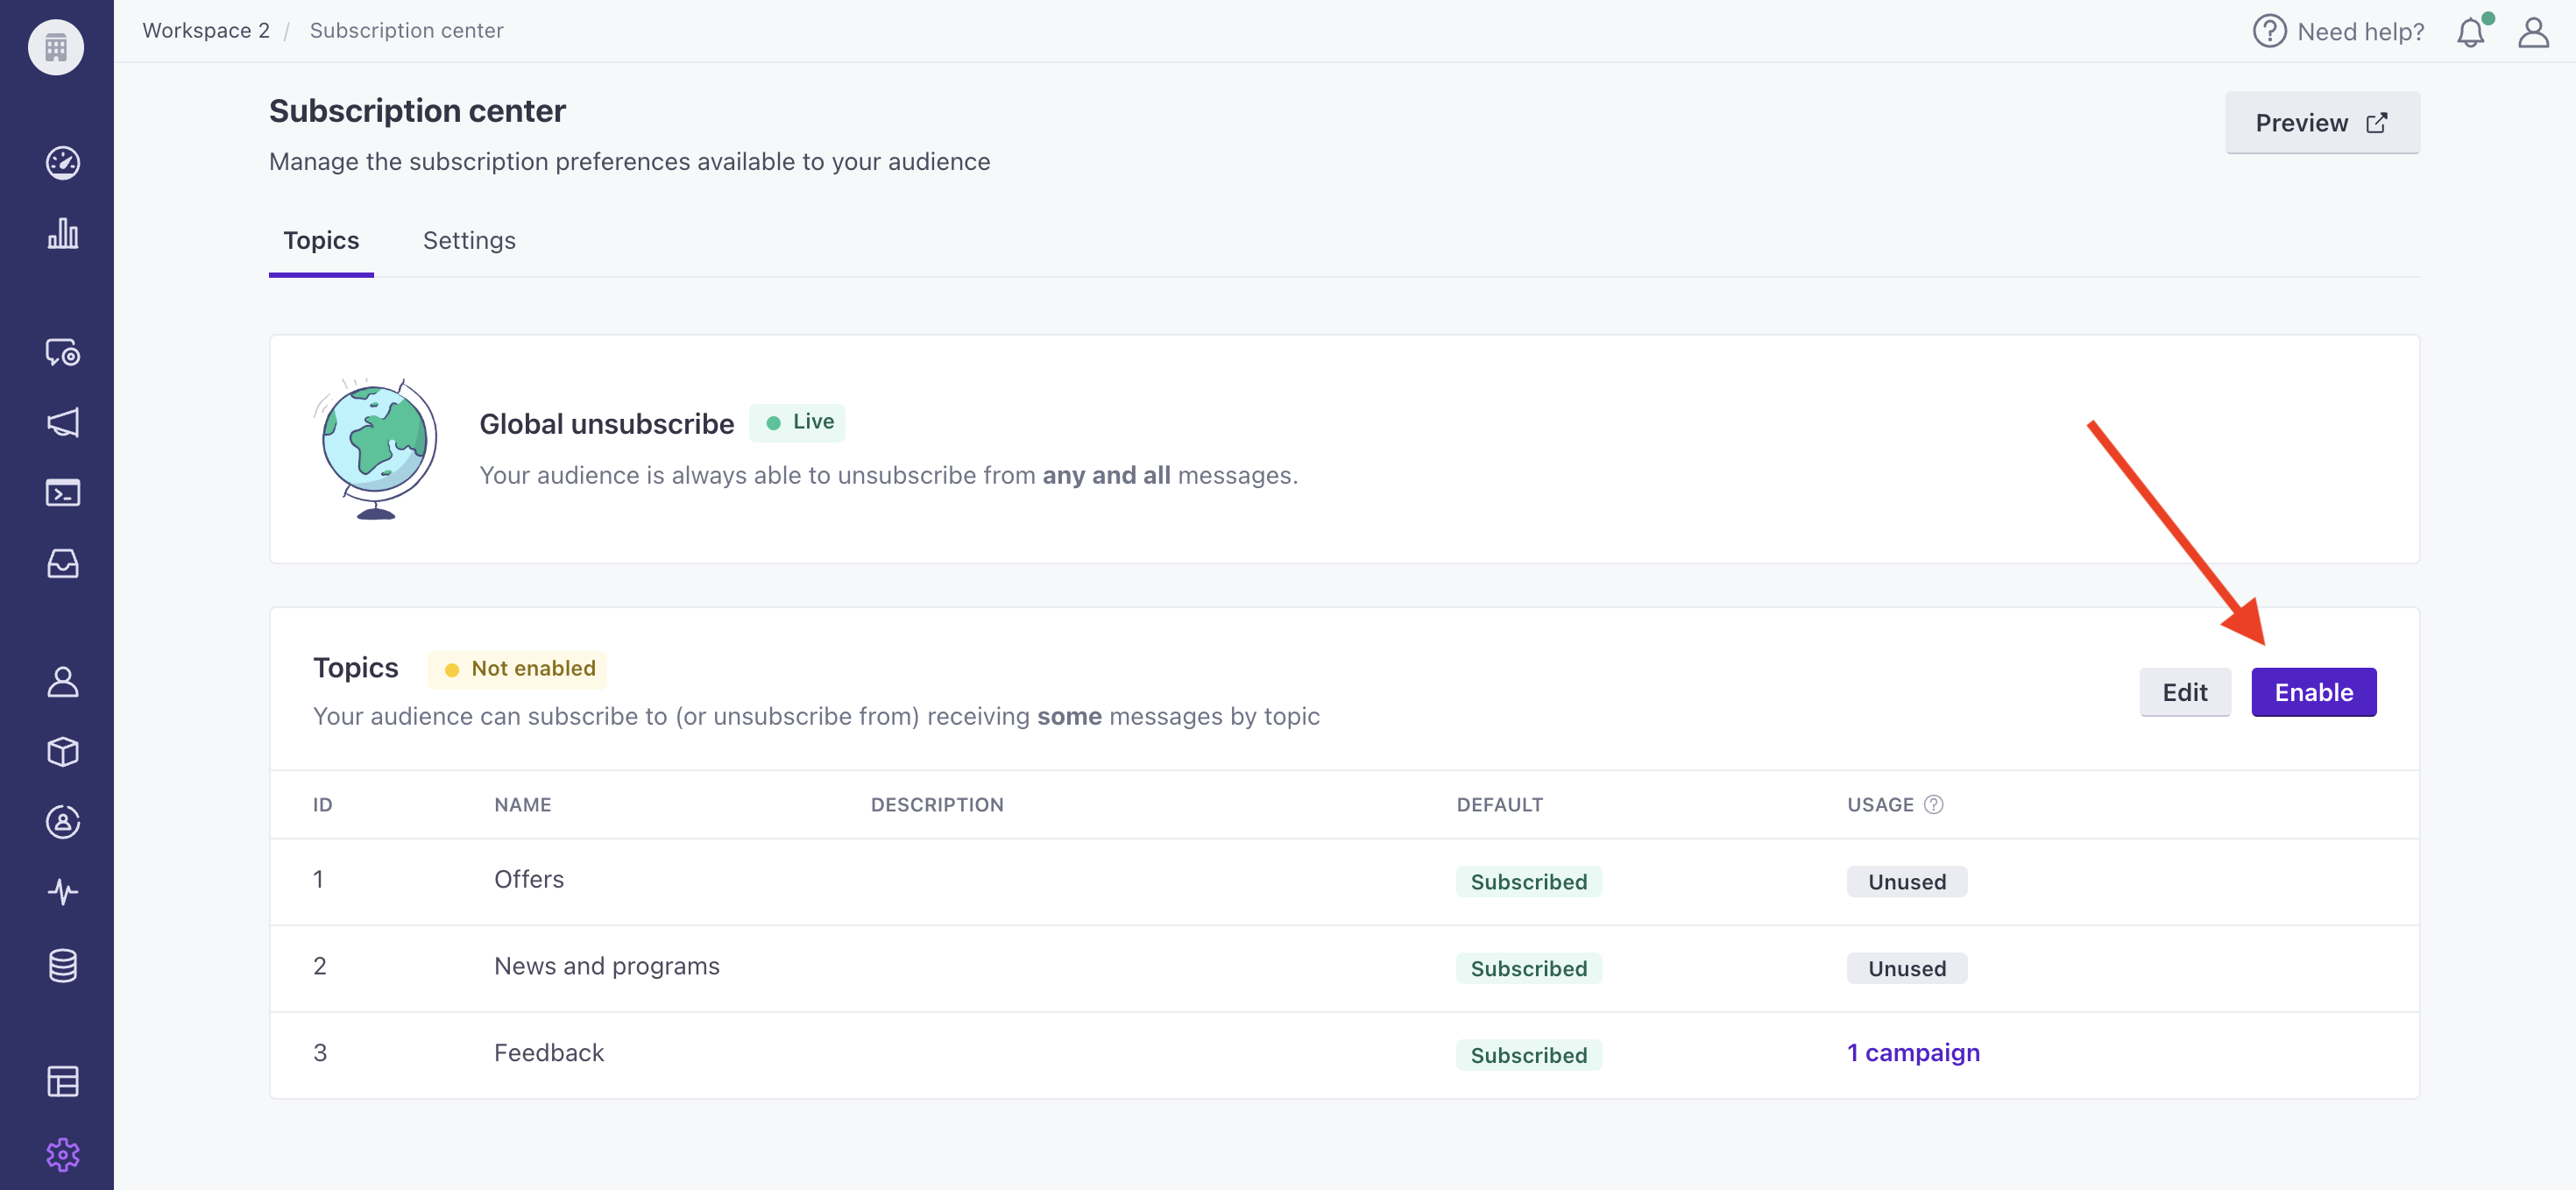
Enable the subscription center
Before you can enable subscription center topics, you must have created at least one topic, and applied topics to the Audience setting for all your active campaigns, scheduled newsletters, and API-triggered broadcasts. You may also want to backfill or migrate existing subscription preferences. When you enable the subscription center, your audience’s Unsubscribe link in your messages also lets people set their topic preferences.
To enable your subscription center:
- Go to Settings > Workspace Settings.
- Click Subscription Center and then click Enable.
Set subscription topic preferences
Beyond people unsubscribing themselves from messages, you can also:
- manually set subscription preferences in your workspace
- migrate people’s existing preferences from another service
- send out a campaign requesting they update their preferences
- track their preferences outside of the subscription center
You have the option to set preferences for some subscription topics, while preserving those set for others, using JSON dot notation.
Adjust subscription preferences in the UI
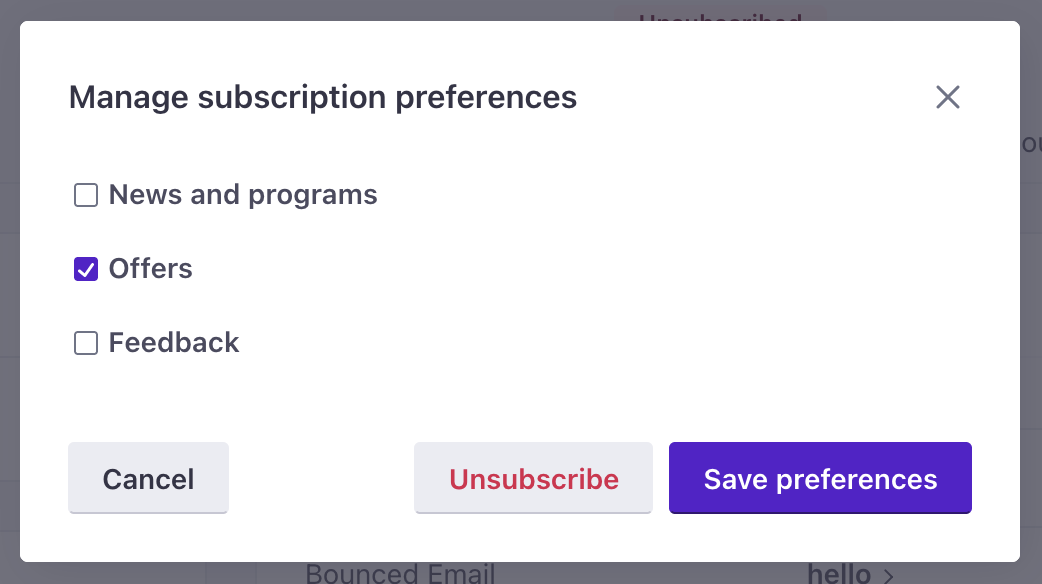
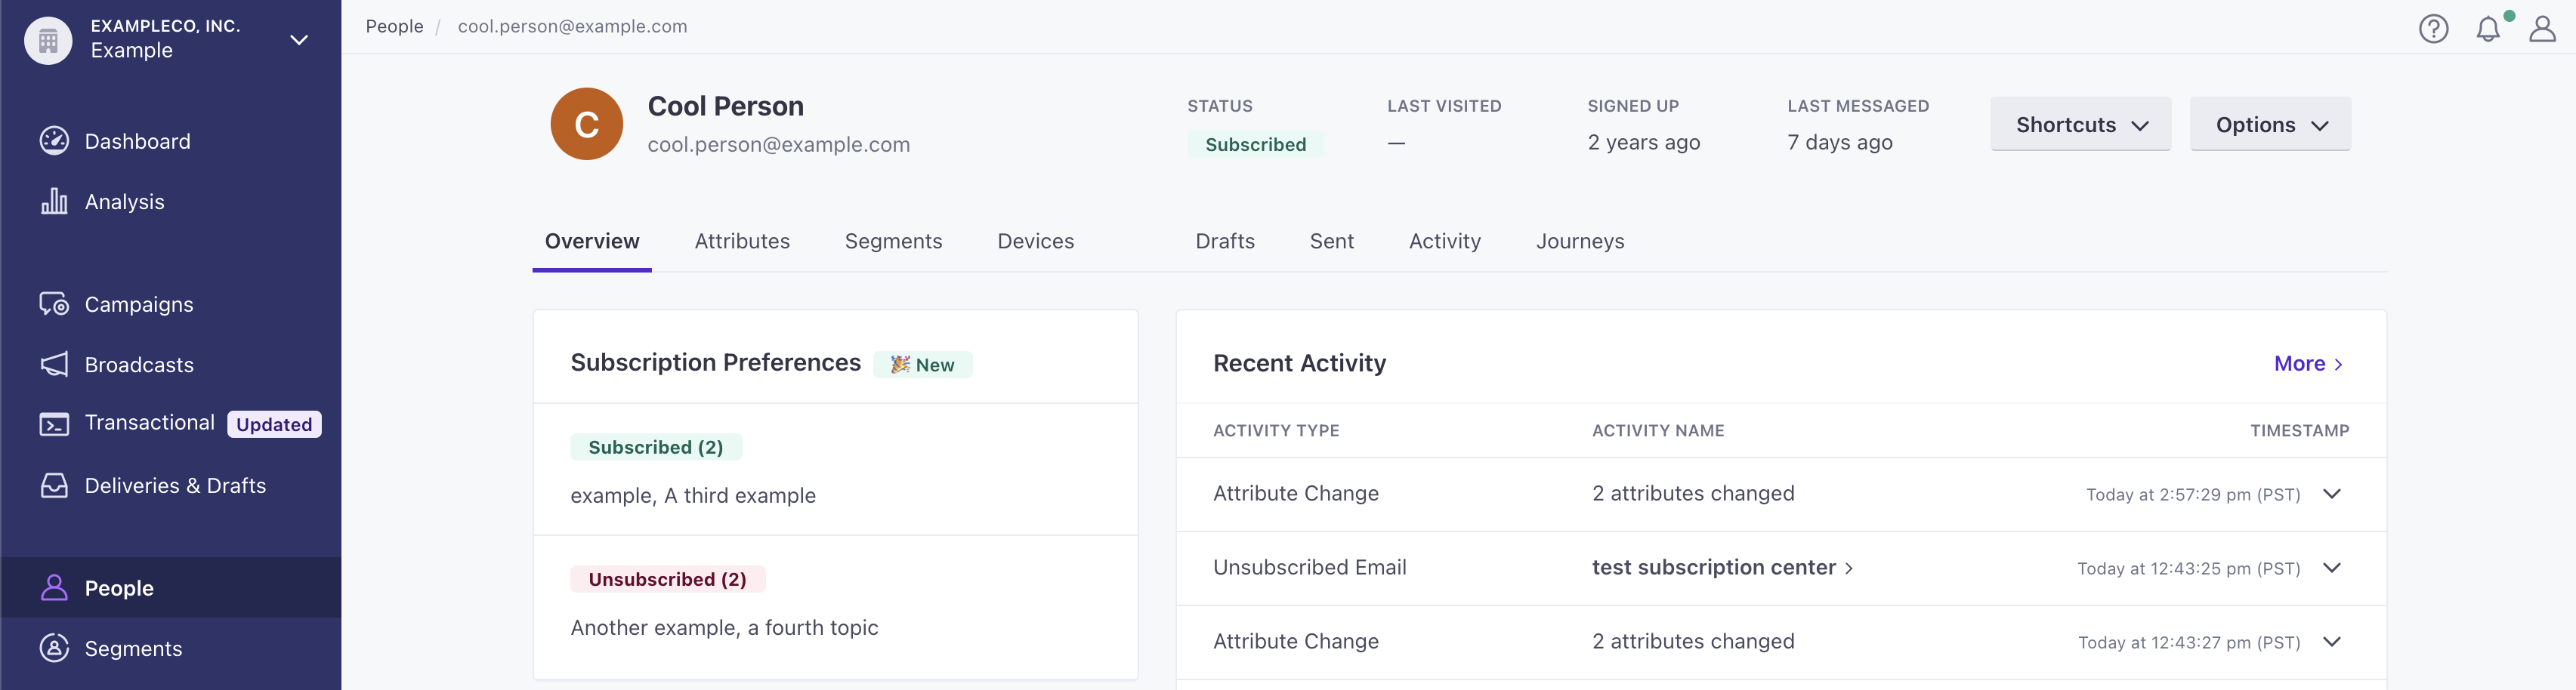
After you enable your subscription center, you can view and change people’s preferences on their profiles:
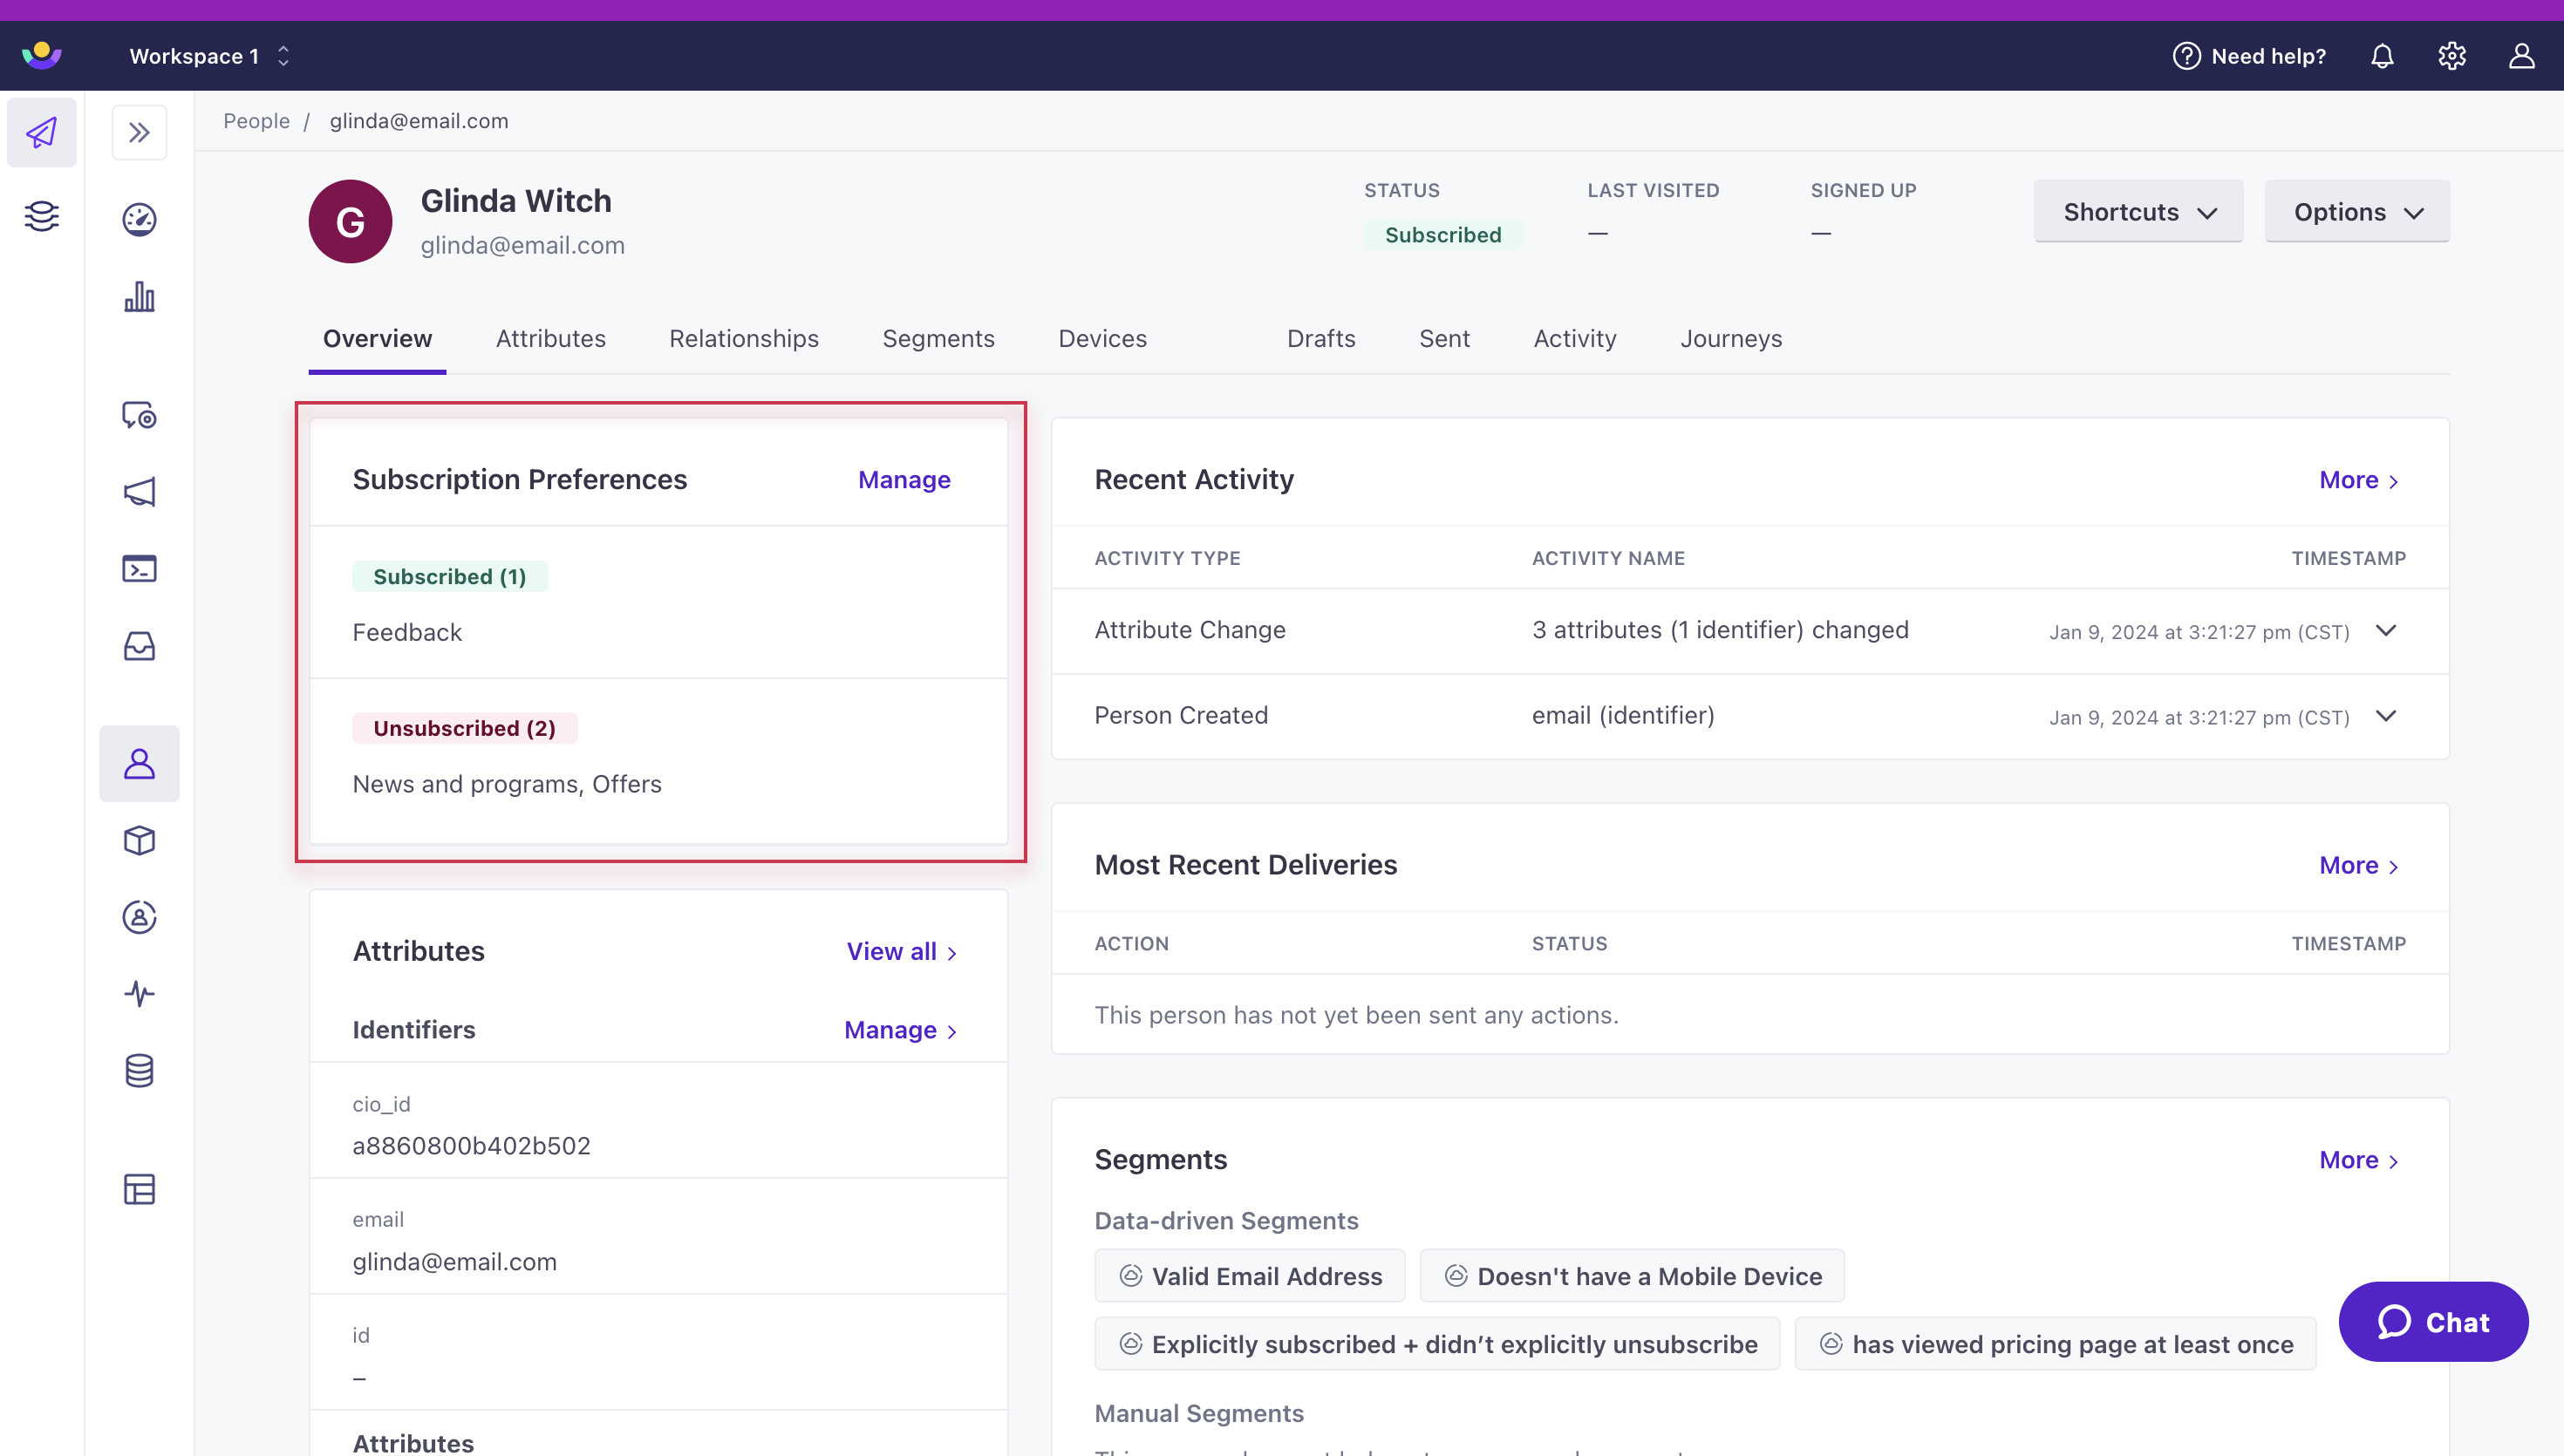
Click Manage beside Subscription Preferences to change them.
Click Save Preferences to adjust individual preferences or click Unsubscribe so they no longer receive emails, SMS, or push.
Backfill or migrate preferences
Before you enable subscription center topics, you might want to set or migrate your audience’s subscription preferences. You’ll almost certainly need to do this if you set your topics up as “opt-in” by default.
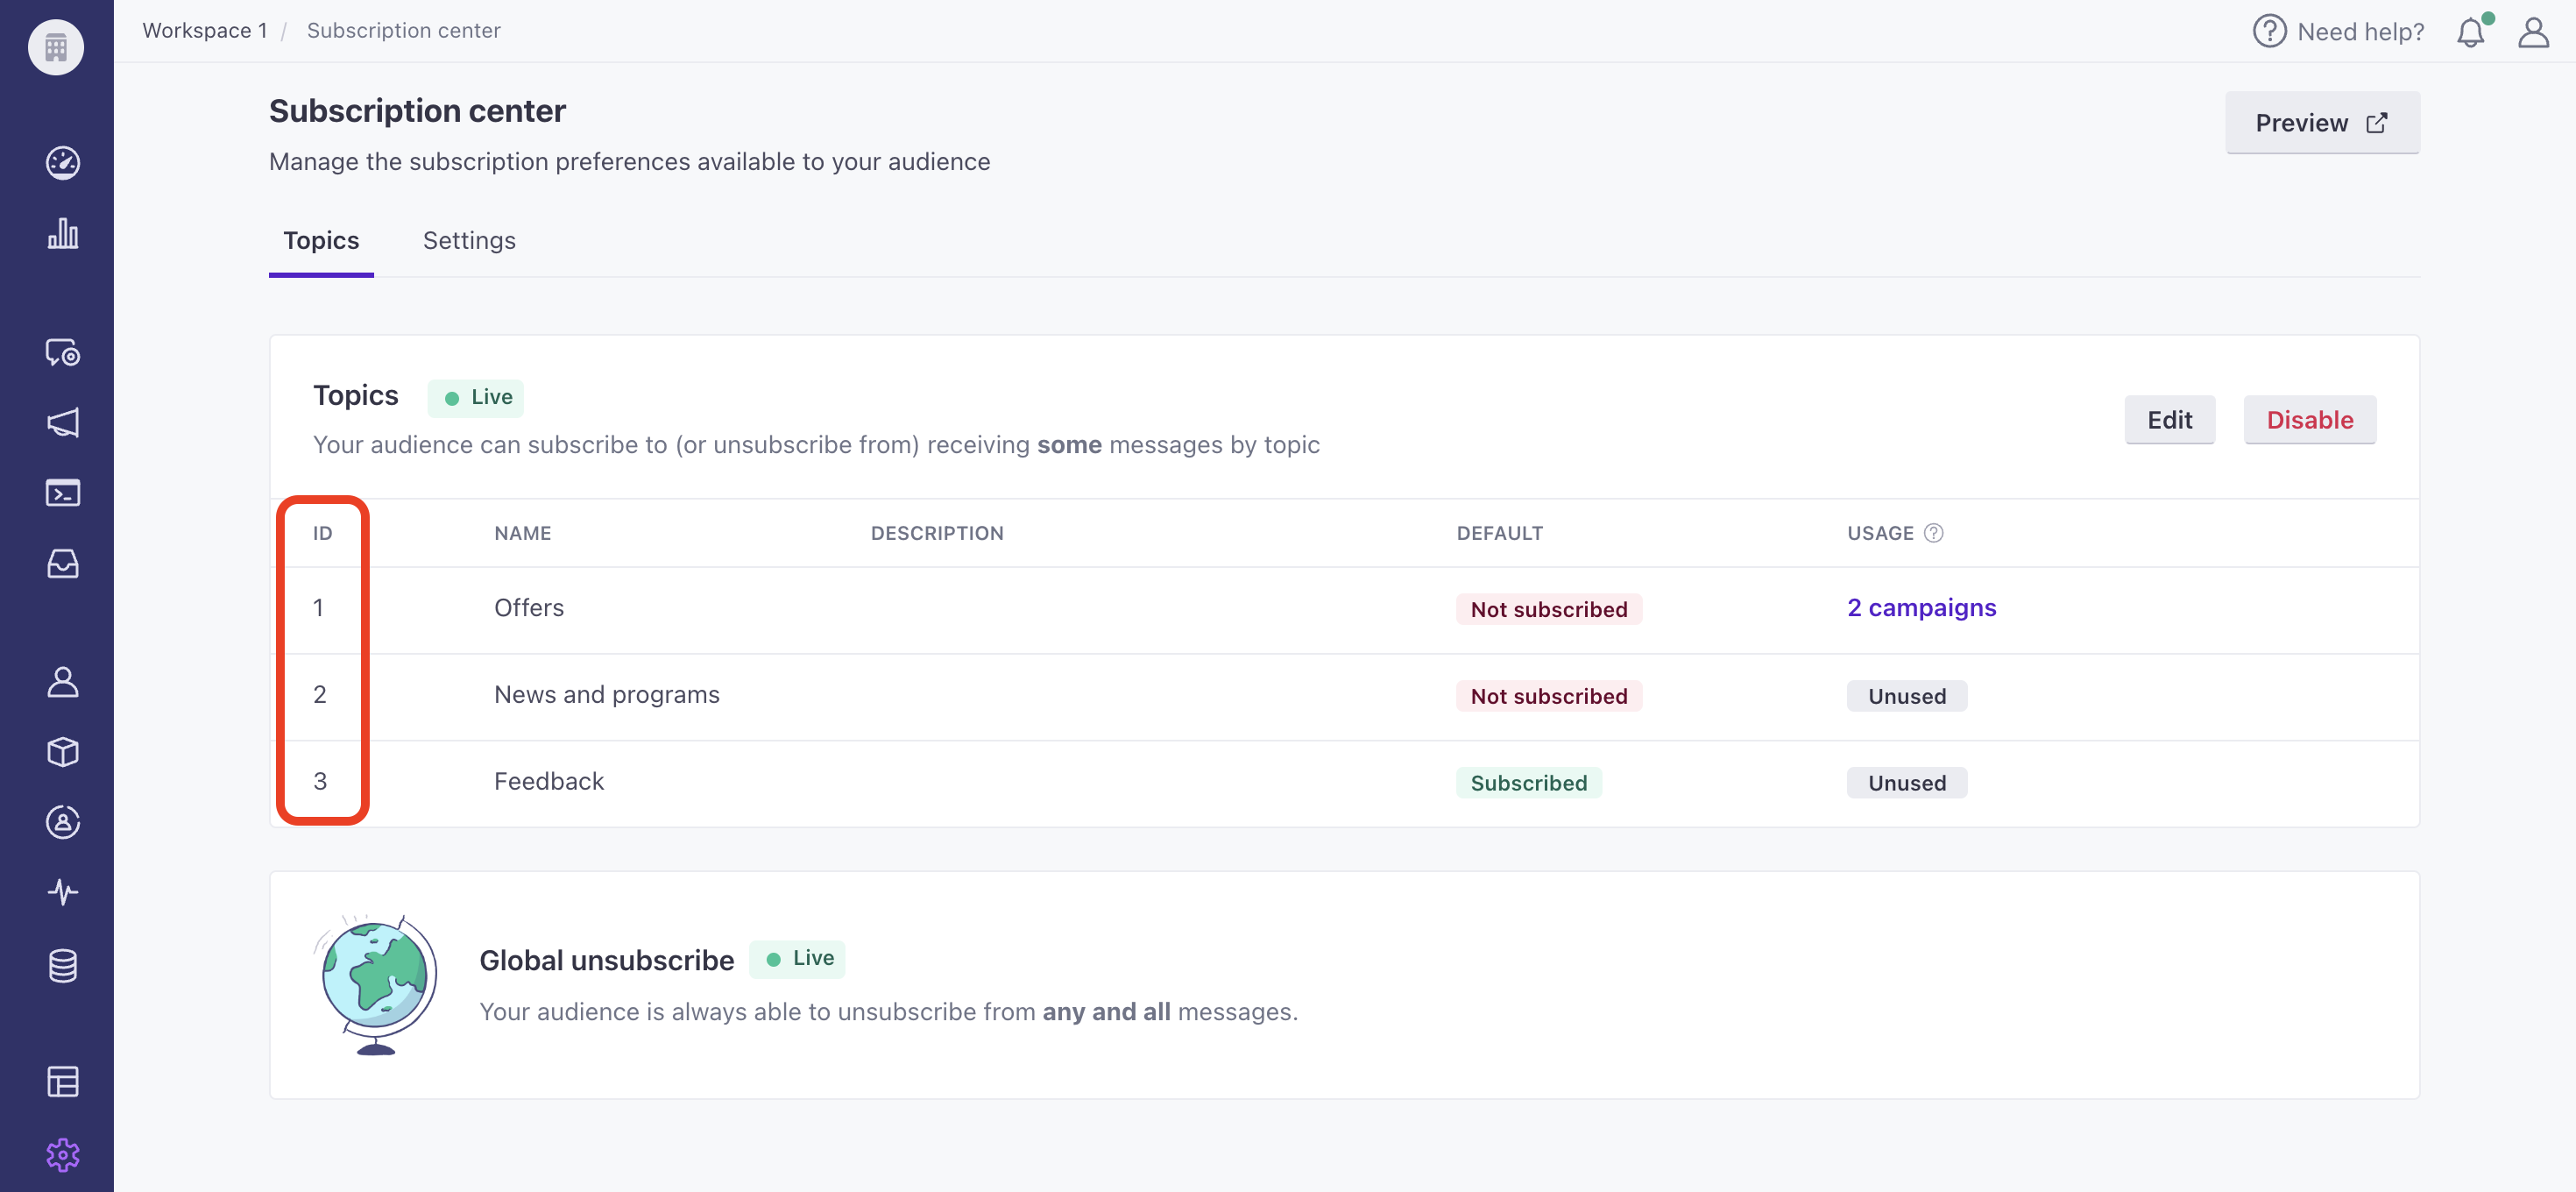
You can set your audience’s subscription preferences using the reserved cio_subscription_preferences attributeA key-value pair that you associate with a person or an object—like a person’s name, the date they were created in your workspace, or a company’s billing date etc. Use attributes to target people and personalize messages. Attributes are analogous to traits in Data Pipelines.. Each topic in the attribute is numbered, based on the ID that you see in the UI—topic_1 corresponds to ID 1 in the left-column in your Subscription Center setup page. We set subscription preferences by topic ID rather than the topic Name, so that you can change the name of a topic without affecting your audience’s preferences. For each topic, true means that a person is subscribed to a topic; false means they’re unsubscribed.
You’ll set this attribute—either through the API, a CSV upload, a Create or Update Person action, or Database sync—to apply preferences to a person.
{
   "cio_subscription_preferences": {
      "topics": {
         "topic_1": true,
         "topic_2": false
      }
   }
}
Check your payload
Applying subscription preferences incorrectly prevents us from observing your audience’s preferences, and can result in extra, misapplied attributes that clutter your workspace.
Create a campaign to record preferences
After your subscription center topics are enabled, you can send a campaignA series of actions that you perform for each person who matches criteria. Campaigns typically send people a series of messages, but you can also use campaigns to send webhooks, update attributes, etc. to customers to show them they now have the option to subscribe to topics. You can prompt them to manage their preferences in the message.
Set preferences outside of the subscription center
You can send subscription preferences to your workspace based on actions your customers take outside of Customer.io’s messaging. For instance, you may want to track and send preferences upon account sign-up. This ensures your marketing platform is up-to-date with your other systems of record.
Resubscribe a person to topics
If a person accidentally unsubscribes from a topic, they have the option to resubscribe.
If they click the resubscribe button, we set their topic preference back to true and confirm that they are subscribed once again.
If a person accidentally unsubscribes from all on the preferences pages, they just need to recheck the topics they want to receive messages for then save their preferences again.
Find subscription preferences
After you enable topics, you’ll find people’s subscription preferences when you select them on the People page. You can view and edit subscription preferences from the Overview tab of a person’s profile.
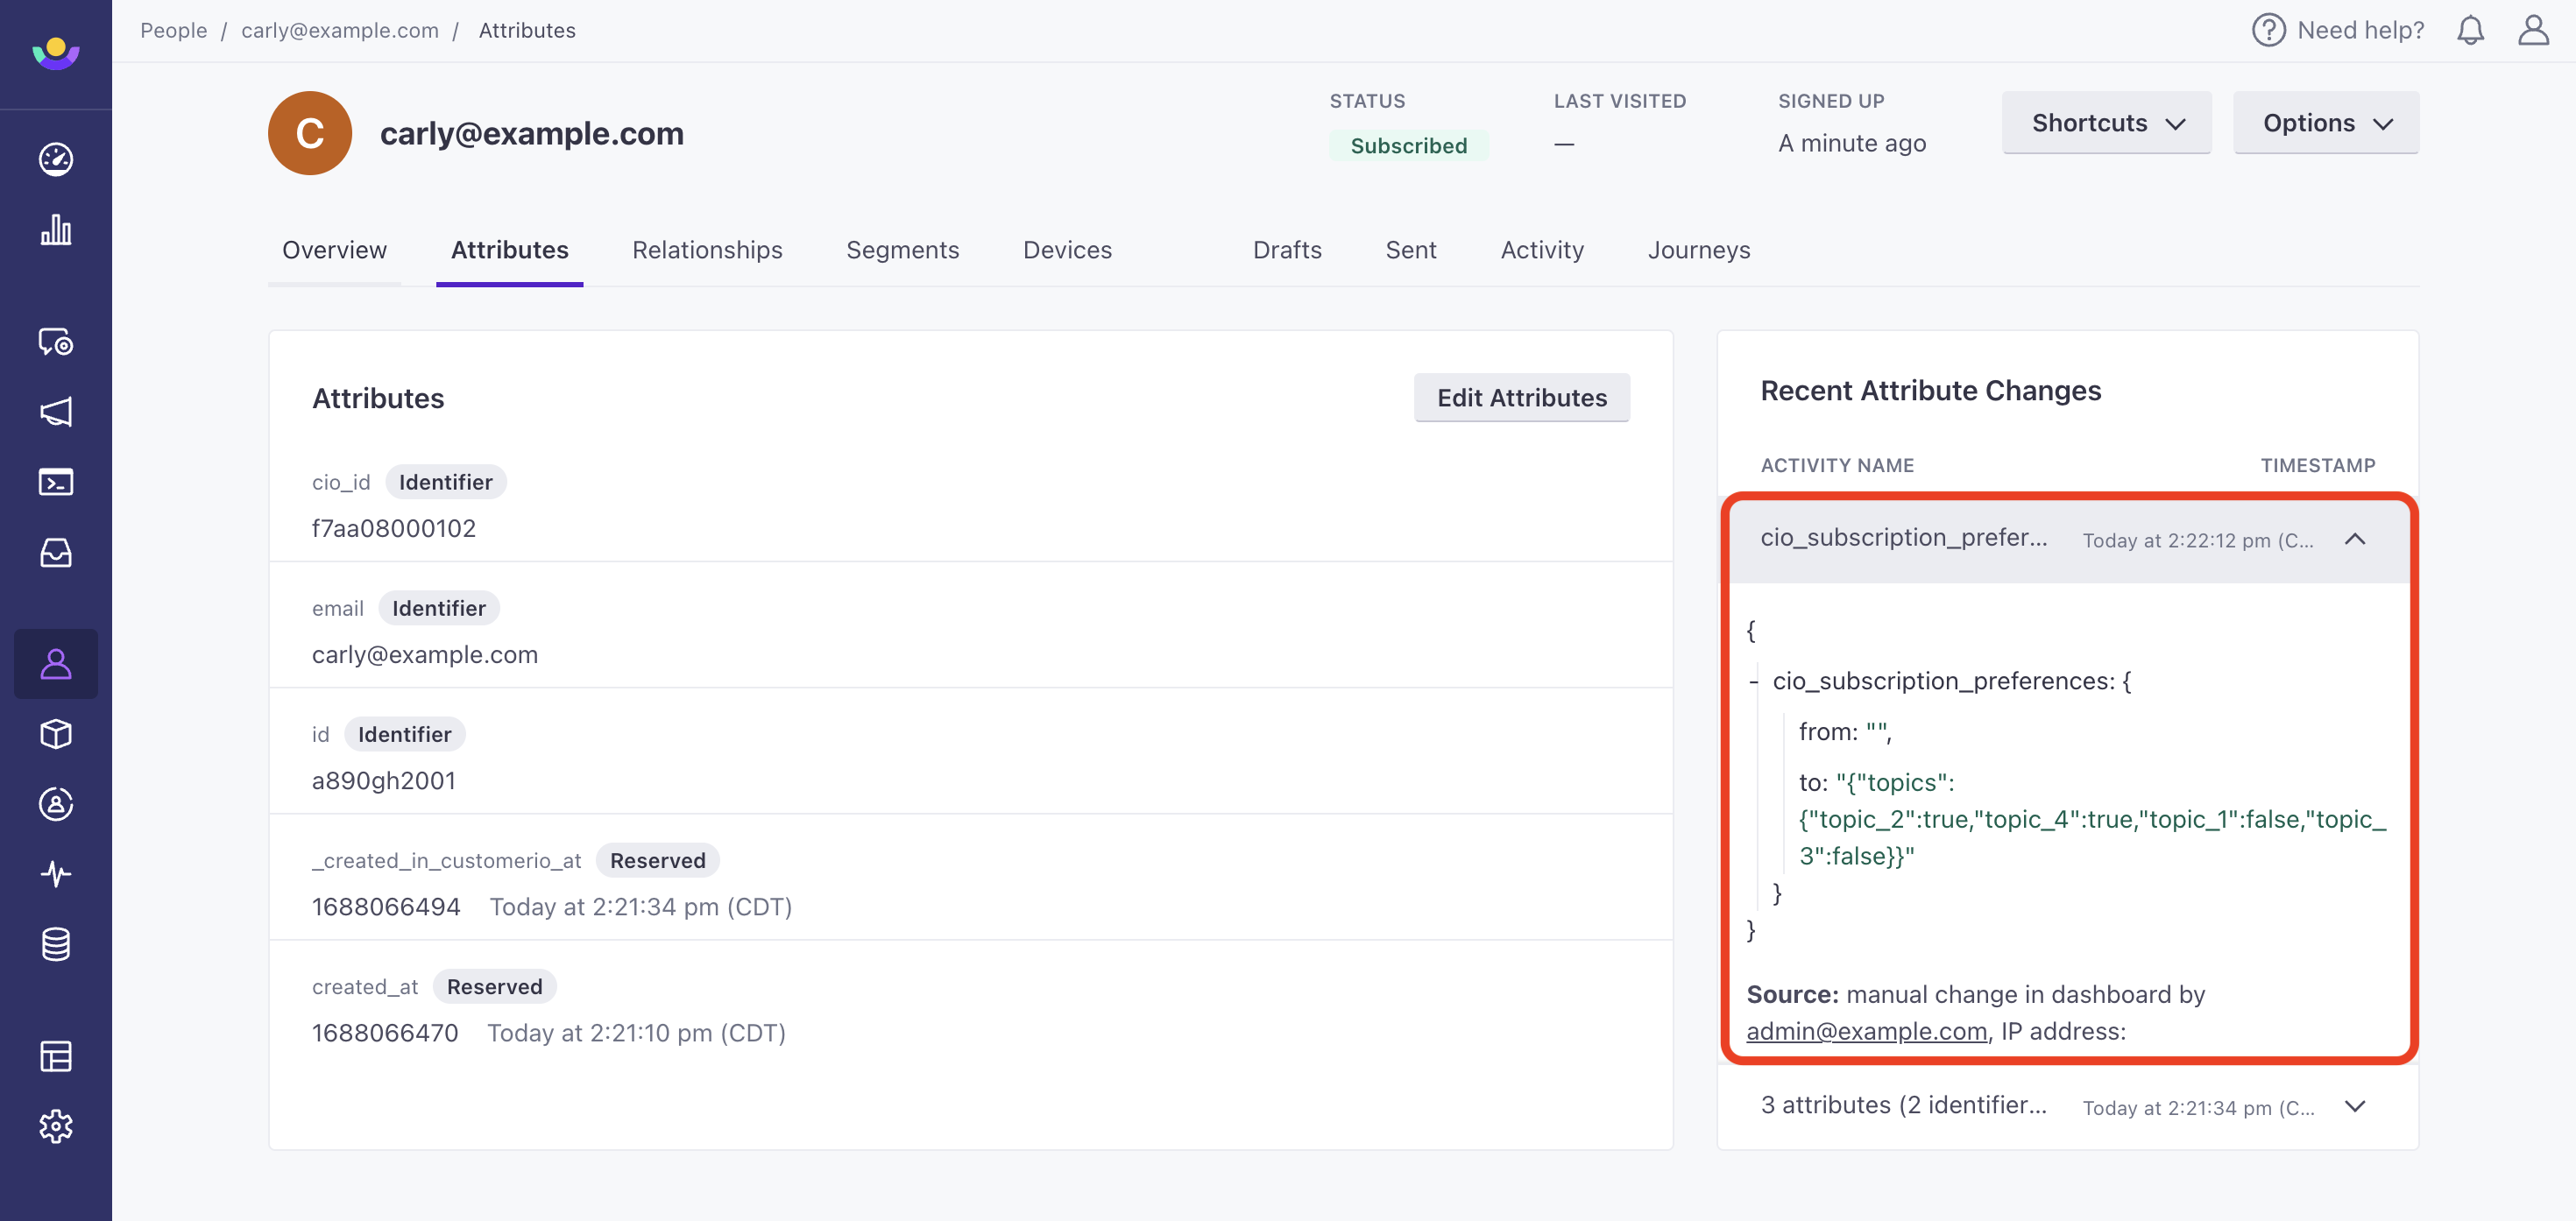
Track changes to preferences
On the Attributes tab, as well as your workspace’s Activity Log, you can track when someone changed a subscription preference with the reserved attribute cio_subscription_preferences (more on that below).
A change is logged when:
- your customer updates a subscription preference from the subscription preferences page.
- you/an admin manually change a subscription preference from the Journeys UI.
- a campaign with an Update or Create Person workflow action updates a subscription preference.
- you update a person’s subscription preferences via CSV, Track API, web SDK, or a reverse ETL sync.
Subscription preferences in the API
When you look up a person using our API, or export a person, we include a person’s subscription preferences and their computed subscription preferences.
The cio_subscription_preferences attribute contains preferences that a person set through the subscription center—or attributes you otherwise applied to a person. However, a person might not have set preferences, or you may have changed topics since the last time a person set their preferences.
For these cases, we also include a _cio_subscription_preferences_computed attribute containing all of a person’s subscription preferences, including defaults for topics a person hasn’t set preferences for yet. For example, if you have an opt-in topic that a person hasn’t set a preference for, that topic would show false—even though a person doesn’t have that attribute on their profile.
This is an example of what we show when you look up a person’s attributes.
Use reporting webhooks to track preference changes
If you capture your audience’s attributes in an external CRM or another system, you can use reporting webhooks to get real-time events when people change their subscription preferences.
{
  "customer": {
    "id": "1",
    "attributes": {
      "_last_emailed": "1528932553",
      "created_at": "1489014595",
      "email": "test@example.com",
      "id": "1",
      "cio_id": "03000001",
      "cio_subscription_preferences": "{\"topics\":{\"topic_7\":false,\"topic_8\":false}}",
      "_cio_subscription_preferences_computed": "{\"topics\":{\"topic_6\":false,\"topic_7\":false,\"topic_8\":false}}"
    },
    "timestamps": {
      "cio_id": 1489014595,
      "_last_emailed": 1528932553,
      "created_at": 1489014595,
      "email": 1508932553,
      "id": 1489014595,
      "_cio_subscription_preferences_computed": 0,
      "cio_subscription_preferences": 1673987303
    },
    "unsubscribed": false,
  }
}
Filter by subscription preferences
On the People page, you can filter by subscription preferences.
To target the desired people, use the same conditions you would set for data-driven segments.
Metrics for subscription preferences
You can track unsubscribes from topics across campaigns and broadcasts within the Journeys UI or through reporting webhooks. Unsubscribed from topics counts each subscription topic that a user unsubscribed from through a delivered message. As such, you may see a percentage above 100; say you have 4 subscription topics and 5 messages are delivered to five users. Two users unsubscribe from 3 topics each (6 total). We would divide this by the number of delivered messages (5) to get 1.2 or 120% unsubscribed from topics. You can read more about how our subscription center works in Customer.io.
For campaigns and API-triggered broadcasts, you can find data in the Metrics tab under Performance & Delivery Metrics and Message Metrics. Check Unsubscribed from topics in the right hand column of Performance & Delivery Metrics to update the chart. Scroll down to Message Metrics to find the unsubscribed rate per message. Select on the right and check the box for Unsubscribed from topics.
For newsletters, go to the Overview tab. You’ll find Unsubscribed from topics at the top of the table.
You can also go to the Analysis Dashboard to view unsubscribed rates across any campaign, newsletter, and API-triggered broadcast. Check which type of workflows you want to compare at the top. Then select the table icon to add Unsubscribed from topics as a column.
Tracking topic subscriptions over time
You can track the evolution of the volume of subscribed or unsubscribed profiles for a subscription topic by creating data-driven segmentsA group of people who match a series of conditions. People enter and exit the segment automatically when they match or stop matching conditions..
Subscription preferences attribute
Keep in mind that users do not have a subscription preference attribute until their status has been explicitly set, which means it is no longer the default status you set in your subscription center. As such, we’ll have to target attributes based on whether they exist as well as when they equal certain, boolean values.
When creating a data-driven segment, a subscription topic will only show in the dropdown of attributes AFTER at least one person’s preference has been explicitly set for the topic. At this point, the topic will also show as an attribute in the data index.
For this recipe, let’s say a workspace has 2 topics: an opt-out topic and an opt-in topic. Remember that opt-out means people are subscribed by default (they must opt-out to stop receiving messages) and opt-in means people are unsubscribed by default (they must opt-in to receive messaging).
Tracking people that are subscribed to a topic
To track the evolution of subscribers to the 2 topics above, create 2 data-driven segments:
Opt-out topic
For an opt-out topic, people are subscribed if they have not unsubscribed from it, that is, their subscription comes from the default status of the topic (so the attribute doesn’t exist) or if they have explicitly subscribed to the topic (so the attribute exists and equals true).
To track all people who are subscribed to an opt-out topic, set this condition:
Attribute
cio_subscription_preferences.topics.topic_<id>is NOT equal toFALSE
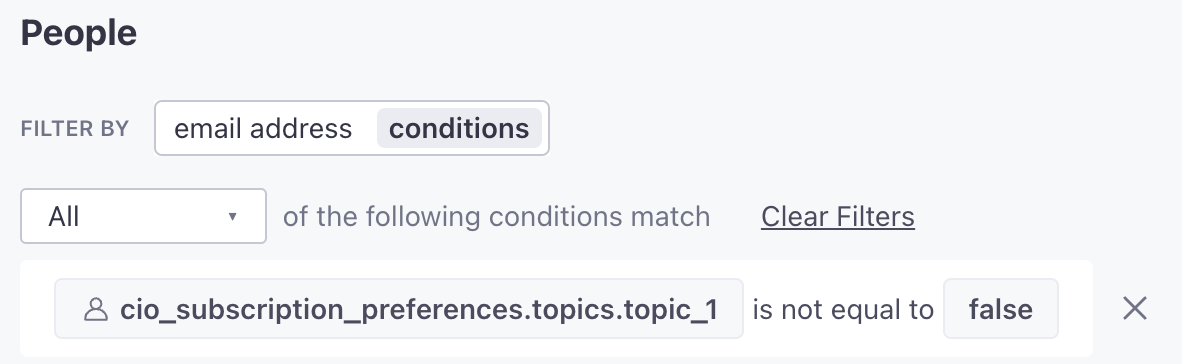
where topic<id> corresponds to the topic ID you can find in your workspace’s subscription center or fetch through the App API.
Opt-in topic
For an opt-in topic, people are subscribed only if they have explicitly subscribed to it (so the attribute exists and equals true).
To track all people who are subscribed to an opt-in topic, set this condition:
Attribute
cio_subscription_preferences.topics.topic_<id>is equal toTRUE
where topic<id> corresponds to the topic ID you can find in your workspace’s subscription center or fetch through the App API.
Tracking people that are unsubscribed from a topic
To track the evolution of unsubscribed users to the 2 topics above, create 2 data-driven segments:
Opt-out topic
For an opt-out topic, people are unsubscribed only if they have explicitly unsubscribed (so the attribute exists and equals false).
To track all people who are unsubscribed to an opt-out topic, set this condition:
Attribute
cio_subscription_preferences.topics.topic_<id>is equal toFALSE
where topic<id> corresponds to the topic ID you can find in your workspace’s subscription center or fetch through the App API.
Opt-in topic
For an opt-in topic, people are unsubscribed by default (so the attribute doesn’t exist) or if they have explicitly unsubscribed from the topic (so the attribute exists and equals false).
To track all people who are unsubscribed to an opt-in topic, set this condition:
Attribute
cio_subscription_preferences.topics.topic_<id>is NOT equal toTRUE
where topic<id> corresponds to the topic ID you can find in your workspace’s subscription center or fetch through the App API.
Data-out integrations
You can use our reporting webhooks to send information on whether a person is subscribed or unsubscribed from messaging and whether the status of any of their subscription preferences has changed.
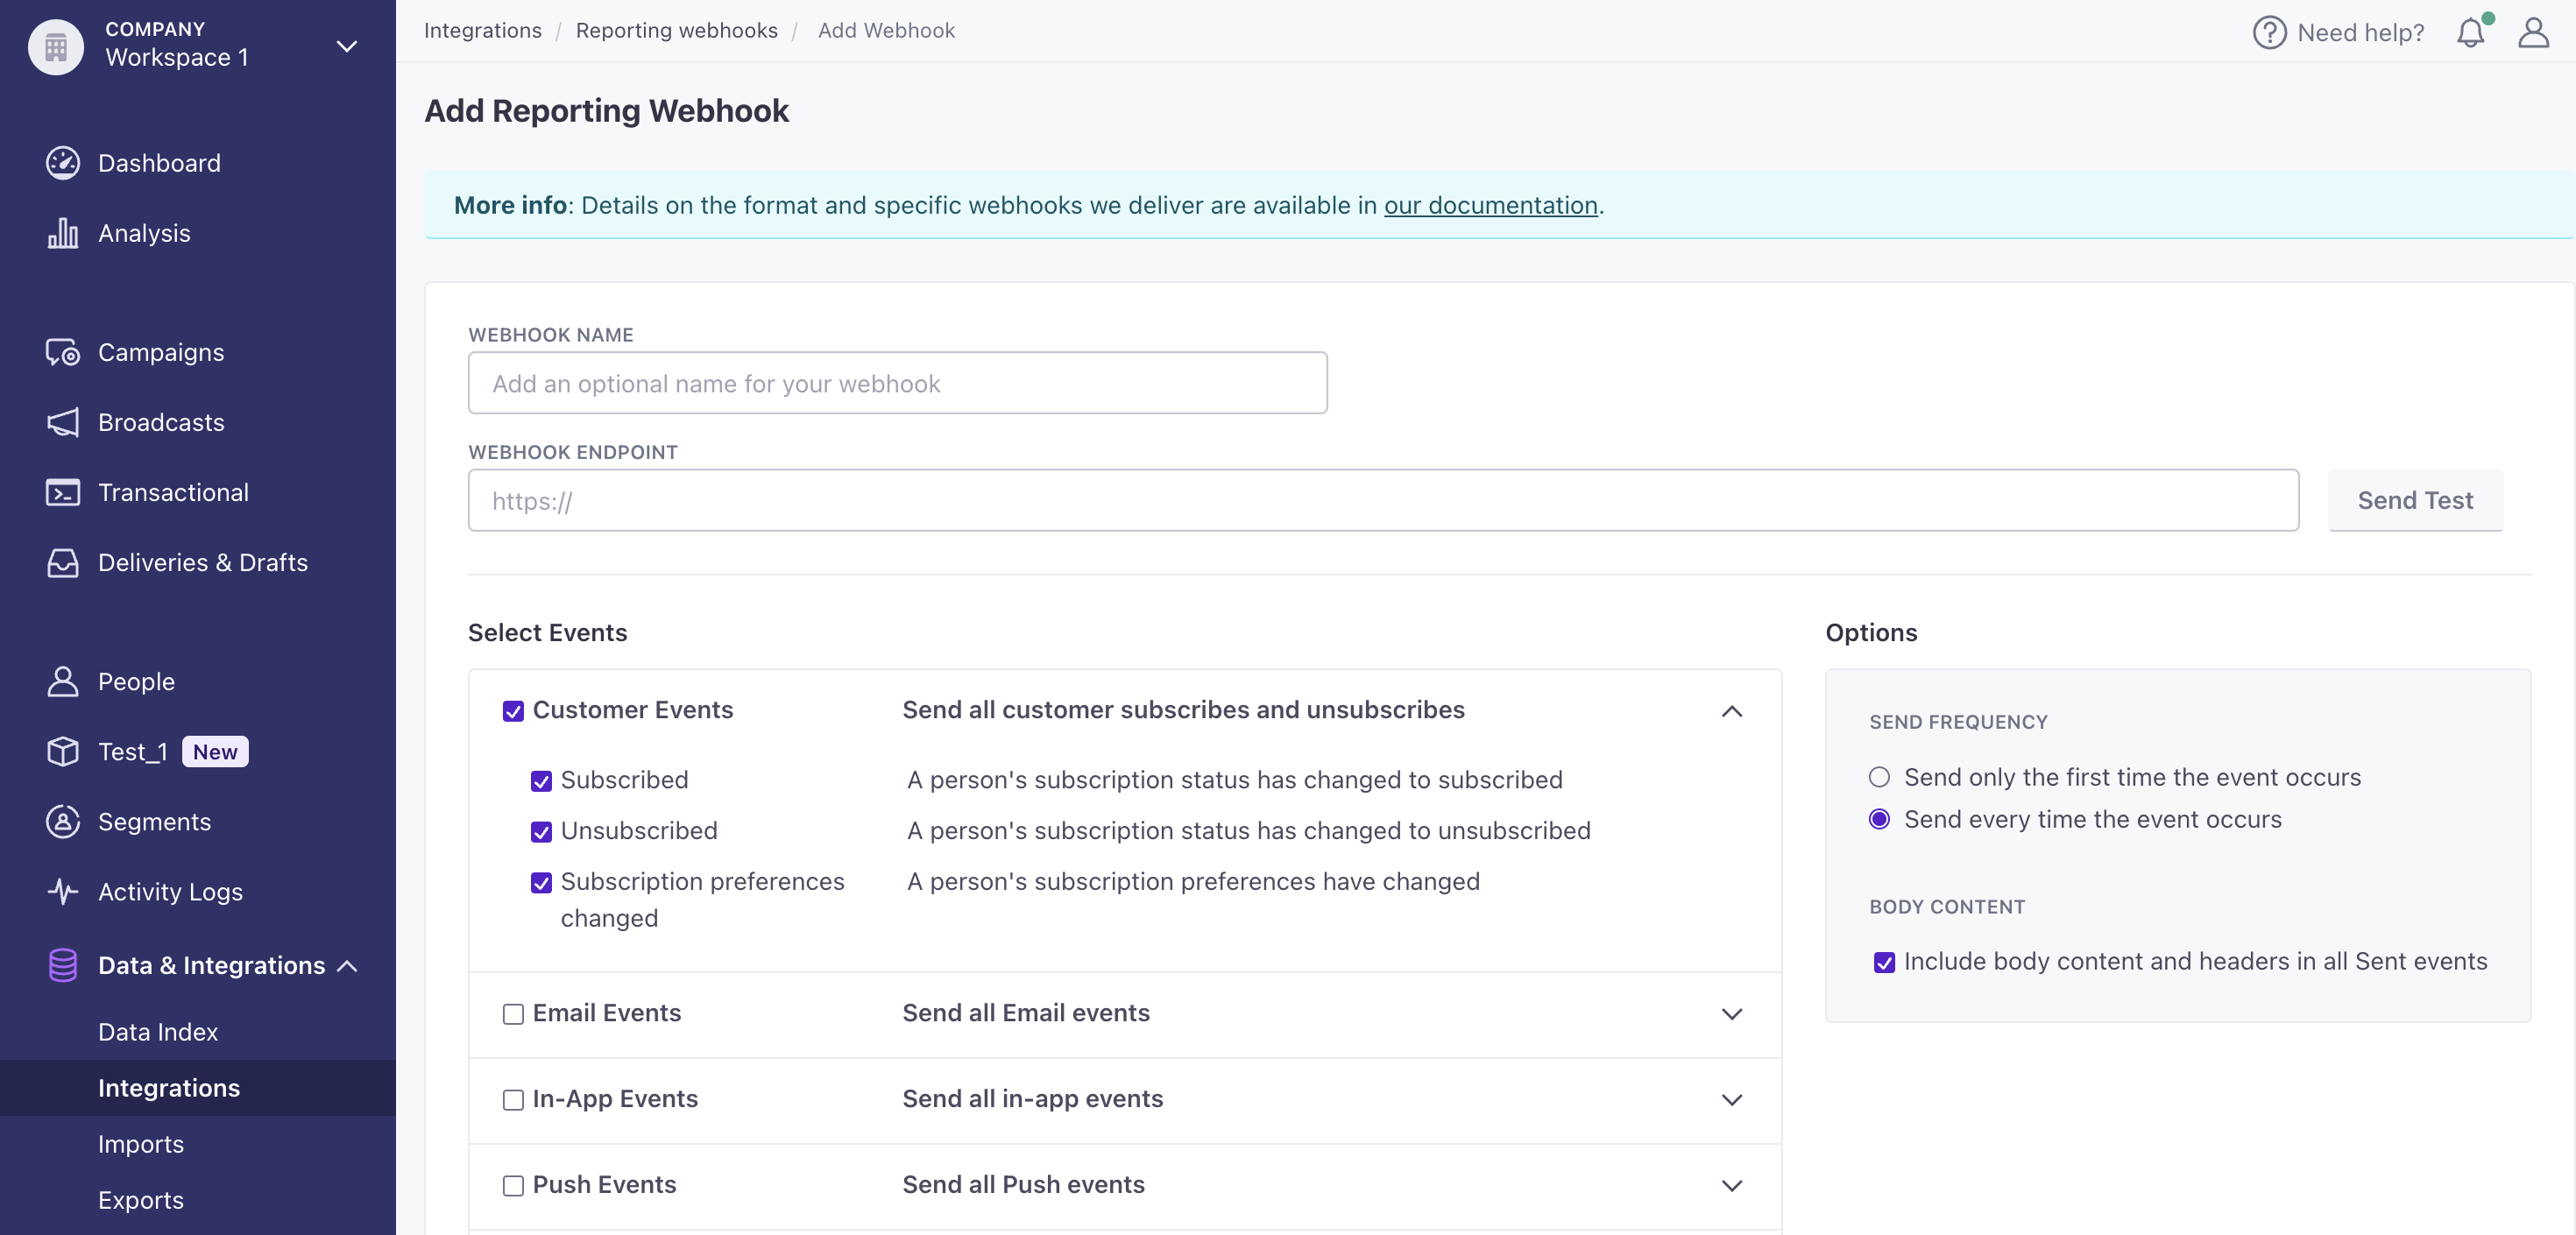
In order to send the specific values of people’s preferences, check “Include body content and headers in all Sent events” to the right of the event checklist.
Subscription preferences aren’t part of our data warehouse and other data-out integrations today. If you need to capture subscription preferences in another integration, let us know!

