Campaign for new subscribers with Stripe
Use subscription events from Stripe to trigger a campaign welcoming new subscribers to your service.
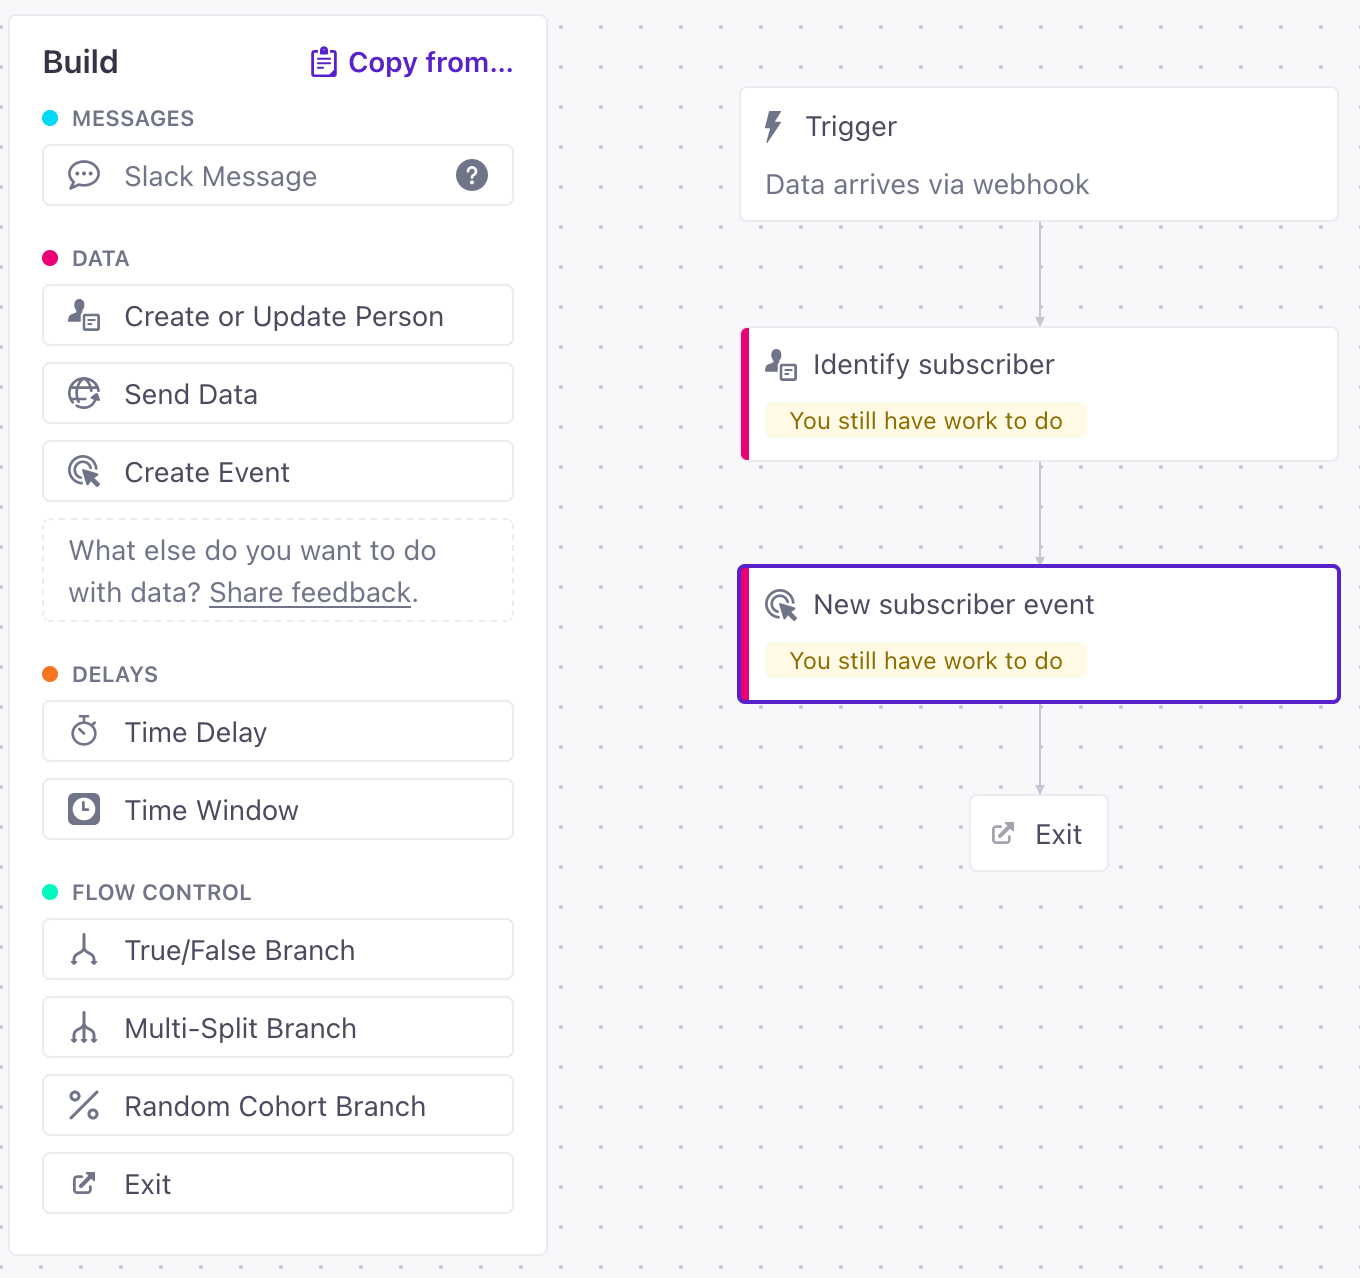
As a part of this process, you’ll trigger a campaign when someone signs up for a subscription (a subscription_schedule.created event). You’ll use this incoming data to identify your new subscriber and send an event to trigger a welcome campaign to your new subscriber.
This process works for other Stripe events
This tutorial is based on subscription events, but you could just as easily adapt it to send dunning emails based on Stripe’s invoice.payment_failed event or other use cases!
that triggers campaign C->>A: Send messages (Welcome to our service!)
Before you begin
You’ll need access to your Stripe account and your Customer.io Site ID and API Key credentials. You can find your Customer.io Site ID and API Key credentials under Data & Integrations > Integrations > Customer.io API.
As a part of this guide, you’ll:
- Set up a webhook-triggered campaign using Stripe’s Connect Webhook feature to capture a response from Stripe when someone creates a subscription—represented by the
subscription_schedule.createdevent below. - Set up an event-triggered campaign using the Stripe event to message people about their new subscription.
{
  "id": "sub_sched_1Jydf3JRq3BWBpoSiD8FYI62",
  "object": "subscription_schedule",
  "canceled_at": null,
  "completed_at": null,
  "created": 1637591905,
  "current_phase": null,
  "customer": {
      "id": "customers-id-here",
      "email": "person@example.com"
  },
  "default_settings": {
    "application_fee_percent": null,
    "automatic_tax": {
      "enabled": false
    },
    "billing_cycle_anchor": "automatic",
    "billing_thresholds": null,
    "collection_method": "charge_automatically",
    "default_payment_method": null,
    "invoice_settings": null,
    "transfer_data": null
  },
  "end_behavior": "release",
  "livemode": false,
  "metadata": {},
  "phases": [
    {
      "add_invoice_items": [],
      "application_fee_percent": null,
      "billing_cycle_anchor": null,
      "billing_thresholds": null,
      "collection_method": null,
      "coupon": null,
      "default_payment_method": null,
      "default_tax_rates": [],
      "end_date": 1669646305,
      "invoice_settings": null,
      "items": [
        {
          "billing_thresholds": null,
          "price": "price_1Jyd0G2eZvKYlo2CgSUwG9P3",
          "quantity": 1,
          "tax_rates": []
        }
      ],
      "proration_behavior": "create_prorations",
      "start_date": 163819670
      5,
      "transfer_data": null,
      "trial_end": null
    }
  ],
  "released_at": null,
  "released_subscription": null,
  "status": "not_started",
  "subscription": null
}
Capture your audience’s email in subscriptions!
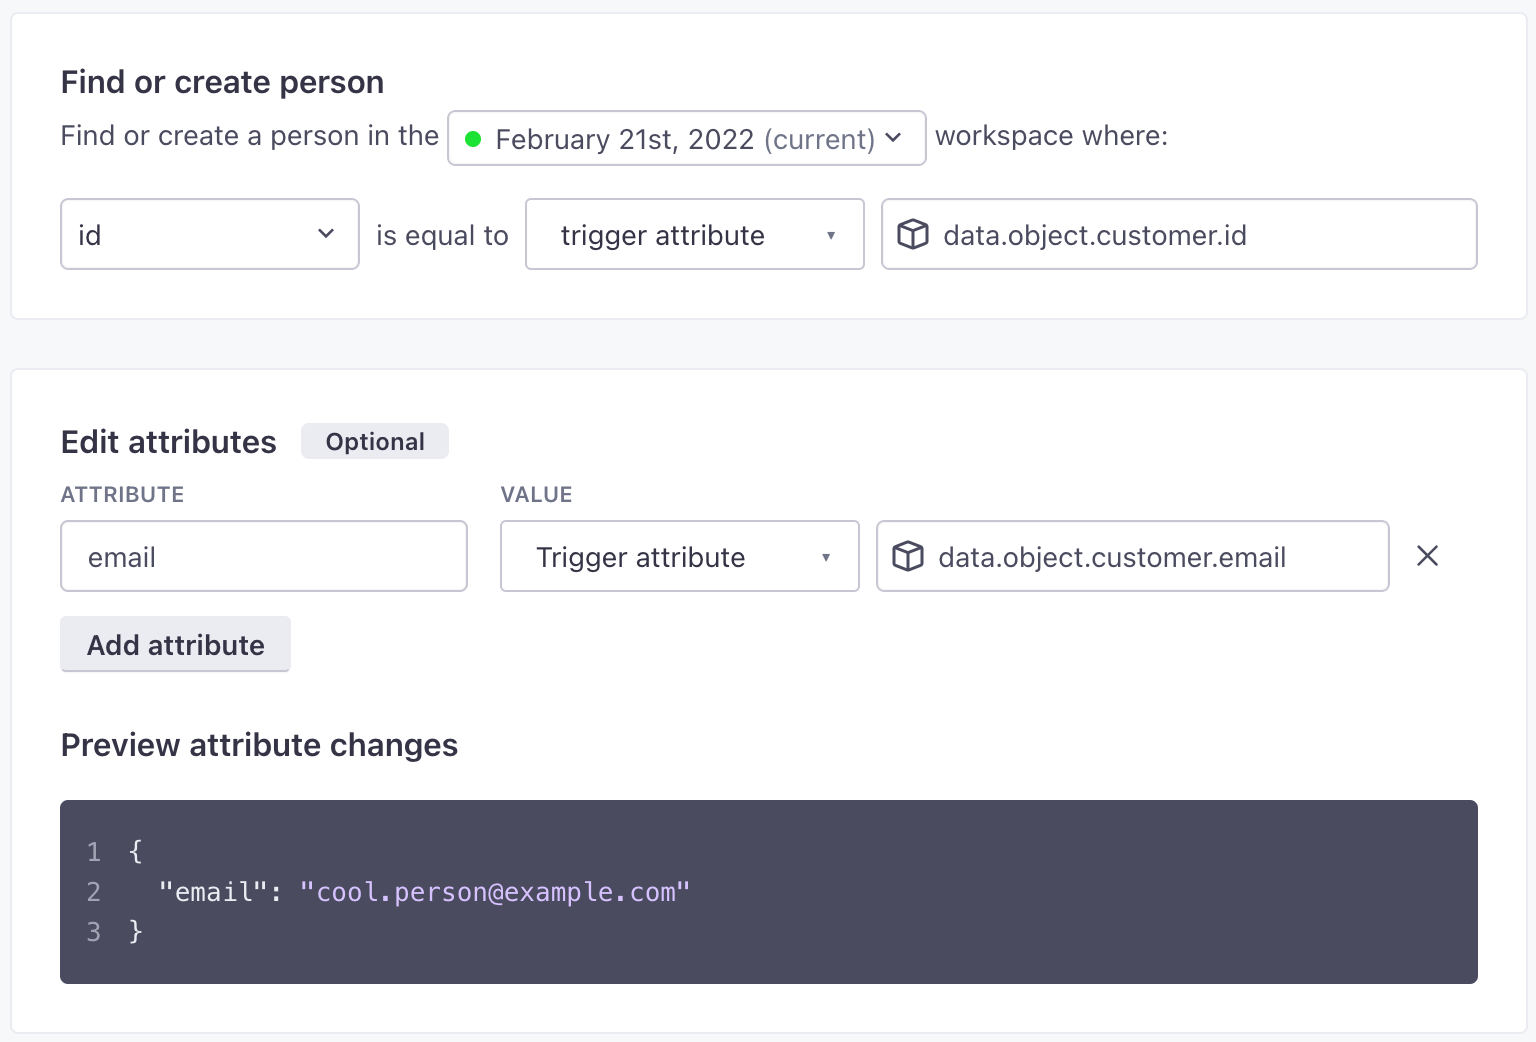
The customer value in a Stripe event can be a string containing a person’s ID, or an object containing multiple identifiers (id, email, etc) depending on the information you gather from a person. Capturing a person’s email lets you use Stripe as a single source to identify and message people as a part of this tutorial.
Set up your webhook-triggered campaign
This workflow will identifyThe Customer.io operation that adds or updates a person. When you identify a person, Customer.io either adds a person if they don’t exist in your workspace, or updates them if they do. Before you identify someone (by their email address or an ID), you can track them anonymously. people and convert incoming subscription_status.succeeded events—sent when someone subscribes to your service—to Customer.io events. Later, we’ll use these events to trigger a campaign that messages your new subscribers and assigns them an ID if they don’t already have one.
Go to Campaigns and click Create Campaign.
Select Data arrives via webhook and copy the Webhook URL.

In Stripe, go to Developers > Webhooks and click Add endpoint.
- Paste your Webhook URL into the Endpoint URL field.
- Click Select events, select Supscription Schedule > subscription_schedule.created, and then click Add events. This tells Stripe to trigger your webhook when someone creates a new subscription.
- Click Add endpoint.
- Turn Test mode on, if it isn’t already, and then Send a test event. This provides Customer.io with some test values that you can reference when creating your campaign.
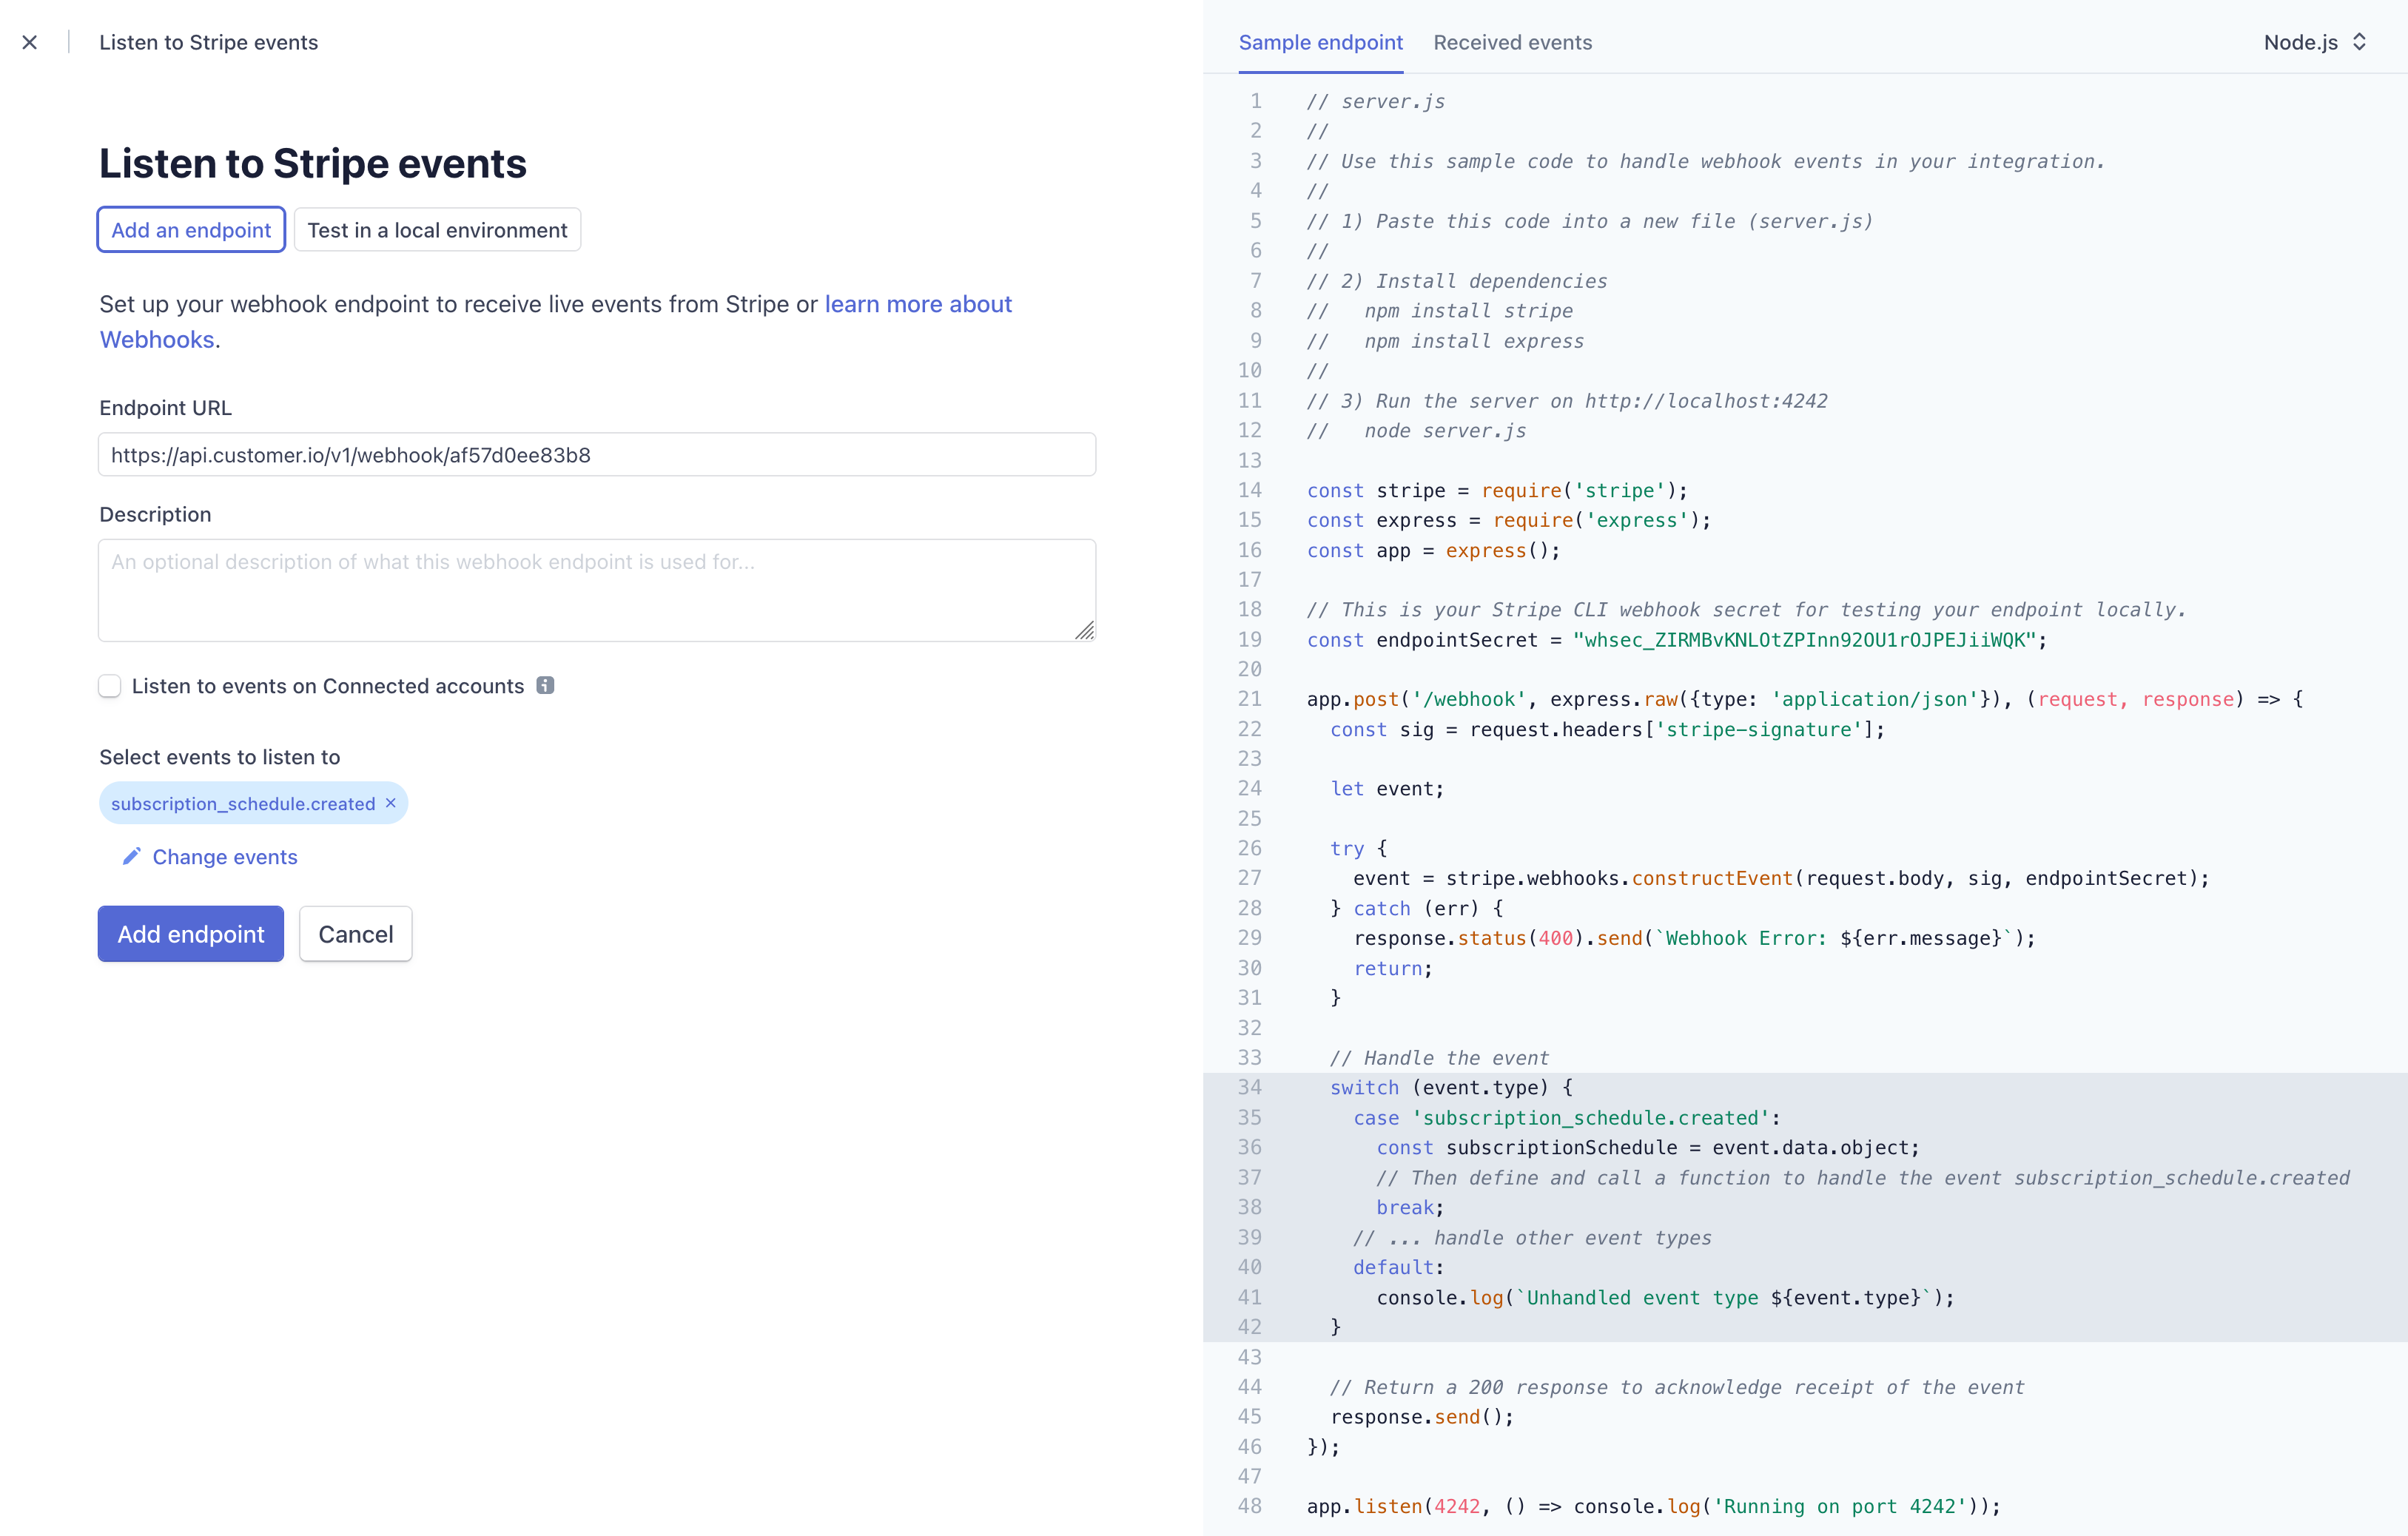
Return to Customer.io and make sure that you received test data. If so, click Save & Next.
Click Save Changes and finish setting up your webhook-triggered campaign. Now you’re ready to set up your campaign to message people who responded to your NPS survey!
Set up your event-based campaign
Now you can trigger a campaign to send messages to new subscribers using the Stripe Subscription Created event you set up in your webhook-triggered campaign.
Tag your campaigns
In this tutorial, you need two campaigns to achieve your goal. If you apply a tag to both your webhook-triggered and event-based campaigns, you can easily relate your campaigns and find them on the Campaigns page.
Go to Campaigns and click Create Campaign.
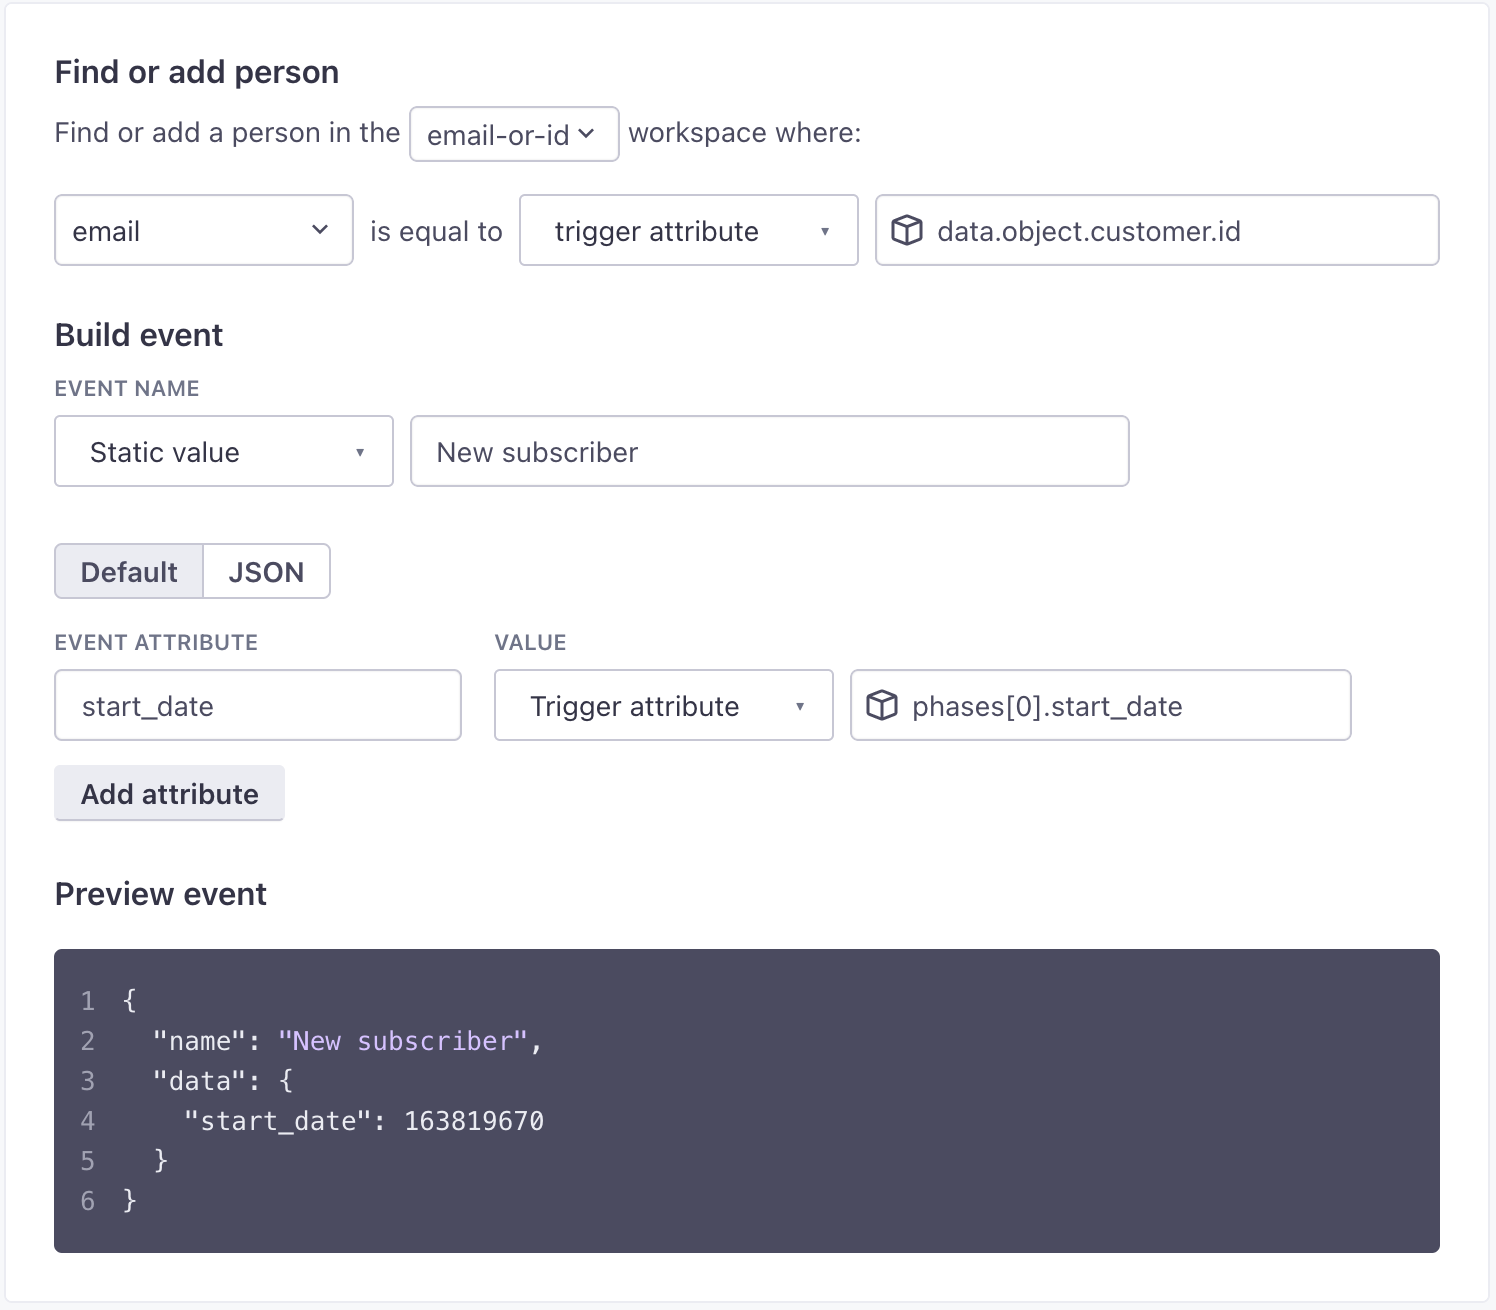
Click A person performs an event. Under Define the trigger event, enter
stripe-subscription-createdand set additional filters. For this case, we only care that they’re creating a subscription, but we might want to limit the campaign Frequency, in case a person has cancelled and restarted their subscription over a short period.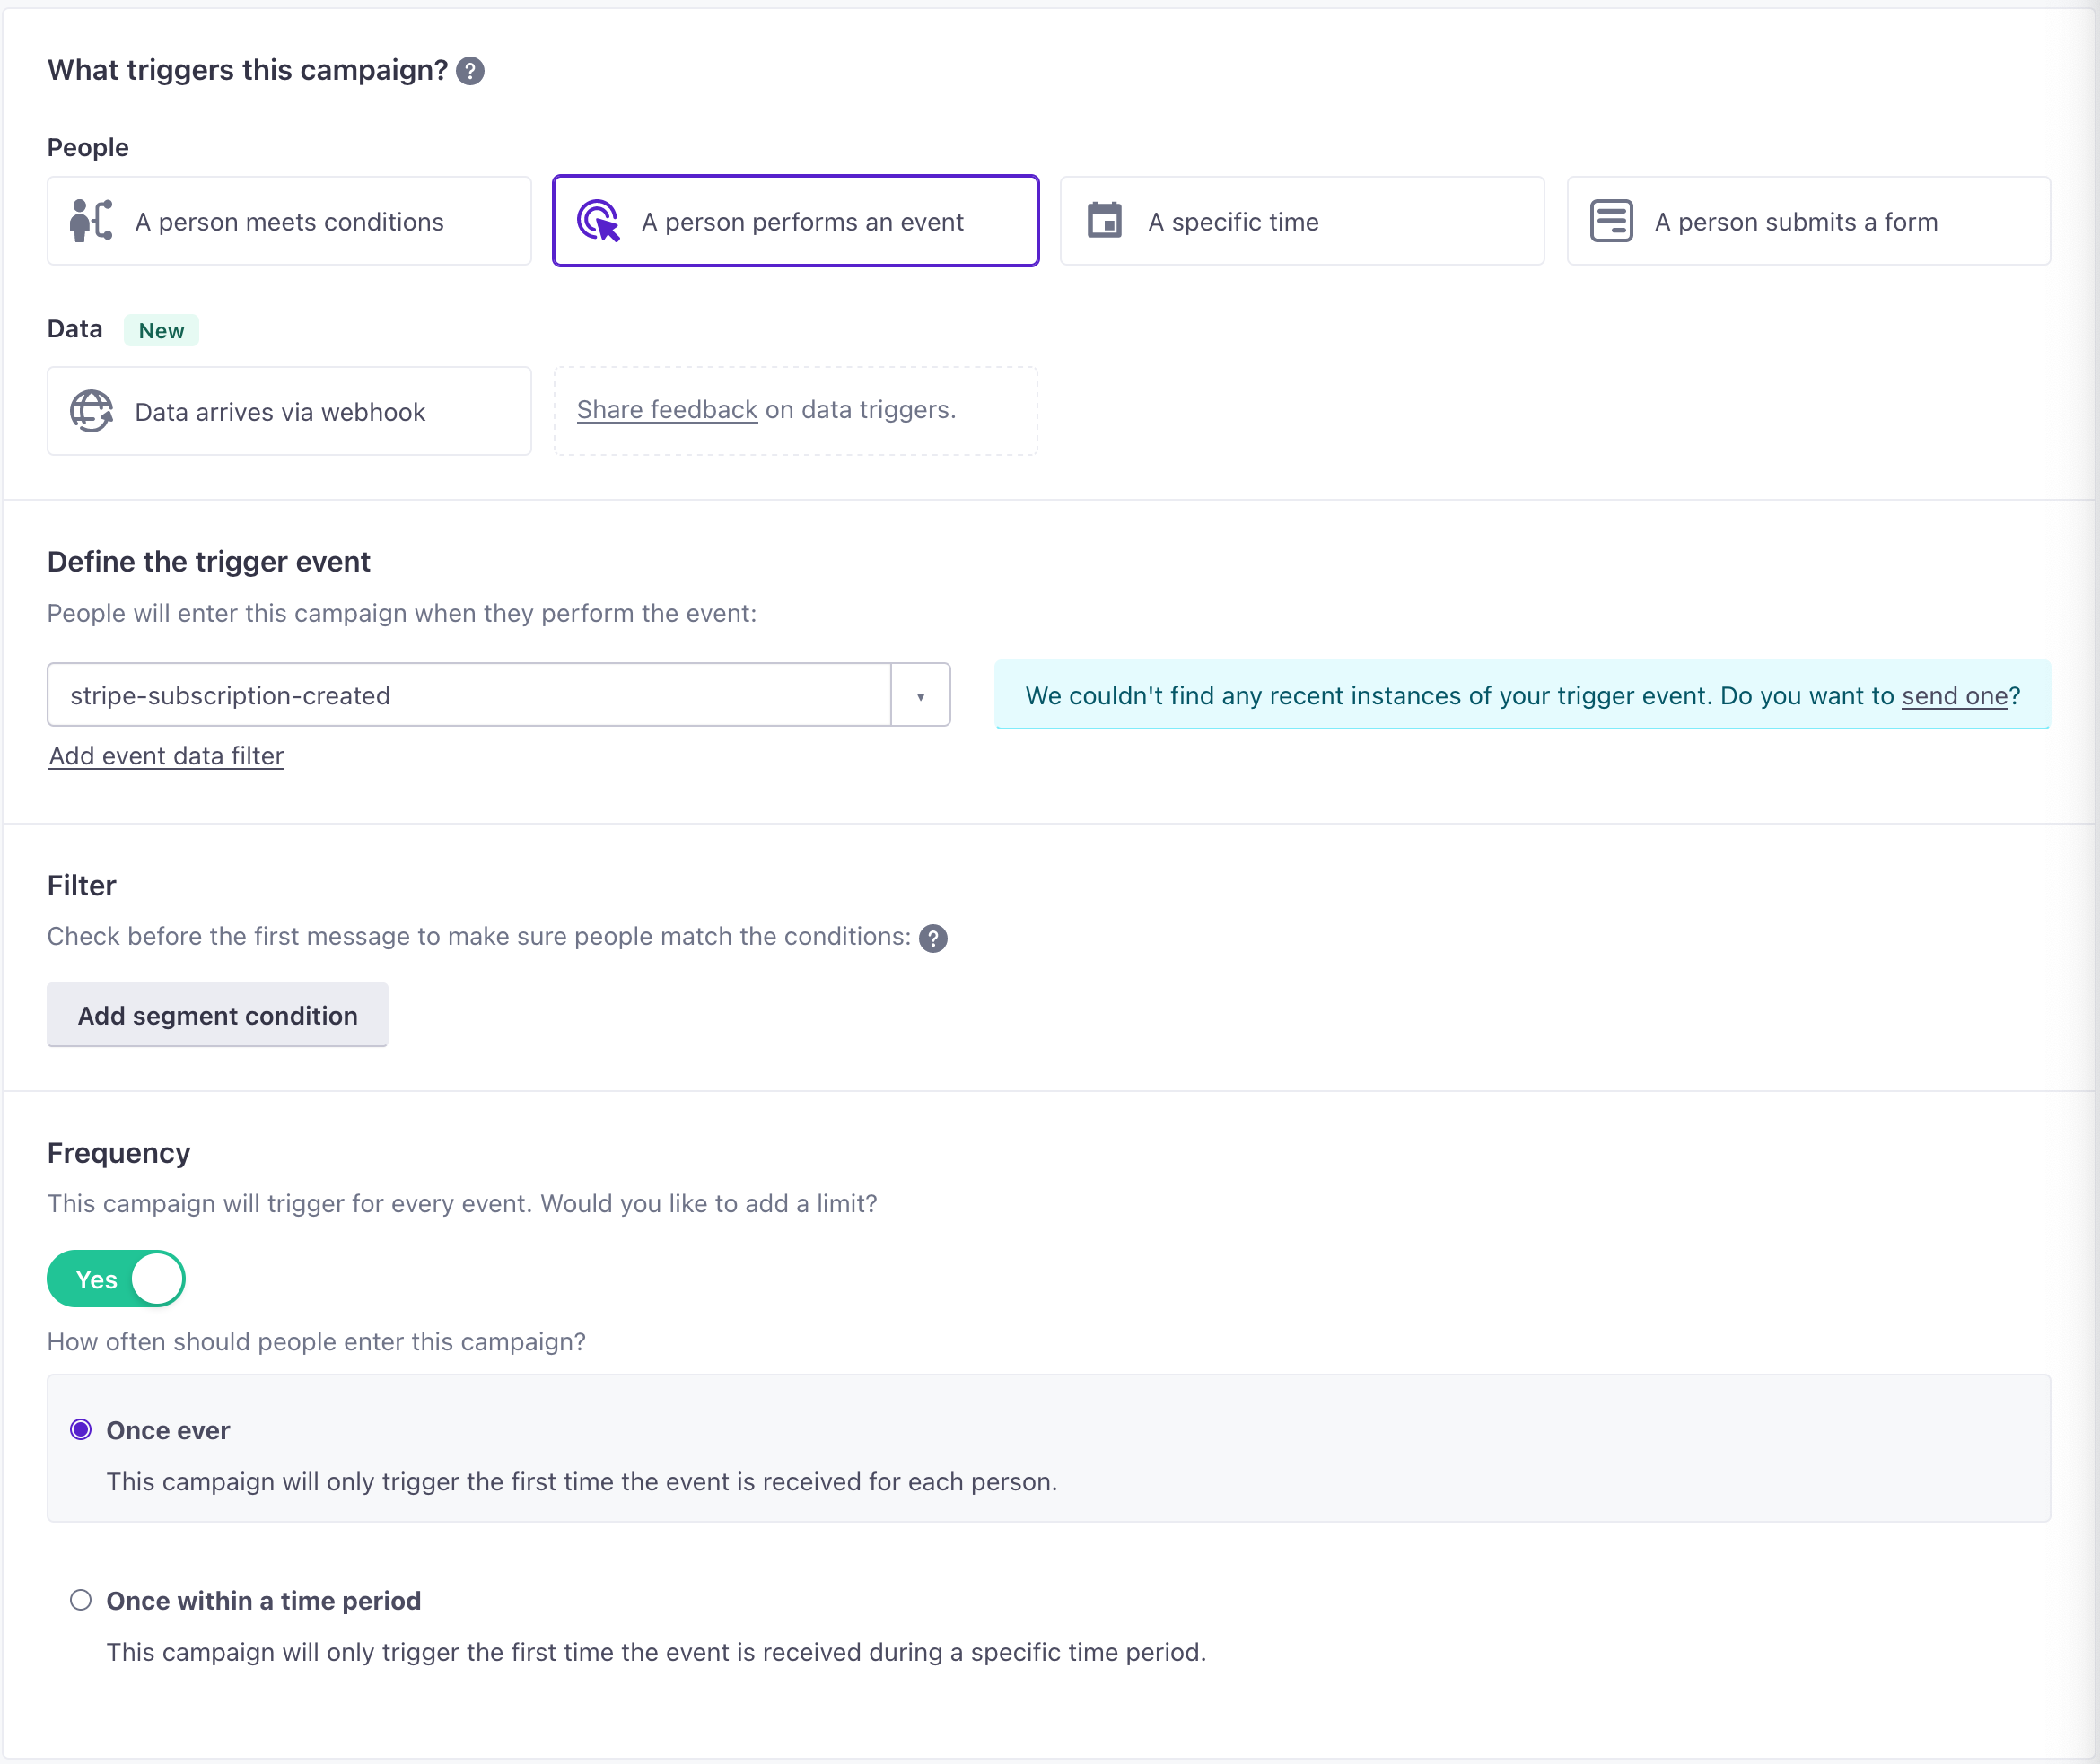
In your workflow, add messages. You can access properties from the incoming event using liquidA syntax that supports variables, letting you personalize messages for your audience. For example, if you want to reference a person’s first name, you might use the variable
{{customer.first_name}}. in theeventobject—i.e.{{event.<property>}}.When you’re finished, click Save & Next, and finish configuring your campaign. Now, when someone subscribes to your service, you can identify them and start them on a campaign!

