Segment destination
Use Segment’s destination actions to capture events and shape data from any one of Segment’s Source integrations in Customer.io, including anonymous events.
Do you have a standard Segment destination?
This page helps you use Customer.io with Segment’s “destination actions” feature. If you’re using Segment’s classic integration with Customer.io, and you don’t want to upgrade, see the Segment Destination (classic) page.
Unlike our standard Segment Destination integration, the Destination Actions integration supports anonymous events. Segment’s Destination Actions feature lets you filter the events that you send to Customer.io, helping you determine exactly what data you want to send to your destination. It also lets you map properties from the source event to destination calls, helping you shape information from your source to Customer.io without having to write code.
If you already have a standard Segment Destination integration and want to upgrade, check out our upgrade path.
Set up Segment Destination Actions
If you want to take advantage of anonymous events from Segment in Customer.io, you need to use Segment’s Destination Actions feature. This framework makes it easy to map anonymous events that you capture from another source to Customer.io.
- In your Segment workspace, go to Destinations and click Add Destination.
- Click Destination Actions in the left navigation, and then select Customer.io Actions.
- Click Configure Customer.io Actions. If prompted, select the source that you want to connect to Customer.io.
- Enter your Customer.io Site ID and API Key.
You can find your Customer.io Site ID and API Key credentials under Data & Integrations > Integrations > Customer.io API.
- Click Configure Actions.
- Select the Source that you want to connect to your destination and then click Authenticate.
- Enter your Customer.io Site ID and API Key. You can find your Customer.io Site ID and API Key credentials under Data & Integrations > Customer.io API.
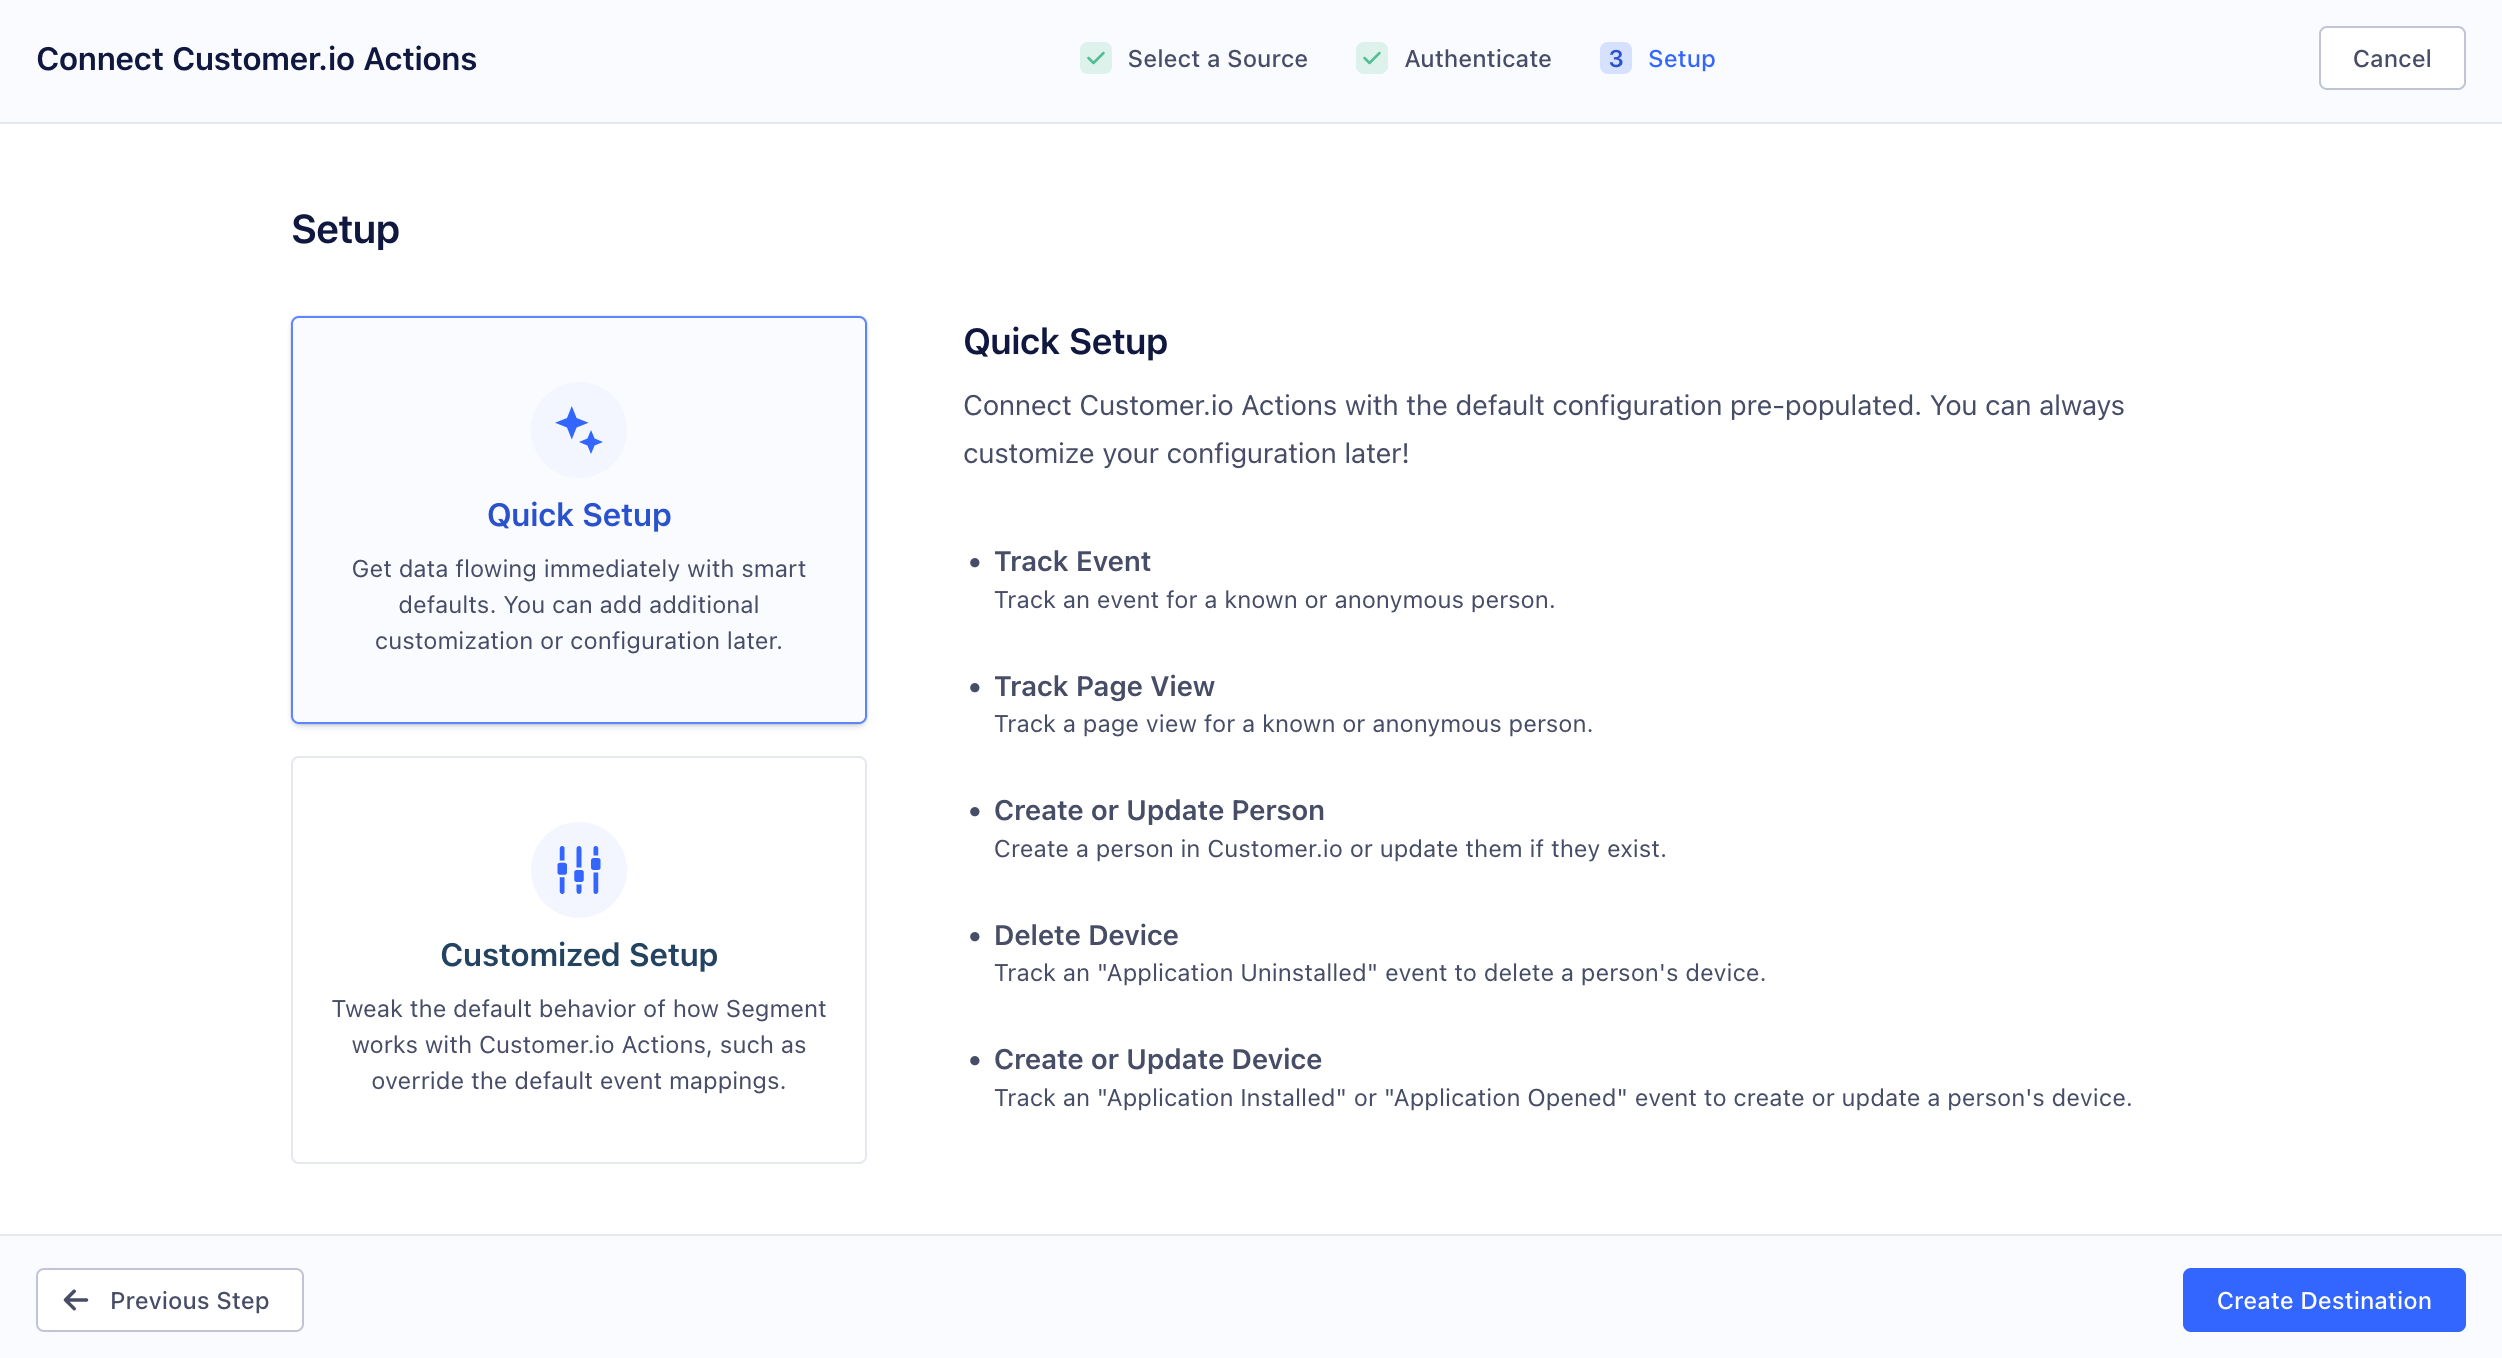
- Select how you want to set up your actions and click Create Destination. In general, you should use Quick Setup and take advantage of our default mappings, but you can also click Customized Setup to filter the events that you send into Customer.io and re-map event properties. See the section below for more information about filtering and mapping actions.
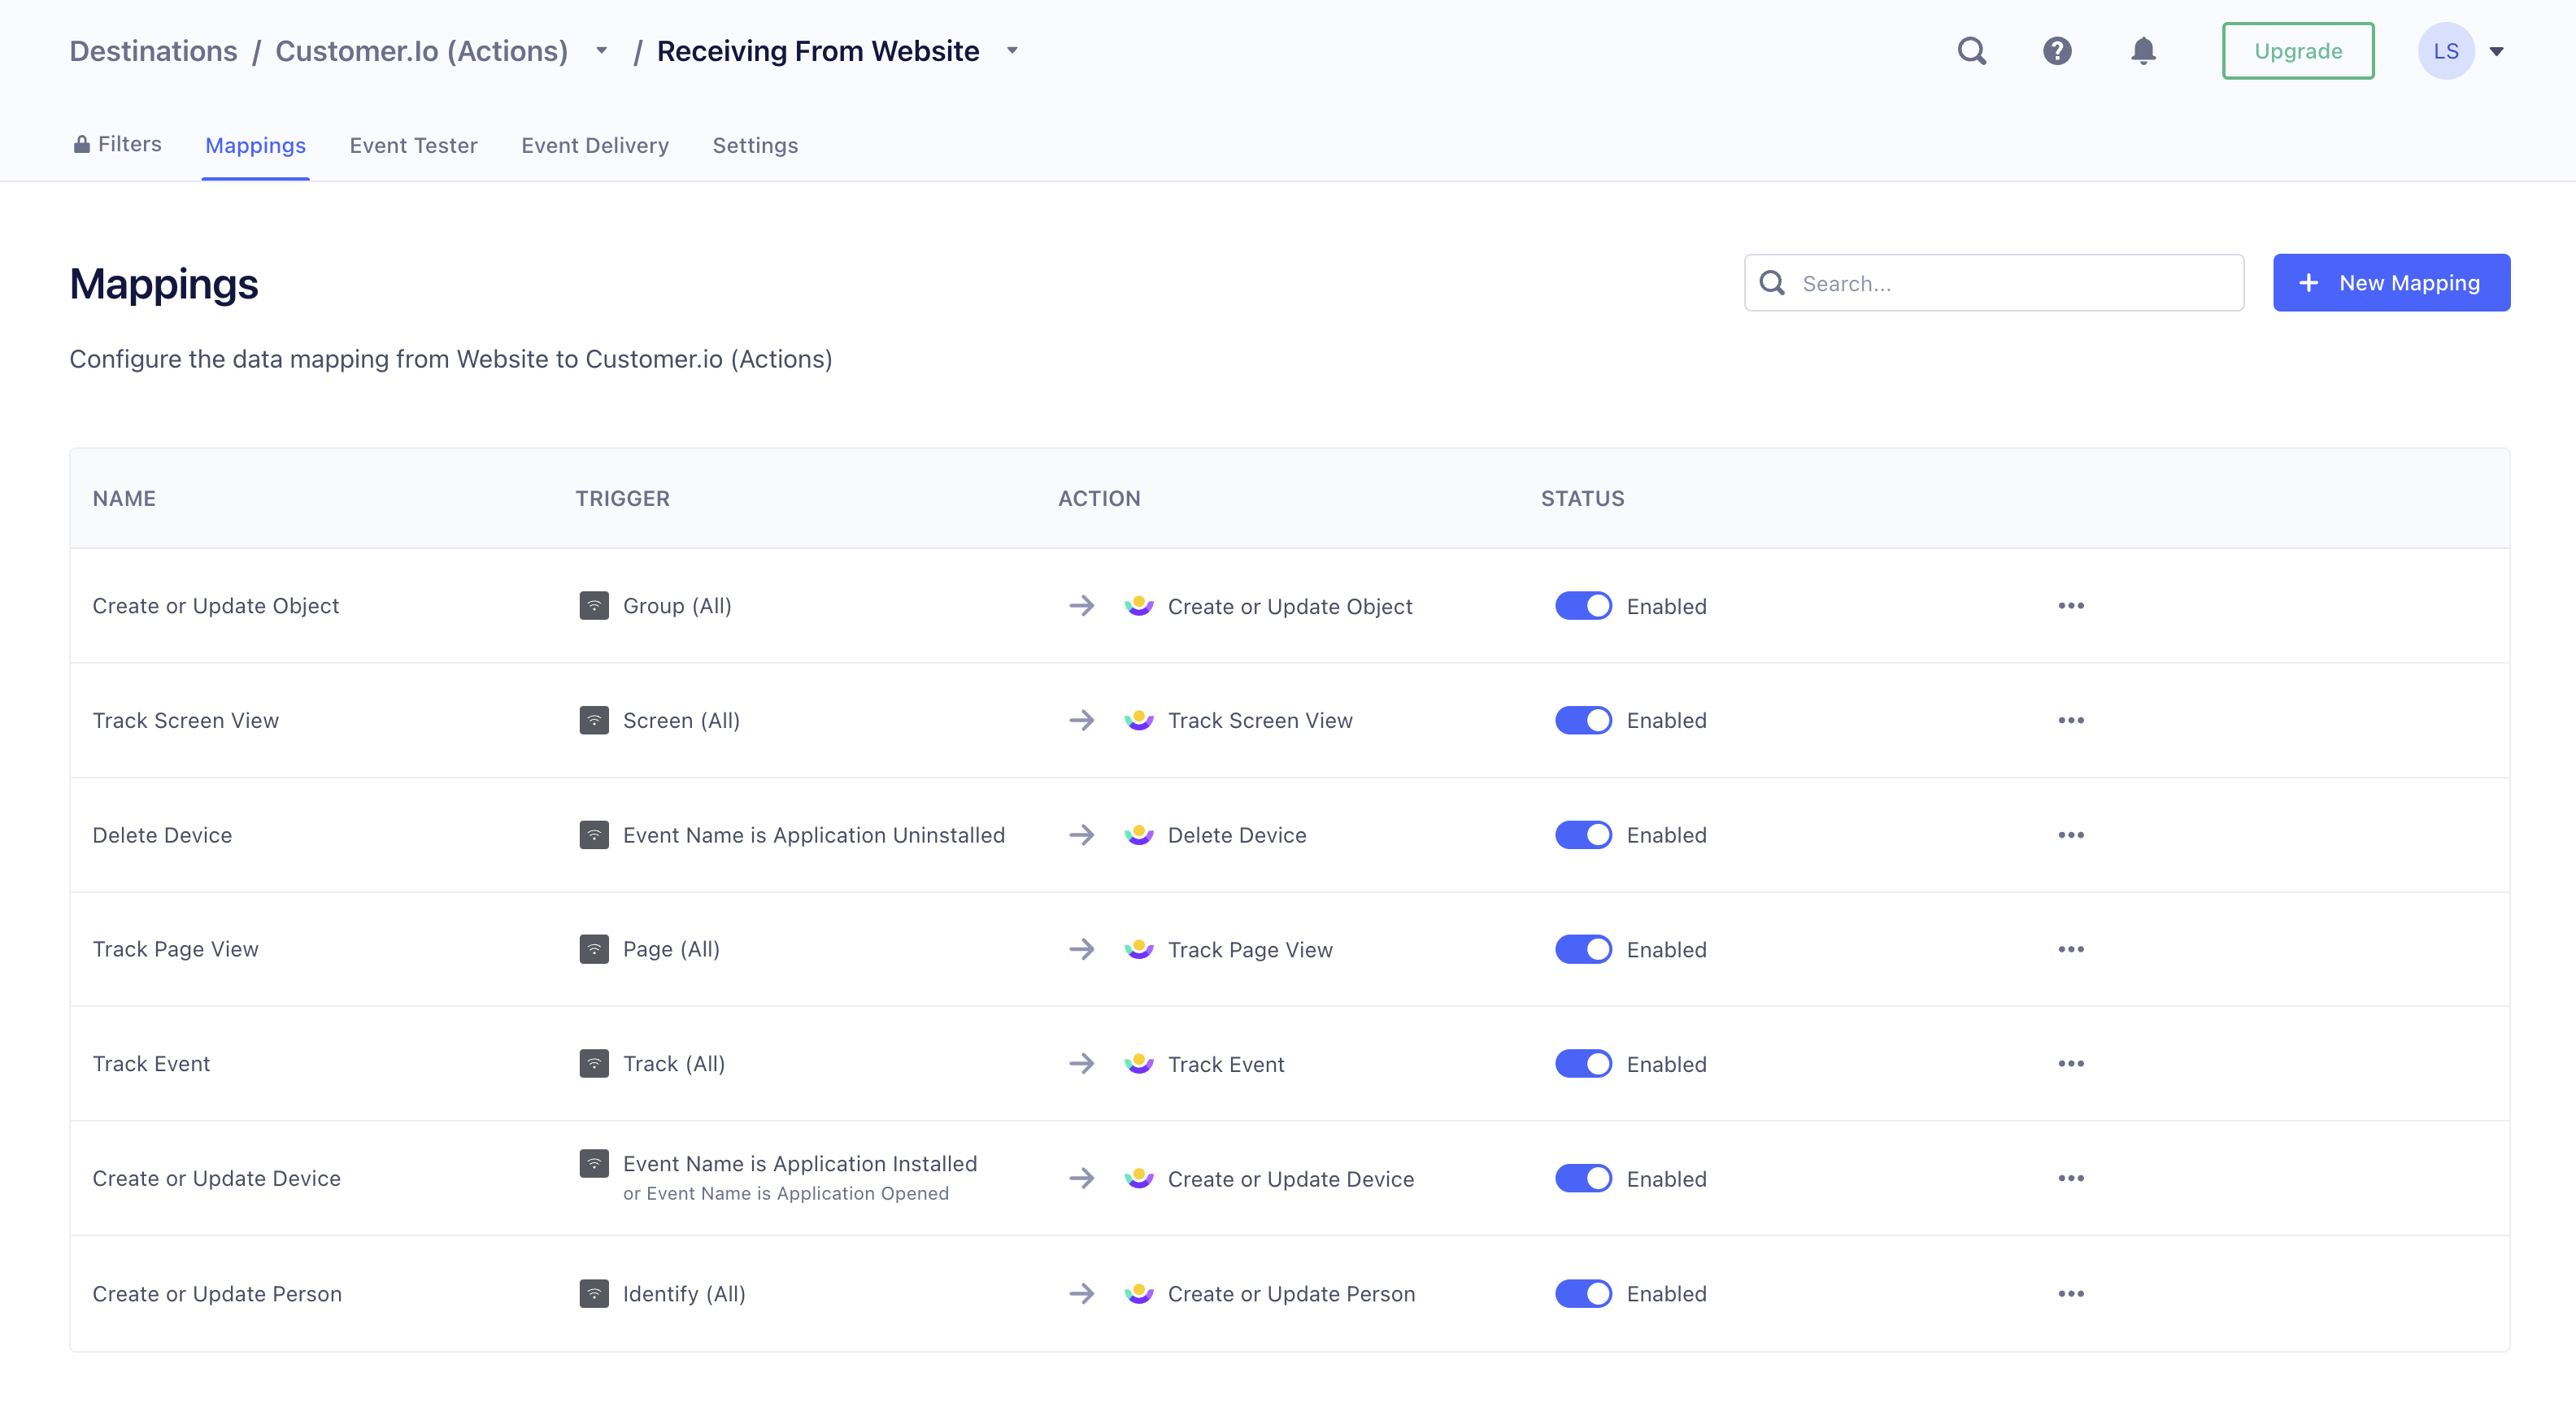
Filter and Map Actions
When you configure Customer.io with Destination Actions, the actions are pre-populated with default settings. You can select an action to filter the source events that you send to Customer.io and map the properties from the source event to the Customer.io action. If this is something you want to do, you should understand the information that you send in identify and track calls to Segment before you begin.
To get to your Actions, go to Destinations, select your Customer.io destination, and then click Actions. Select any of the actions to filter the source event and map to the destination event.
- Use Set up event trigger to filter the event(s) that Segment sends to Customer.io.
- Use Configure action fields to re-map source properties to Customer.io.
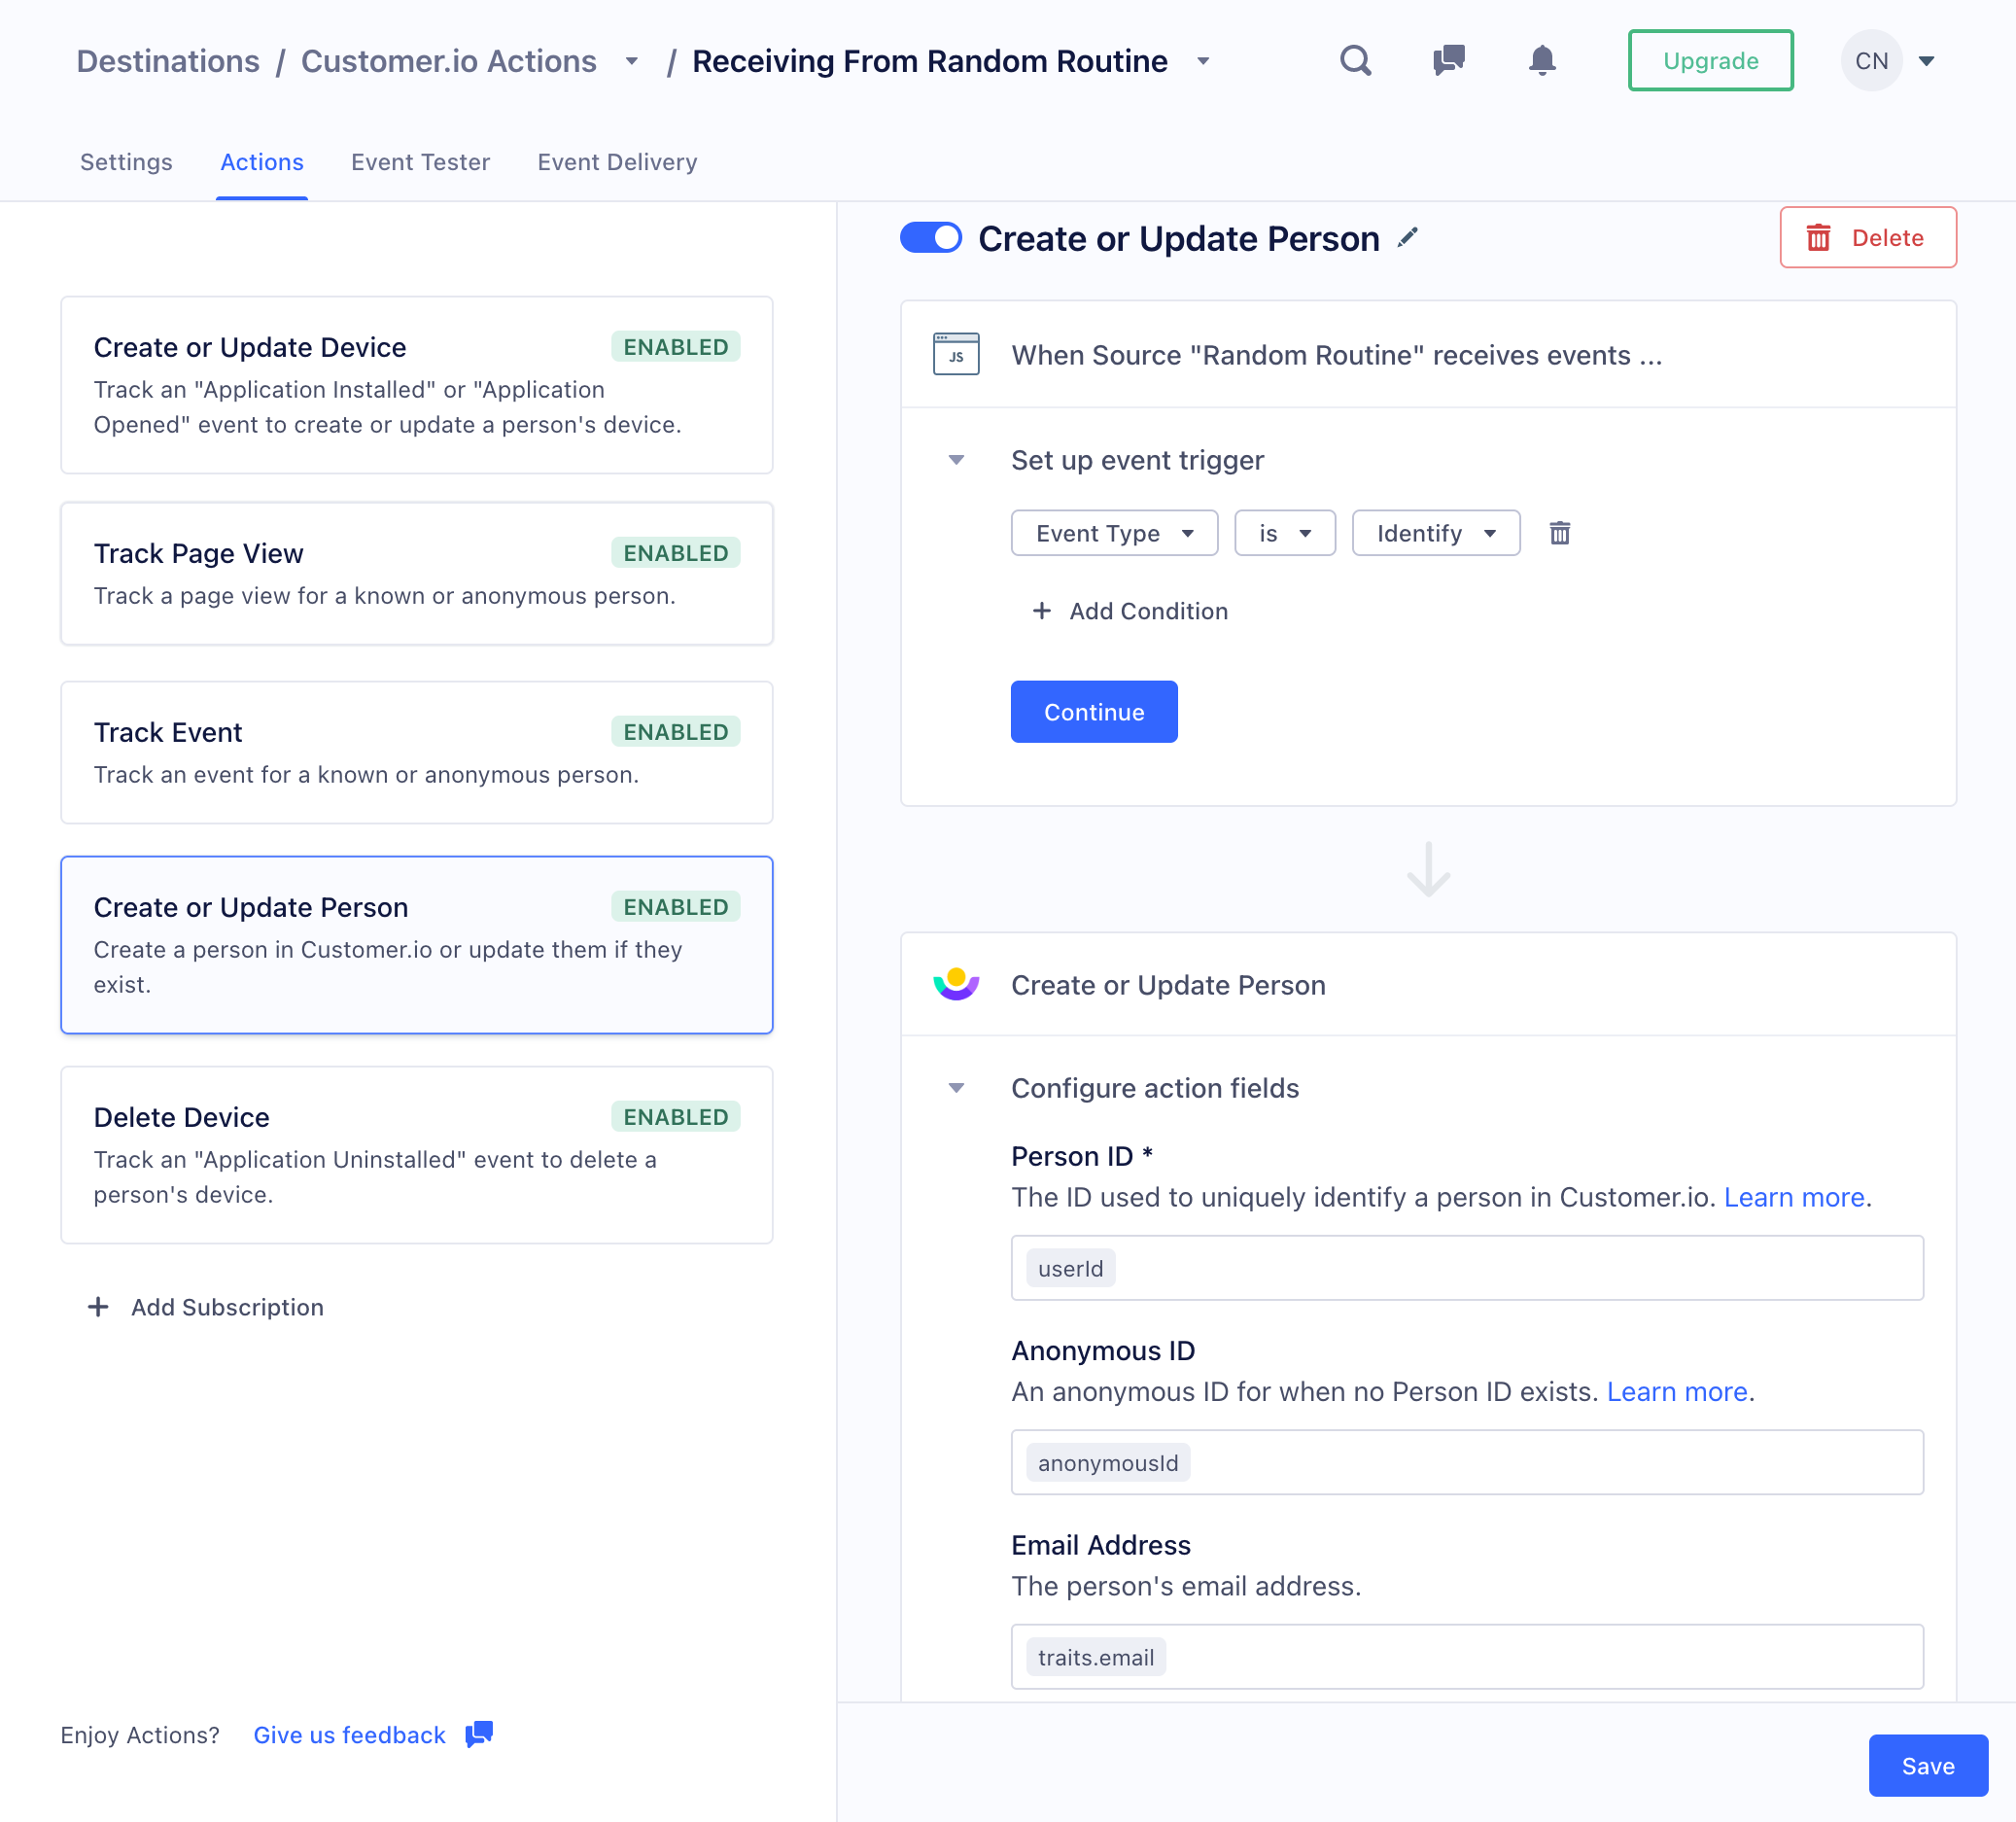
For example, if you know that a specific event type represents your leads—people you identify by email address—you may want to filter the event trigger by that event name, and then set the Person ID action field to email. This ensures that the source event represents a person that you identify by email address.
Converting timestamps
When you map some actions, you’ll see a Convert Timestamps setting. This setting is on by default, and converts traits containing ISO-8601 timestamps to Unix timestamps (seconds since epoch). We strongly suggest that you leave this setting enabled. While we support ISO-8601 timestamps in liquidA syntax that supports variables, letting you personalize messages for your audience. For example, if you want to reference a person’s first name, you might use the variable {{customer.first_name}}., you must use Unix timestamps to take advantage of timestamp conditions when segmenting your audience.
Event tester and common errors
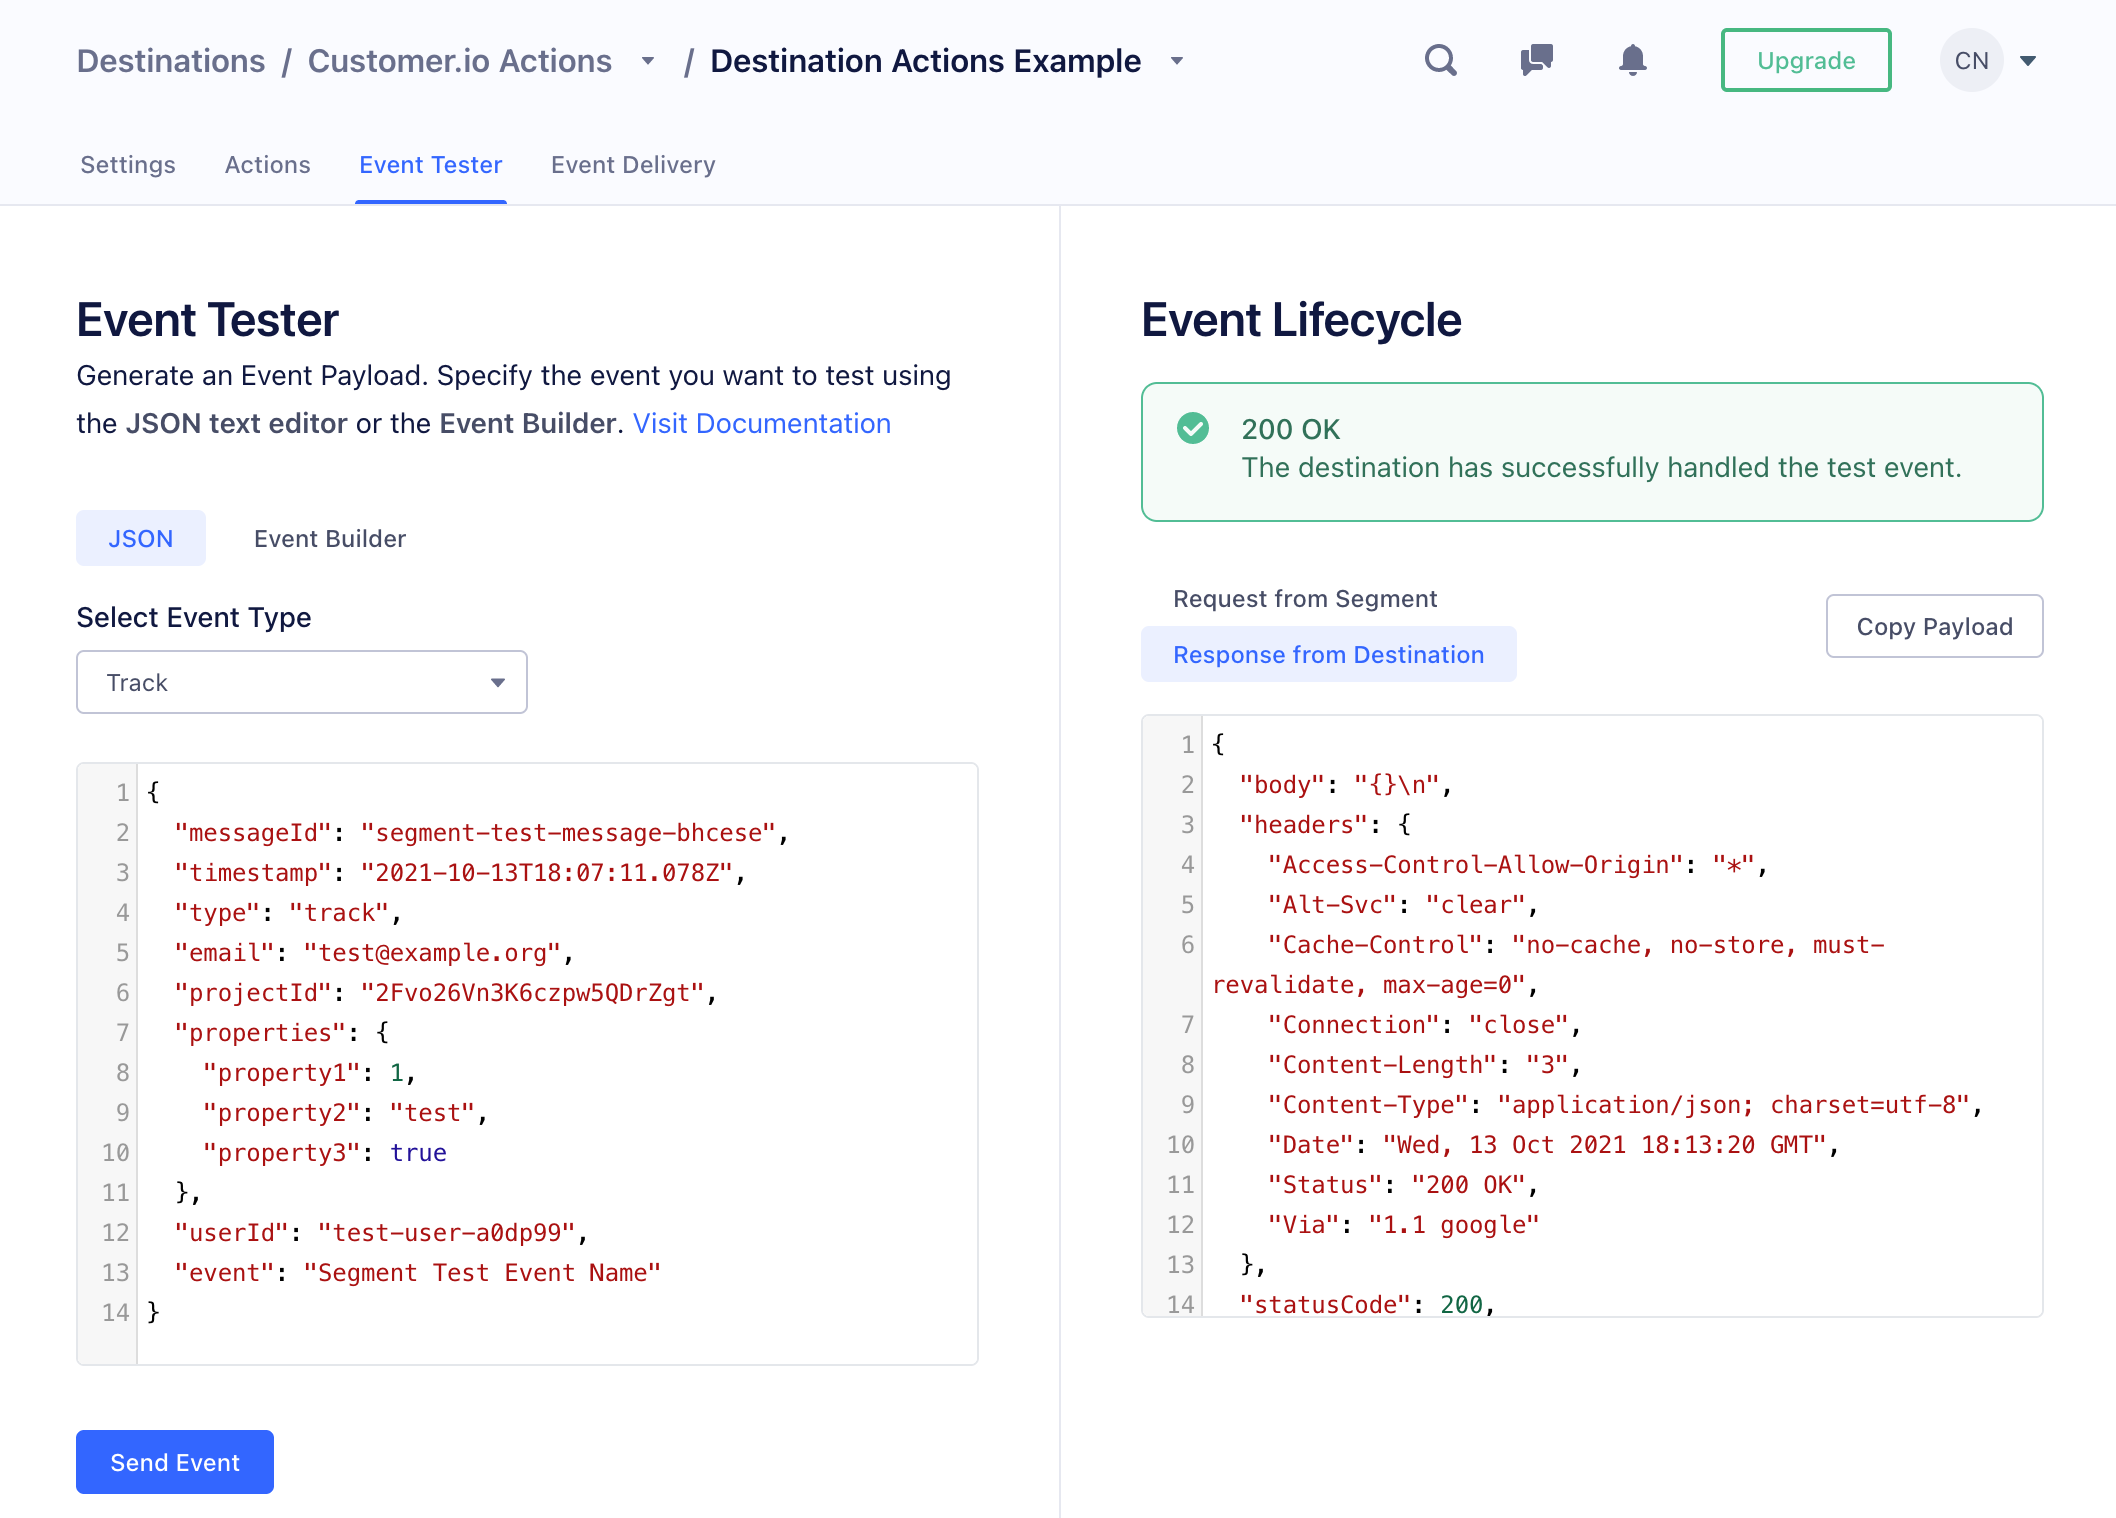
On your destination actions page in Segment, you can go to the Event Tester tab to send test events to validate your action subscriptions. Test events will appear in your event destination as real data; most event types contain a userId, so take care not to inadvertently represent a real person with your test data. You may want to change the userID to the value of a designated “test person” in your Customer.io workspace.
Use the Type option to determine the type of event you want to test. By default, the Event Tester shows the JSON tab, but you can use the Event Builder for a no-code option to build your event. In either case, the event is pre-formatted, but you can populate properties to better represent your audience.
Common errors include:
The default Page event subscription expects page views as sent from Segment’s JavaScript snippet, which populates URLs at If you capture page view events using Segment’s API, which expects URLs in the We don’t support Segment’s Screen event type; you can’t set up a subscription using this event type. Attempting to test against this event will result in an error.The root value is missing the required field
url.properties.url. You must provide this value in your test event unless you set up a subscription to capture events page views using Segment’s API.name field, you can set up a new subscription on the Actions tab. Set the event trigger when the Event Type is Page and set Page URL to name.Segment did not send any requests to the destination
Migrate to Destination Actions
If you already have a Segment Destination integration, and want to take advantage of anonymous events or other mapping functions, you can migrate to Destination Actions in Segment. You’ll need to set up Destination Actions first then turn your standard destination integration off. While migrating over, you may receive duplicate events.
- Set up your new Destination Action.
- In Segment, click Destinations and select your original Customer.io Segment destination.
- Click the toggle to disable it.
You may receive duplicate events in the time after you set up your new destination action and before you disable the old destination.

- In Customer.io, go to Integrations and click your legacy Segment integration.
- Click Remove Integration so it no longer displays as active in your workspace integrations.
Identify people
The Identify method corresponds to the Create or Update Person action (or any custom subscriptions you create to identify people in Customer.io). Segment’s method to identify people is very similar to adding or updating people in Customer.io.
Here’s an example request:
analytics.identify('userId123', {
  email: 'john.doe@example.com'
});
When you identify a new user, the user is added to your Customer.io workspace. If the user already exists, the request updates the existing person’s attributes.
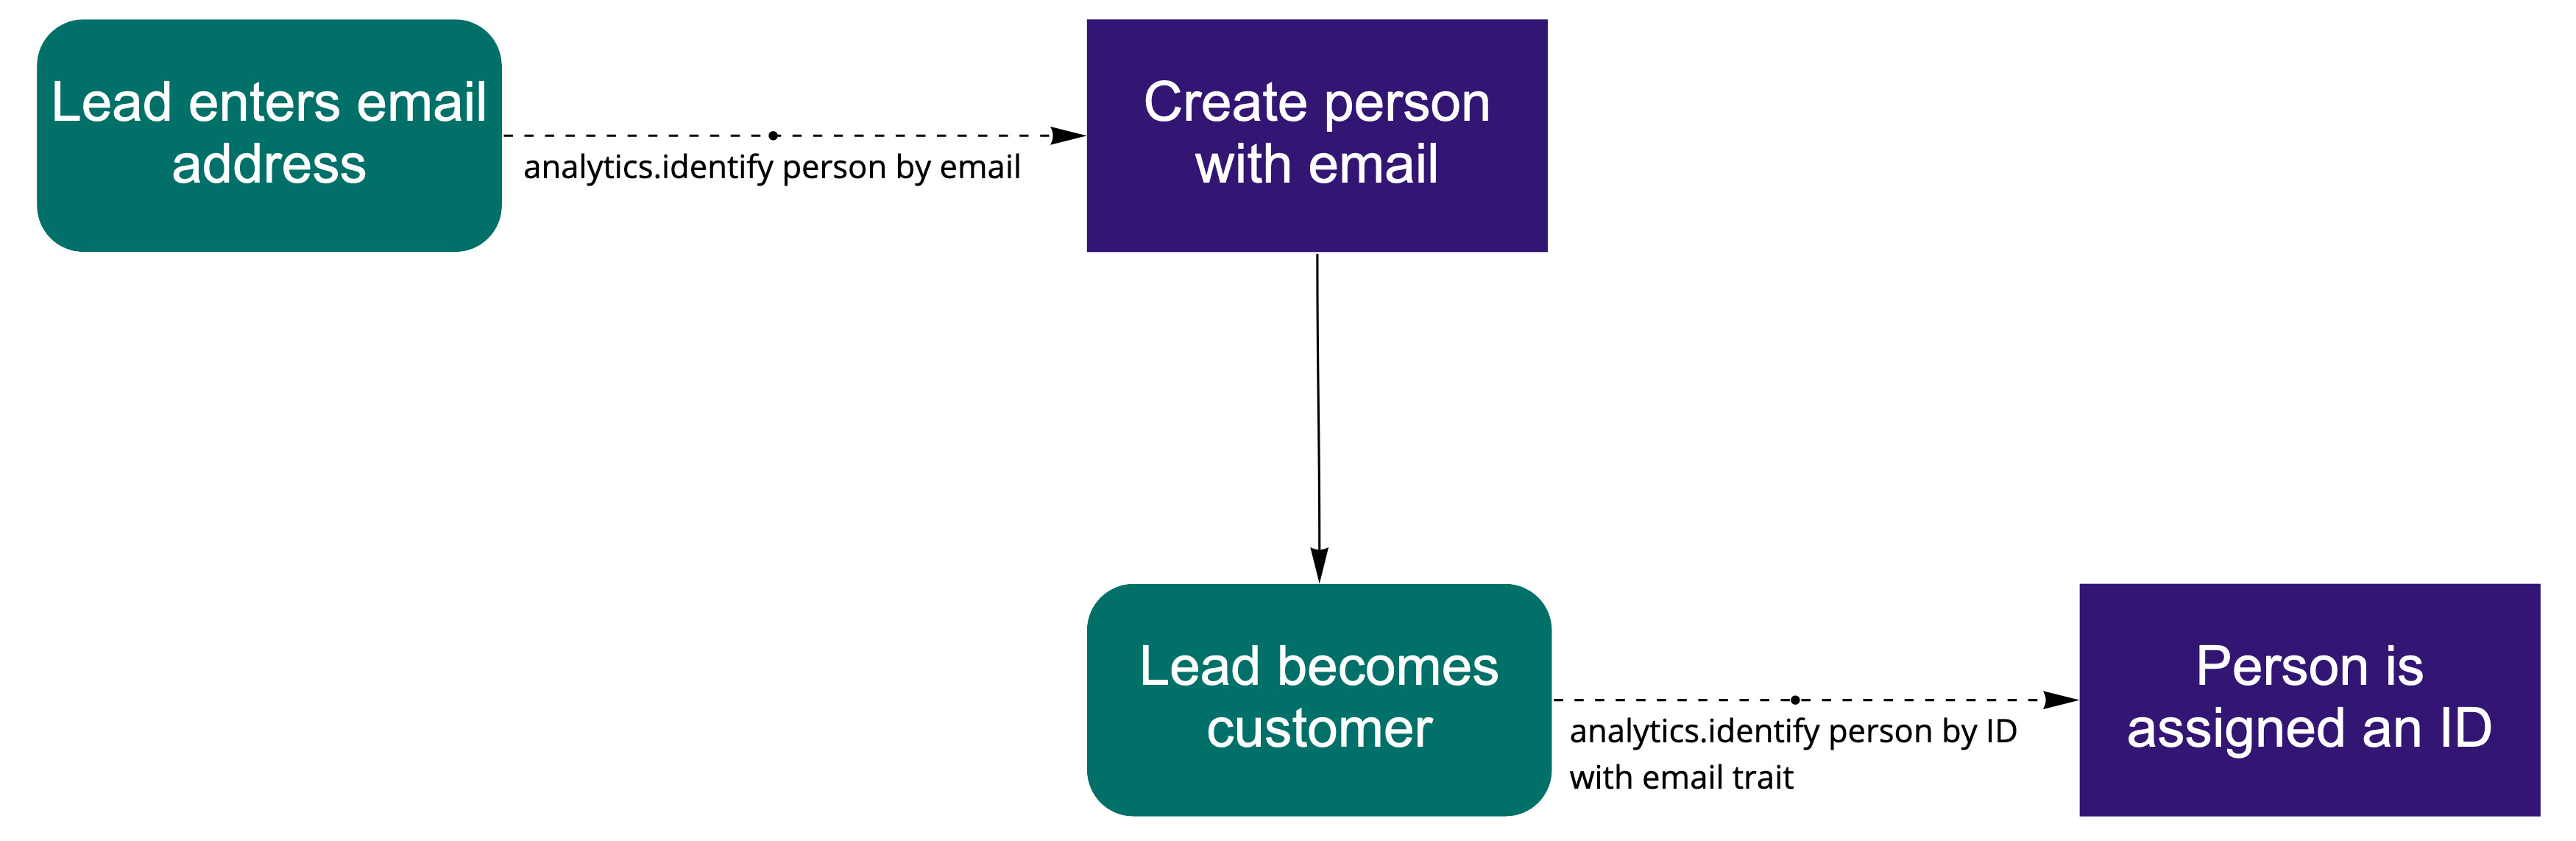
If your Customer.io workspace supports both email and id as identifiers (the default setting as of June 2021), you can identify people either by id or their email trait. This provides a path to identify people who enter your system as leads (by email) and then assign them an ID in Customer.io when they become a customer or user.
- If you don’t have an ID, send your identify call an empty
userIdin the identify call and anemailtrait. Customer.io automatically maps theemailtrait to a person’semailattribute. - If you have an ID, set the
userIdin the identify call to the person’s ID and passemailas a trait. This sets both a person’sidandemailattributes in Customer.io. If you previously identified a person byemail, your request updates that person and assigns them anid.
Converting leads to customers
If your workspace supports both id and email identifiersThe attributes you use to add, modify, and target people. Each unique identifier value represents an individual person in your workspace., you may want to identify a lead first by email, and then assign them an id when they become a customer or user.
To create a lead and then assign them an id when they become a customer or user:
Identify a lead by sending an
identifyrequest with anemailtrait and emptyuserIdpassing theiremailas theuserId. This creates your lead in Customer.io—a person who has anemail, but does not yet have anid.analytics.identify('', { // The email address does not belong to anybody // so we create a new person email: 'person@example.com' first_name: 'person', interested_in: 'baseball' });Later, when that person becomes a customer, pass their new
idas theuserIdin your Identify call, and pass theiremailas a trait. We’ll update the lead (who you first identified by email) with the new ID—as long as this person does not already have anidvalue and theidyou use does not already exist.analytics.identify('userId123', { // the email belongs to the lead you identified in the previous step // so we'll assign an id to this person—userId123. email: 'person@example.com', account_created: 1629224941 });
In this second request, if the ID already belongs to a person, we’ll attempt to update that person. If the ID and email already exist, you’ll receive an error.
Update email and ID values that have already been set
After you set a person’s email or id identifiersThe attributes you use to add, modify, and target people. Each unique identifier value represents an individual person in your workspace. in Customer.io, changing them can be tricky.
Email: if you allow updates to email using id, you can change the email address to any value that isn’t already in use with id. Otherwise you need to pass the cio_id in the format cio_<cio_id value> to change the email address.
ID: you must pass the cio_idAn identifier for a person that is automatically generated by Customer.io and cannot be changed. This identifier provides a complete, unbroken record of a person across changes to their other identifiers (id, email, etc). in the format cio_<cio_id value> to change id values.
analytics.identify('cio_<cio_id value>', {
  email: 'new.email@example.com',
  id: 'new-id-value'
});
You can find a person’s cio_id value by going to their People page or by looking up a person with the customers API.
Unsubscribe Users
To unsubscribe a user, simply pass unsubscribed: true in your Segment identify call. Be sure the id and/or email values match the values in Customer.io. You can find these values by selecting a person on the People page, and clicking Attributes. Here is an example that unsubscribes a user:
analytics.identify('userId123', {
    email: 'john.doe@example.com',
    unsubscribed: true
  }
)
Identifying people in workspaces that only support ID
In older workspaces, or workspaces using “classic” settings, you can only identify people by ID. You do not need to pass an email address unless you intend to send emails. If you intend to send emails, you must provide the email address as a trait labeled email.
Segment Group Calls
You can use Segment’s group call to create or relate people to an objectNot to be confused with a JSON object, an object in Customer.io is a non-person entity that you can associate with one or more people—like a company, account, or online course. You can use objects to message people based on changes to their company, account, or course itinerary. in Customer.io—like a company people might belong to or a flight they might have booked.
To take advantage of group calls, you need to enable the Create or Update Object action. You can only use group calls with Segment’s Destination Actions feature; you cannot use it with Segment’s “Customer.io (Classic)” integration.
A group call specifies an object_id representing the group that you want to create, modify, and associate people with. If you’ve sent an identify call, a group call automatically associates an object with the identified person. If you haven’t identified a person yet, we won’t process the group call until you identify the user. See Group calls and anonymous people for more information.
Beyond the object_id, a group call also takes an optional object containing:
object_type_id: Each id is an integer, starting at 1. If you don’t pass this key as a trait, we check for the property in the Create or Update Object mapping. If it does not exist there, we default theobject_type_idto 1.- Additional attributes: any other keys you pass in the object are attributes assigned to the object itself. This call does not assign attributes to a person.
analytics.group("<object_id>", {
  name: "Initech",
  industry: "Technology",
  employees: 329,
  plan: "enterprise",
  object_type_id: 1
});
See Segment’s group specification for more information about this call.
New objects and object types
If you send an object_id that doesn’t exist, we’ll create it.
For unrecognized object_type_id values, we create a new one named after a type of animal! If an object_type_id is not passed as a trait, we check for the property in the Create or Update Object mapping. If it does not exist there, we default the object_type_id to 1.
Group calls and anonymous people
You can send group calls before you identify a person. If you don’t pass a userID in the request, and you haven’t already identified a person, we won’t process the request until you identify a person.
When you identify the user, we’ll process the group call and relate it to the identified person.
If your group call references a new object_id or object_type_id, we won’t create the new object or object type until you identify the associated person.
Group calls and object attributes
You can create and update object attributes with the traits you send in your group call. Segment’s group call requires either a userId or an anonymousId, however. That means in order to update an object attribute through Segment, an object must also be related to a user in the same call.
Passing null or an empty string for an attribute removes it from an object.
You cannot use relationship as an object attribute name. relationship is reserved for referencing relationship attributes (coming January 2024) in Liquid.
Group calls and relationship attributes
Through our Track APIs, you can manage relationship attributes. You can’t, however, manage relationship attributes through Segment group calls.
Segment Suppression and Deletion
To help comply with GDPR and CCPA regulations, Segment supports their own Suppression and Deletion tools. These tools are separate from Customer.io’s methods to delete and suppress people.
In Segment, suppressed users are blocked across all sources; any message sent to Segment via a suppressed userId is blocked at their API (with the exception of device-mode destinations). Suppressions are not synchronized between Segment and Customer.io. However when you suppress and delete a customer via Segment’s UI, that deletion is passed along to Customer.io to ensure that the person you suppressed and deleted in Segment is removed in Customer.io.
Anonymous Events
Segment generates an anonymousId trait for people that you haven’t identified with a userId. Events generated by unidentified people are passed to Customer.io as “anonymous events”—events attributed to this anonymousId. If the anonymous event merge feature is turned on in your Customer.io workspace (the default setting for new workspaces), Customer.io automatically merges anonymous events with people when you identify them. This all happens automatically with the Segment Destination Actions integration.
Add and Update Devices
A standard identify call can add and update mobile devices. This might happen if a user logs into your service from inside your mobile app. In this case, you’re both identifying a person and associating a device with them.
However, there are also default Destination Actions to add, update, and delete devices based on track events. These actions are filtered by the event value.
Application Installedevents add or update devices.Application Openedevents add or update devices.Application Uninstalledevents remove devices.
Here’s an example Application Installed event.
{
    "action": "track",
    "userId": "019mr8mf4r",
    "event": "Application Installed",
    "properties": {
        "version": "1.2.3",
        "build": 1234
    },
    "context": {
        "device": {
            "token": "ff15bc0c20c4aa6cd50854ff165fd265c838e5405bfeb9571066395b8c9da449",
            "type": "ios"
        }
    }
}

