RSS Feed Email Campaign
Introduction
With an RSS Feed Email Campaign, you can send new posts to your audience whenever you publish content. This makes use of our API Triggered Broadcast campaigns and a Zapier workflow.
Ingredients
- Zapier account
- publicly accessible RSS Feed URL
Method
Create an API Triggered Broadcast Campaign
Learn how in our guide for API Triggered Broadcasts.
Set up Zapier Workflow
For those of you new to Zapier, it’s a handy tool that helps you connect your apps and automate workflows. For this recipe, you’ll be setting up a Multi-Step Zap in Zapier, which lets you automate a sequence of tasks in a workflow with a single trigger. (Multi-Step Zaps are available on paid plans.)
Once you’re in Zapier, click “Make a Zap!” in the top menu to get started.
Set up the trigger
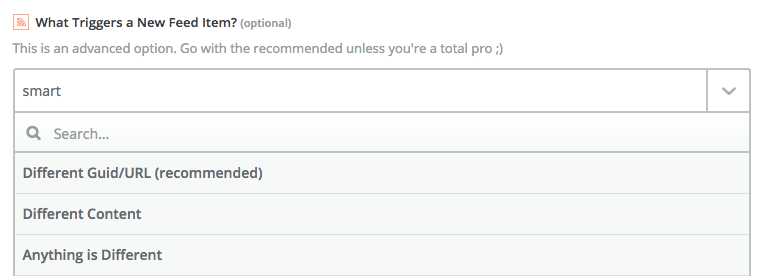
First, we’ll choose the built-in app “RSS by Zapier” and select “New Item in Feed” as the trigger. Then, enter your Feed URL. Take a minute and make sure that the “What Triggers a New Feed Item” field says “smart” — which means you’ve chosen the recommended Different Guid/URL option. (This makes sure that when you make changes to a post, it won’t cause this Zap to re-trigger.)
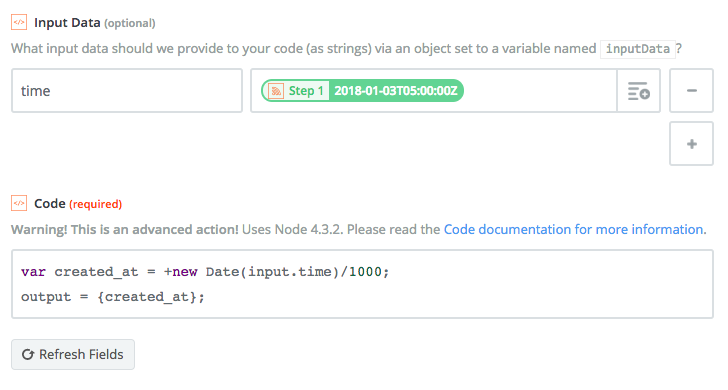
Publish Date to Unix Timestamp
Next, we’ll take the human readable timestamp (in our feed, that was our published date and time) and convert it to a Unix timestamp by running a bit of code. We’ll do that by choosing another built-in app “Code by Zapier”, choose to “Run JavaScript”, and add our code.
Here’s the code we used, which may vary depending on your date format.
var created_at = +new Date(input.time)/1000;
output = {created_at};
(An alternative in this step is to use the Zapier formatter to convert a datetime value into a Unix timestamp.)
Convert body to JSON
Next, we’ll convert the article to a JSON object. Choose the built-in app “Code by Zapier” and the “Run JavaScript” option again.
For the Input Data field, enter “body” and then from the dropdown, we were able to select our raw content text, which allowed Customer.io to parse the HTML as-is in the designed email.
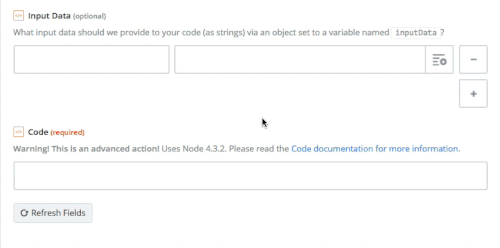
Here’s the code we used:
var object = input.body
var escaped_body = JSON.stringify(object)
output = {escaped_body};
Send Webhook to API Triggered Broadcast
In the final Zapier workflow step, choose the built-in app “Webhooks by Zapier” to send a webhook to Customer.io. Create a “Custom Request”.
- In the “Edit Template” step, choose POST as your HTTP method.
- Enter your URL. It will look like this, with your campaign ID filled in:
https://api.customer.io/v1/api/campaigns/<your-campaign-id-here>/triggers
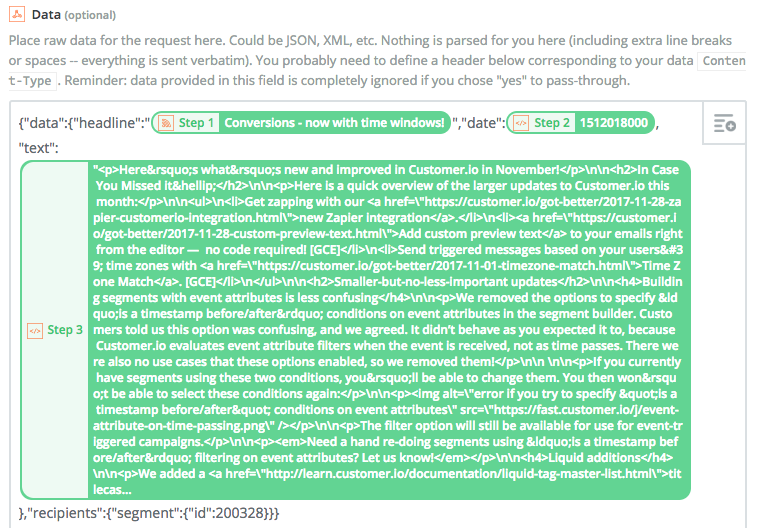
- In the “Data” step, we’ll add our data, in JSON format. In our example, we’re adding headline, date, and text data, as well as defining our recipient segment.
- Select “no” for the “Unflatten option”.
- Next we’ll add our bearer credentials by filling in our App Key.
- In the “Headers” step, fill in “Content-Type” and application/json" as the key, value pair.
Wrap Up
API Triggered Broadcasts are a great way to save time for recurring messages like blog post updates. If you have questions about how to apply this recipe, let us know!

