Microsurveys

Microsurveys help you send messages requesting feedback from your audience, track their responses, and send follow-up messages accordingly.

How it works

Microsurveys are a component of in-app message that you can use to request feedback from your audience. You can use microsurveys to ask your audience to rate their experience, provide a review, or answer a question. You can also use microsurveys to ask your audience to provide feedback on a specific feature or product.

You can add a survey component to any in-app message. These components simply provide default survey layouts, but you can adapt these components to any kind of call to action or choice architecture you want to offer your audience.

We automatically track the responses to your microsurveys, both for the individual user and in aggregate (for your message and campaign), and you can use responses to trigger follow-up messages. For example, you might send a follow-up message to thank your audience for their feedback.

flowchart LR b(User gets survey) b-->c{How does the
user respond?} c-.->|User closes
message|d(No tracked response) c-->|User picks a
survey option|e(Customer.io captures response) d-.->f(Dismiss in-app message) e-->f

Create a microsurvey
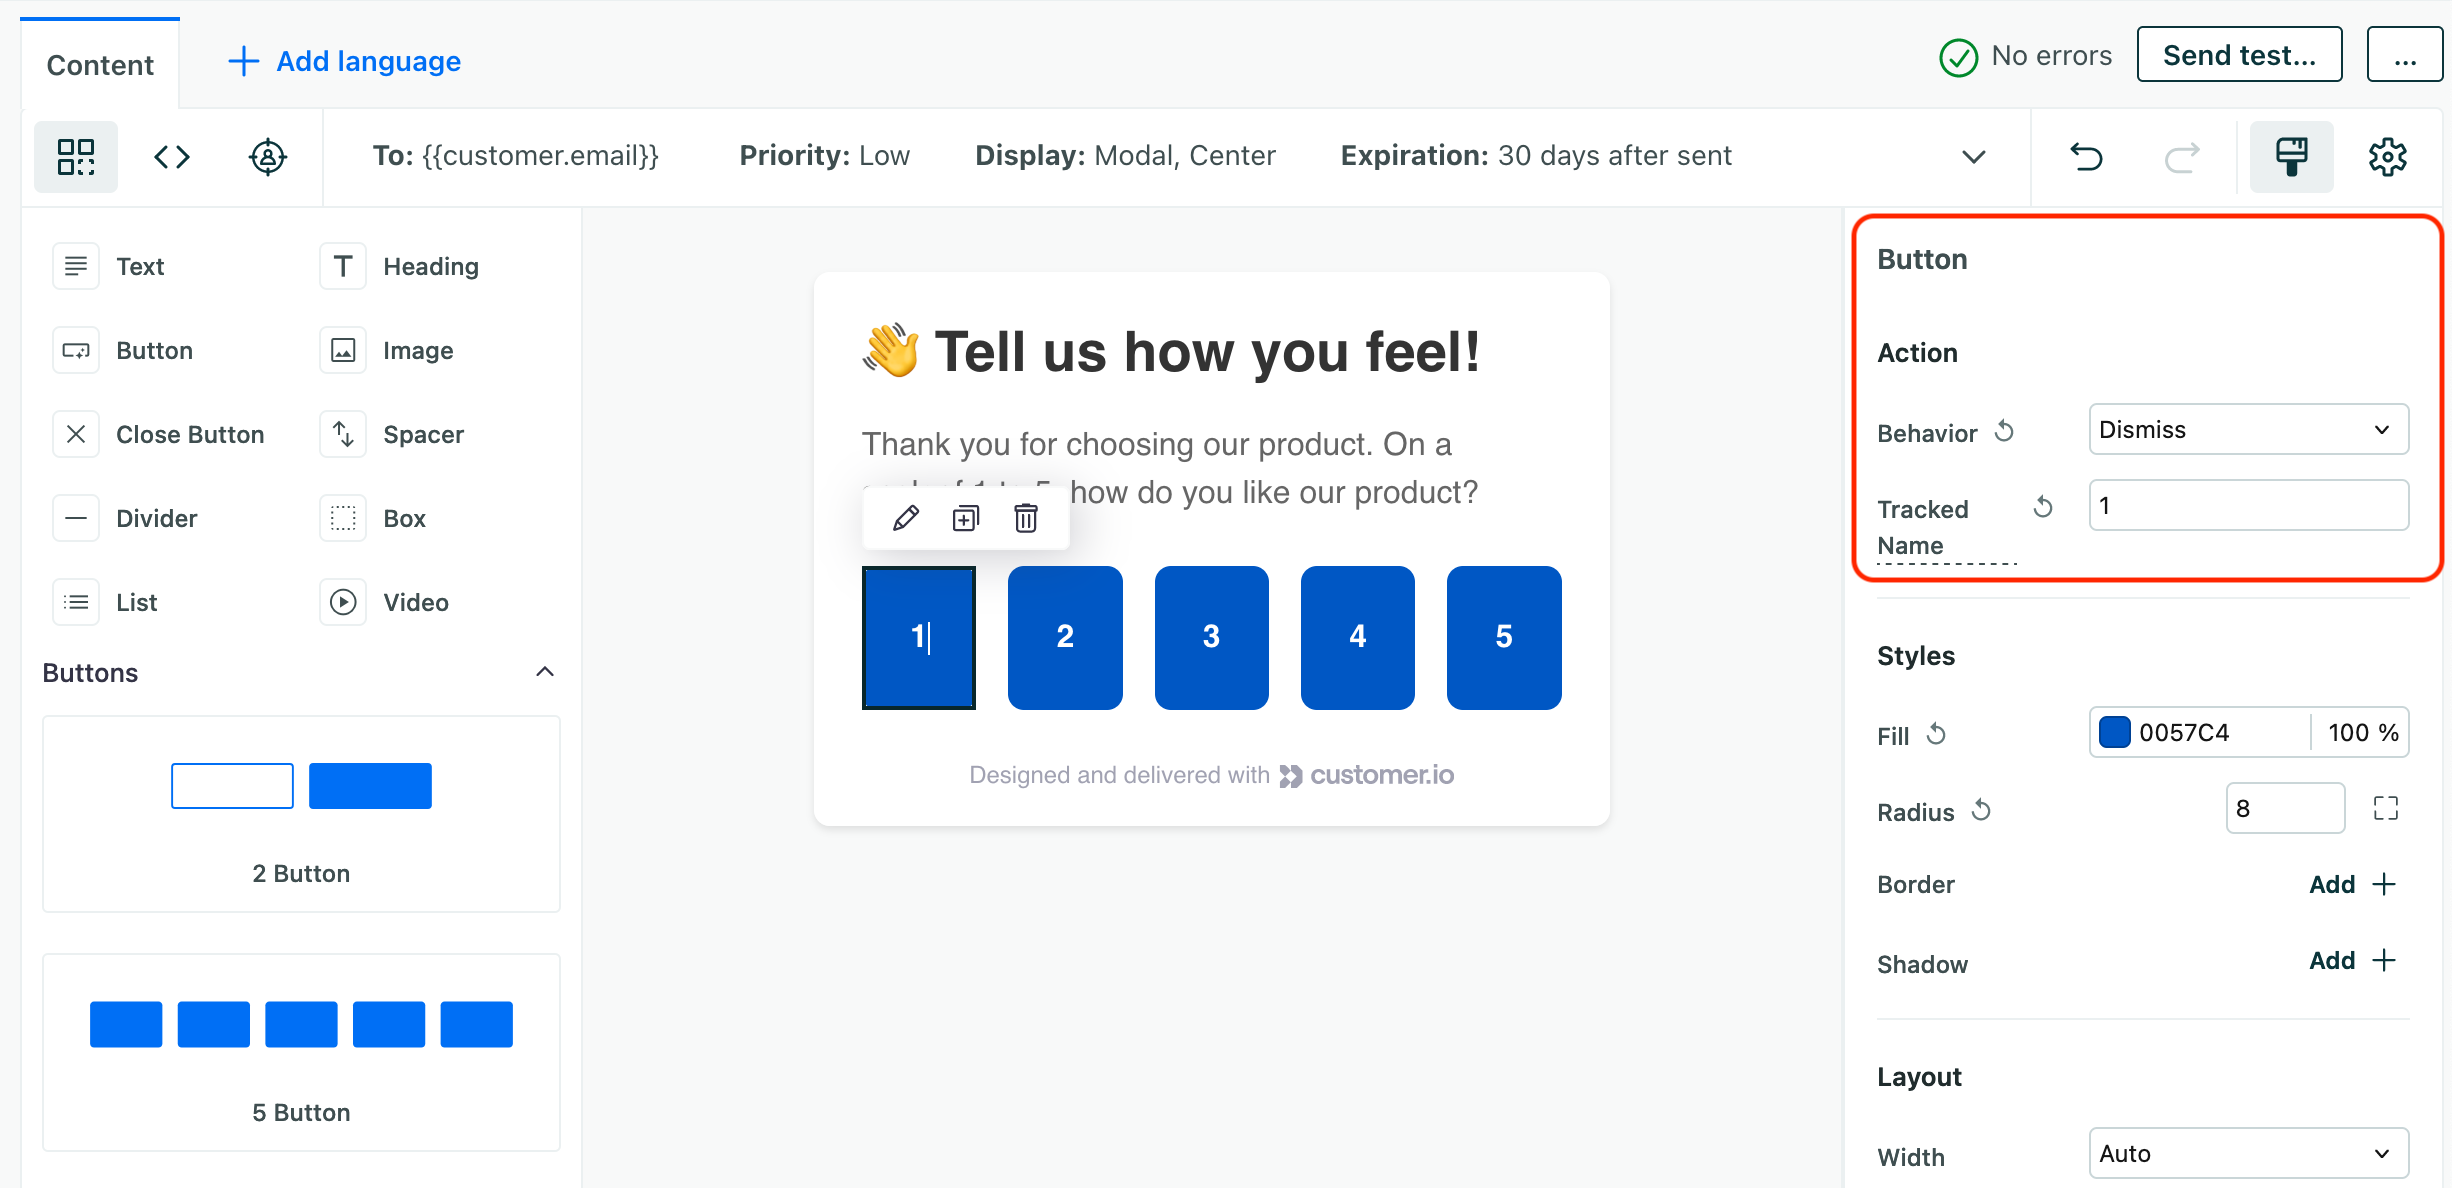
Microsurveys are components that you’ll add to your in-app messages. Like all in-app messages, you’ll need to create a message before you can use it in a campaign or braodcast first.

Survey components are based on your default Branding styles, but you can override these styles to customize your surveys, and the messages containing surveys.

  1. Go to Content > In-App Messages, and click the Messages.
  2. Select the message you want to add a microsurvey to, or create a new message.
  3. Find the section of your message where you want to insert the survey. In general, you’ll want to insert your survey inside a Block element with padding, below a title or text element that explains the purpose of the survey.
    Add microsurvey component to your in-app message
    Add microsurvey component to your in-app message
  4. Under Components, select one of the Survey options and click Add Component.
  5. (Optional) Customize your survey.
    • Set the Action name for each Option action in your survey. We track responses based on the Action name, and they’re named Option beginning at 1 by default. You should set the Action name to a plain text value that helps you understand what each option means, so you can better understand and classify responses to your survey.
    • Customize button Text elements: Like action names, buttons are also named Option , beginning at 1 by default. You should set a descriptive text value that resonates with your audience. You can also use a variable that you customize when you send your message.
    • Customize Image elements elements: We provide default images for some of our microsurvey options, but you can also upload your own images. You can also use a variable that you customize when you send your message.
  6. When you’re done, click Save.
set up your microsurvey

Customizing surveys

Microsurveys are preconfigured groups of components in an in-app messages, arranged in a way that produces a survey—like how “buttons” in your in-app message consist of a padding component and a text component. While they’re ready to use out of the box, you’ll generally want to customize them to set button names, images, and action names that make sense to you your audience.

Use variables in surveys

In microsurvey componets, you can set variables for images and text, so you can populate values when you use your message in a campaign. This can make your surveys more flexible, so you can reuse a message across multiple campaigns or broadcasts. When you set up your message, you can even use liquidA syntax that supports variables, letting you personalize messages for your audience. For example, if you want to reference a person’s first name, you might use the variable {{customer.first_name}}. to set options based on customer variables.

To set a variable in your microsurvey, set a field to $properties.variable_name. This exposes a field called variable_name when you go to use your message in a workflow. In most cases, you may want to set the same field name for both the Action name and the button Text, so it’s easy to recognize your tracked responses.

set up your microsurvey

Default styles

We use default branding styles when you add a microsurvey to your message. You can customize the styles for each component in your survey, or you can change your branding values so that your defaults better reflect the colors and fonts you want to use in your surveys and other messages.

Customizing survey options

Many default button values may be fine for your survey, but you’ll generally want to customize the Option action and Text elements. Both items default to Option beginning at 1, which isn’t very descriptive. You should change these to plain text values that resonate with your audience and make sense in tracked responses.

Text-based buttons are made up of four components. You can customize each component to change the appearance of your buttons.

  1. Button padding: determines the spacing inside each button (essentially determining the maximum size of text in your button).
  2. Option action: contains the Action name that we track when users tap the option.
  3. Button style: contains the background color for each button in the list.
  4. text: the text in each button.
set up your microsurvey

Customizing image-based survey options

Some surveys use images for options, like our default CSAT survey with emojis option. In these cases, you won’t customize buttons and text, but the images you want to represent the options in your survey.

In general, you’ll want to customize the Option action to set an Action name that will make sense in tracked responses. Action names default to Option beginning at 1, which isn’t very descriptive. You should change the action names to a plain text value that helps you understand what each option in your survey means, so that you can better understand and classify responses.

  1. Option action: contains the Action name that we track when users tap the option.
  2. Option style: contains the background for each button/image in the grid.
  3. Option padding: determines the spacing inside each button (essentially determining the size of the image).
  4. Image: the image that appears within each button.
set up your microsurvey

Set up conditional branches in a campaign

You can use conditional branches to act on your audience’s responses to your surveys. For example, you might send a follow-up message to thank your audience for their feedback, of send information about a feature that a person indicated interest in.

You’ll Wait Until a person engages with your message, and set conditional branches based on the names of the options (by Action name) in your message. Depending on the option that a person selects, you can send them down a different branch in your workflow.

  1. In your campaign, add a Wait Until branch.
  2. In the Add condition branch, select Message.
  3. Set the top-level condition to Message action.
  4. In the next box, select the message you want to listen to responses for.
  5. Change the condition to is clicked.
  6. In the last box, set the Action name you want to act on.
set up your microsurvey's conditions to respond based on the option our audience taps

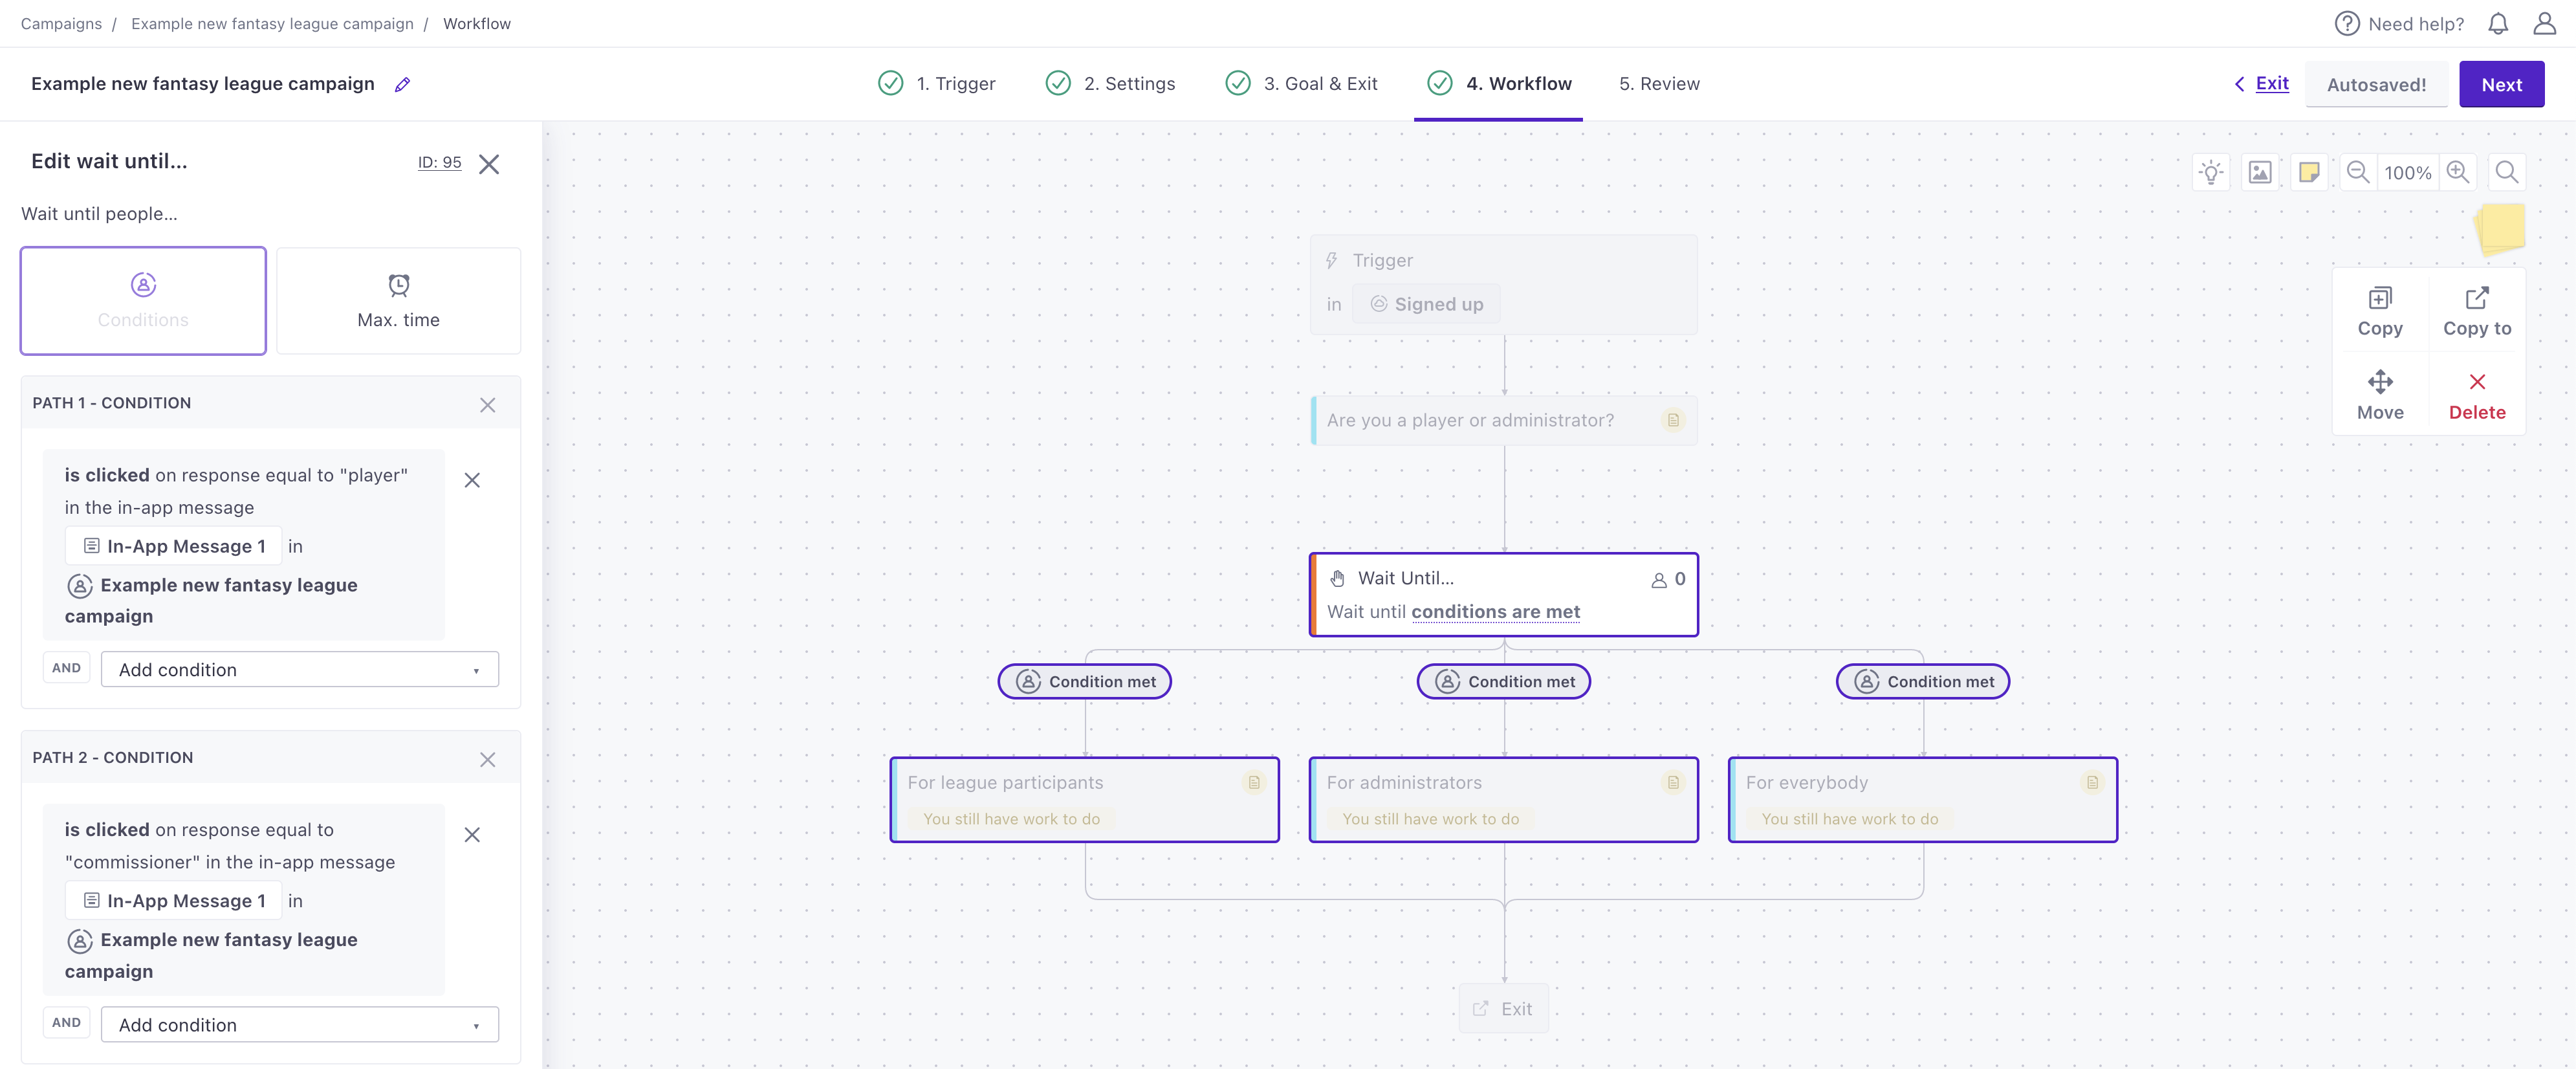
Repeat this process for all the options in your message. You may also want to add a condition that bypasses the wait—in case someone doesn’t see or respond to your survey—either when someone dismisses the message or just a Max Time condition if people never receive your message. Otherwise, people in your audience who don’t get the message or don’t respond will be stuck at this part of your workflow forever.

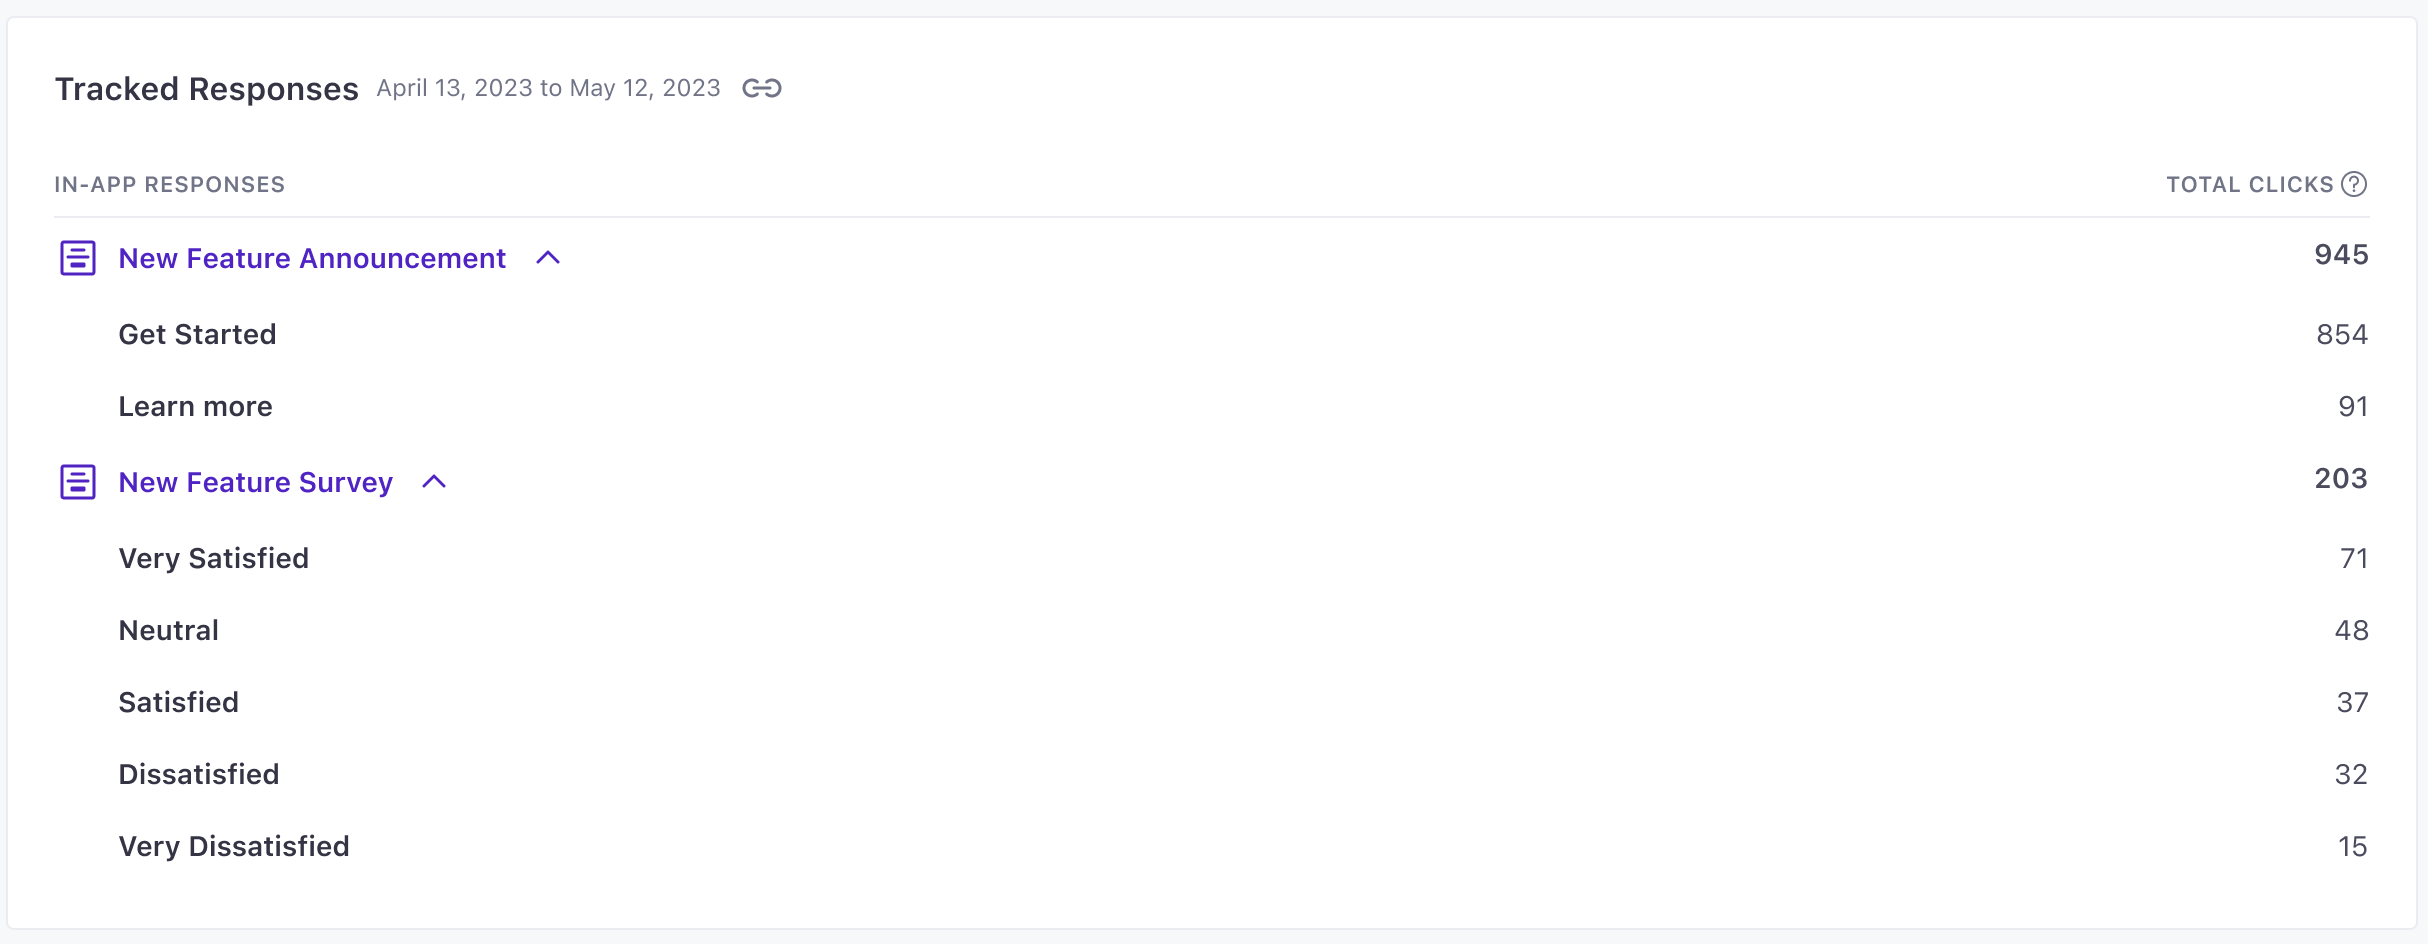
Track and measure responses

The actions (buttons) in your microsurveys have a setting called Track Click, that’s enabled by default. This setting tells Customer.io to track audience engagement with the action. In the case of microsurveys, this setting lets us track how your audience responds to options in the survey.

When you run a campaign or send a broadcast, the Tracked Responses section in the metrics tab shows responses for each action that had Track Click enabled. Responses are broken down by message and action name, helping you understand how your audience responded to your messages and microsurveys.

track responses in your campaign
Copied to clipboard!
  Contents
Is this page helpful?