HTTPS Link Tracking
By default, tracked links that use your custom subdomain as specified with the CNAME record will be generated as non-secure HTTP links. To generate secure HTTPS links, you’ll configure your link tracking subdomain to point to a server that proxies our link tracking domain (track.customer.io or track-eu.customer.io) using a valid SSL certificate.
We cannot generate secure HTTPS links without using your own custom subdomain and we’re not able to request or manage certificates for your domain.
There are two options for enabling link tracking over SSL for your custom subdomain:
- Use a Content Delivery Network (CDN) service, like Amazon CloudFront, Cloudflare, or Fastly.
- Set up a custom SSL configuration with a proxy through a service or tool like NGINX.
Changing your link tracking domain will cause your existing tracked links to break
If you have already configured a link tracking domain in your Customer.io workspace(s), we recommend that you continue using that domain (e.g., link.example.com) when you enable HTTPS link tracking.
Set up HTTPS link tracking with Cloudflare
Cloudflare automatically handles TLS certificate generation and proxying for you, making it easy to set up HTTPS link tracking. If your link tracking domain contains more than one subdomain (e.g. a.b.example.com), you’ll need to pay for Cloudflare’s Advanced Certificate Manager, on which you can specify the subdomain you need to cover. Or, if you have a Cloudflare Business or Enterprise plan, you can upload a custom SSL certificate with the required hostnames.
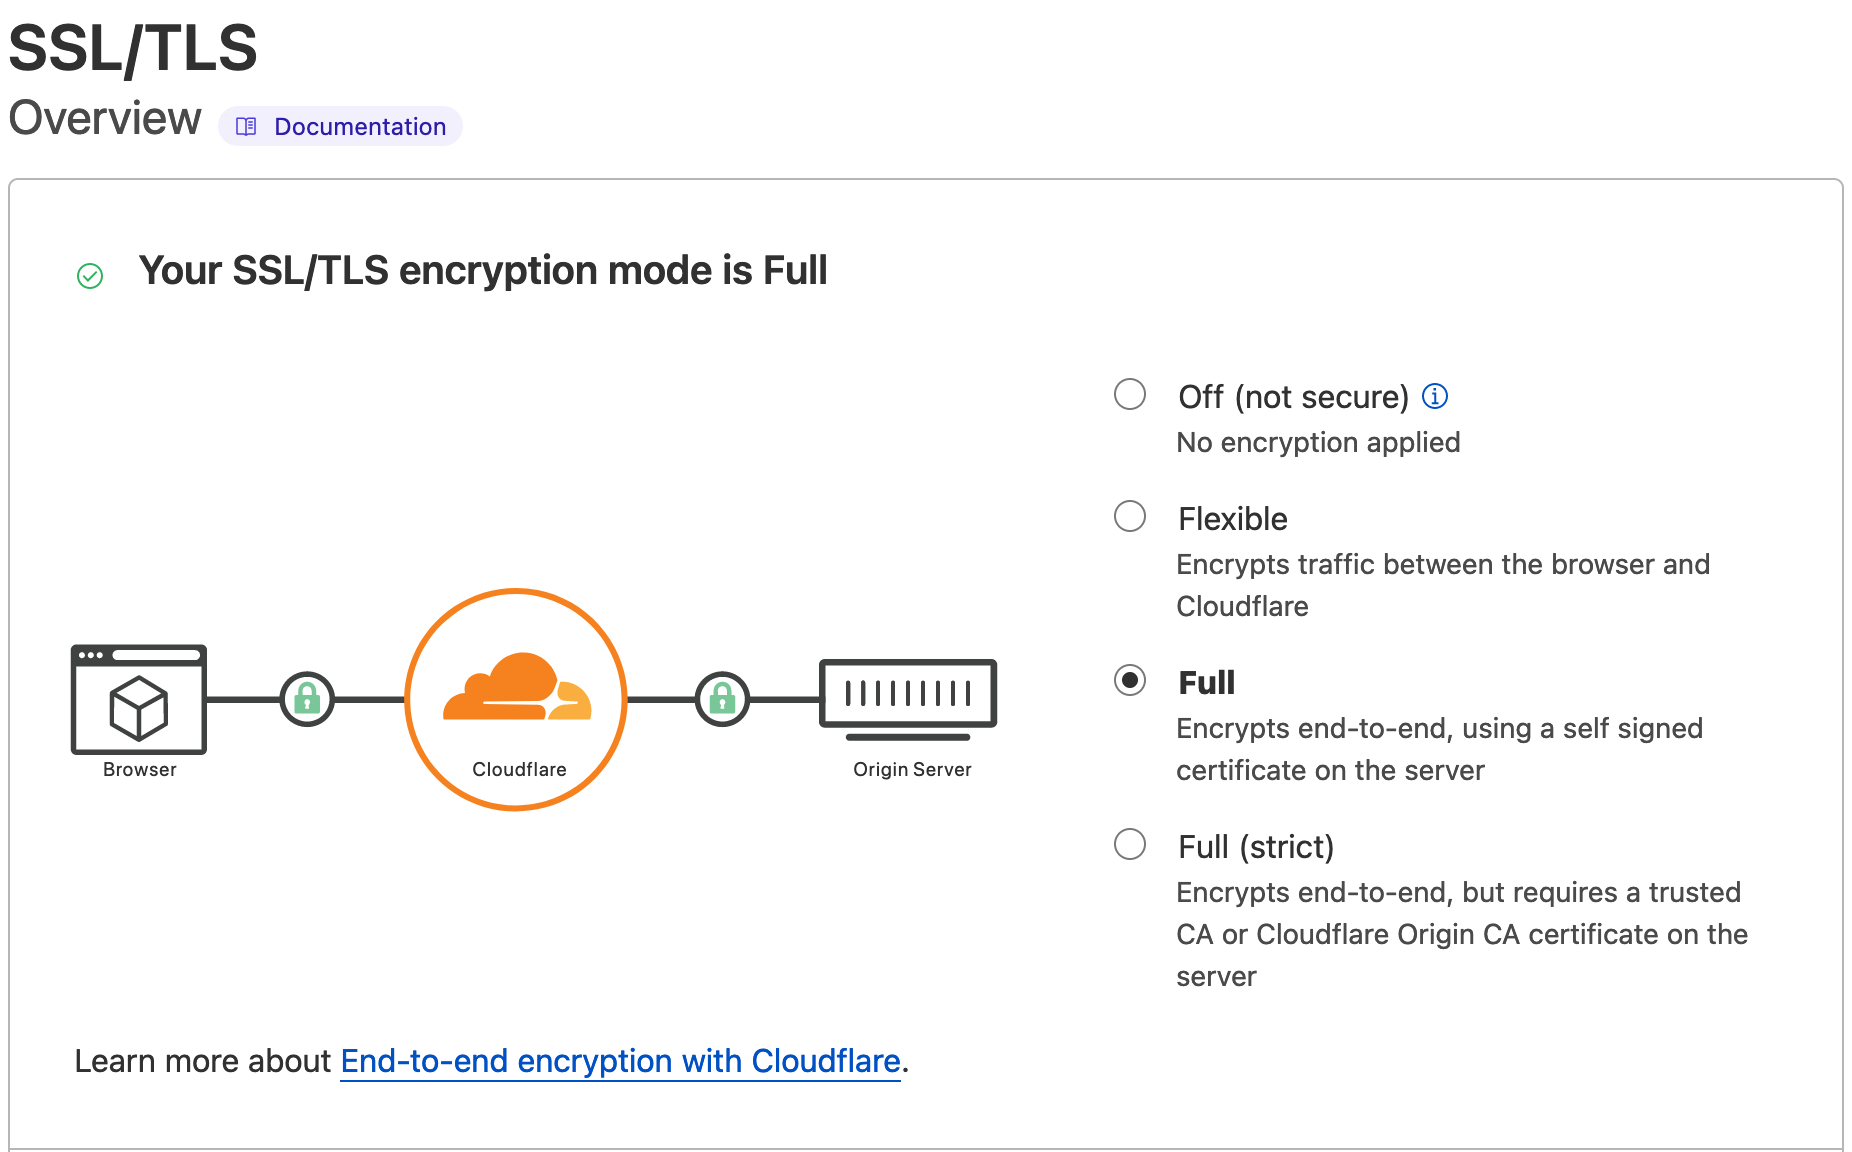
When you set up link tracking with Cloudflare, your SSL/TLS mode must be set to Full. The Full (strict) mode will not work. See Cloudflare’s documentation for more information about SSL modes.
In Cloudflare, go to Websites.
If your domain is already present, skip to the next step. Otherwise, click Add Site and set up your Name servers and DNS records as directed by Cloudflare.
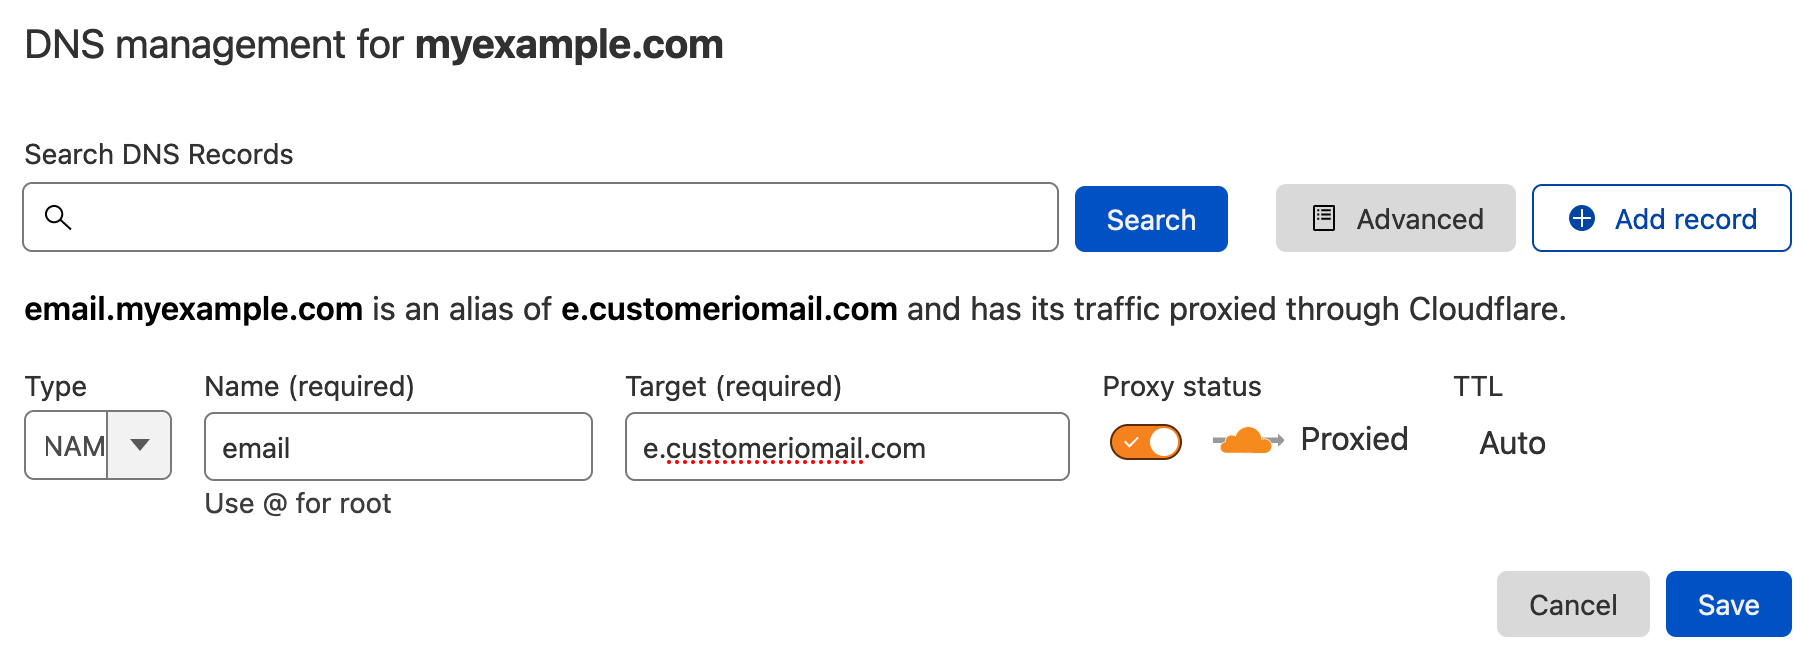
Go to the DNS page and click Add record.
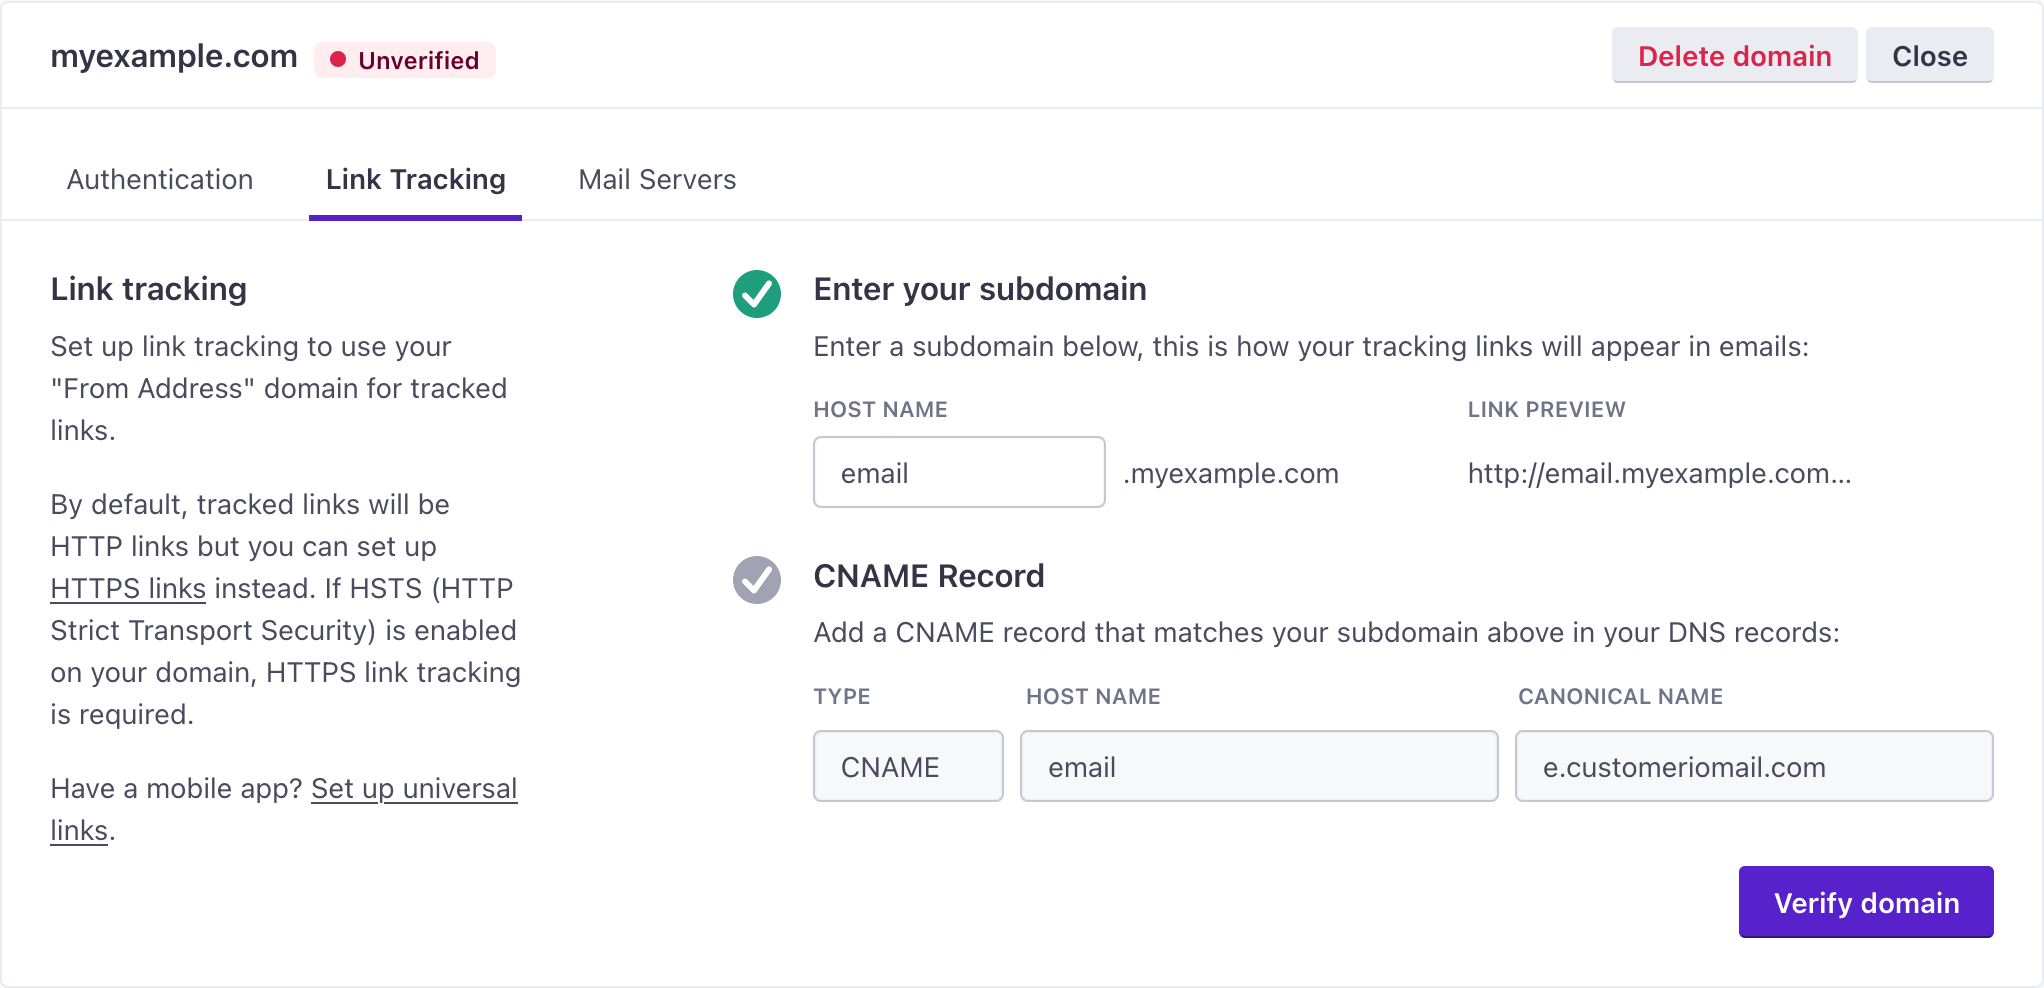
In Customer.io, go to Settings > Workspace Settings > Email, and select your domain. Go to the Link Tracking tab, and copy the CNAME record information to your new record in Cloudflare.
Make sure that the Proxy status is enabled (it’ll show Proxied). If your record looks like the image below, click Save.
Go to the SSL/TLS tab and make sure that you’re using the Full mode.
(Optional) If you want to record repeat opens/clicks, and you have a paid Cloudflare account, you can go to the Caching page and set your time to live (TTL) value to 10 seconds or less (effectively zero), which can help you record repeat opens/clicks. If you’re not on a paid plan, you can’t control your cache’s TTL settings.
In your Customer.io Workspace Settings under Email, set up your link-tracking domain if you haven’t already. Enter your domain in the HOST NAME field and click Verify domain to re-validate the domain. You should now pass the HTTPS check and tracking links will use HTTPS by default.
If past messages already have white-labeled tracked links, changing your link tracking domain will cause those existing tracked links to break.
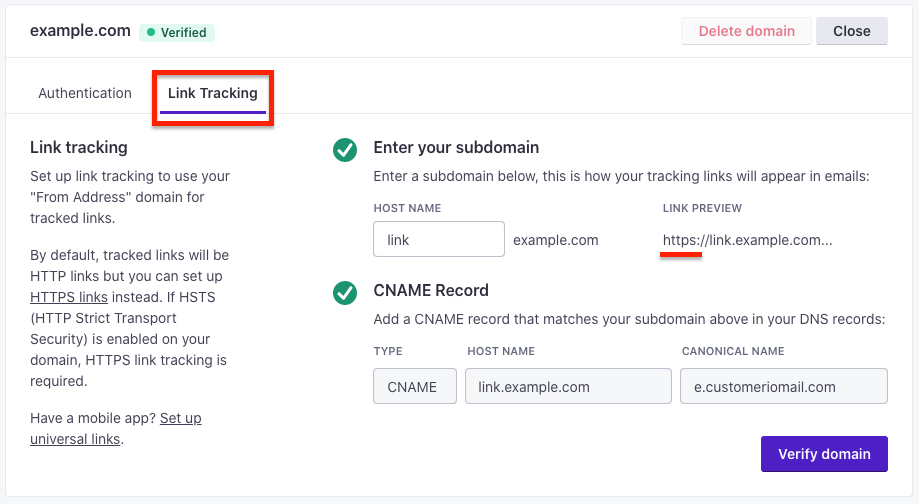
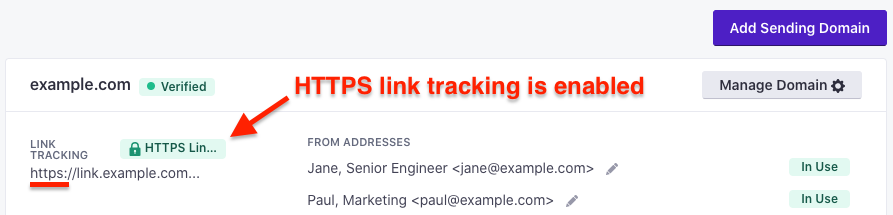
When the domain is collapsed/closed, you can tell that HTTPS link tracking is enabled by looking at the LINK TRACKING section pictured below. Once enabled, your tracked links will now start with something like: https://link.example.com…
Troubleshooting failures to verify your link-tracking domain
WAF settings
Cloudflare has Web Application Firewall (WAF) settings. Depending on the strength of your firewall, it may block our request to verify your domain. If you have problems, you may need to add a rule to your WAF ruleset to make an exception for our user-agent.
- Go to Security > WAF > Managed Rules.
- Click Add exception and add the following information:
- Field:
http.user_agent - Operator: Matches
- Value:
Customer\.io\/.*
- Field:
Bulk redirects
Make sure you don’t redirect requests away from the subdomain that you set up HTTPS link tracking for/on. In your Cloudflare configuration settings, you may need to disable the “include subdomains” option for Bulk Redirects.
Setting up HTTPS Link Tracking with Amazon CloudFront
Log into AWS and navigate to the AWS Certificate Manager.
Import or request a new SSL certificate for the domain you want us to use for your tracked links (e.g.
link.example.com).To satisfy CloudFront…
Your SSL certificate:
- must be in the US East (N. Virginia) Region (us-east-1)
- cannot be more than 2048-bit RSA (per CloudFront’s limitations
- must cover the subdomain you are using with us for your tracked links (e.g.
link.example.com)
If requesting a new certificate through AWS, they will send an email to the appropriate domain owners, requesting them to approve the certificate or you can verify ownership by adding a DNS record.
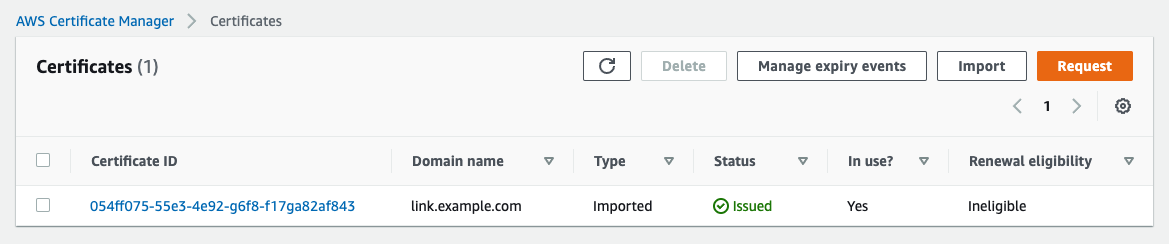
Ensure that the certificate is approved and issued.
Navigate to AWS CloudFront.
Create a new distribution.
Under the Origin section, set the fields as follows:
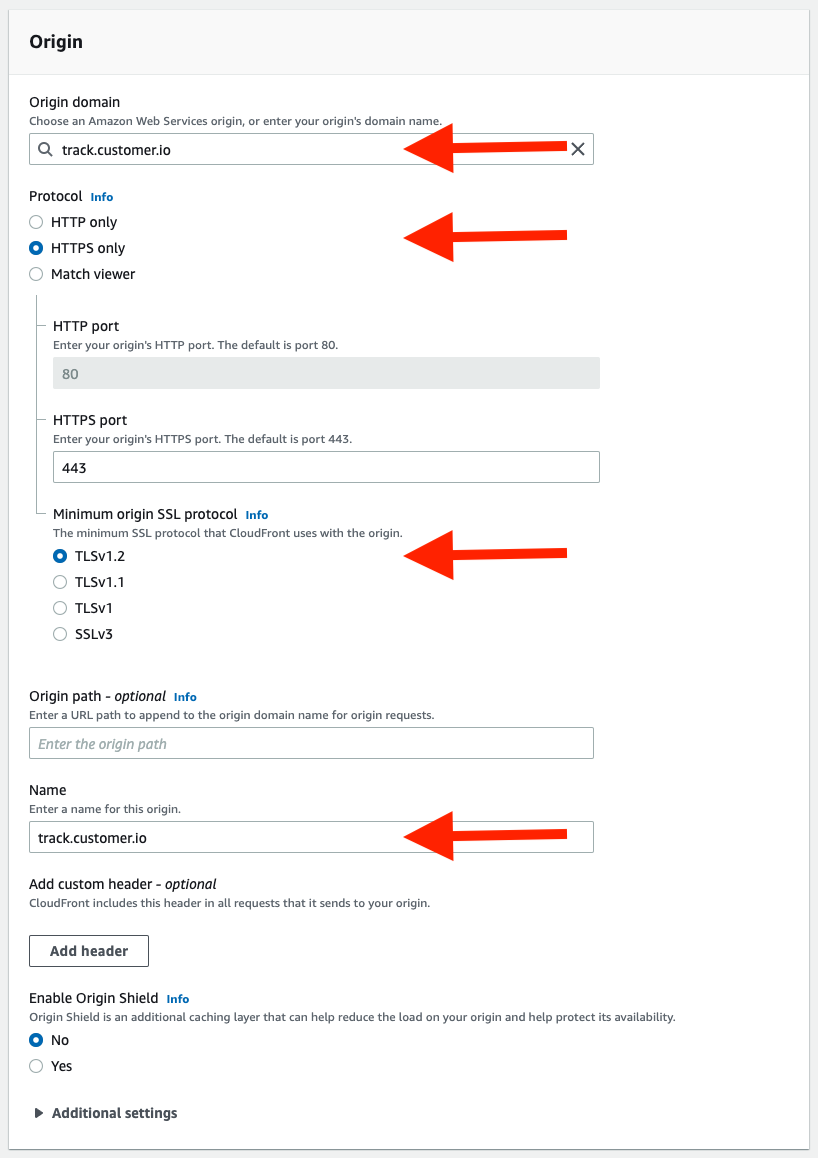
- Origin domain: track.customer.io (or track-eu.customer.io depending on your region)
- Protocol: HTTPS Only
- Minimum origin SSL protocol: TLSv1.2
- Name: track.customer.io (or track-eu.customer.io depending on your region)
Under the Default cache behavior section, set the fields as follows:
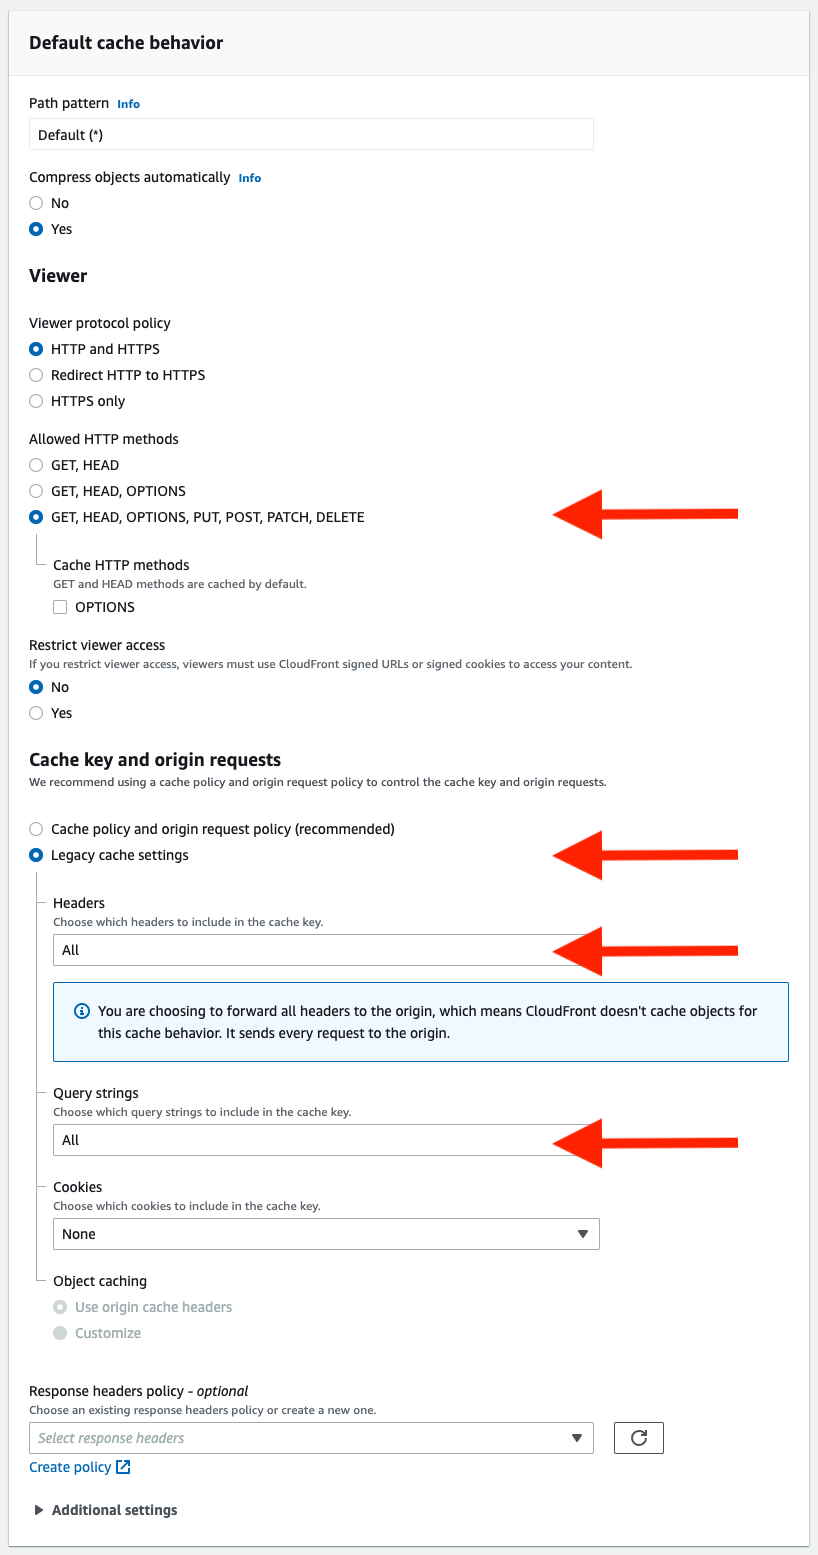
Allowed HTTP methods: GET, HEAD, OPTIONS, PUT, POST, PATCH, DELETE
Cache key and origin requests: Legacy cache settings
- Headers: All
- Query strings: All
Under the Settings section, set the fields as follows:
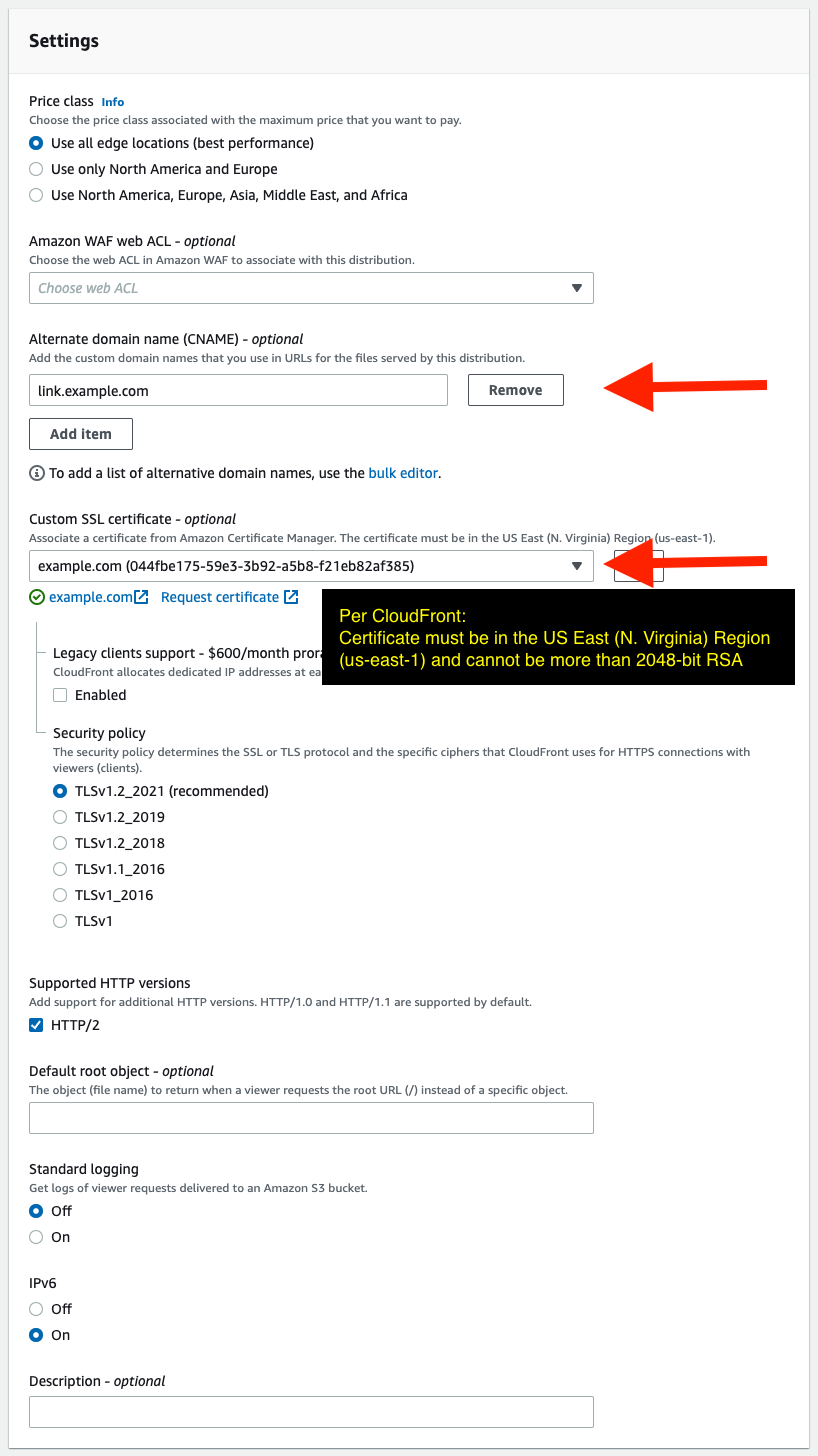
- Alternate domain names (CNAME):
link.example.com(replace with your preferred link tracking domain) - Custom SSL certificate: Choose the appropriate ACM certificate
- Alternate domain names (CNAME):
Click a Create distribution button.
Wait for the distribution status to be “Enabled”.

Add (or update) a CNAME record in your link tracking domain’s DNS settings for the domain you are configuring (e.g.,
link.example.com) and point it to the Domain name shown in CloudFront for your distribution. (e.g., CHANGEME.cloudfront.net).The host name and value for your CNAME record will be something like:
CNAMErecord host name:link.example.comCNAMErecord value: CHANGEME.cloudfront.net
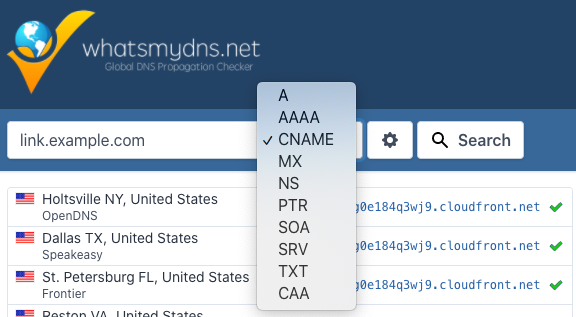
Verify that your DNS record has propagated and is now pointing to your CloudFront distribution. You can do this by checking the CNAME value at a propagation checker like WhatsMyDNS.
As an additional “sanity check” you can visit your link tracking domain, followed by
/health(e.g.,https://link.example.com/health). If your domain is properly pointing to our API, the response body will just be{}. Anything else means there is a problem with your configuration.If anything in your proxy’s configuration modifies or misrepresents the referring host, your links may result in Invalid link security token errors—even if you get a
{}response. Your proxy server MUST use your link tracking domain as the host header for the requests that are passed to our server.Finally, once you are sure that your distribution is properly pointing to our API, head back to Customer.io and go to your Workspace Settings for Email. If you haven’t already set up your link tracking domain (e.g.
link.example.com), enter it now in the HOST NAME field and click the Verify domain button to re-validate the domain. You should now pass the HTTPS check and tracking links will use HTTPS by default.If past messages already have white-labeled tracked links, changing your link tracking domain will cause those existing tracked links to break.
When the domain is collapsed/closed, you can tell that HTTPS link tracking is enabled by looking at the LINK TRACKING section pictured below. Once enabled, your tracked links will now start with something like: https://link.example.com...
Set up HTTPS link tracking with Fastly CDN
Fastly is a content delivery network (CDN) and can proxy requests to Customer.io to support HTTPS tracked links.
This process assumes you’ve already set up your domain in Fastly. If you haven’t done that, you’ll want to do that first in your Fastly dashboard under Security > TLS Management > Domains.
- In Fastly, go to CDN and click Create a CDN Service.
- Give your service a name.
- Enter the domain you want to use for your tracked links (e.g.
link.example.com). - Under Add an origin, enter
track.customer.io. - Disable the Override default host setting. We match the host header to your branded tracking domain for security purposes. If Fastly overrides the host, we’ll think that the link poses a security risk and return an
Invalid Security Tokenerror!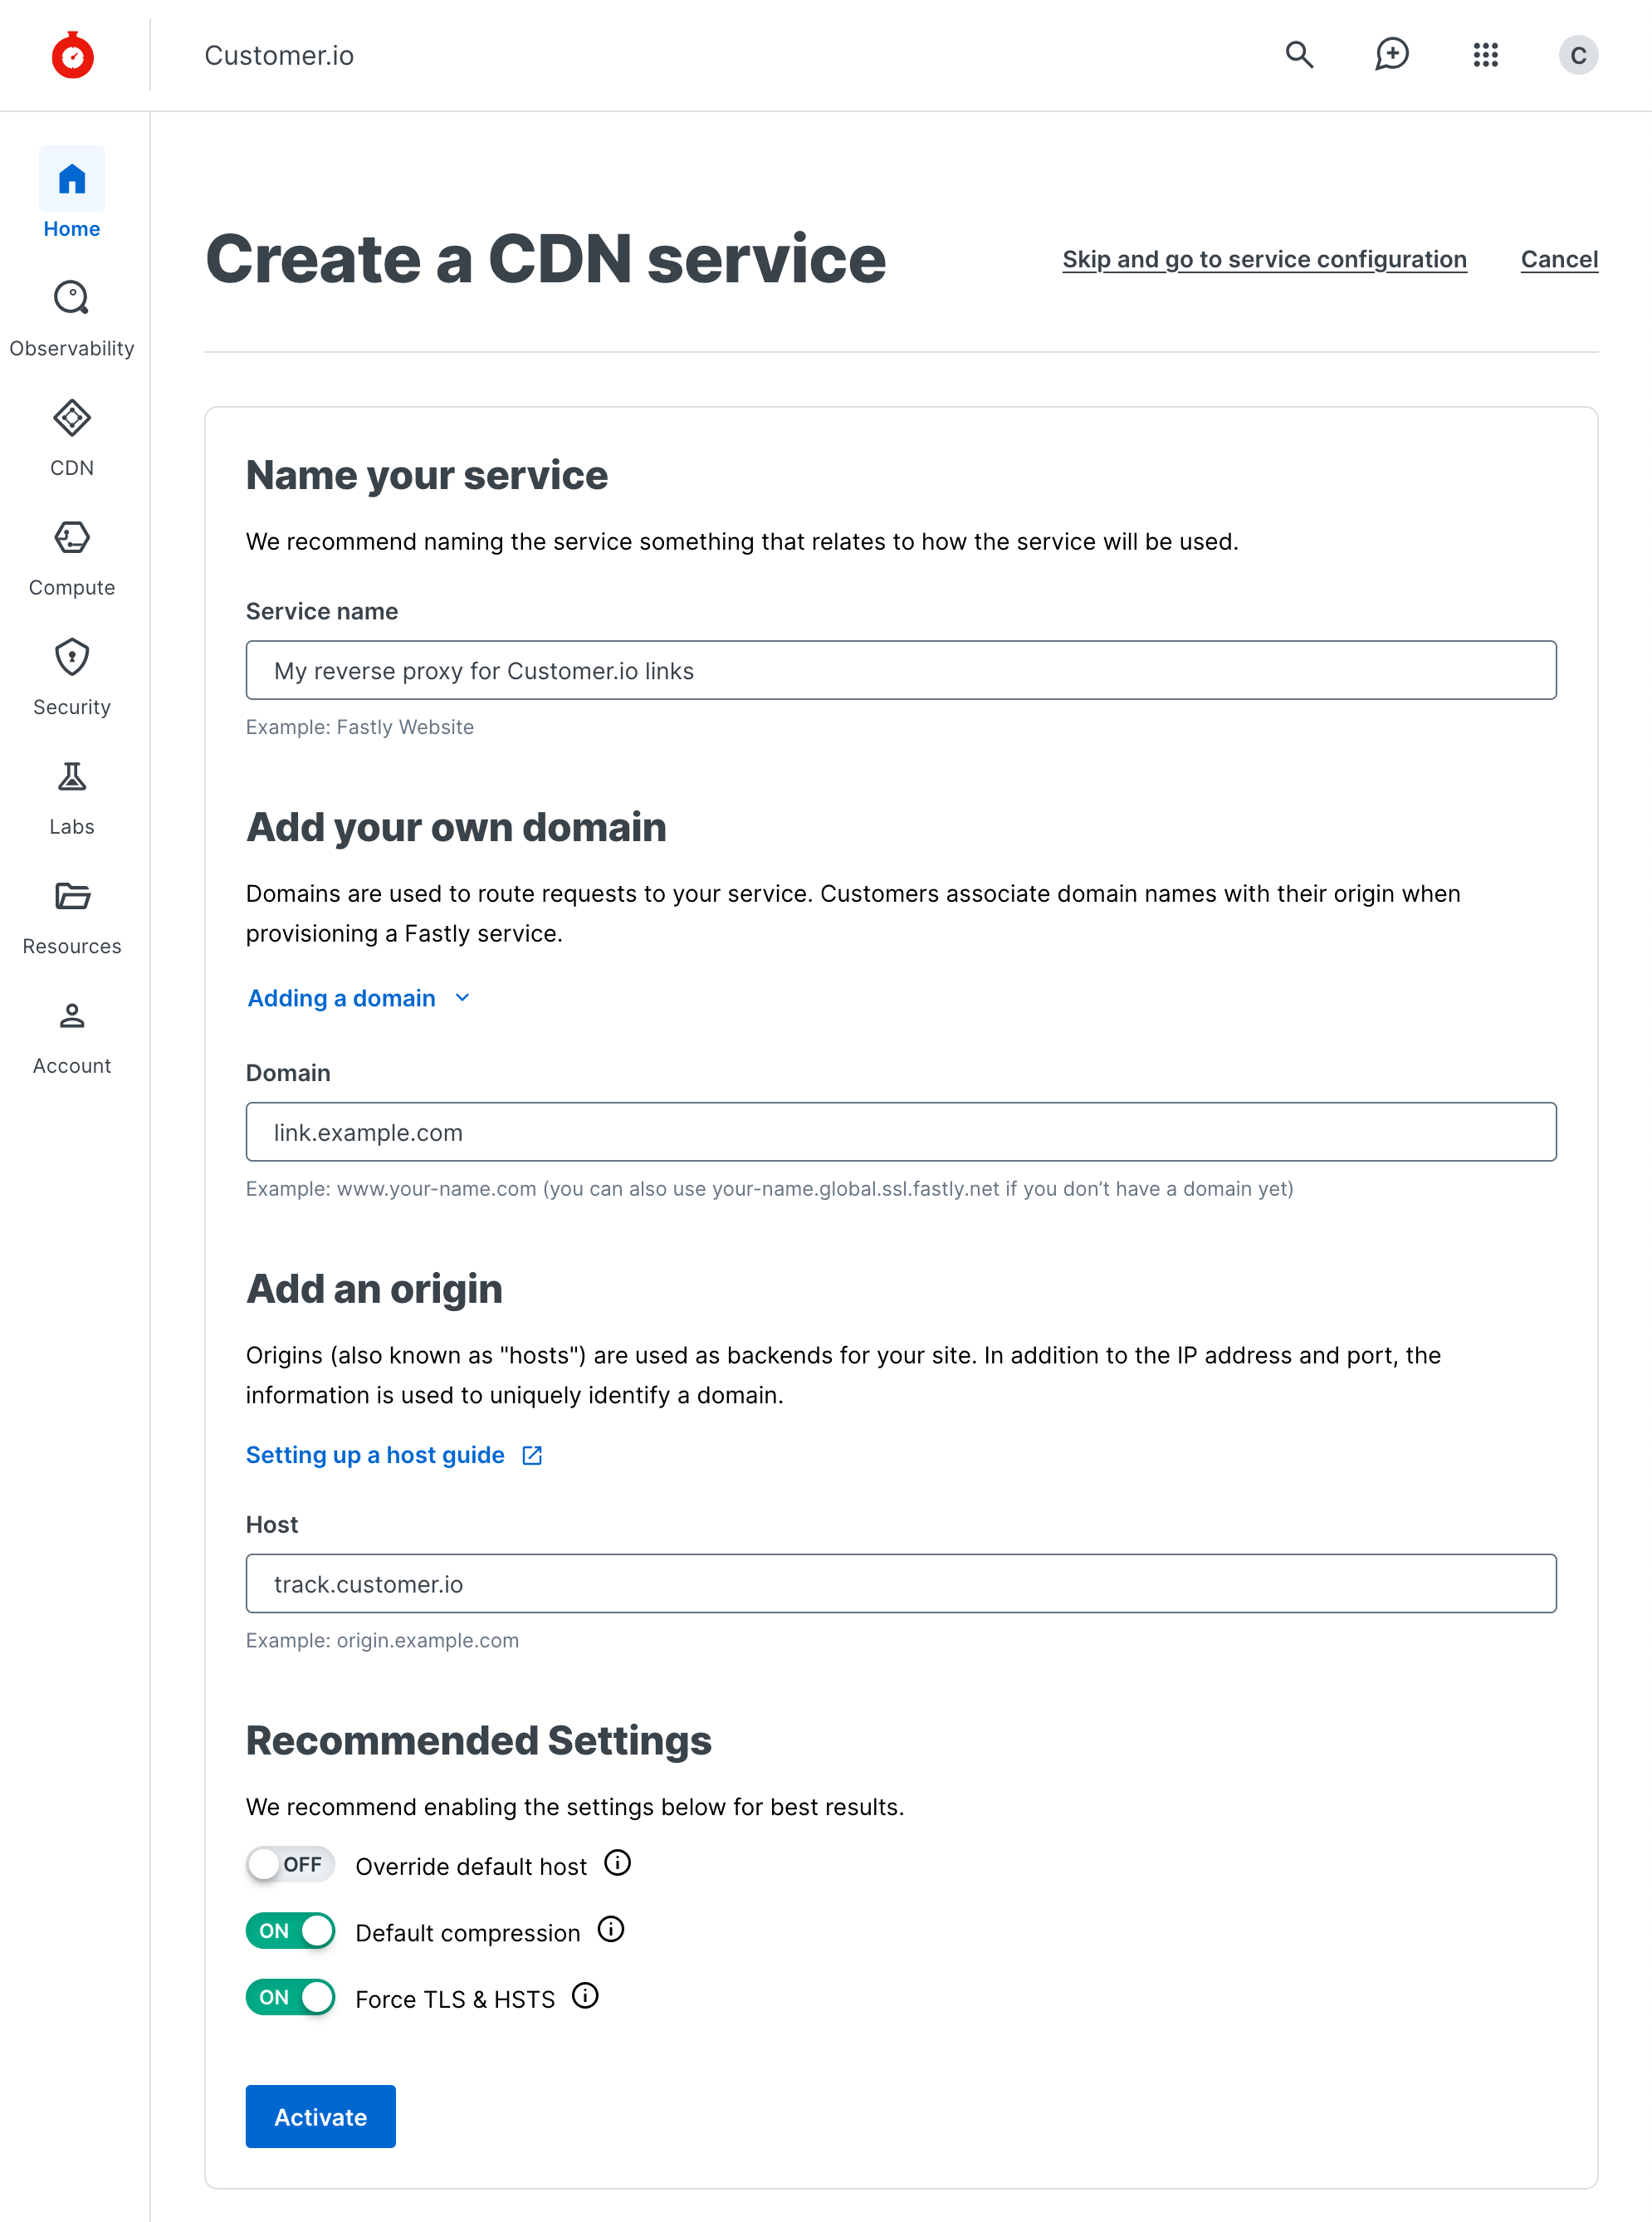
- Click Activate. It may take a minute or two for your CDN to finish activating. Then your links should be proxied through Fastly and use HTTPS by default.
- If you haven’t already set up your link tracking domain in Customer.io, go to Settings in the upper right > Workspace Settings > Email.
- On your domain, go to Actions , click Edit and go to Link Tracking to set your domain. Then click Verify domain.

If you already set up your CDN, and the Override default host setting enabled, you can edit the Override host setting for your CDN and set it to your domain or leave it blank.
Setting up HTTPS Link Tracking with NGINX
Alternatively you can use your own server to serve HTTPS tracked links. The following instructions will guide you through setting up NGINX, however it’s possible to use other server software to accomplish this.
Request a new SSL certificate for the domain you want us to use for your tracked links (e.g.
link.example.com).Place the certificate chain into the file named
/etc/pki/tls/certs/link.example.com.crtPlace the private key into the file named
/etc/pki/tls/private/link.example.com.keyCreate the file
/etc/nginx/conf.d/link.example.com.conf, with the following content - ensuring that the host header is set to the Host Name specified in your link tracking settings in Customer.io (e.g.link.example.com). Theproxy_passURL should match your region (track.customer.ioortrack-eu.customer.io):Use
https://track-eu.customer.ioif you’re in our EU data regionIf you use the wrong regional URL in the
proxy_passfield, we won’t be able to validate your link-tracking domain in later steps.server { listen 80; listen 443 ssl; server_name 'link.example.com'; ssl_certificate '/etc/pki/tls/certs/link.example.com.crt'; ssl_certificate_key '/etc/pki/tls/private/link.example.com.key'; location / { proxy_pass 'https://track.customer.io'; proxy_set_header 'Host' 'link.example.com'; } }Update your DNS record to change the CNAME record for
link.example.comto send traffic to your NGINX server. If you’re specifying the IP address of your server this will need to be anArecord instead of aCNAMErecord.CNAMEorArecord host name:link.example.comCNAMEorArecord value: IP Address of your NGINX server
As an additional “sanity check” you can visit your link tracking domain, followed by
/health(e.g.,https://link.example.com/health). If your domain is properly pointing to our API, the response body will just be{}. Anything else means there is a problem with your configuration.If anything in your proxy’s configuration modifies or misrepresents the referring host, your links may result in Invalid link security token errors—even if you get a
{}response. Your proxy server MUST use your link tracking domain as the host header for the requests that are passed to our server.In your Customer.io Workspace Settings under Email, set up your link-tracking domain if you haven’t already. Enter your domain in the HOST NAME field and click Verify domain to re-validate the domain. You should now pass the HTTPS check and tracking links will use HTTPS by default.
If past messages already have white-labeled tracked links, changing your link tracking domain will cause those existing tracked links to break.
When the domain is collapsed/closed, you can tell that HTTPS link tracking is enabled by looking at the LINK TRACKING section pictured below. Once enabled, your tracked links will now start with something like: https://link.example.com…

