Events
Events are actions people perform in your app, on your website, etc—things like button clicks, scrolling to the bottom of a page, or purchases. When you send us events, you can start campaigns and segment your users based on the things they do (or don’t do) in your app.
How does it work?
Where an attributeA key-value pair that you associate with a person or an object—like a person’s name, the date they were created in your workspace, or a company’s billing date etc. Use attributes to target people and personalize messages. Attributes are analogous to traits in Data Pipelines. represents something you know about a person, an event represents point-in-time data about something a person did. Throughout Customer.io’s APIs and SDKs, you’ll use the track command to send events. You can use events to trigger campaigns, as conversion criteria, or as segment criteria, helping you respond relevantly to the things people do on your website or in your app.
An event consists of an event name and data about the event. The name is how you’ll target events in Customer.io, and the data represents information that you might reference in liquidA syntax that supports variables, letting you personalize messages for your audience. For example, if you want to reference a person’s first name, you might use the variable {{customer.first_name}}., segment criteria, and so on.
Event name and data
Event data can take any structure. But it generally helps to make all events with the same name take the same data structure. You can use your event data in liquidA syntax that supports variables, letting you personalize messages for your audience. For example, if you want to reference a person’s first name, you might use the variable {{customer.first_name}}. to display relevant information in messages or in segments to filter people who performed the same event containing different values or data.
The method you use to send event data changes slightly depending on your integration—JavaScript, API, mobile SDK, but you can access nested event data in your campaigns, segments, and so on with standard JSON dot notation. For example, if you send an event representing a person’s abandoned cart like the example below, you could create a segment of people who abandoned their cart with a monitor using items[].type equals monitor.
{
    "name": "abandoned_cart",
    "data": {
        "total": 215,
        "items": [
            {
                "category": "computers",
                "type": "monitor",
                "price": 200
            },
            {
                "category": "cables",
                "type": "hdmi",
                "price": 15
            }
        ]
    }
}
Reserved event data
There are a few attributes in the data object that are reserved by Customer.io—recipient, from_address, and reply_to. These properties automatically override settings in emails triggered by the event. For example, a recipient in an event will override the To field in your emails.
{
    "name": "event_name",
    "data": {
        "recipient": "person@example.com", //email override for To field
        "from_address": "from@example.com", //email override for From field
        "reply_to": "manager@example.com" //email override for Reply To field
    }
}
How do I send event data?
The methods you use to send events depend on the mediums you use to communicate with your audience and the types of events you want to track. You can send events to Customer.io using one or more of the following:
- From your website: The JavaScript snippet
- From an integration: The API
- From your app: Our Mobile SDKs
- Manually: By uploading a CSV
- From inside a campaign: With the Send Event action
Send events using the JavaScript snippet
Before you can send events, you’ll need to add our JavaScript snippet to any page you want to send events from.
Call _cio.track('your_event_name'); whenever your users perform an event that you want to track in Customer.io. The track function works based on the current browser session, so you don’t need to tell us who to associate the event with. You can send additional event properties representing values from the event. You can use additional event data in liquidA syntax that supports variables, letting you personalize messages for your audience. For example, if you want to reference a person’s first name, you might use the variable {{customer.first_name}}., as criteria when segmenting your audience, and so on.
_cio.track('likes_pizza', {favorite_topping: pepperoni, dislikes: [anchovies, onions]})
If you send an event before you identifyThe Customer.io operation that adds or updates a person. When you identify a person, Customer.io either adds a person if they don’t exist in your workspace, or updates them if they do. Before you identify someone (by their email address or an ID), you can track them anonymously. someone, we’ll log an anonymous event. By default, we’ll associate anonymous events with a person after you identify them. See anonymous events for more information.
We trim leading and trailing spaces from event names
You would not be able to reference events with leading or trailing spaces in the name, so we automatically trim leading and trailing spaces from event names for you.
Send events using the API
While some of the other methods for sending events might support a specific medium—like your website or your mobile app—you can always send events using the API.
curl --request POST \
  --url https://track.customer.io/api/v1/customers/{identifier}/events \
  --header "Authorization: Basic $(echo -n site_id:api_key | base64)" \
  --header 'content-type: application/json' \
  --data '{"name":"likes_pizza","data":{"favorite_topping":"pepperoni","dislikes":["anchovies", "onions"]}}'
As with our JavaScript snippet, you can send an event before you identifyThe Customer.io operation that adds or updates a person. When you identify a person, Customer.io either adds a person if they don’t exist in your workspace, or updates them if they do. Before you identify someone (by their email address or an ID), you can track them anonymously. someone, to log an anonymous event. When you identify someone, you can pass their anonymous_id attribute to associate anonymous events with a person after you identify them. See anonymous events for more information.
Send events using the SDK
When you use our SDKs, you can send events with the track command. You can also set up our SDKs to automatically send screen events—events representing the pages in your app that your audience visits. See our SDKs for help integrating your app with Customer.io.
Uploading a CSV
You can upload a CSV containing event data for each person in the CSV. You might do this if you need to backfill events that your audience performed outside of your normal integration path—things your audience did before you integrate with Customer.io. See uploading people for more information about uploading a CSV.
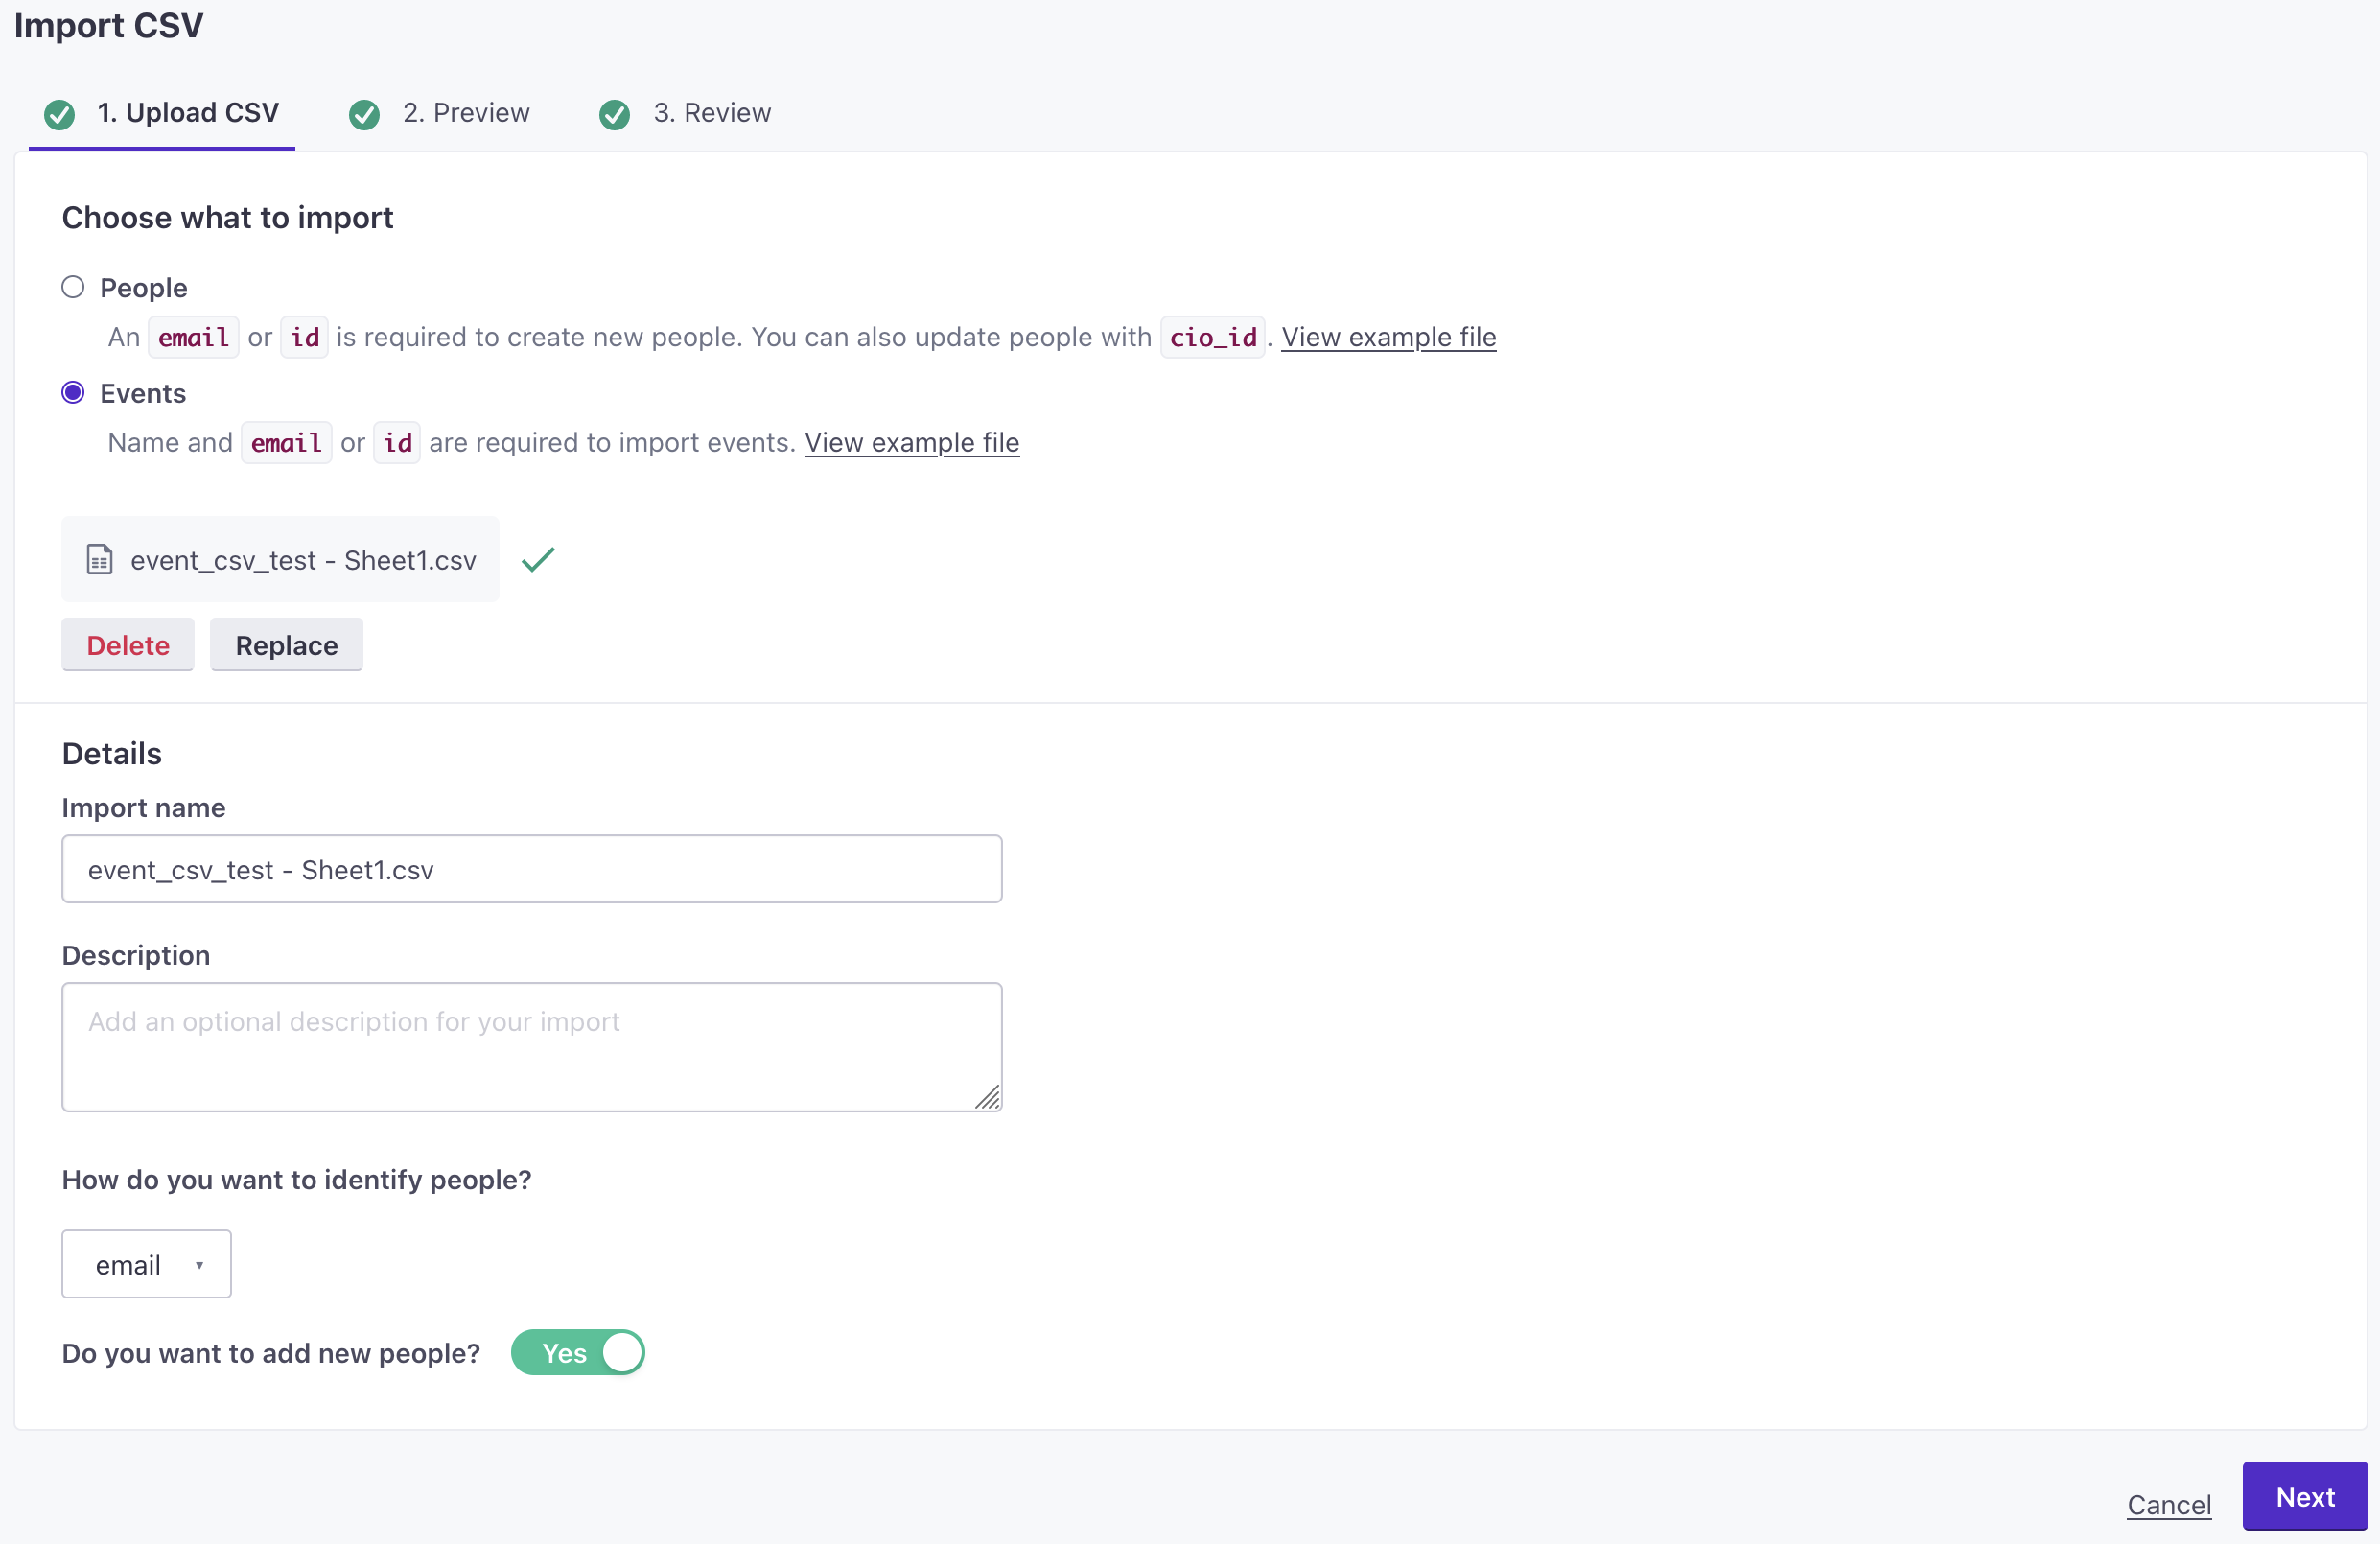
If you want to pass events this way, the people in your list must already exist. Unlike other CSV-upload operations, you cannot add new people when you upload event data. To upload a CSV, go to People, click Add People > Upload a CSV.
The first two columns in your CSV must be _cio_name, _cio_customer_id. Take a look at an example CSV. You can also include a third _cio_timestamp column representing the date-time when the event occurred if you want to back-date your event. If you don’t include this column, we’ll use time that we process the event as the event’s timestamp. Additional columns are event data attributes that you want to associate with the person.
Event data provided via CSV (columns 4 and greater) is flattened and cannot contain nested JSON. For example, a column called property.subproperty will simply become a stringified key called "property.subproperty".
| col | col name | required | description |
|---|---|---|---|
| 1 | _cio_name | The name of the event. | |
| 2 | _cio_customer_id | The identifier for a person. Depending on your workspace settings, this can be the person's id or email. You must use the same identifier for the entire CSV—you cannot mix IDs and email addresses. | |
| 3 | _cio_timestamp | The date-time when the event occurred. | |
| 4+ | Subsequent columns contain additional attributes for the data object in the event; one column per event property. These are properties you'll use in liquidA syntax that supports variables, letting you personalize messages for your audience. For example, if you want to reference a person’s first name, you might use the variable {{customer.first_name}}.—i.e. {{event.column_name}}. These columns can have any name, though you may want to make sure your column names don't contain spaces or special characters that might make them hard to use in Customer.io |
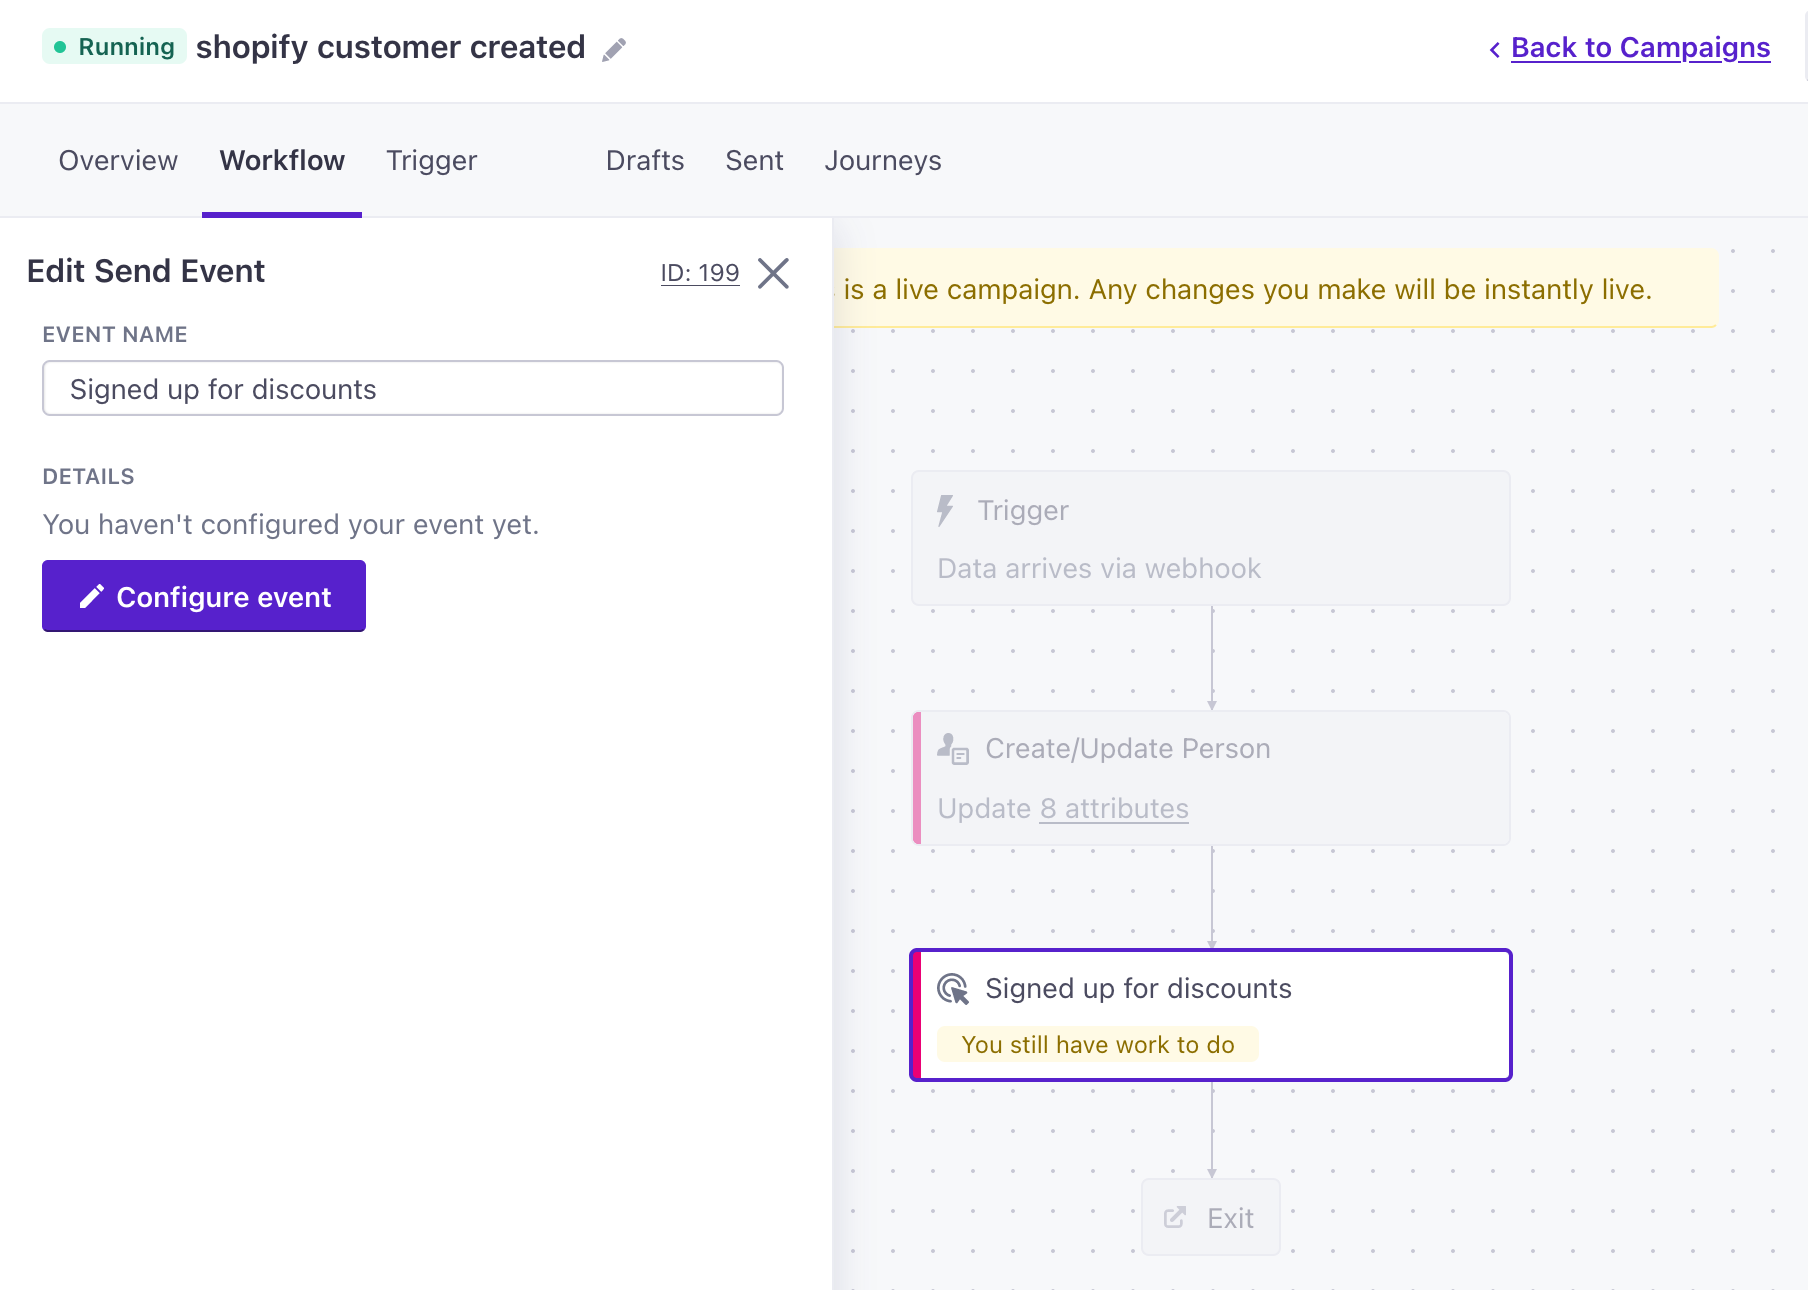
Send events as a part of a campaign
You can create an event within a campaign, making it easy to trigger downstream campaigns or add people to segments. For webhook-triggered campaigns, this makes it easy to reshape and associate data from an outside source with people in your workspace, all without having to talk to a developer or write your own code.
See the Send Event action to learn more about creating events within campaign workflows.
Event segments
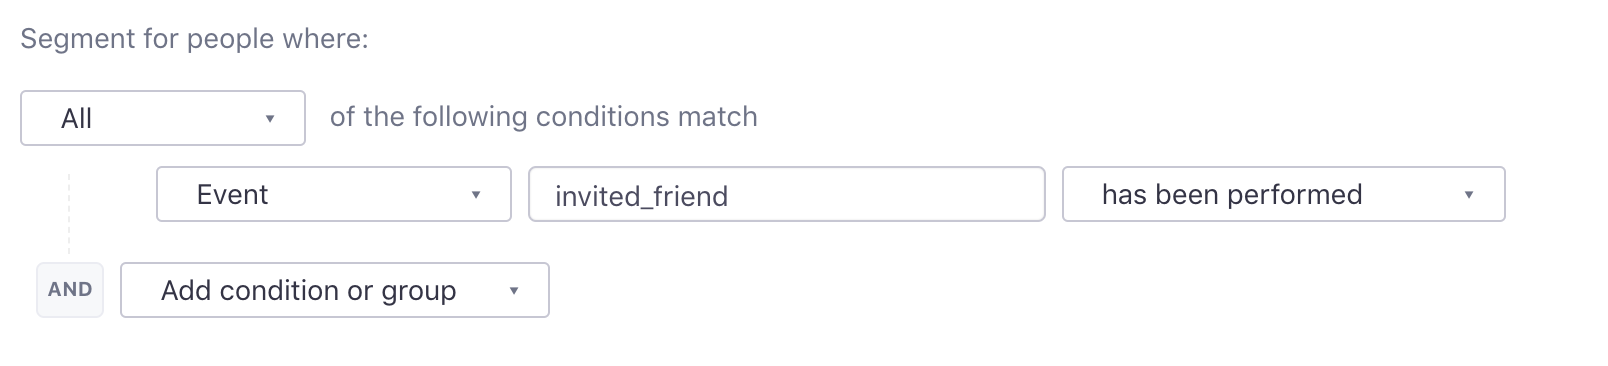
Once you’re sending us these events, you can then build data-driven segments from them based on actions users have or have not done. Make sure that the event name used in _cio.track('your_event_name') and the event name used to create a segment are the same.
You can also set a time frame for the action—e.g., “have not created_project in 30 days”, or “have invited_friend in the last 14 days”.
Here’s an example without a timeframe:
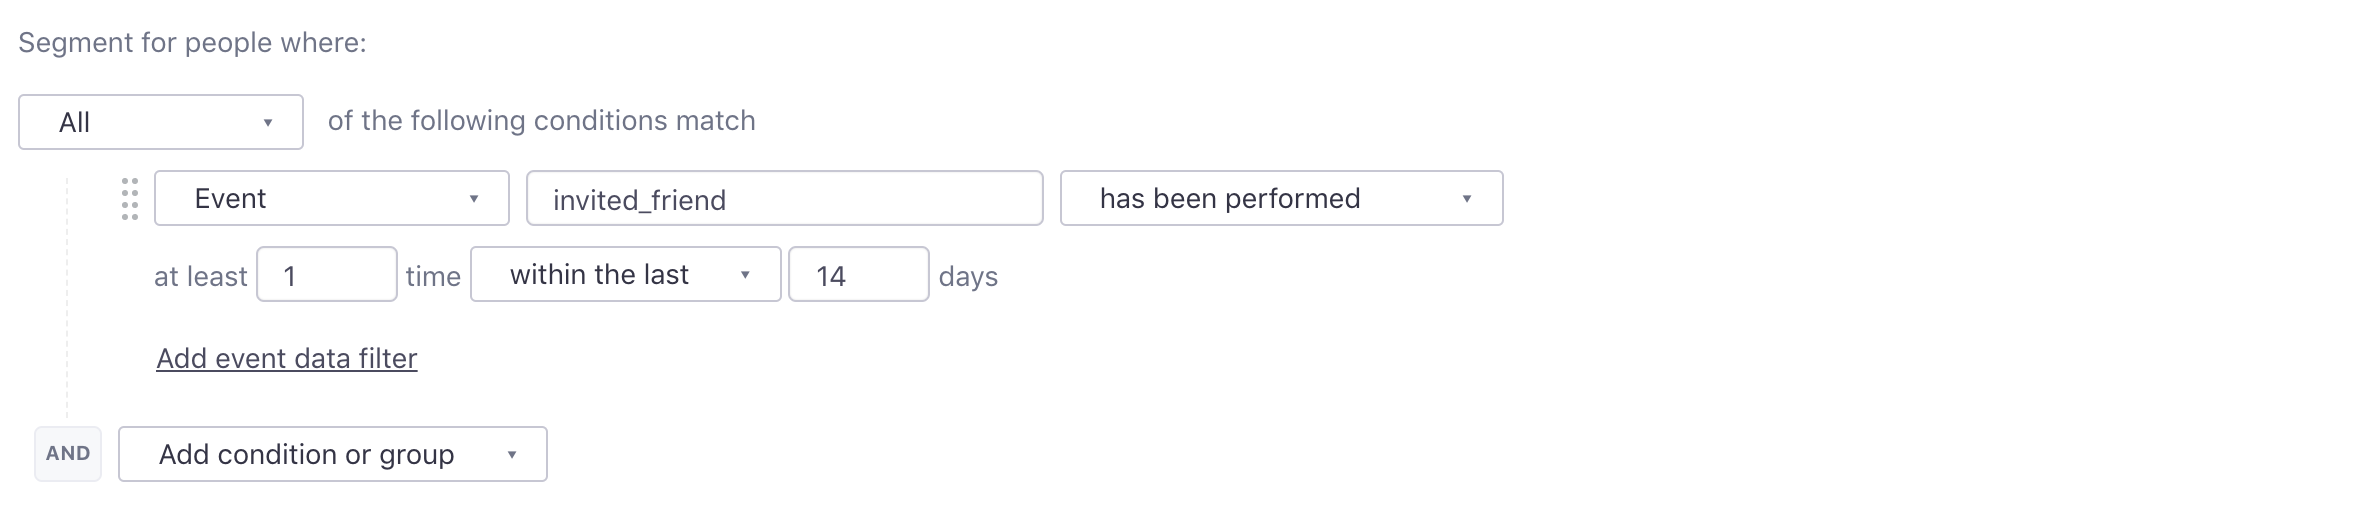
And if you’d like to add the timeframe, click Refine, and adjust the time inputs:
Back-date events with event timestamps
When you send an event, you can send a timestamp representing the date-time that the event occurred. Format your timestamp value as a Unix timestamp (seconds since epoch). Take care when backfilling events: events with a timestamp in the past 72 hours can trigger campaigns. Before you send back-dated events, make sure that you won’t inadvertently trigger campaigns or send messages that aren’t relevant to your audience.
If you don’t provide we’ll use the time we process the event as the timestamp.
We only show activity for the last 30 days in Customer.io.
Events that are older than 30 days are logged for use in segmentation (e.g., “event ‘made_purchase’ has been performed at least once in the past 90 days) but they will not appear in your activity logs.
Here’s an example of how to send this data using curl to the REST API. If your account is in the EU region, make sure you use https://track-eu.customer.io as the base for your calls.
curl -i https://track.customer.io/api/v1/customers/5/events \
   -u YOUR-SITE-ID-HERE:YOUR-SECRET-API-KEY-HERE \
   -d name=purchased \
   -d data[price]=23.45
   -d timestamp=1359389415
Format your event parameters without spaces or special characters
We recommend that you avoid using spaces in event names and parameters. For example, instead of sending new sign up, use new_sign_up or newSignUp.
If you do send us event parameters with spaces, you’ll need to use special notation to reference events:
- Without spaces:
{{ event.sign_up_date }} - With spaces:
{{ event["sign up date"] }}
Event names can include special characters. However, when searching for events—like when you want to create a segmentA group of people who match a series of conditions. People enter and exit the segment automatically when they match or stop matching conditions.—you may want to escape *, +, or | characters using a \ character to treat them as literals. Otherwise, these characters act as a wild card, additive search, and subtractive search respectively unless you escape them.
Anonymous Events
You can send anonymous events to Customer.io containing an anonymous_id. When you set the anonymous_id on a person, we associate those anonymous events with a person. This lets you log events before people log in, sign up, or are otherwise identified, and then attribute those events to people after you identify them.
Did you send anonymous events before July 2021?
Our previous anonymous events are now called “invite events”. You can find more information about them in our invitation recipe.
Send test events through the UI
You can send a custom event through the UI to test event-triggered campaigns, segments, and liquid conditions in your messages.
Try sending an event representing you, or a designated test account, to make sure that your campaign and messages behave the way you expect them to.
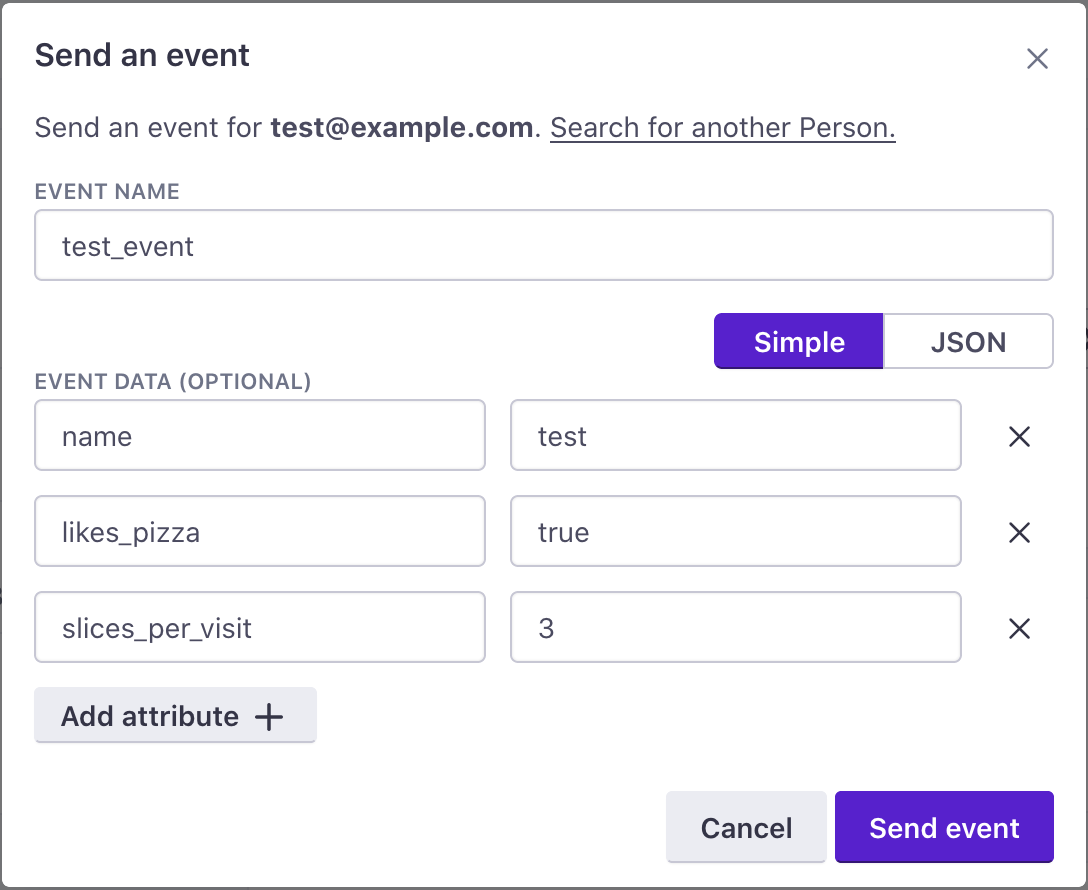
To send a custom event:
- Go to one of the following places and click Send Event:
- The Trigger page when setting up a new campaign.
- Your Campaign Overview page (available after you start an event-triggered campaign)
- A person’s profile—click Options > Send Event
- Data Index > Events > select an event.
- In Activity Logs, select an Event activity and click Resend.
- Use the search box to select the person you want to send this custom event to.
- Enter the EVENT NAME as it appears in your trigger, segment, etc.
- Enter EVENT DATA. These may be items you reference in messages with liquid or criteria for campaigns and segments.
- Click Send event.
Resend an event
When you update event-triggered campaigns or segments, you may want to resend events to test your changes.
In the Activity Log and Data Index, you can click events to see Recent Activity for a particular event. Select an entry and click Resend to resend an event associated with that person.
Deduplicating events
You can provide an id with your events, to deduplicate events—if there’s a possibility that your integration might send duplicate events. The id must be a ULID. If two events contain the same id, we won’t process the event multiple times.
Deduplicating events helps you accurately represent people’s activity; can prevent people from accidentally entering or leaving campaigns based on the number of times that a person performed an event; and prevents duplicate events from impacting your workspace’s performance.
{
    "name": "my event",
    "id": "01BX5ZZKBKACTAV9WEVGEMMVRY",
    "data": {
        "prop1": "value"
    }
}
Events in the Activity Log
The Data & Activity > Activity Logs page has two tabs: Identified and Anonymous. Identified events are associated with a person. Anonymous events are not.
Both tabs include columns called Timestamp and Processed at.
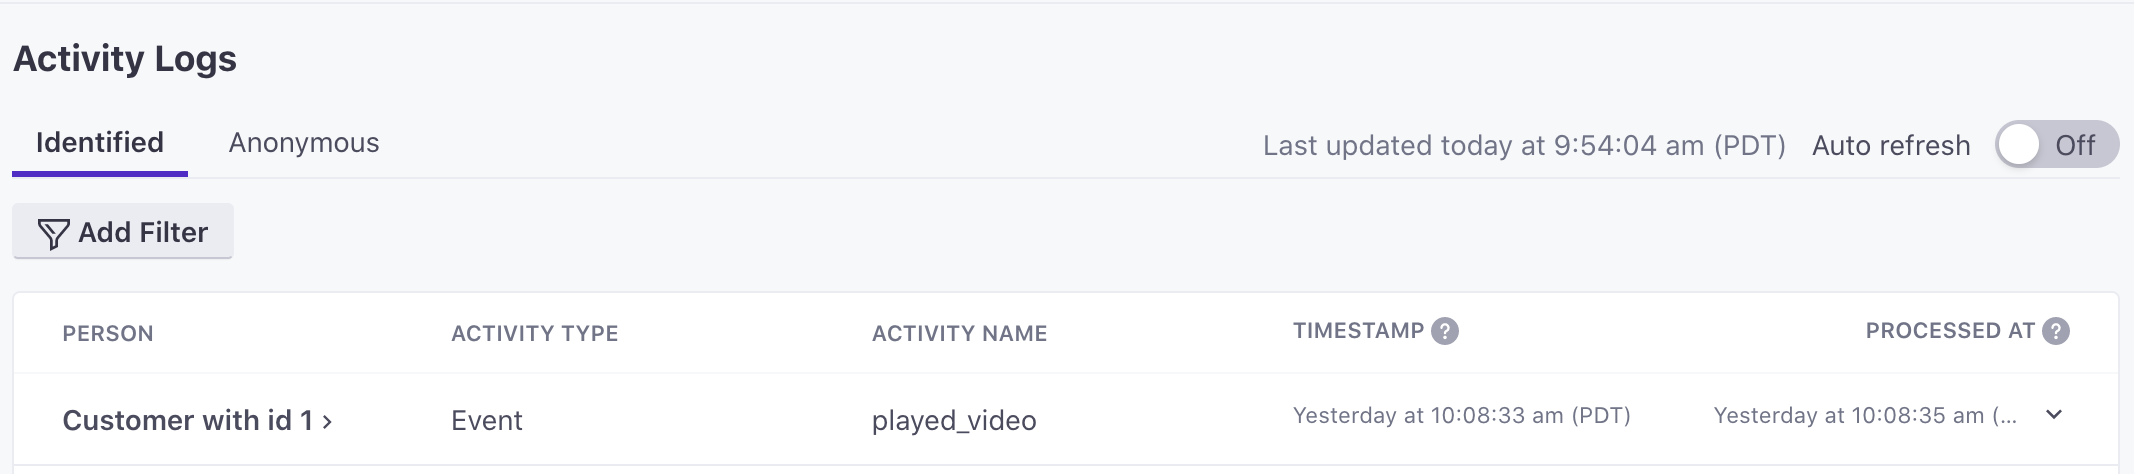
- Timestamp represents the date and time listed on an event. If you don’t set a timestamp, we use the date-time when we receive the event.
- Processed at is the date and time when we process an event. Anonymous events are not processed, and therefore do not have a “processed at” time.
If there is a significant difference between the two:
- An anonymous event was merged to a profile. Anonymous events are not processed until they’re associated with a person, so anonymous event may be timestamped well before you identify a person and the event is associated with the person.
- You may have manually set a timestamp on an event. This typically happens when you backdate an event, or want to log the exact date-time that an event occurred and you don’t immediately send the event to Customer.io.
- Customer.io experienced a processing delay.
Data-out for events
You can export event data for a person from their profile. Select Options > Export profile data in the top right. You will receive an email with the export or you can go to Integrations > Exports to download it. The export includes message events (clicked, opened, etc), attribute changes, and custom events (like “Order Completed”).
You can also export high-level event data from the data index, like the number of campaigns that use an event and when an event was last received by Customer.io. Go to Data & Integrations > Data Index > Events. Then click Export to CSV.
You can programmatically send message events (clicked, opened, etc) and subscription preferences to destinations outside Customer.io using reporting webhooks. Go to Integrations > Reporting Webhooks to get started. This does not include custom events that were sent to Customer.io.
We don’t currently have a programmatic way of sending custom event data to a desintation outside Customer.io, but in the future, our Data Pipelines will be a solution for you.

