Connect forms to your workspace
You can connect forms to your Customer.io workspace to automatically add people and trigger campaigns when they submit your form. Connecting forms to your workspace makes it easy to capture and respond to leads.
How it works
When someone submits your form, we’ll identifyThe Customer.io operation that adds or updates a person. When you identify a person, Customer.io either adds a person if they don’t exist in your workspace, or updates them if they do. Before you identify someone (by their email address or an ID), you can track them anonymously. the form submitter and assign them attributesA key-value pair that you associate with a person or an object—like a person’s name, the date they were created in your workspace, or a company’s billing date etc. Use attributes to target people and personalize messages. Attributes are analogous to traits in Data Pipelines. based on the values they provide in your form. You can map form fields to attributes when you set up your form (normally after the first submission). Form submissions also act as eventsSomething that a person in your workspace did. Events can trigger campaigns, add people to segments, etc. You can access event properties in liquid with {{event.<property>}} that you can use to trigger campaigns, making it easy to respond to your audience automatically based on their form submissions!
There are three ways to connect forms to your workspace:
You provide the URL of a page containing a form supported by our JavaScript snippet. We scan the page for your form and the fields on that form, letting you map form fields to attributes on the people who respond to your form. Forms captured this way also capture query parameters in the URL of the page containing the form. You can use URL parameters that we capture for segmentation, but we do not apply them to people who fill out your form as attributes. The custom forms JavaScript snippet is different from our basic JavaScript snippet You can find the JavaScript snippet for forms under Data & Integrations > Integrations > Forms > *Settings**. You must install this snippet to send form submission data to Customer.io. You pass a This is typically for backend integrations. While you can write your own client-side JavaScript integration with the Forms API, our custom forms JavaScript snippet is ready-made for that purpose. You can set up your form with an Use the custom forms JavaScript snippet with a compatible form provider.
Use the Forms API (generally for backend integrations).
form_id, along with the data you want to capture from that form. If the form, or the person you reference in the data of your request, do not exist, we create them!Use your form’s
action attribute to POST data to Customer.io without writing any code.action attribute pointing to an endpoint provided by Customer.io, letting you POST form data to Customer.io without adding the JavaScript Snippet to your pages.
These processes are not for Facebook Lead Ad forms, Jotform, or Typeform. See our Facebook Lead Ads, Jotform, or Typeform pages for more information about our direct integrations.
Install the custom forms JavaScript snippet
To capture form submissions using the custom forms JavaScript snippet, you need to:
Scan your form to Customer.io on the Data & Integrations > Integrations > Forms page. For us to scan your form, it must:
- Use a
<form>tag. We cannot scan<div>-based forms. - Not be inside an
<iframe>. - Have fields with
nameattributes;nameis how we identify non-textarea fields and map them to attributes. - Have a field that maps directly to one, and only one identifier—
idoremailas determined by your workspace settings.
- Use a
Install the custom forms JavaScript snippet on the page(s) containing your form.
You can do these things in any order, but you cannot capture form information until you’ve done both.
Scan a form
To add a form, provide the URL of the page containing your form. Customer.io can scan most forms that use the <form> tag, as long as your form is not inside an <iframe> and your form fields have name attributes. If your form contains <textarea> fields that do not have a name (as with Squarespace), we’ll number them (e.g. textarea_1).
If your form is on multiple pages, you only need to add your form once.
If you have instances of the same form on multiple pages, we’ll treat them as the same form (so long as the custom forms JavaScript snippet is installed on all pages containing the form).
- Go to Data & Integrations > Integrations > Forms.
- Select Custom and click Connect form.
- Enter the URL of your form and click Scan for Forms.
- Select the form(s) you want to connect to your workspace and click Choose Form. If your page contains multiple forms, you can select each form and set a Name. The Name is how you’ll select forms in the UI.
- If you haven’t already, Install the custom forms JavaScript snippet. Go to the Settings tab to find the snippet.
Add the custom forms JavaScript snippet to your site
The custom forms JavaScript snippet is not the same as our basic JavaScript snippet. You must install the Connected forms JavaScript snippet to send data from scanned forms back to Customer.io.
Before you can find the custom forms JavaScript snippet, you must have scanned at least one form.
To find and install this snippet:
Go to Data & Integrations > Integrations > Forms and click Settings. The Settings tab only appears after you scan your first form. If you haven’t already done so, scan a form.
Click JS Snippet.
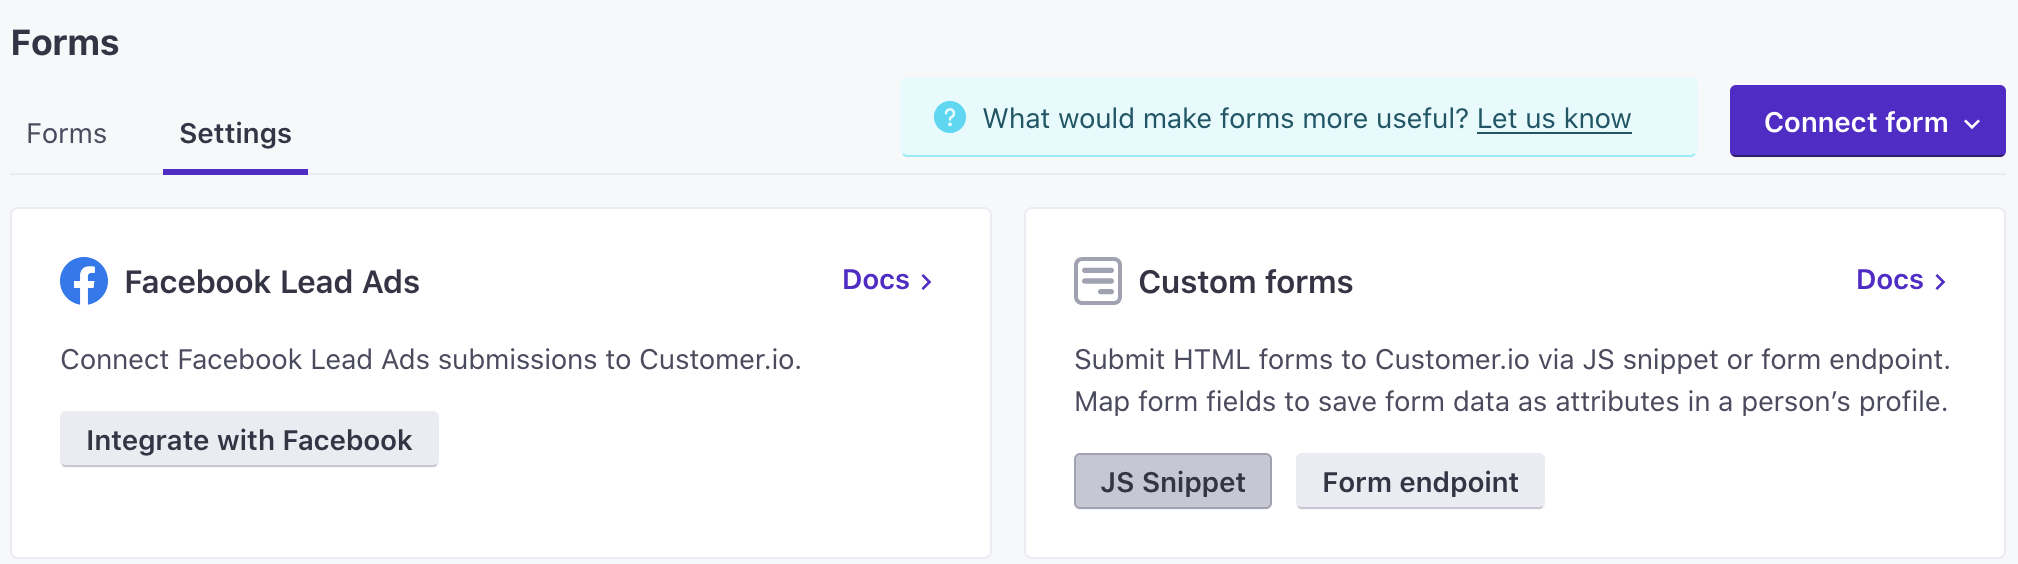
Copy and paste the snippet. Where you paste the snippet may vary based on your form provider.
- Custom HTML or Netlify Forms: paste the script on the page containing your form. The script can go anywhere in the
<head>or<body>tags. - Other form providers: See the supported providers below.
- Custom HTML or Netlify Forms: paste the script on the page containing your form. The script can go anywhere in the
You can install both Customer.io JavaScript snippets
We have two JavaScript snippets: the basic JavaScript snippet and the Custom forms snippet. The basic snippet identifies and updates people who browse your website, and the custom forms snippet identifies and updates people who submit your form.
Compatible form providers
To use our form-scanning service, form fields must have a name attribute and you need to install the custom forms JavaScript snippet. This snippet is different from our basic JavaScript snippet and has been tested with the following services and forms, though it may be compatible with additional services:
- Formstack
- Instapage landing page forms
- Netlify forms
- Squarespace Form Blocks and Newsletter Blocks
- Unbounce landing pages (not pop-ups or sticky bars)
- Webflow
- Wordpress forms
- Your own HTML forms
We can also support virtually any form provider when you integrate directly with the /forms API. In general, we suggest using the API for backend integrations. While you can write your own JavaScript integration with this API, our custom forms JavaScript snippet is made specifically for this purpose.
Formstack
In Formstack, you add JavaScript to a theme. You cannot add a script to the default theme. You either need to create a new theme or copy an existing one so that you can edit it.
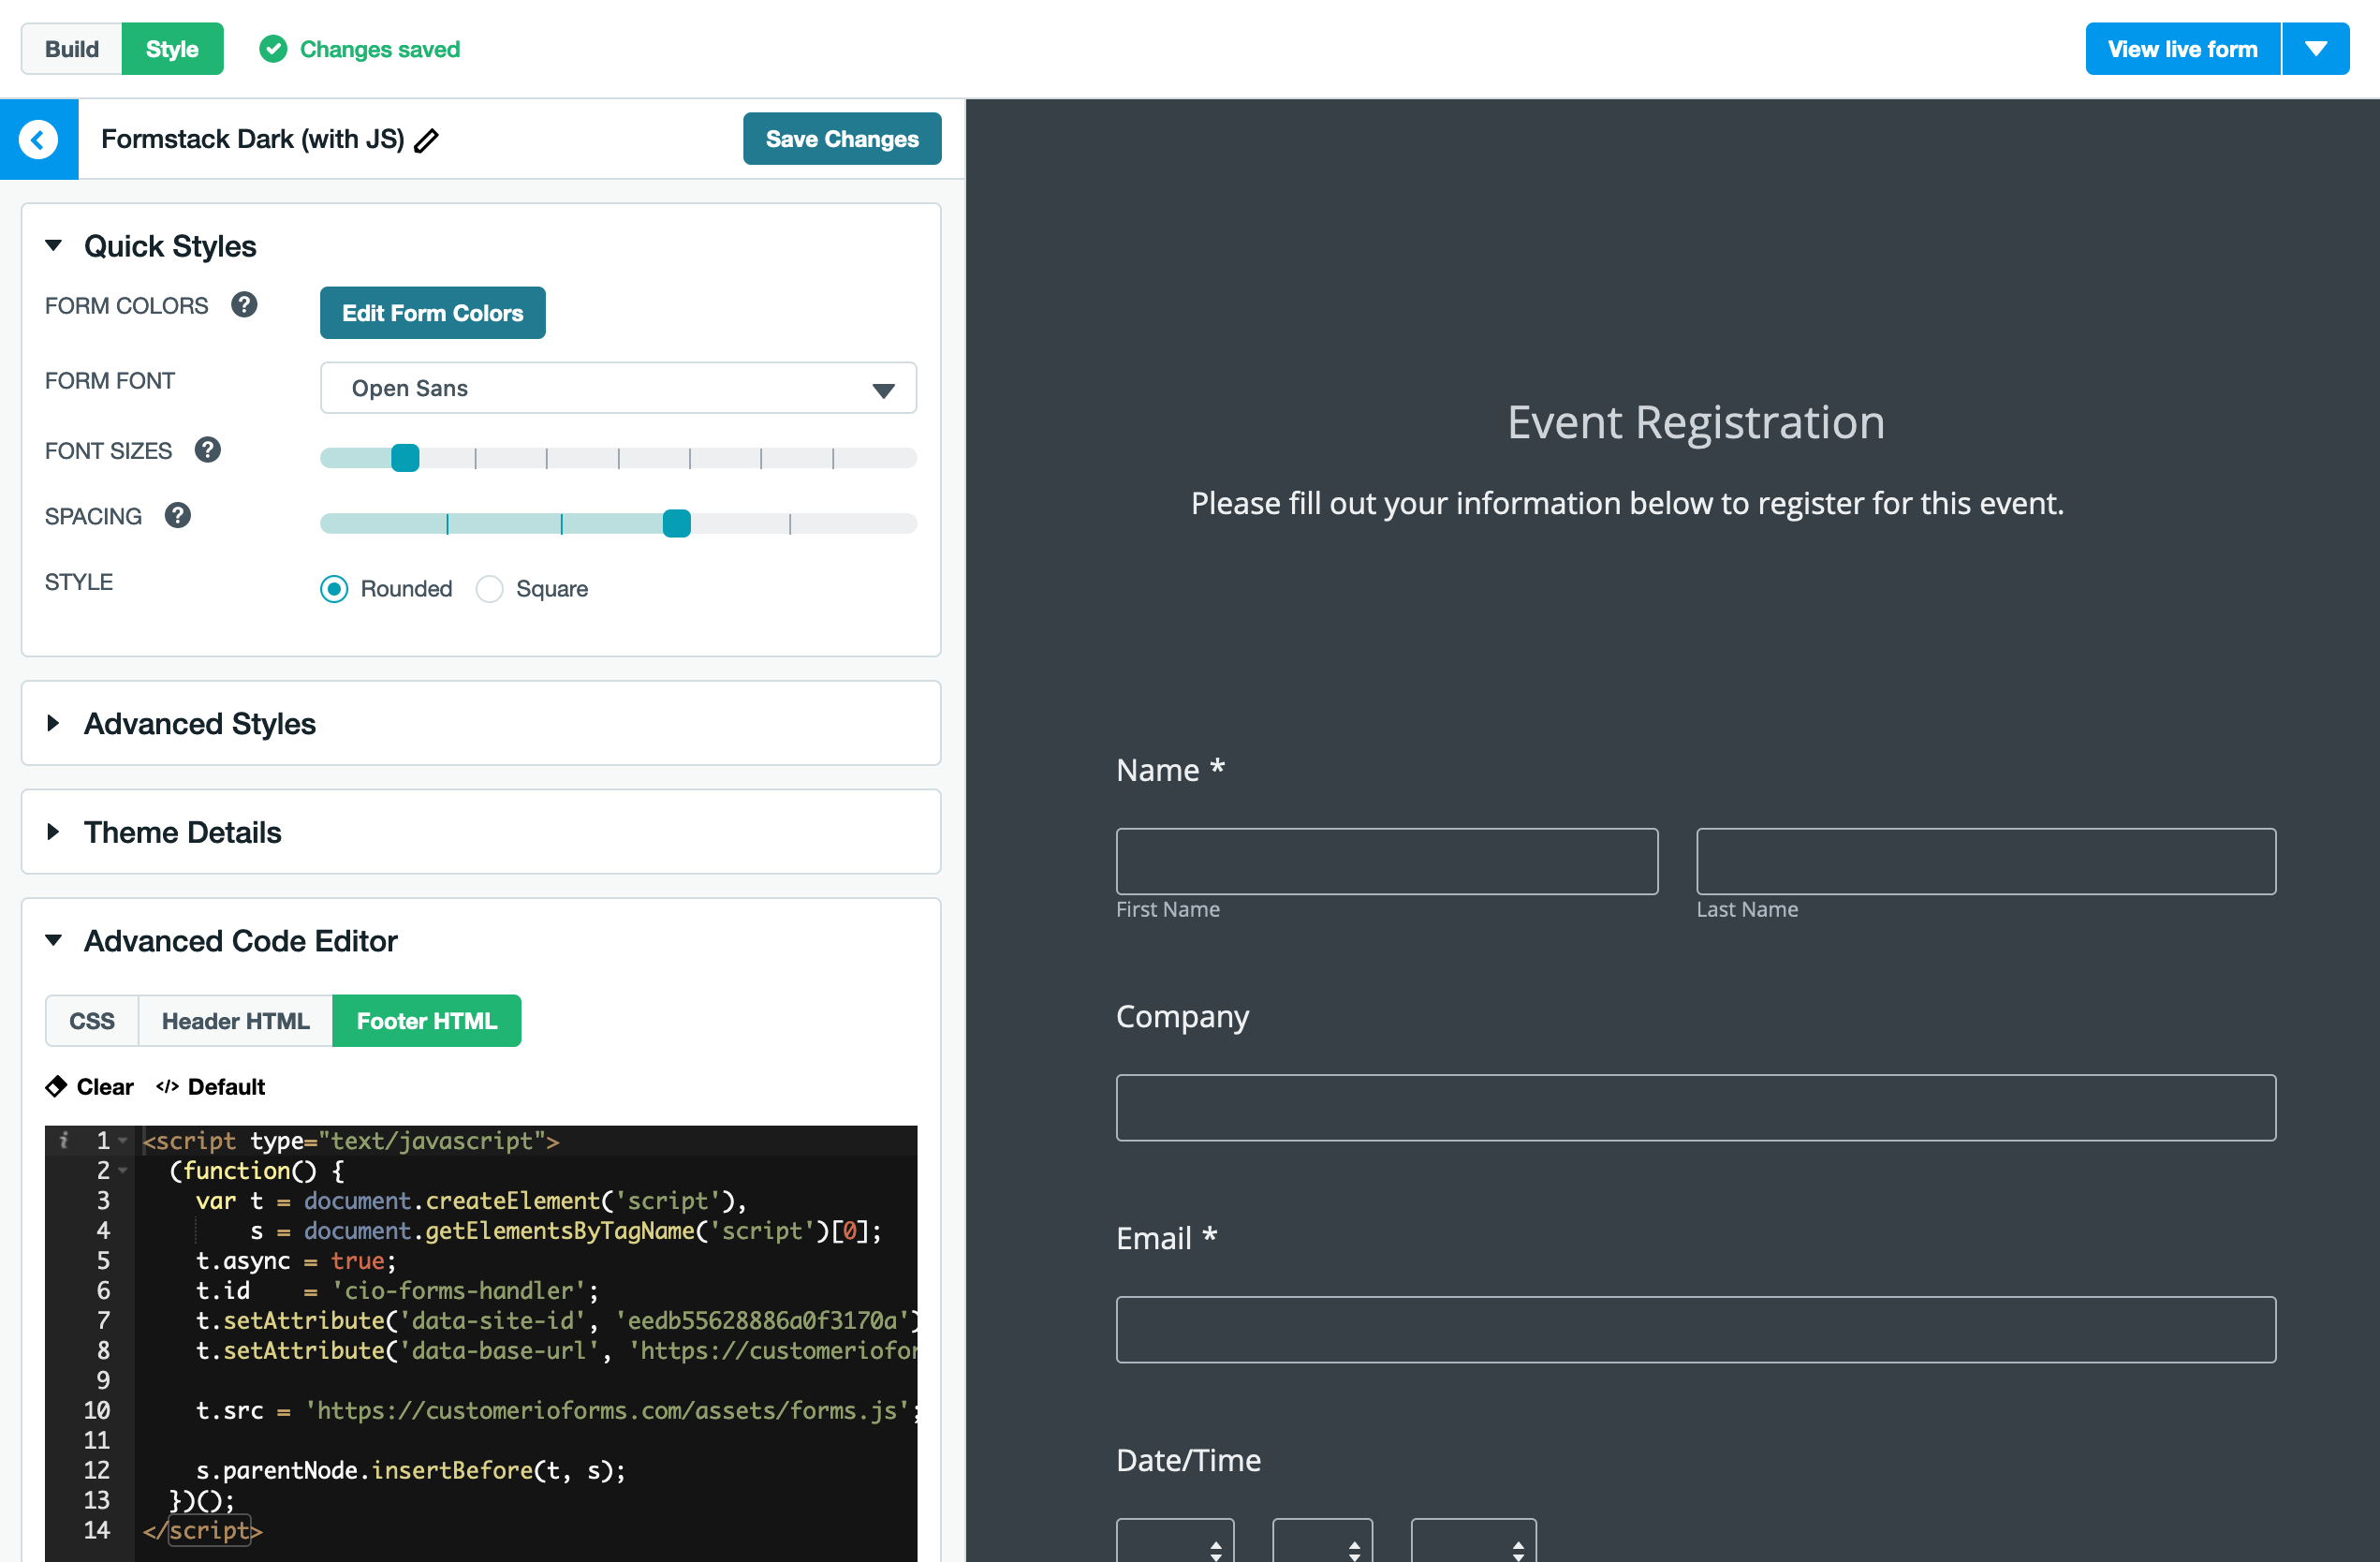
To add the Custom forms JavaScript to your Formstack theme:
- This is your first form in Customer.io, Scan your form.
- Go to the form containing your theme.
- Click Style and then click Advanced Code Editor.
- Paste the custom forms JavaScript snippet into the Header HTML or Footer HTML; it doesn’t matter which.
- Click Save Changes.
Map Formstack fields to attributes
Formstack does not assign a friendly name attribute to fields. Instead, it assigns a numeric identifier value to the name attribute in each field in the format field113891598, which can make it challenging to map form fields to attributes. You need to know which name attribute corresponds to the field label, so that you can accurately map fields to attributes in Customer.io.
When you scan a form, fields generally appear in order from top-to-bottom, left-to-right, which may help you understand the order of fields when you map them to attributes. Otherwise, you can find the names of your fields by examining the HTML on your form page, or in Formstack by going to Forms, selecting your form, and then clicking the field you want to find the identifier for. The URL updates with each field you select; the final segment in the URL path represents the field identifier (in the format field<identifer>).
Send a test event to check Formstack field mappings
Because Formstack fields don’t have friendly names, we strongly recommend that you send a test form_submit event to make sure that your fields map to the correct attributes. After you map your form, click Create Campaign for your Formstack form, and then click Test form event to send a test event representing a test user in your workspace. Click View
Instapage
You can install the JavaScript snippet in the head, body, or footer of your Instapage form page. If you use a custom domain (as opposed to the default, pagedemo.co URL), it may take a while before you can begin transmitting data to Customer.io due to DNS propagation issues.
Netlify
Netlify forms are basically custom HTML forms that include a data-netlify="true" parameter in the <form> element.
Include the JavaScript Form Snippet on the page containing your form. It can go anywhere in the <head> or <body> tags. Form submissions will appear both in Netlify and as people in your Customer.io workspace.
Squarespace
You can add the custom forms JavaScript snippet to Squarespace pages using the code injection feature. You can inject code at the page or site levels depending on how many pages contain your form.
- Click Settings > Advanced for the page or site you want to add code to.
- Paste the custom forms JavaScript snippet in the header or body sections.
- Click Save.
We automatically assign a name to Squarespace text area elements
We normally identify form fields by their name attributes. Squarespace does not let you assign a name to <textarea> elements, so we assign them names in the format textarea_1, with ascending numbers for each text area element in your form.
Unbounce
You can add the JavaScript snippet at the domain level or page level, but you should not add it in both places, or you’ll receive duplicate submissions for each form.
- Add to the domain under Settings > Script Manager.
- Add at the page level, click Javascripts at the bottom of the page and insert the custom forms JavaScript snippet.
The JavaScript snippet does not work with forms in Unbounce popups or sticky bars.
Webflow
You must have a paid Webflow plan to add the custom forms JavaScript snippet to Webflow forms pages. In Webflow:
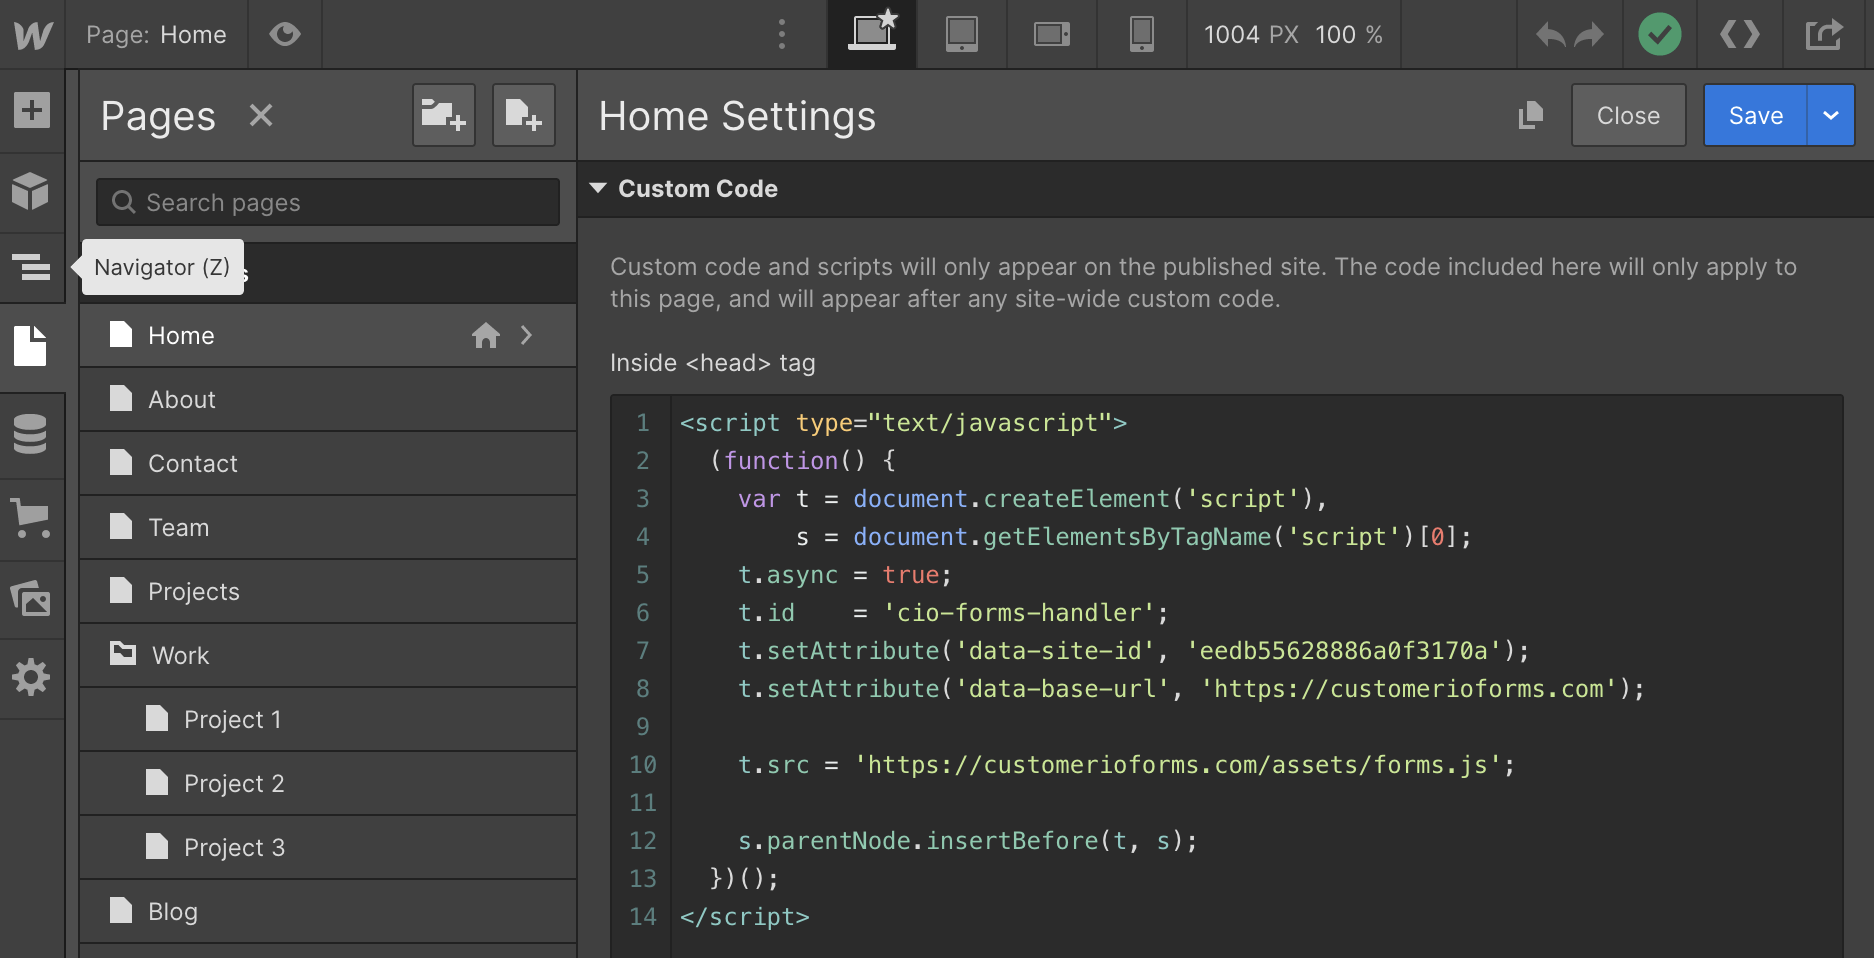
- Go to Pages.
- Click for the page you want to install the custom forms JavaScript snippet on.
- Scroll down to Custom Code and paste the custom forms JavaScript snippet in either the Insidetag or Before tag. It doesn’t matter which.
- Click Save.
Wordpress with WPForms
We tested our JavaScript snippet with the WPForms plugin for Wordpress. You may be able to capture form submissions from other Wordpress plugins, but we can only guarantee support for WPForms. Contact us if you need support for a different Wordpress plugin.
You’ll need to add the JavaScript snippet to pages containing your form. If your form is on a few pages, you can add a custom HTML block below the form and paste the JavaScript snippet into the block.
Otherwise, you can add the snippet to your site using Google Tag Manager, the Wordpress Insert Headers and Footers plugin, etc.
When you publish the page containing the form, it’ll begin submitting results to your workspace.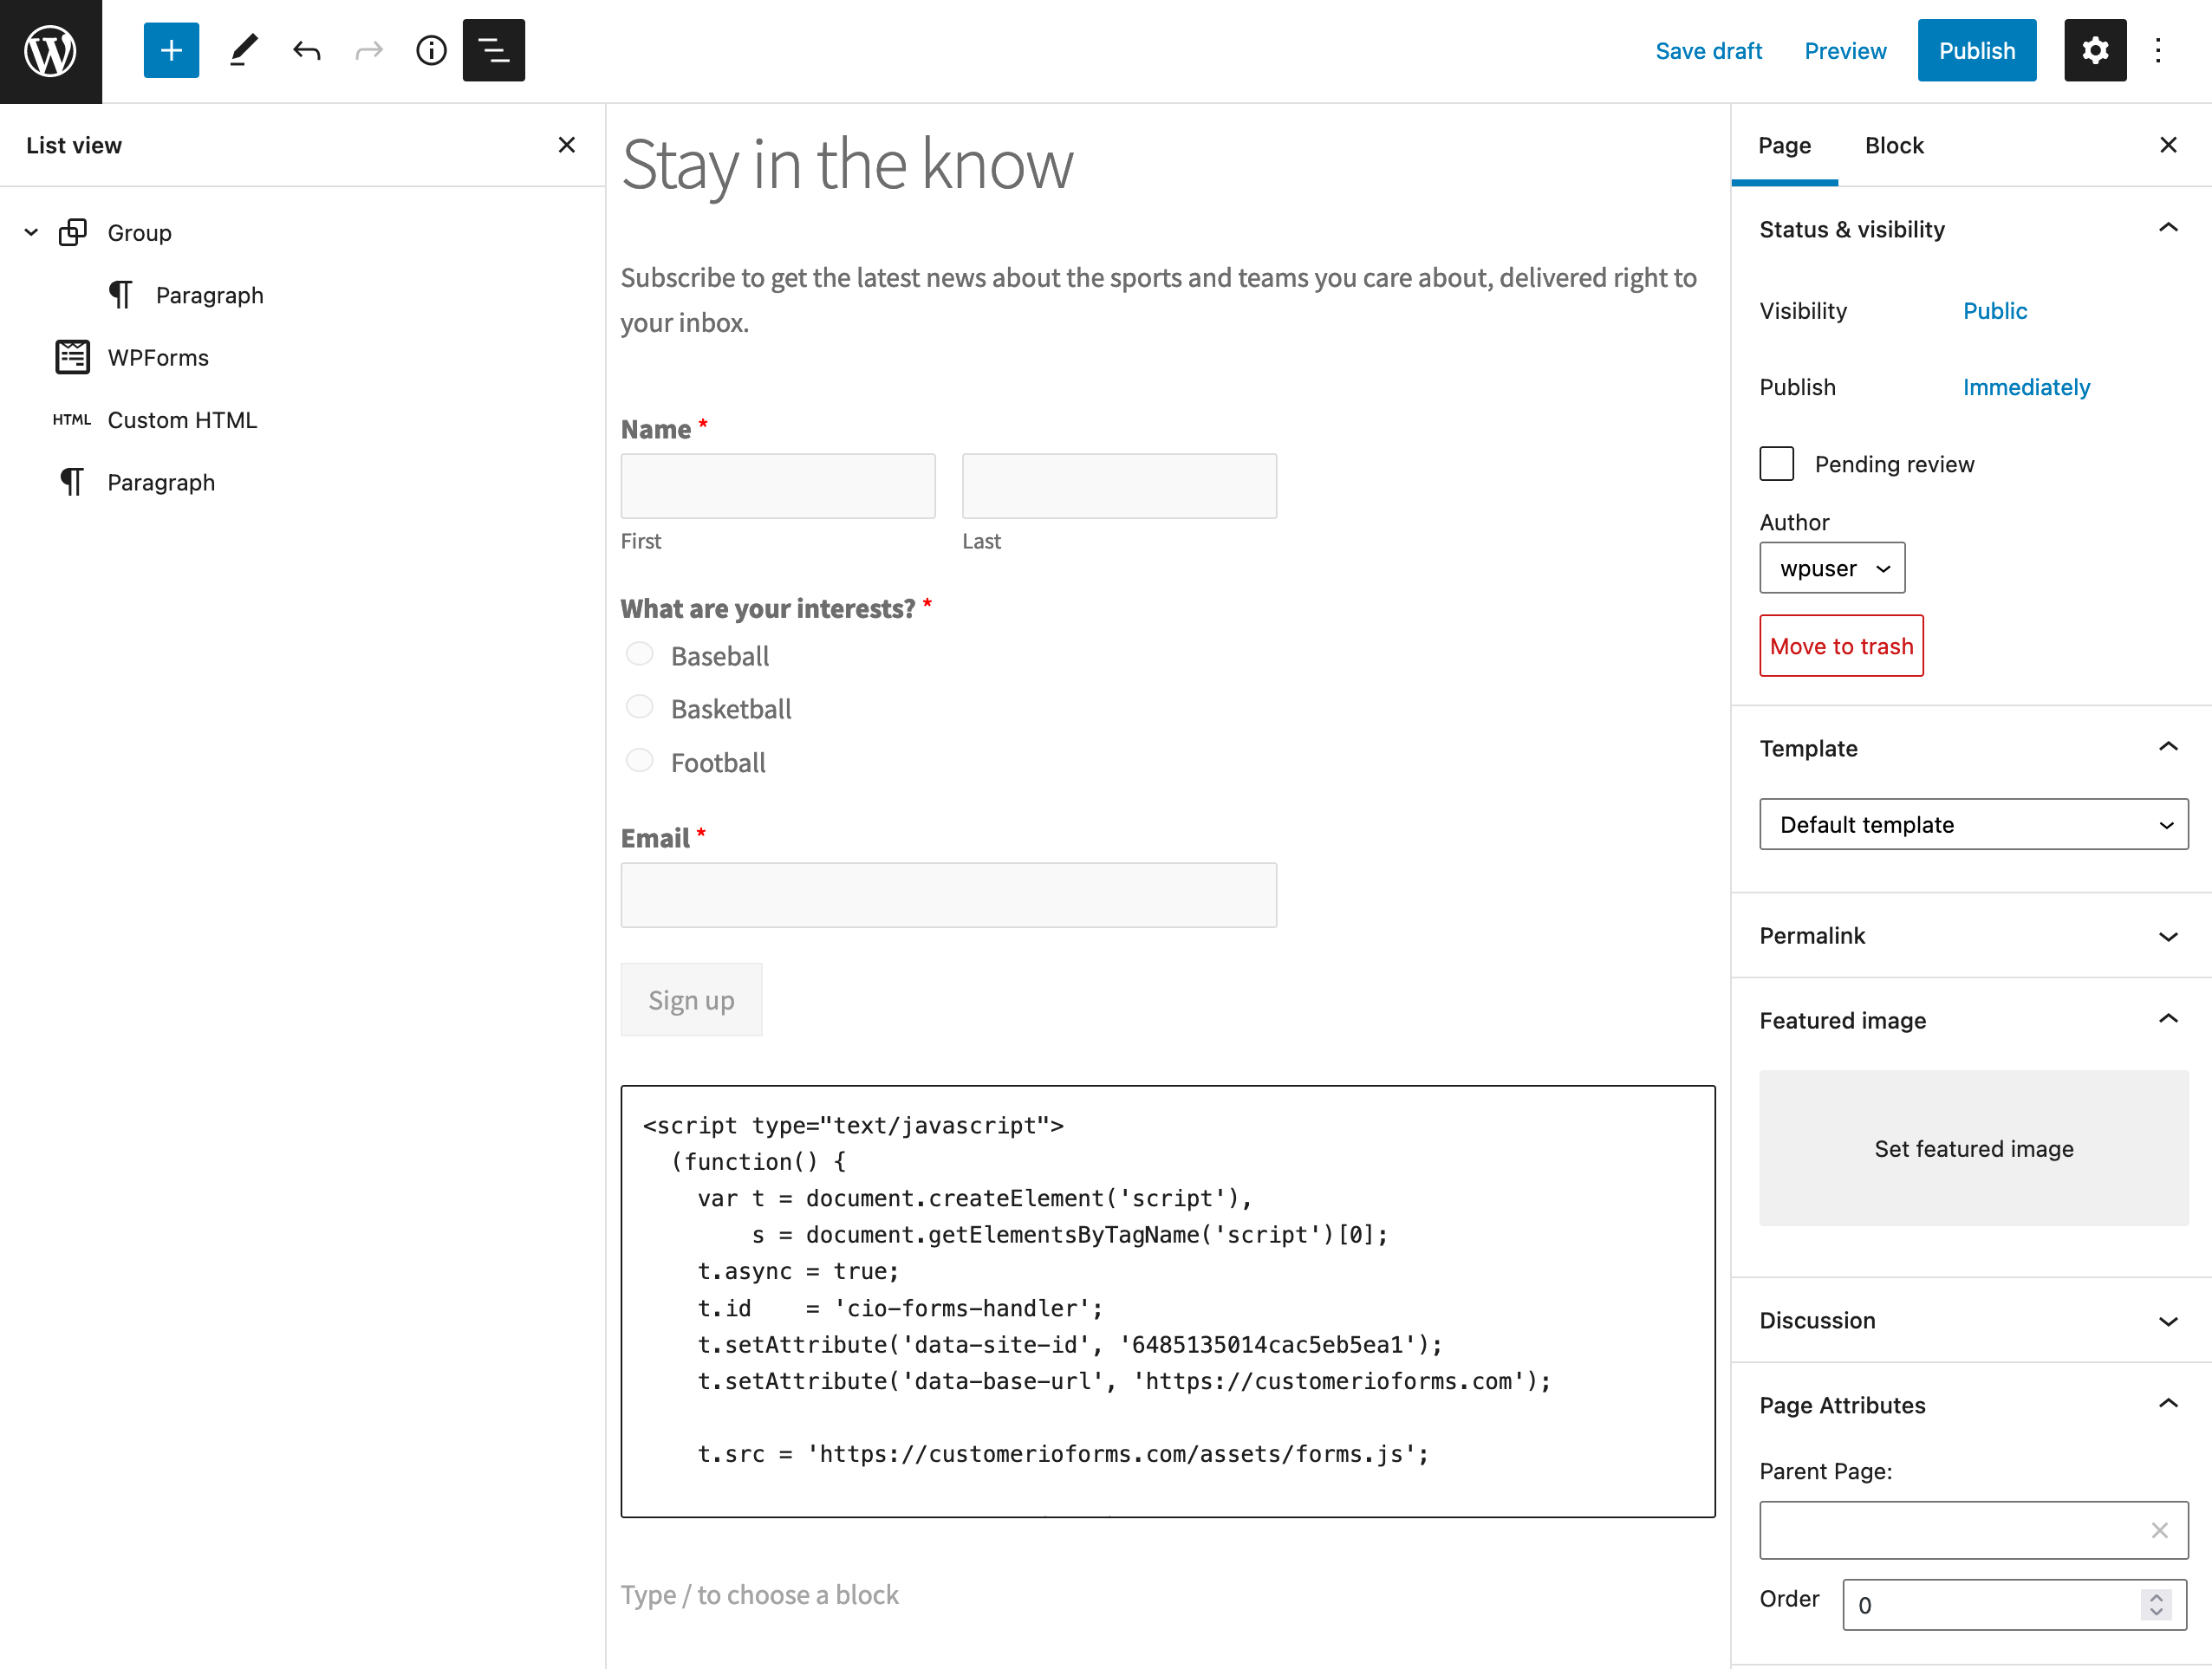
Form fields and URL parameters captured by the JavaScript snippet
The custom forms JavaScript snippet captures both form fields and URL parameters on the page containing your form, but the two work differently: form fields are converted to attributesA key-value pair that you associate with a person or an object—like a person’s name, the date they were created in your workspace, or a company’s billing date etc. Use attributes to target people and personalize messages. Attributes are analogous to traits in Data Pipelines. on a person who submits a form; URL parameters are not.
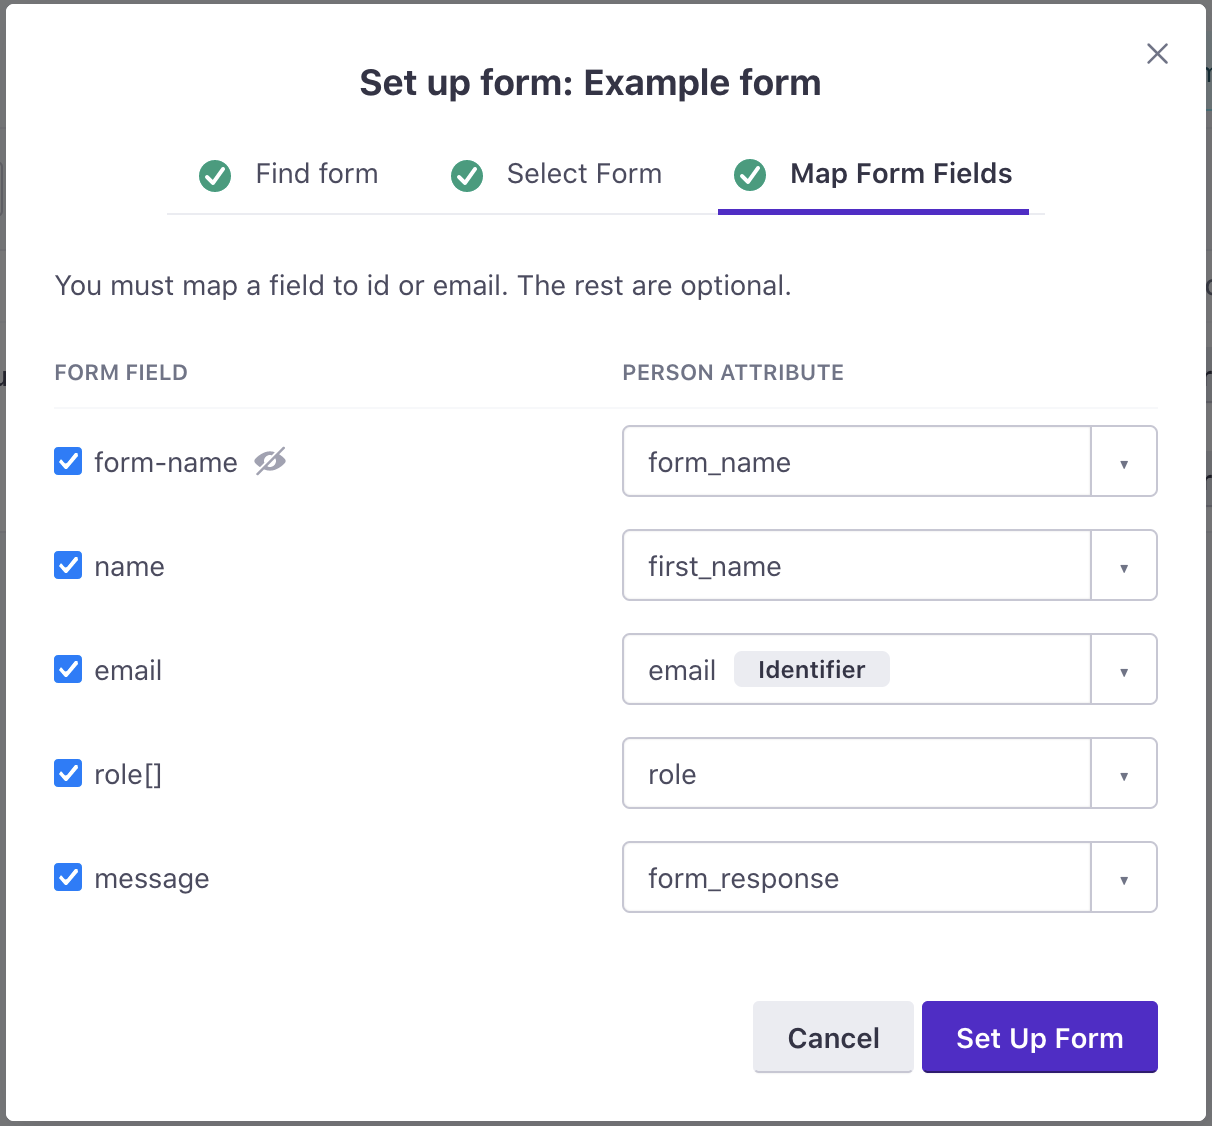
Form Fields: When you set up a form in Customer.io, you scan a URL for forms. Customer.io identifies fields in your form by name attributes. After you scan a form, you determine which fields we capture, and map each field to an attribute for people who submit the form.
Customer.io also reserves three fields: form_id, form_name, and form_type; if fields on your form (or in your API payload) include these fields, we’ll ignore them.
form_id: Assigned by customer.io when you scan the form or through the API in the path.form_name: Assigned when you map your form in Customer.io.form_type: Represents the form’s origin. Using the JavaScript snippet or API, this will always readcustom. Other values represent direct integrations with Facebook Lead Ads, Jotform, Typeform, etc.form_url: The URL of the page that a user submitted your form from.form_url_params: An array of URL parameters present when a user submitted your form.
URL Parameters: When someone submits a form, we capture URL parameters on the form page, so that you can segment people and filter campaigns based on these values. But, because URL parameters are not mapped to attributes when you connect your form to Customer.io, we cannot apply URL parameters to people as attributes.
URL parameters captured in this way appear in the form_url_parameters array, to help you understand which fields come from your form and which come from the page URL; items in this array are not applied to to a person as attributes. If a form field and URL parameter have the same name, the form field will win and we’ll ignore the URL parameter.
Use an attribute change to apply URL parameters to people
By default, we only capture URL parameters for segmentation purposes. However, you can use an attribute change event in a form-triggered campaign to convert URL parameters to attributes for people who submit your forms.
Capturing the same form on multiple pages
If you have a form with the same fields on multiple pages, you only need to scan one URL; we capture submissions from all pages under the same form in Customer.io.
When you scan a form, we identify the form based on the fields contained in the form. Each field on the form is identified by its name, or, for textarea elements without names, we assign them a name in the format textarea_1.
When you integrate directly with our API, a unique form is determined entirely by the form_id. If you submit a form with the same fields on different pages, you can submit them with the same form_id to treat them as the same form, or set different form_id values to differentiate between your forms.
Form scanning errors
When scanning forms, you may run into some errors. In most cases, an error means that you’re trying to scan a form we don’t support, or you’re trying to scan a form that you’ve already scanned on another page.
No forms found under this address
In general, this means that the URL either does not contain a form, or contains a form we don’t support. This error appears when:
- The URL contains forms we don’t support yet: Typeform, Jotform, HubSpot forms, etc. You’ll find a list of the form providers we currently support here.
- The URL contains JavaScript-rendered forms. We do not yet support pure JavaScript forms.
- The page contains
<div>-based forms. Forms must use the<form>tag.
Form with same form fields already exists
You’ve scanned this form on another page, and you do not need to scan it again. We identify forms based on their visible fields; if a form with identical, visible fields exists on multiple pages, we’ll recognize it on any page you submit it from.
If you need to differentiate between the same form on different pages, you can add a hidden field to the form that represents the page it’s submitted on. We’ll pass this data in Customer.io, and you can use it to filter people in or out of campaigns based on your form.
Use the Forms API
If you don’t want to use our JavaScript snippet, you can write your own backend integration with the Customer.io /forms API. Even if you use our JavaScript snippet, you may want to maintain a backend API integration in case your audience blocks or disables JavaScript.
To connect your form to Customer.io, just send a send a POST to https://track.customer.io/api/v1/forms/{form_id}/submit when someone submits your form. The form_id is an arbitrary string value representing your form. If we haven’t seen the form ID before, we create a new form connection (found on the Data & Integrations > Integrations > Forms page). Requests with the same form ID are treated as submissions from the same form.
The payload of a request is a data object that must contain field that maps to an identifierThe attributes you use to add, modify, and target people. Each unique identifier value represents an individual person in your workspace.—the email or ID of the person filling out the form. If these attributes are titled email or id, we’ll map them automatically. If not, your form will show an error on the Go to Data & Integrations > Integrations > Forms page after your first submission, and you can re-map map fields to the appropriate identifiers. If the person represented by the identifier in your request does not already exist, we create them.
Additional keys in the data object represent form fields and values from the form that a person submitted. By default, we map form fields in your request directly to attributes, e.g. if you have a form field called first_name, we map that field to the first_name attribute.
{
    "data": {
        // each key represents a form field
        // form fields map directly to attribute names unless you re-map them
        "first_name": "Cool Person",
        "email": "cool.person@example.com",
    }
}
After you submit your first /forms request, you can re-map form fields (properties in the data object) to attributes on the Data & Integrations > Integrations > Forms page.
You cannot disable fields sent to the /forms API
While you can map form fields to attributes in our UI, you cannot disable fields sent to the /forms API. If you send data to the /forms API, we’ll apply it to the person represented in the request.
Mapping identifiers and initial form submission errors
If an identifier in your form does not map directly to an identifierThe attributes you use to add, modify, and target people. Each unique identifier value represents an individual person in your workspace.—i.e. a field capturing email addresses is called something like email_address rather than email in your initial request—you’ll receive a 400, but we’ll still add your form on the Data & Integrations > Integrations > Forms page. You can then re-map your email_address field to email, and your form will begin working normally.
Submit forms using the action attribute
You can assign a POST method and action to your HTML form tag to submit forms directly to Customer.io without using our JavaScript snippet. When you set up a form this way, we generate a URL that you’ll copy directly to your form’s action attribute. Your form must have a success page—a page that you redirect people to when they click Submit.
<form
  method="POST"
  action="https://customerioforms.com/forms/submit_action?site_id=1ea07cb331d4ed0c39ba&form_id=2d75e032c78a41a&success_url=https://success.example.com/thanks"
>
<!-- by default, we map input name attributes to Customer.io attributes -->
  <label for="email_input">E-mail address</label>
  <input id="email_input" name="email" type="email" />
  <label for="job_title">Job Title</label>
  <input id="job_title" name="job title" type="text" />
  <button>Submit</button>
</form>
By default, we map form fields to attributesA key-value pair that you associate with a person or an object—like a person’s name, the date they were created in your workspace, or a company’s billing date etc. Use attributes to target people and personalize messages. Attributes are analogous to traits in Data Pipelines. using the name property. For example, if you have a field with a name property job_title, we’ll set that attribute on people who respond to your form. You can remap fields after your first submission.
Your form must contain one field that maps to an identifierThe attributes you use to add, modify, and target people. Each unique identifier value represents an individual person in your workspace.—the email or ID of the person filling out the form. If your identifier field has a name attribute of id or email, we’ll map it to the appropriate identifier automatically. If your identifier field isn’t named id or email, your form will show an error and you’ll have the opportunity to map your fields after your first submission.
You cannot disable fields sent to the /forms API
While you can map form fields to attributes in our UI, you cannot disable fields sent to the /forms API. If you send data to the /forms API, we’ll apply it to the person represented in the request.
Set up a form with an action attribute
- Go to Data & Integrations > Integrations and Select Forms.
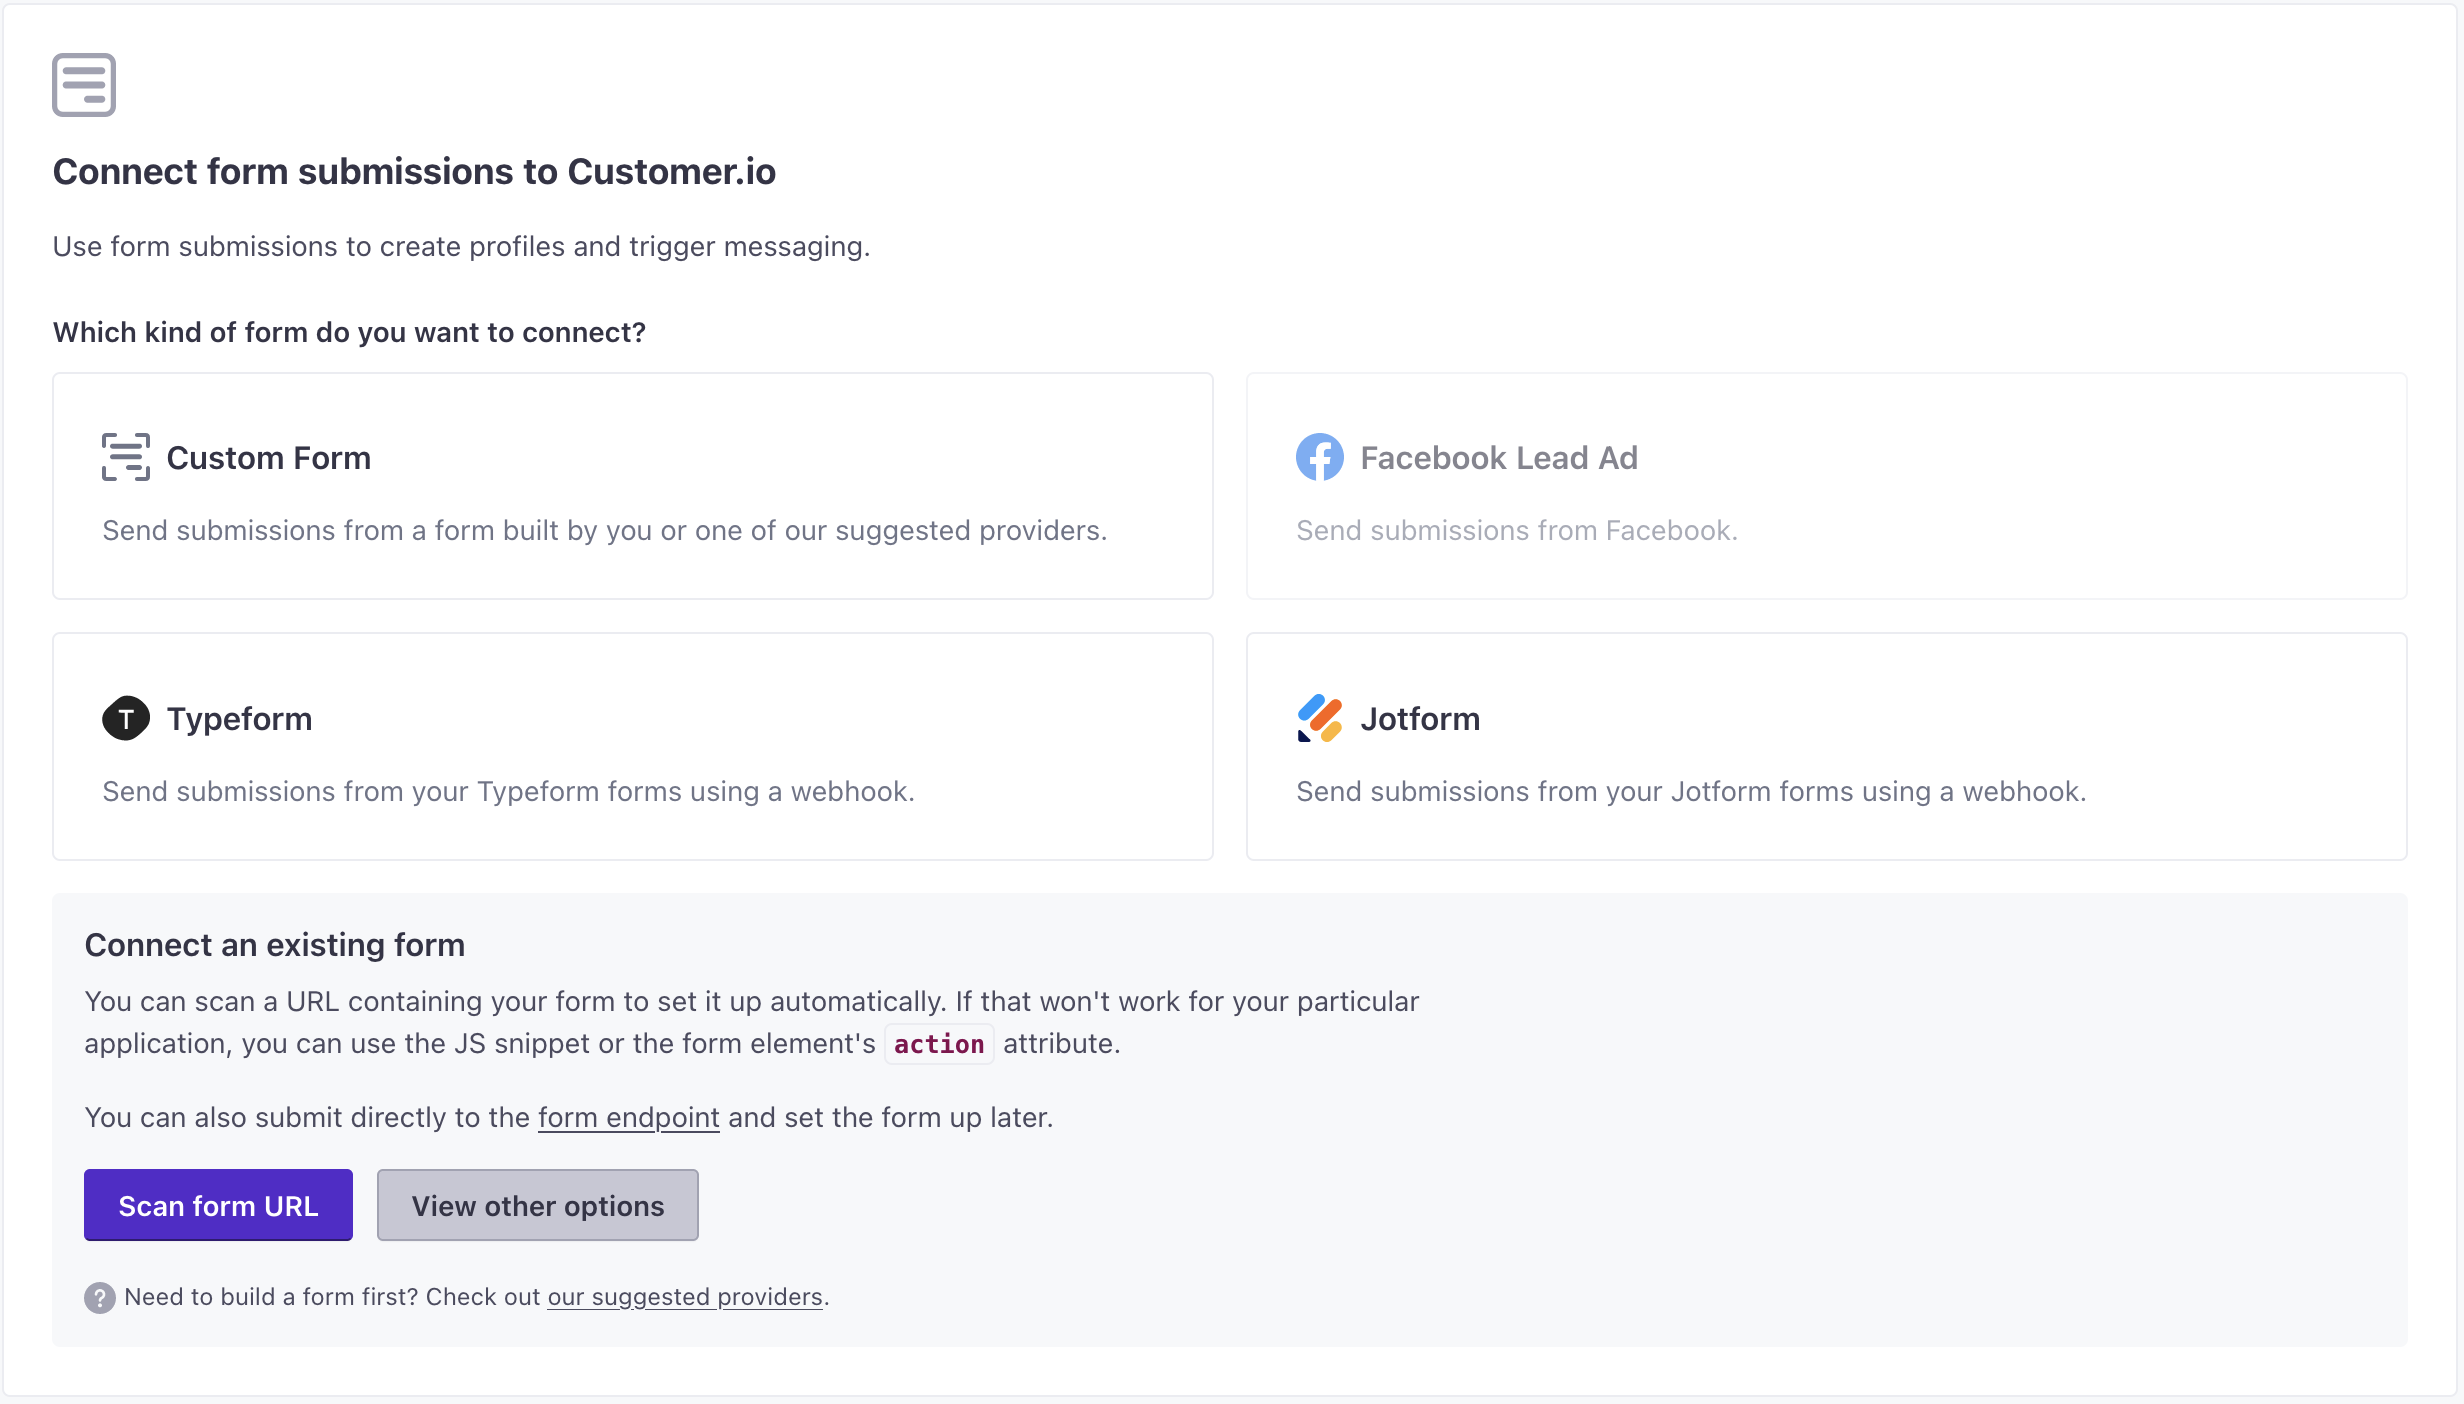
- Select Custom Form, click View other options, and click Action attribute.
- If your workspace has multiple sets of Track API credentials, select the credentials you want to use for your form.
- Enter your Success page address URL. This is the page your form sends people to when they click Submit.
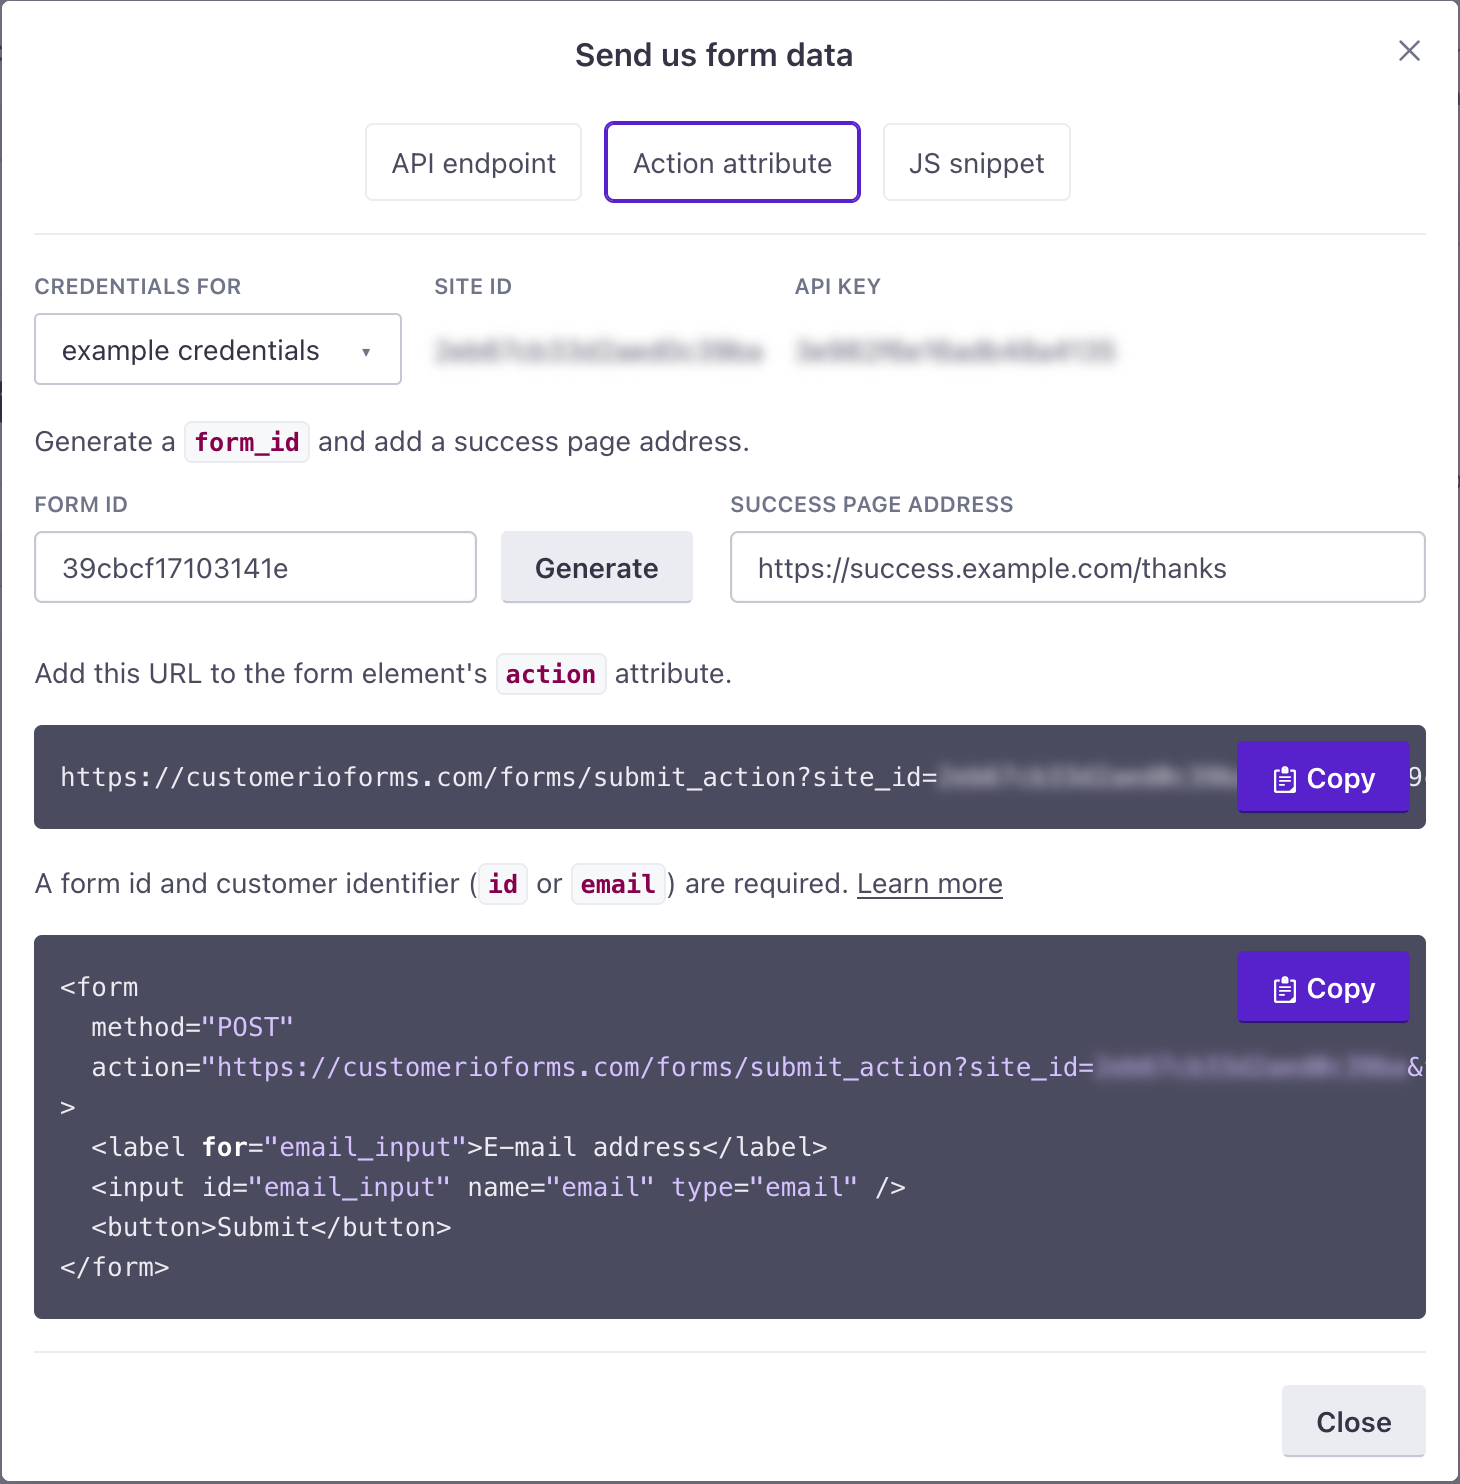
- Copy the HTML snippet and adjust the form to add your form’s fields. Or, Copy the URL to your form’s
actionattribute and make sure that your form’smethodattribute is set toPOST. - Submit your form as a test. This makes it appear in your Customer.io Forms dashboard.
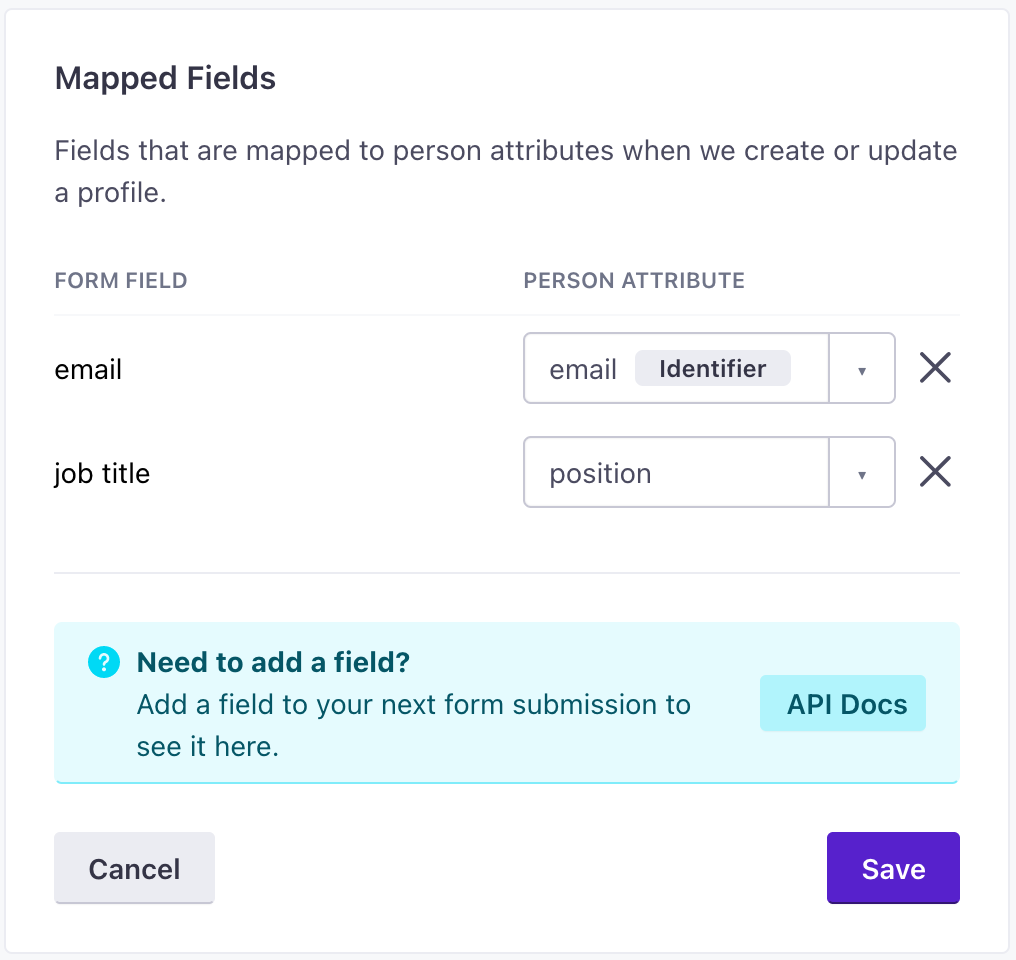
- Return to the Data & Integrations > Integrations > Forms page, and select the form you just added. Make sure that the Mapped Fields reflect the attributes that you want to assign to people who submit your form. If they don’t, click Edit and re-map attributes appropriately.
Edit a form
You can edit your form to add fields, re-map fields to attributes, or turn off fields you no longer want to capture. Your changes only reflect new respondents. Changing form fields doesn’t change attributes on people who already filled out your form.
If you move a form to a new page, you do not need to edit or re-scan your form. You simply need to make sure that the page you move the form to has the custom forms JavaScript snippet.
- Go to Data & Integrations > Integrations and Select Forms.
- Select the form you want to edit and click Edit.
- Add, remove or re-map form fields.
- Enable/disable fields: Check and un-check fields to enable and disable them. You cannot disable fields when you use the
/formsAPI or send forms using theactionattribute. - Add fields: If your form uses the custom forms JavaScript snippet, click Re-scan to update the fields on your form. If your form integrates directly with our API, click Add Field.
- Edit field names: Change the names of attributes you want to map form fields to. If integrated with the
/formsAPI, you can also change the name of the form field that you want to map.
- Enable/disable fields: Check and un-check fields to enable and disable them. You cannot disable fields when you use the
- Click Save.
You cannot disable fields when you use the /forms api or an action attribute
While you can map form fields to attributes in our UI, you cannot disable fields for forms sent to our API or using the action attribute. If you send data to the /forms API, we’ll apply it to the person represented in the request.
Disconnect a form
Disconnecting a form prevents Customer.io from collecting form submissions and identifying people who fill out your form. You can reconnect the form later, if you want to stop collecting submissions temporarily.
- Go to Data & Integrations > Integrations > Forms.
- Click and then click Disconnect.
- Confirm that you want to disconnect the form.
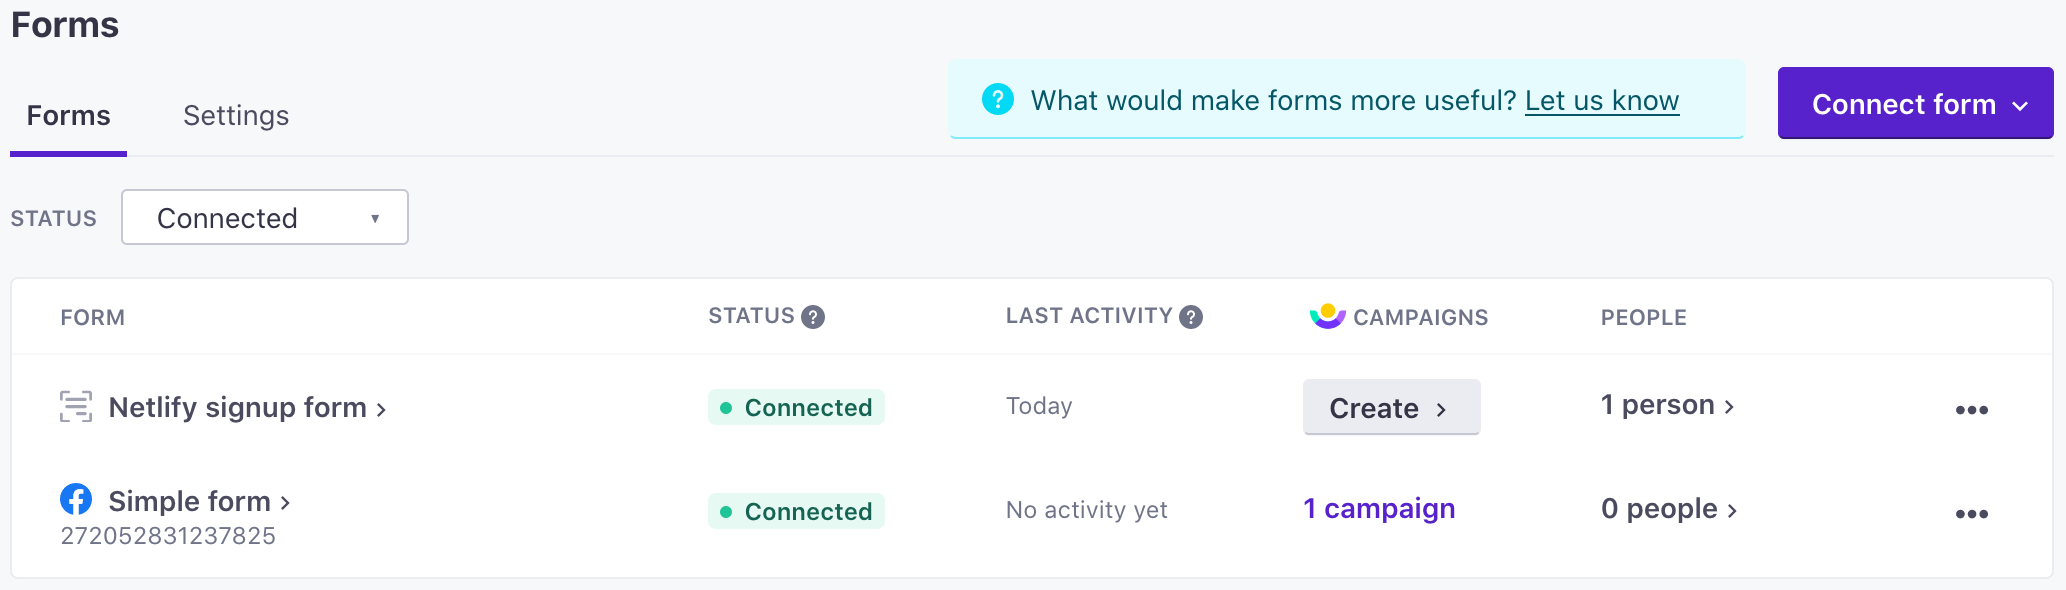
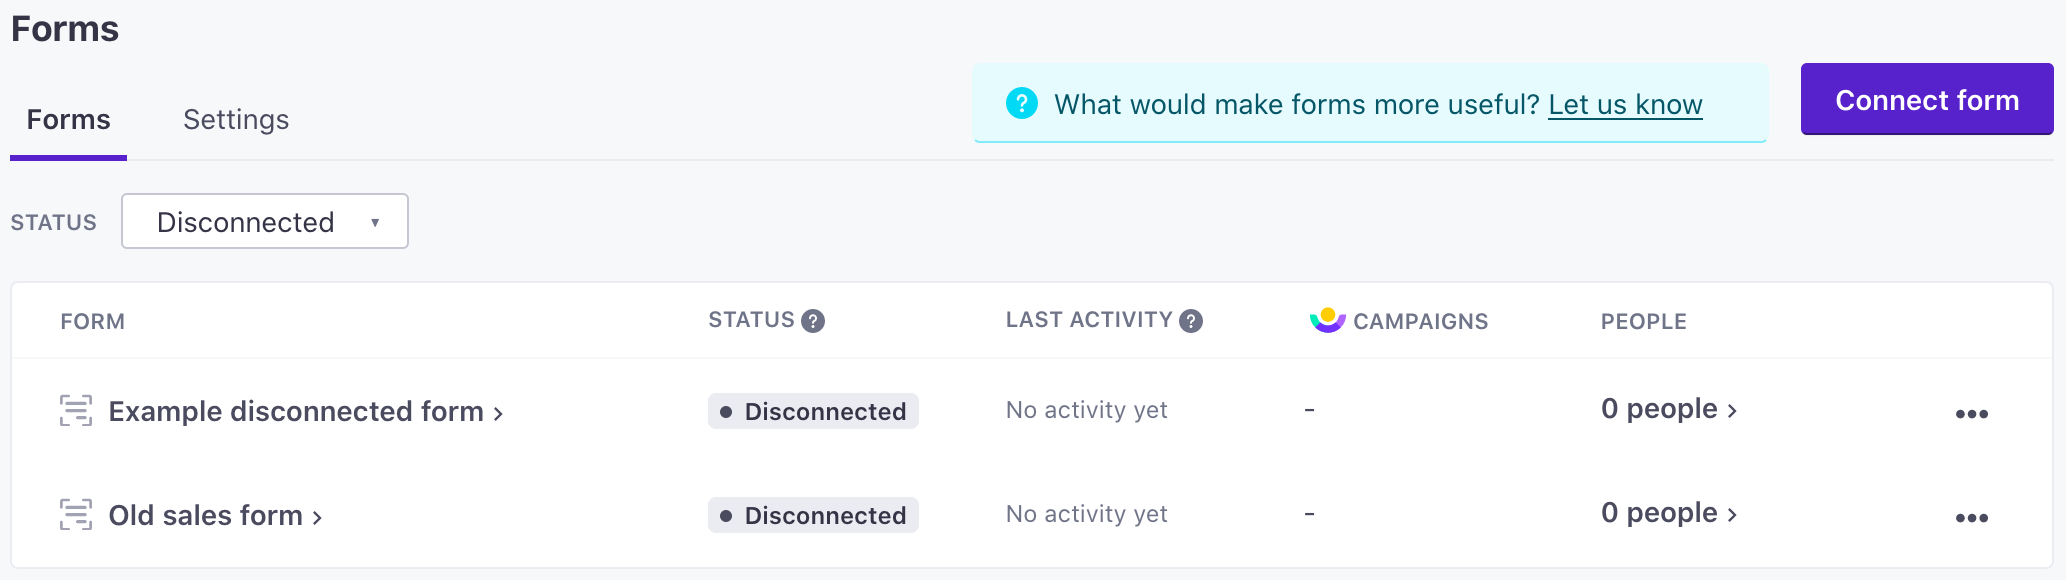
Disconnected forms still appear in the forms list. You can find all your disconnected forms by selecting the Disconnected status.
Trigger a campaign from a form
Form submission events can trigger campaigns, making it easy to start a conversation with people and foster conversions immediately when they fill out your form.
You can start a form-triggered campaign by going to Data & Integrations > Integrations > Forms and clicking Create campaign for the form that you want to trigger your campaign. This automatically populates a campaign trigger with your form name.
Or you can create a form-triggered campaign from the Campaigns menu:
Go to Campaigns and click Create Campaign.
Click Form submission.
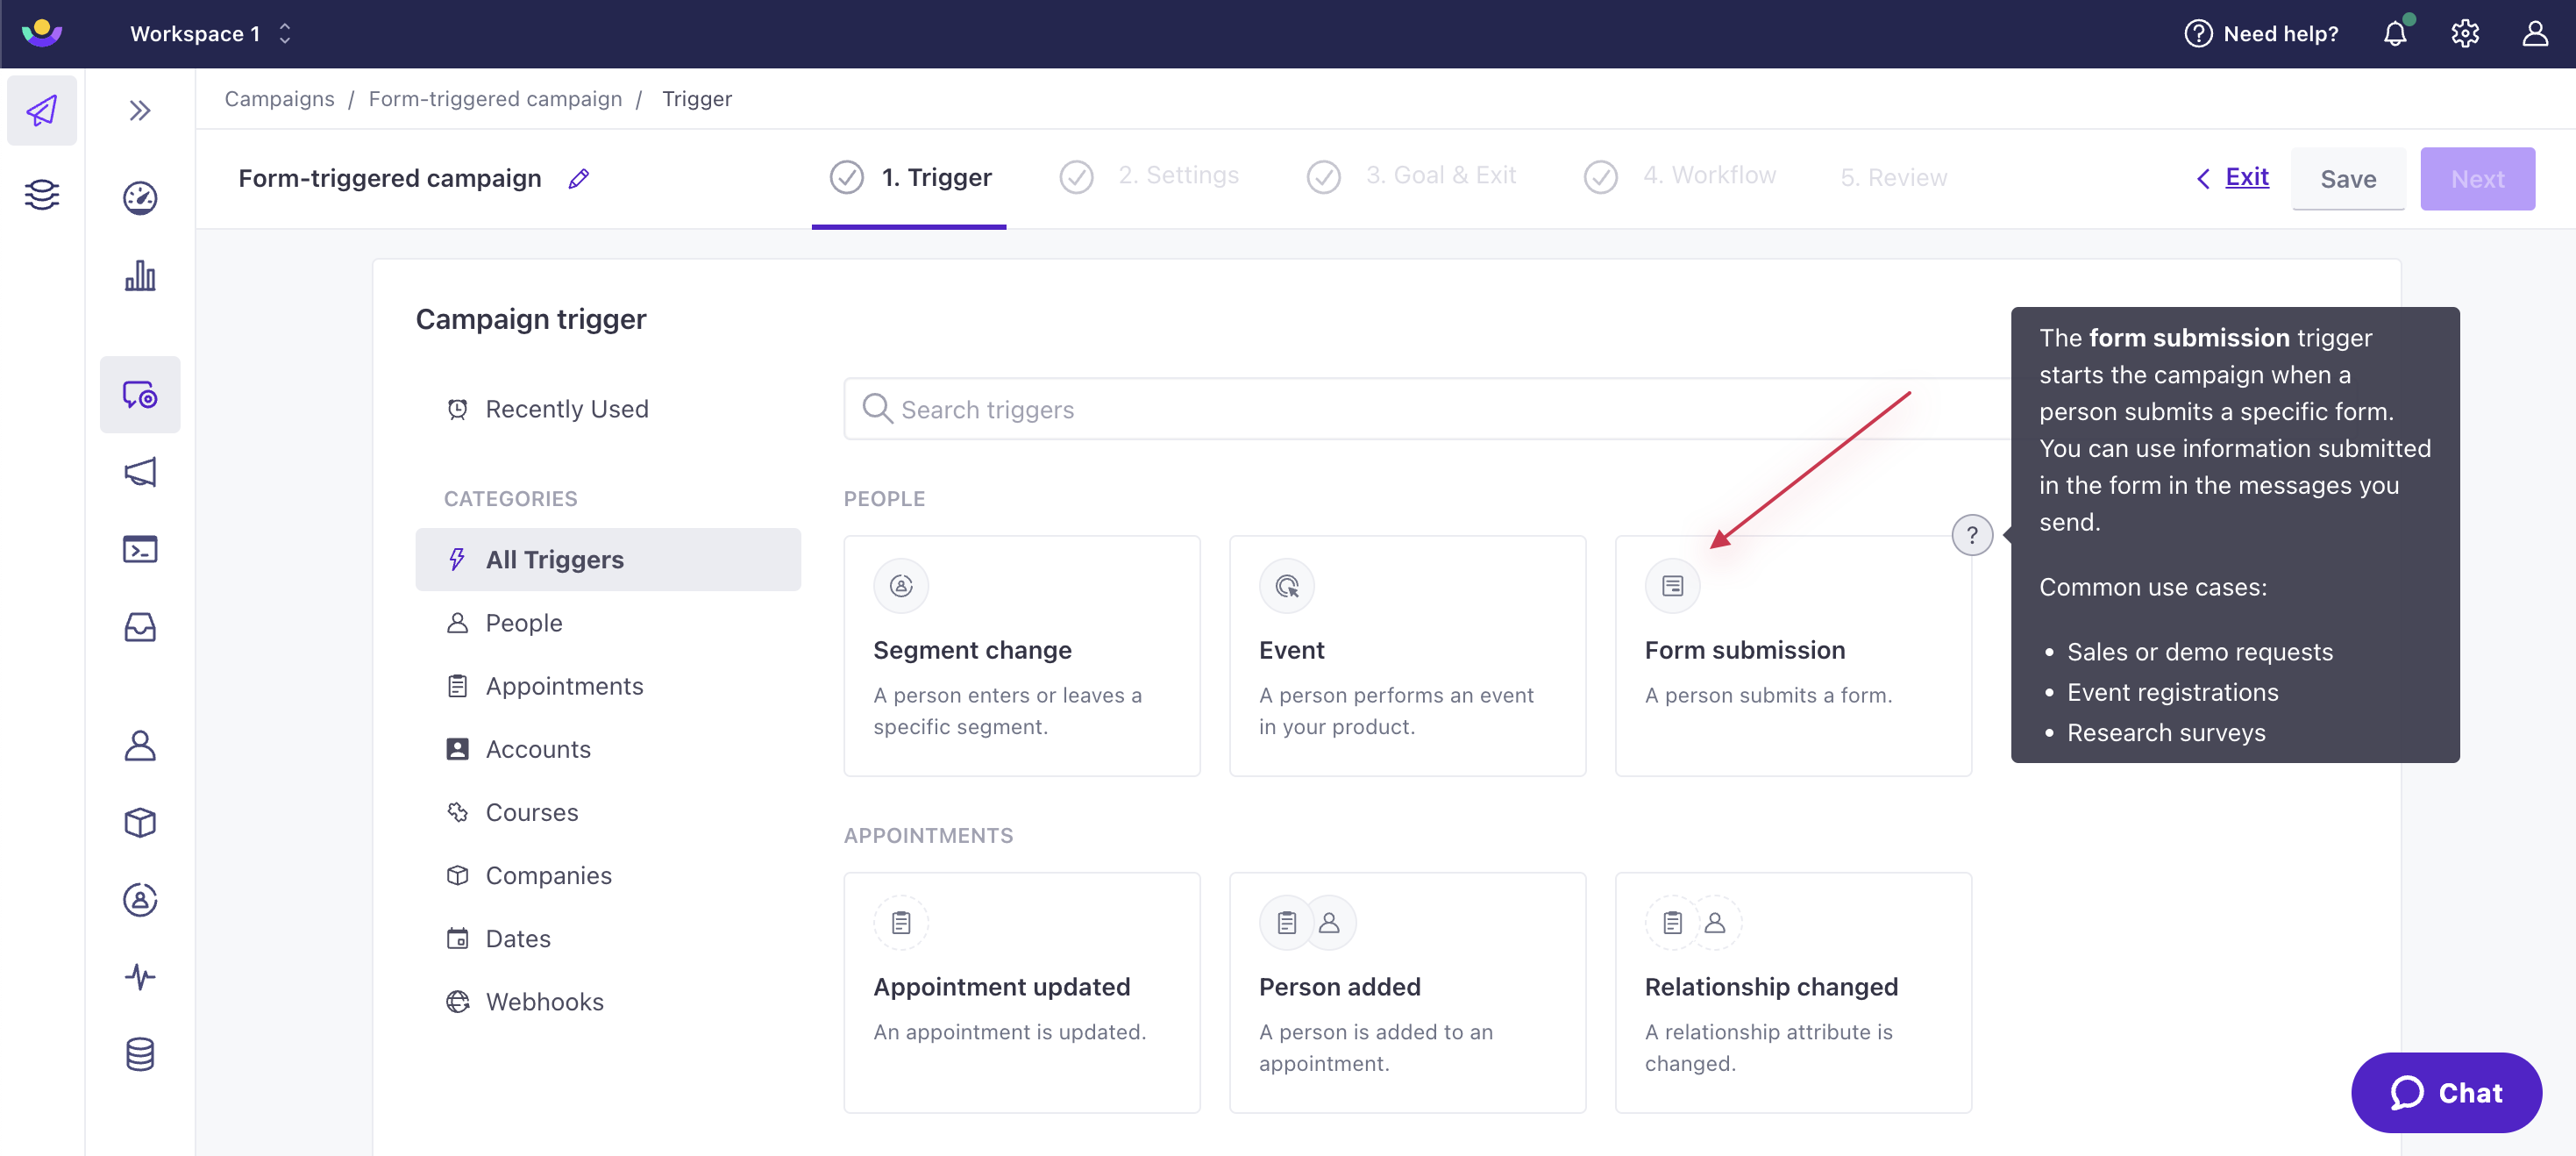
Choose the form that should trigger your campaign.
Continue creating your campaign.
After you activate the campaign, each form submission will trigger a campaign.
Use hidden fields to filter campaigns based on form submissions from different pages
If your form appears on different pages, and you want to differentiate campaigns based on the page a person is on when they submit your form, you can click Add event data filter and filter for a hidden field that differentiates between your forms on different pages.
Form data in liquid
Remember that form submissions captured by the JavaScript snippet include both form fields and URL parameters from the page. You can access these variables in Liquid using different scopes.
Form Fields come in as event properties and are mapped to customer attributes. You can reference form fields either way, but remember that the event property represents the field name from the form, and the customer scope represents the mapped attribute name, and the two can be different if you re-mapped form fields to attributes when you set up your form.
For example, if you mapped a form field called msisdn to phone, then you could access the event property as {{event.msisdn}} or the customer attribute at {{customer.phone}}—both represent the same value!
URL Parameters are only available as event properties. For example, if you want to reference a URL parameter from the page that your form page called referred-by, you would use {{event.referred-by}}.
Form submission events in the Activity Log
Each form submission captured by the custom forms JavaScript snippet or the API is recorded as a form_submit event. You can see these events in the Activity Log. Click an event to see the form_id and values that a person submitted.

