Introduction to campaigns
Campaigns are automated workflows that send people messages and perform other actions when people meet certain criteria. This page describes the basic aspects of campaigns to help you get started.
If you’re new to Customer.io, checkout Campaigns, broadcasts, and transactional messages to make sure you’re creating the right kind of automation.
How it works
A campaign is a workflow to send messages or otherwise manipulate data in Customer.io, and it consists of three major components:
- Trigger: this determines who enters your campaign and when. Along with your trigger, you can set filter and frequency settings to refine who can enter your campaign and how often. Go to Triggers vs Filters for more info.
- Workflows: the messages you want to send and other actions you want to perform for people who enter your campaign.
- Goal and exit criteria: The goal is the outcome you want to achieve through the campaign. Exit conditions determine if people should leave your campaign early or not. You don’t need to define a goal, but it can be helpful to gauge the success and health of your campaigns.
Your campaign starts when someone (or some data) matches your trigger condition. Then they move through your workflow until they meet your goal and exit conditions.
trigger conditions?}-->|yes|c{Does person or data meet
filter conditions?} a-.->|no|i[person doesn't
enter campaign] c-.->|no|i c-->|yes|j subgraph b [Your campaign] direction TB j{Does person meet
goal/exit conditions?}-->|no|d[Send message or take action] d-->f{Does person meet
goal/exit conditions?} f-->|no|g[Send message or take action] end j-.->|yes|e[exit campaign] f-.->|yes|h[exit campaign] g-->|Person finishes
campaign|k[exit campaign]
Campaign triggers
Your campaign trigger determines who enters your campaign and when. Most triggers are based around people, like when they match certain criteria. Typically, these people are the subject of your campaign—you’ll send them messages, set their attributes, and so on.
Trigger options
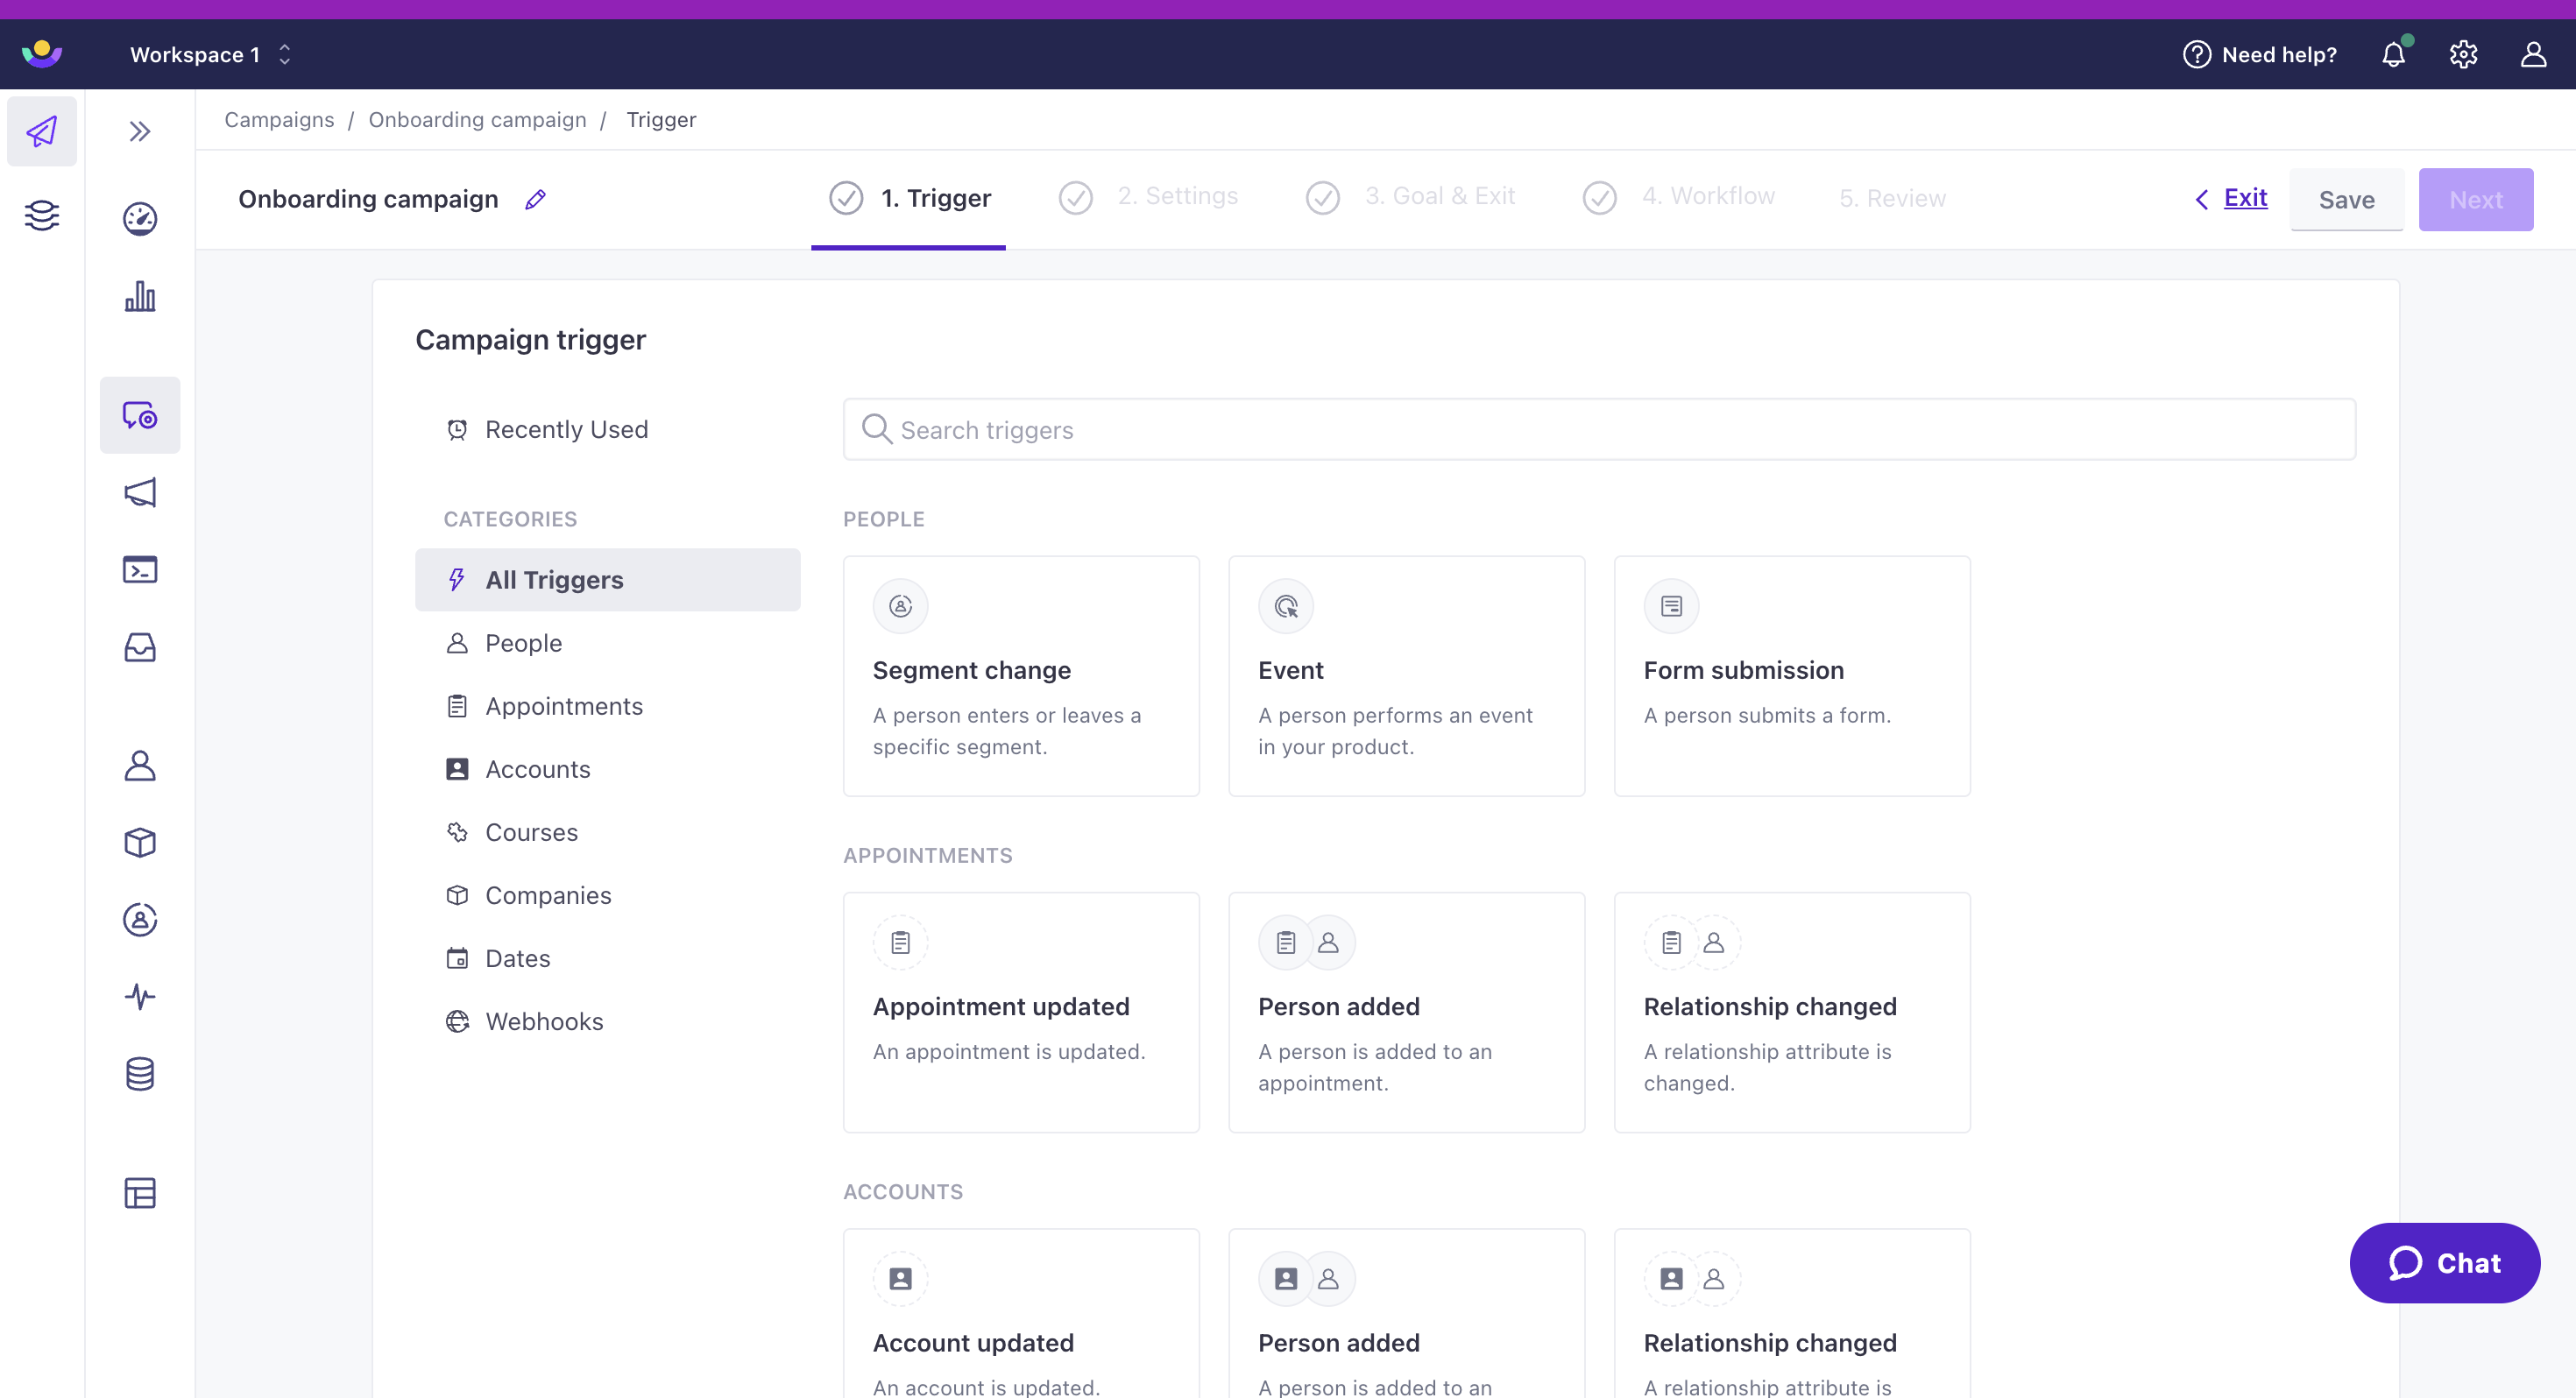
You have seven types of triggers to choose from:
Segment change
Segment change lets you create a segmentA segment is a group of people in your audience that you want to target with campaigns, messages, etc. You can join groups of people manually, or by attribues and event data. or specify existing segments that people must be in (or not in) to trigger a campaign. You can set segment criteria based on your audience’s attributes, events, etc. This option is best for things like recurring NPS surveys, onboarding drip campaigns, inactivity reminders, and so on.
Event
An eventSomething that a person in your workspace did. Events can trigger campaigns, add people to segments, etc. You can access event properties in liquid with {{event.<property>}}-triggered campaign helps you respond to a person’s activity in your app or website. For instance, you could trigger a campaign based on a user abandoning their cart, viewing a specific page on your app, or completing an order.
Form submission
Form submission lets you take advantage of formConnected Forms in Customer.io allow you to automatically trigger campaigns, send data to other services, and add or update people when they submit forms on your website or in your app. responses to trigger campaigns. You can connect a form to your workspace or integrate with Facebook Lead Ads. Use this type of campaign to send messages to nurture new leads or respond to support requests.
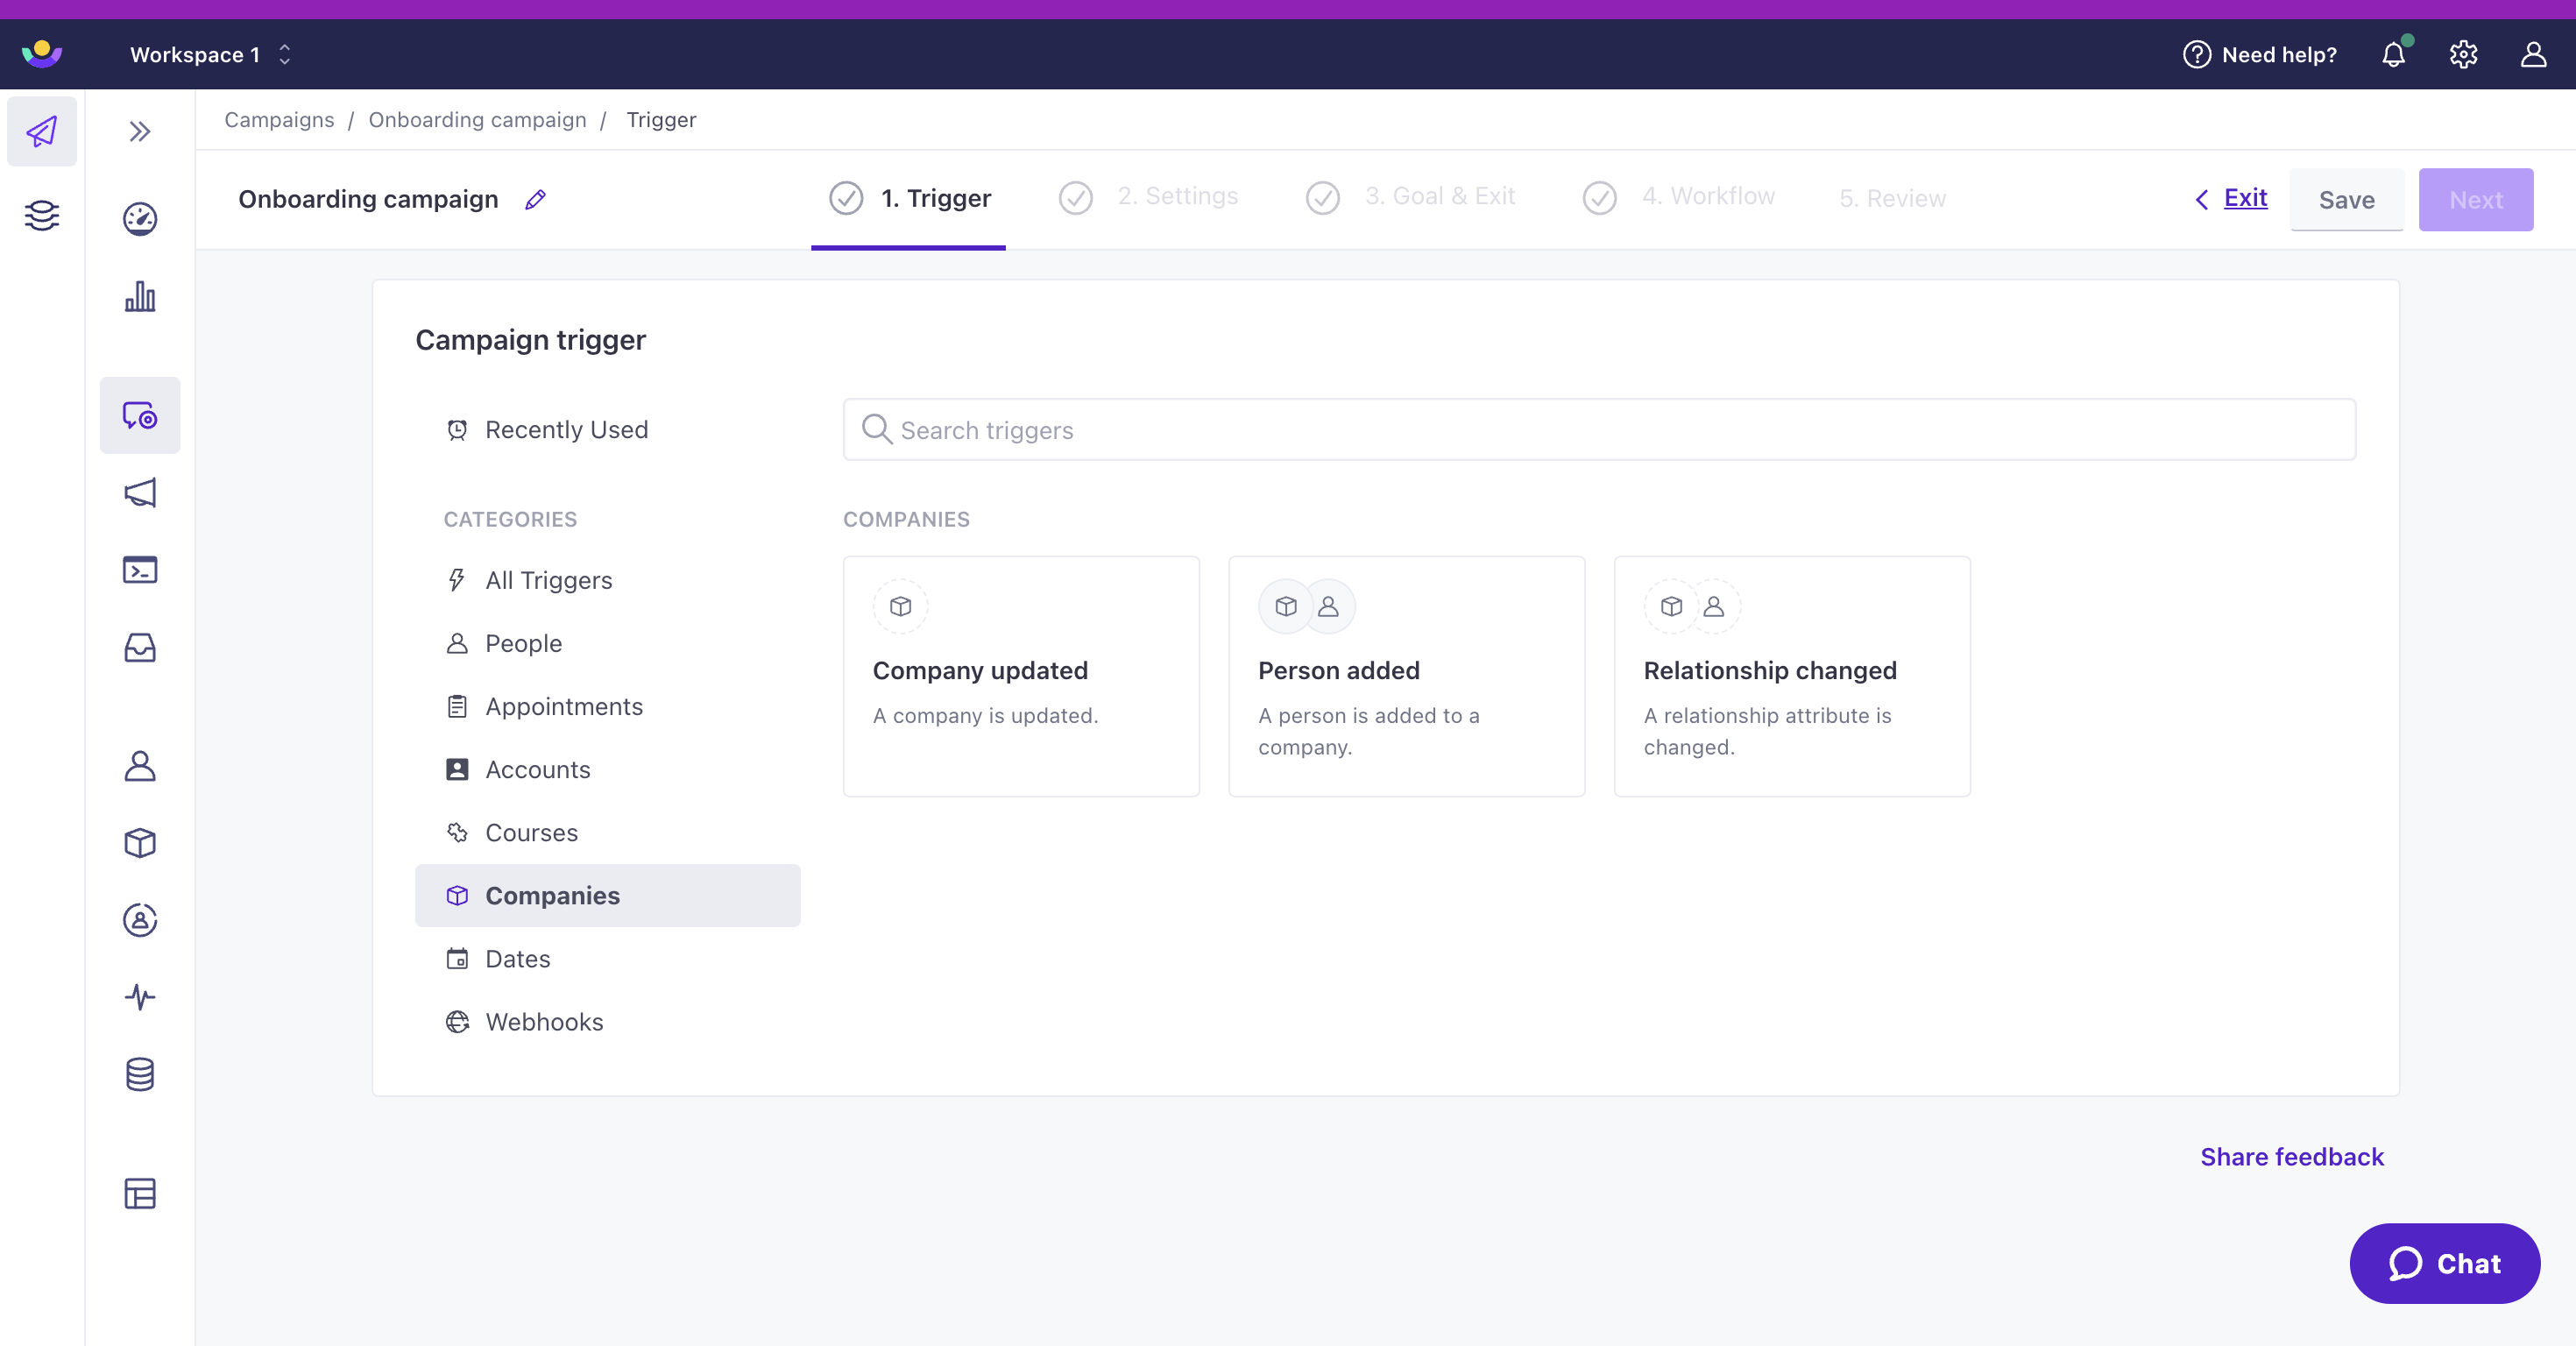
Object updated
Use Object updated when you want people to enter the campaign every time an objectNot to be confused with a JSON object, an object in Customer.io is a non-person entity that you can associate with one or more people—like a company, account, or online course. You can use objects to message people based on changes to their company, account, or course itinerary. is updated in your workspace. For instance, if you were tracking accounts as objects and updated the name of one, you could notify everyone that managed the account that the account went through a rebrand. Keep in mind, only people enter into journeys, not objects.
You’ll see this as “Object_type_name updated” in your trigger list.
When you use objects to trigger campaigns, you can choose who enters into the campaign. The audience could be:
- every person in the object
- certain people related to the object
Relationship added or changed
A relationship is the association between an objectNot to be confused with a JSON object, an object in Customer.io is a non-person entity that you can associate with one or more people—like a company, account, or online course. You can use objects to message people based on changes to their company, account, or course itinerary. and a person. Use this trigger type when you want people to enter a campaign after their relationship to an object has changed. For instance, if you track accounts as objects, this could mean they joined an account (person added), or they are now a manager (relationship changed).
You’ll see this as “Person added” or “Relationship changed” in your trigger list.
When you use relationships to trigger campaigns, you can choose who enters into the campaign. That is, the recipient of the message in this kind of campaign doesn’t have to be the person in the relationship that triggered it. The audience could be:
- the person whose relationship to the object is updated (default)
- every person in the object
- certain people related to the object
Important date
An important date triggers campaigns on a specific or relative date based on an attributeA key-value pair that you associate with a person or an object—like a person’s name, the date they were created in your workspace, or a company’s billing date etc. Use attributes to target people and personalize messages. Attributes are analogous to traits in Data Pipelines. that people in your audience have. You can trigger based on any customer attributes that are properly formatted dates. This is useful for recurring campaigns like birthdays, anniversaries, subscription renewals, and payment reminders.
Webhook
A webhook triggers a campaign based on data from an external service. The purpose of your campaign is to manipulate this data and associate it with people, much like you can with Zapier or Segment, but entirely within a campaign. Because data, not people, is the subject of your campaign, webhook-triggered campaigns don’t typically send messages directly; rather, they let you associate data with people, which can trigger subsequent campaigns.
Webhook campaigns help you perform one-to-many interactions with your audience, like notifying a group of people when you post a job or a product becomes available that a cohort of your audience is interested in.
Settings
Subscription preference
If you use our Subscription Center feature, you’ll set your campaign’s topicA category of message, set within your workspace’s subscription center, that people can subscribe to or unsubscribe from. Topics let your audience determine the kinds of messages they want to get from you. in the Subscription preference setting. Keep in mind, subscription preferences only affect whether people receive a message, not whether they enter your campaign.
- If people are unsubscribed from the topic, they won’t get messages from the campaign. They would, however, continue to receive in-app messages; subscription preferences apply to email, SMS, and push.
- If your campaign includes non-message actions (like Create or Update Person), those actions will still apply to people who aren’t subscribed to the topic.

If you don’t want to set a topic, you can use the All subscribed and unsubscribed people setting. You should use this setting sparingly—for things like transactional-style campaigns and important notices. Sending messages to unsubscribed people can violate their trust—or even violate local laws and regulations (GDPR, CAN-SPAM, etc)!
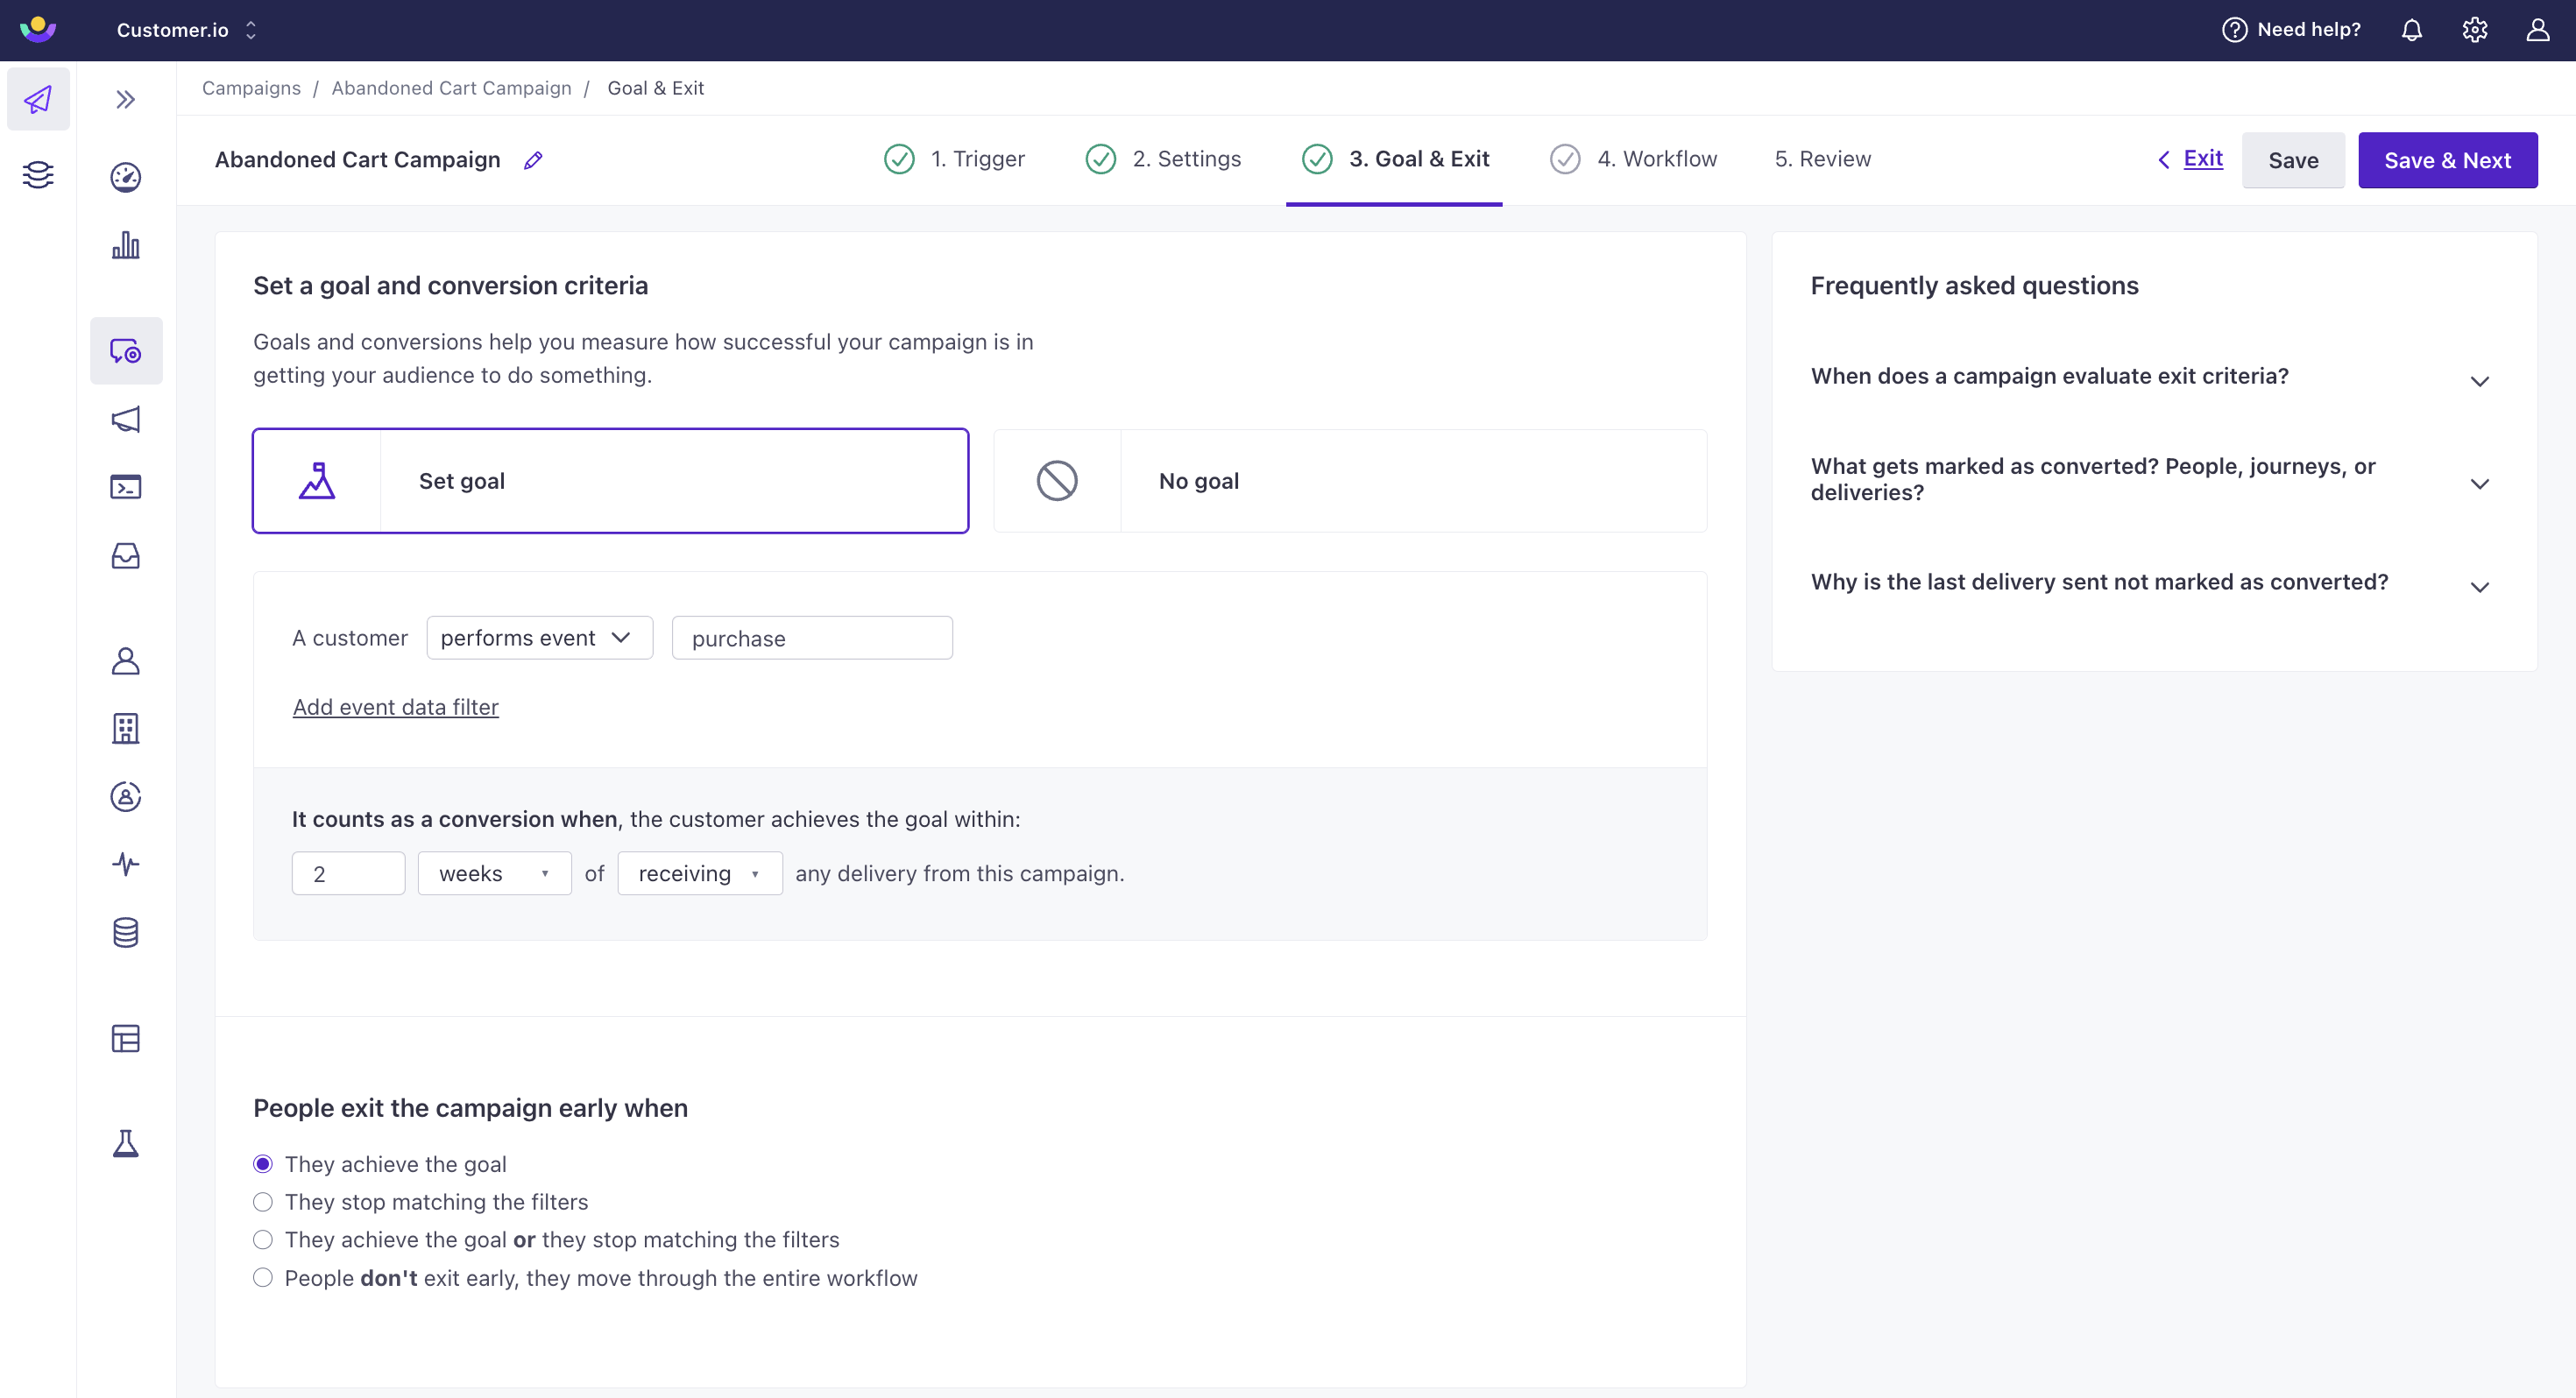
Goal & Exit
A conversion goal helps you track the success of a campaign based on whether a person performs an event, enters a segment, or exits a segment. If a person achieves your goal, we mark the messageThe instance of a message sent to a person. When you set up a message, you determine an audience for your message. Each individual “send”—the version of a message sent to a single member of your audience—is a delivery. and journeyA person or data object’s path through your campaign. as converted. Then you can track conversion rates over time to improve your messaging strategies. See Conversion goals and exit criteria for more information about conversions.
We track conversions for the following message/delivery types:
| Conversions attributed | Conversions not attributed |
|---|---|
| Slack Message | |
| Twilio SMS | Create or update person action |
| Customer.io Push Notifications | |
| Customer.io In-app Messages | |
| Webhooks1 |
Slack and Create or update person actions are often internal or used for analytics purposes; they don’t always send messages to end-users. For that reason, we don’t attach conversions to them. You can enable webhook conversions on individual webhook actions.
Exit Conditions
Exit conditions determine if or when a person should exit your campaign.
These are your options for exit conditions:
They achieve the goal: This setting causes people to exit your campaign after they perform the conversion action (your audience performs an event, enters a segment, or leaves a segment) within a certain timeframe of receiving a message.
They stop matching the trigger segment or filters: If a person stops matching the trigger or filter criteria, see below for how we evaluate exit conditions.
- For campaigns not triggered by a segment (event, form, etc.), triggers are not included in the exit criteria. This option will show as They stop matching the filters.
They achieve the goal OR they stop matching the trigger segment or filters: In this case, a person exits the campaign after they perform your conversion goal within a timeframe of receiving a message OR they stop matching the campaign’s trigger or filter criteria.
- For campaigns not triggered by a segment (event, form, etc.), triggers are not included in the exit criteria. This will show as They achieve the goal or they stop matching the filters.
People don’t exit early, they move through the entire workflow: People won’t exit your campaign early. They’ll complete their entire journey, even after they meet your goal or stop matching your campaign’s trigger or filter conditions during their journey.
How we evaluate exit conditions
We evaluate exit conditions before people enter your campaign and throughout their journeys based on whether there’s a goal, trigger, or filter to check.
If your exit conditions include triggers and filters, we check whether people stop matching them before actions (message delivery, attribute updates, manual segment updates, collection queries, create event actions, and batch updates).
- For example, you may want to send product recommendations to people who have not performed a purchase event in the past 30 days. You want people to exit the campaign when they make a purchase. This means people would exit when they stop matching the trigger (has not performed a purchase recently), which we evaluate before the next workflow action.
If your exit conditions include goals, we check whether people achieve the goal criteria after actions that cause pauses in their journeys (wait until, time window, time delay, attribute updates, and collection queries).
- For example, if your campaign notifies a person about items they left in their shopping cart, you may want them to exit after they purchase these items. You can set people to exit the campaign if they’ve completed their purchase (the goal, in this case). They would exit after the next pause in the workflow.
Journeys briefly pause when people meet trigger/filter exit conditions
Segment-triggered campaigns have grace periods
For segment-triggered campaigns, if someone meets a trigger or filter exit condition when they get to a workflow action, we pause their journey and allow time for them to stop meeting the exit condition. If they still meet the exit condition after that time period is up, they will exit. Otherwise, they will continue on their journey. This is called a grace period (which can vary in length). Learn more about grace periods.
Other campaigns have 30-min pauses
For event, object, relationship, and form-triggered campaigns, if someone meets a trigger or filter exit condition when they reach a workflow action, we pause their journey for 30-minutes. This pause ensures that we don’t send messages to people who have already met the exit condition. If they match the exit condition after 30 minutes, they will exit. Otherwise, they will continue their journeys.
Workflows
The workflow is where you craft your messaging experience and automate other actions that impact people moving through your campaign.
Here, you can add a variety of items—messages, webhooks, attribute updates, or time delays-to set up your campaign. Each item has its own settings, such as:
- Sending behavior - whether or not the message sends automatically, queues a draft, or doesn’t send at all; we queue drafts by default
- Tracking opens and clicks - whether or not to track opens and clicks for a message; this is on by default
- Holdout test - a type of A/B test. Check out how to Create a conclusive A/B test result and how to Understand A/B test results for help.
- Subscription preference setting - whether or not to use campaign settings or override them; this respects campaign settings by default
Journeys
When a person enters a campaign, they start a journeyA person or data object’s path through your campaign.. We use journeys to track people’s history through a campaign like the deliveries they’ve received, conversions, and when they entered/exited. You can find them in the Journeys tab of a campaign:

Journeys work a little differently depending on your campaign’s trigger and filter conditions. For any campaign, a journey will start after the campaign is triggered and there are no filter conditions. If the campaign has filter conditions, the following happens:
- For segment-triggered campaigns, a journey starts as soon as a person matches the campaign’s trigger conditions. The person does not have to match the campaign’s filter conditions.
- For campaigns triggered by an event, object, relationship, date or form, a journey starts after the trigger conditions AND filter conditions are met. Keep in mind:
- If the person does not meet the filter conditions when we receive the event, we will retry for up to 30 minutes.
- If the person matches your filter conditions within 30 minutes, they enter the campaign and start a journey. Otherwise, they don’t enter the campaign or start a journey.
The 30-minute retry prevents race conditions that can occur when you update attributes close to the same time as the campaign trigger event. Rechecking the filter conditions helps us ensure that the right people will enter your campaigns, even when various network conditions or integration issues cause us to receive API calls in an untimely manner.
Manually end a journey
You can end a journey for a person from the Journeys tab of a campaign or a person’s profile.
Click the journey you want to end. You can only end an active journey.
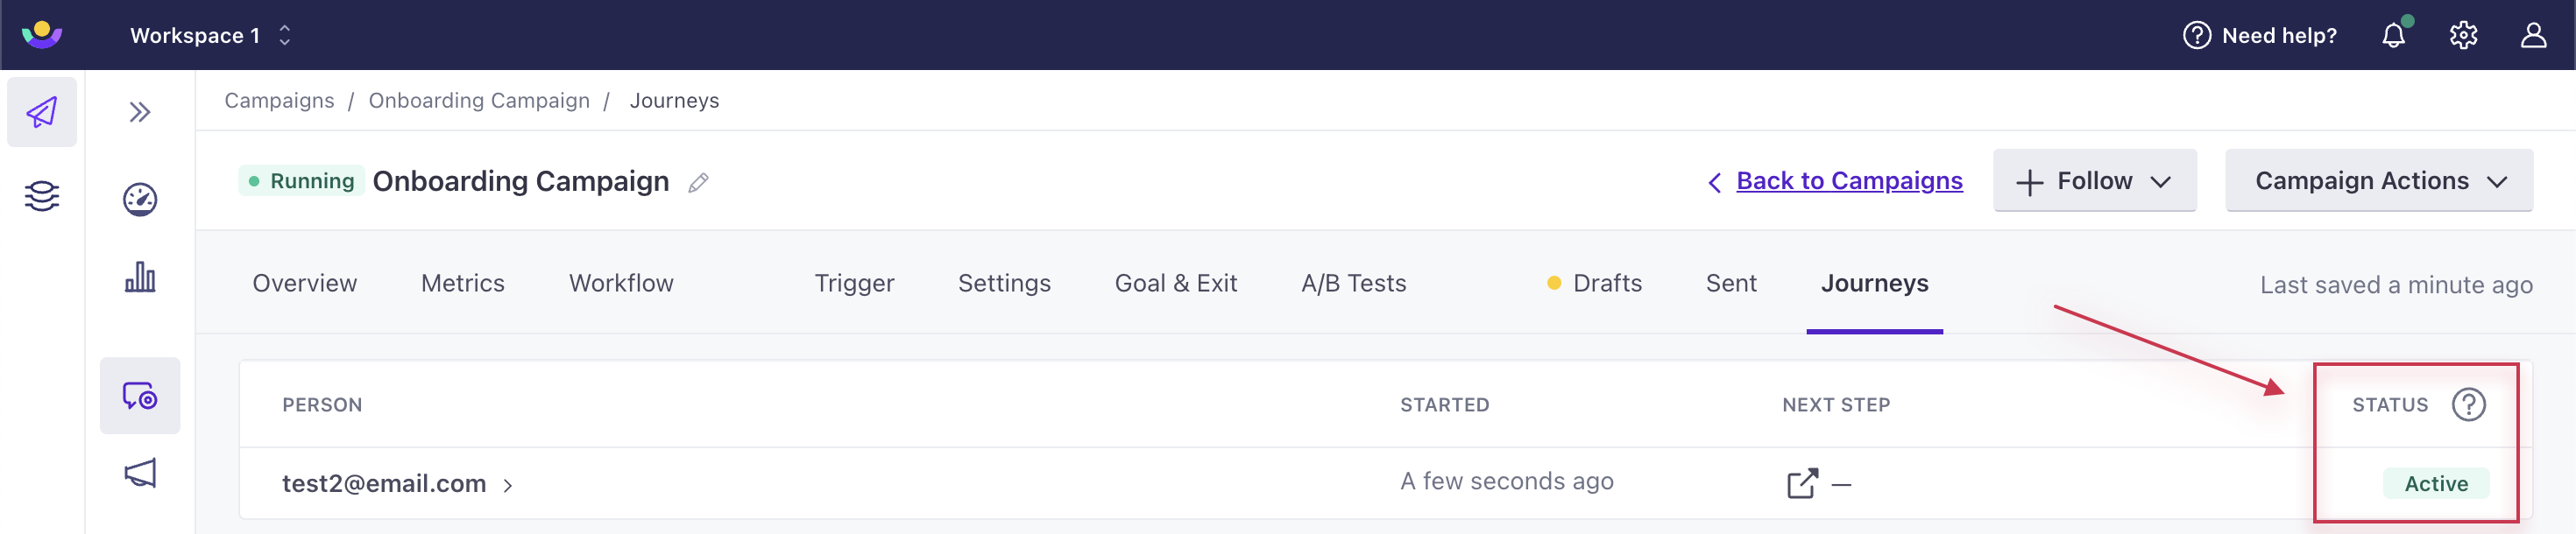
Then click End this journey on the right.
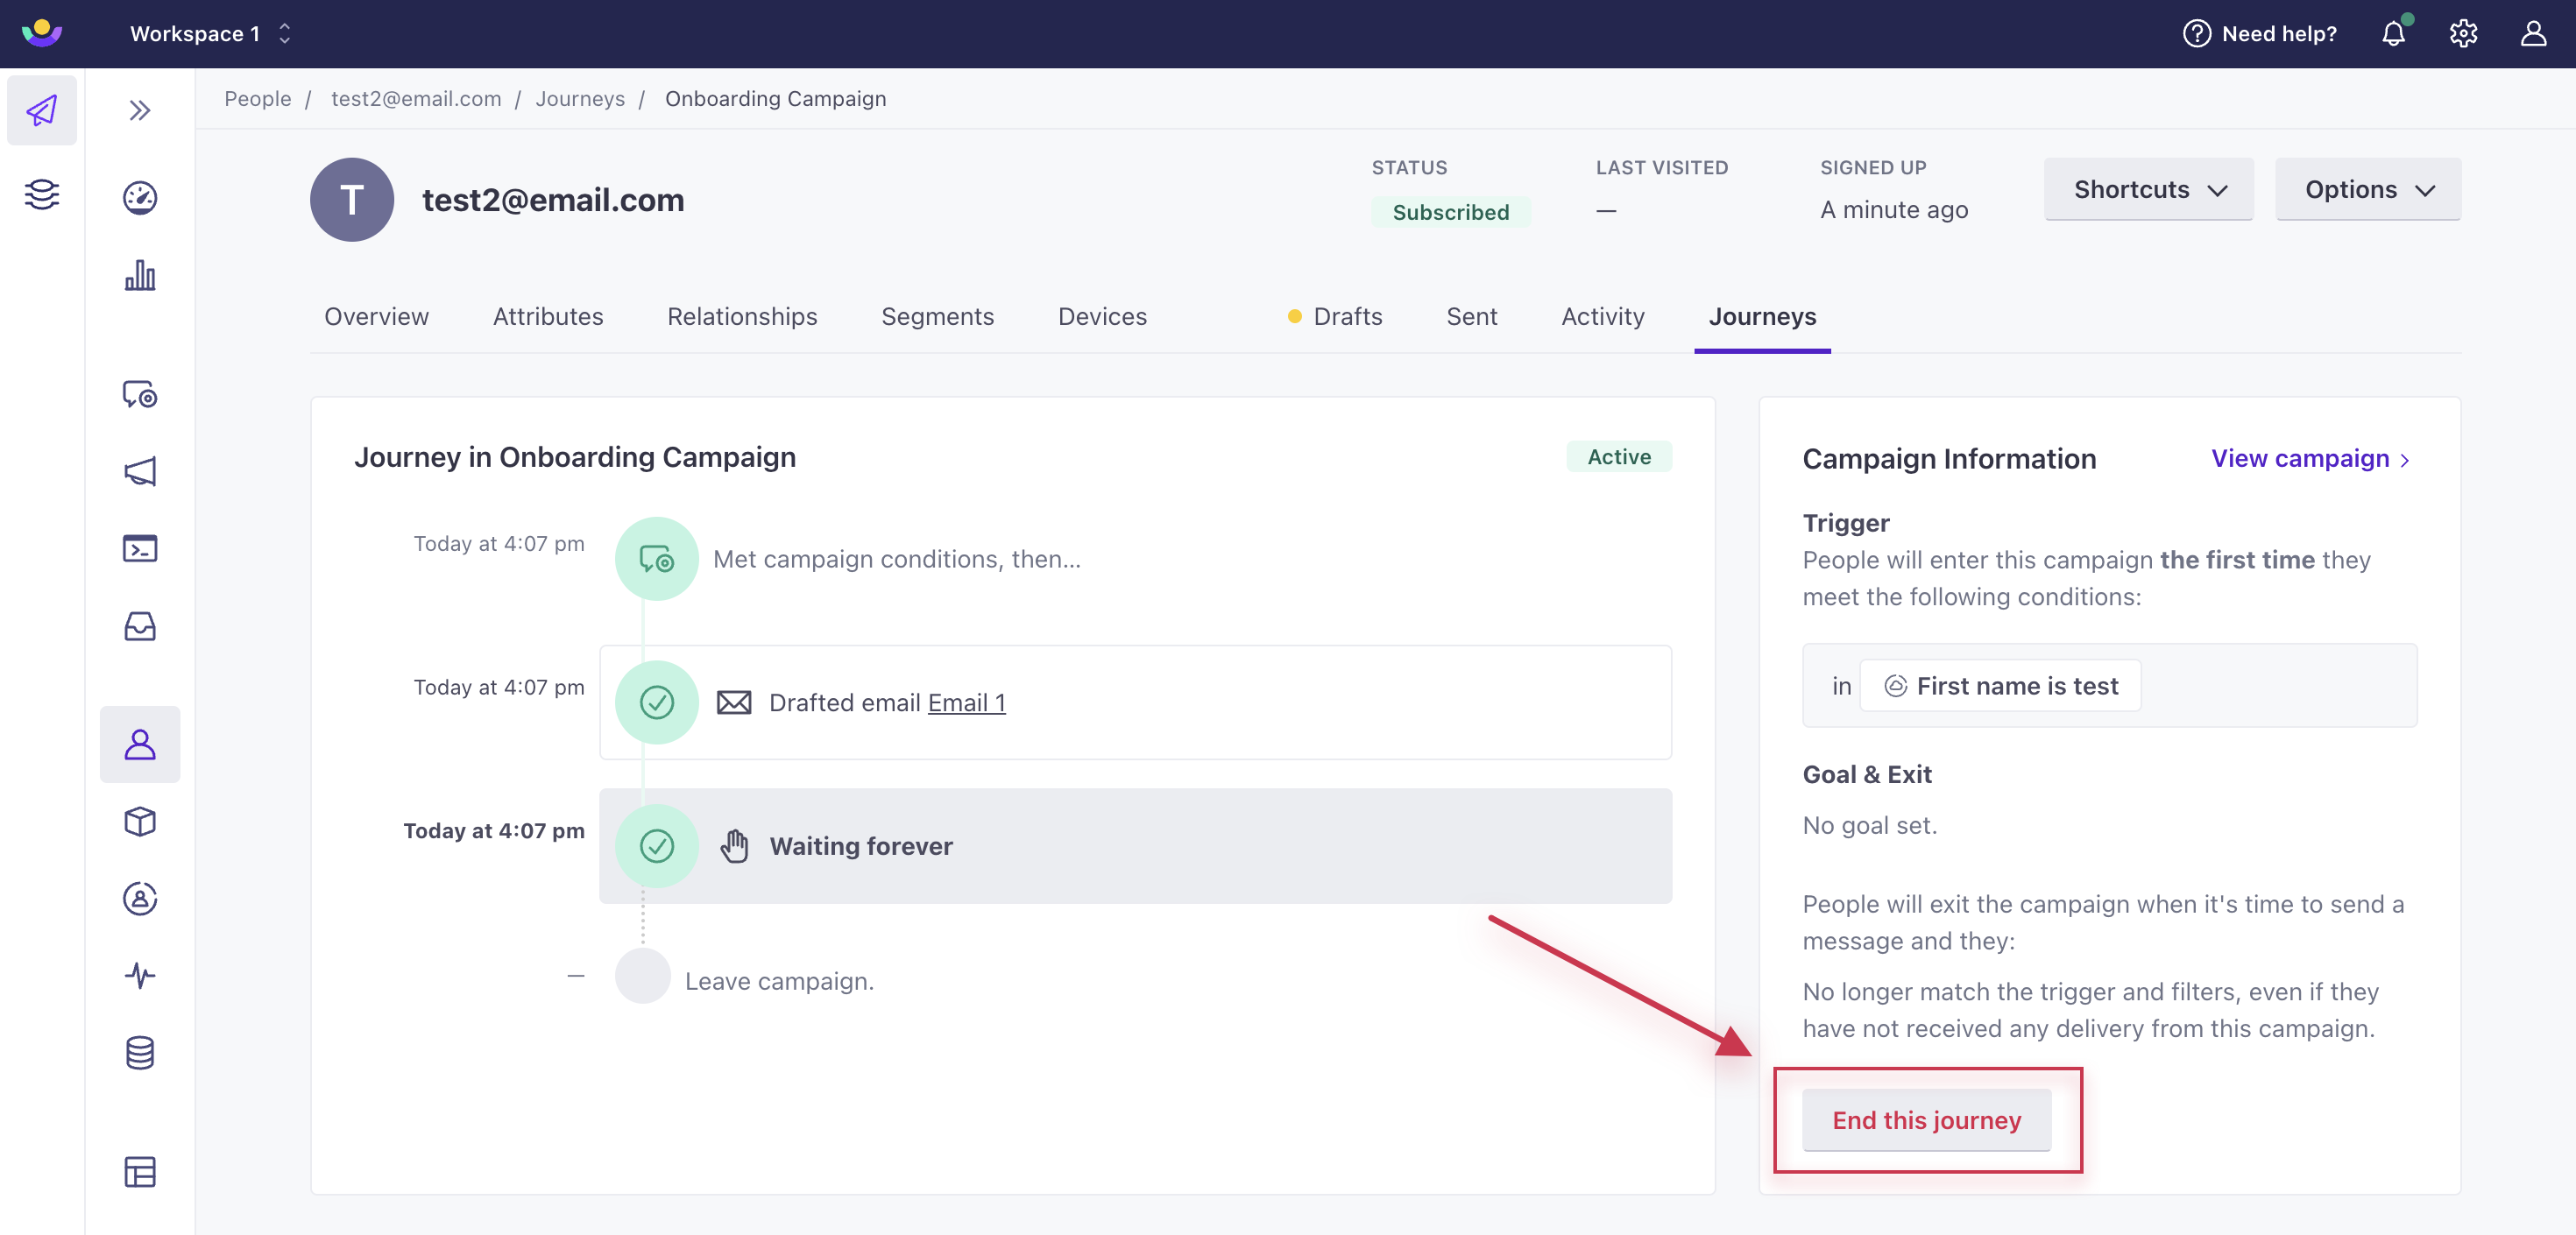
You can also get to this screen by clicking on a delivery in a campaign then selecting “View full journey.”
The journey will update to “Exited early.” And you’ll see this as the reason: “The person was manually removed from the campaign.” Manually ending a journey does not become an entry in the Activity Log.
Message settings
Select a message in your workflow, and the settings will appear in the left hand panel:
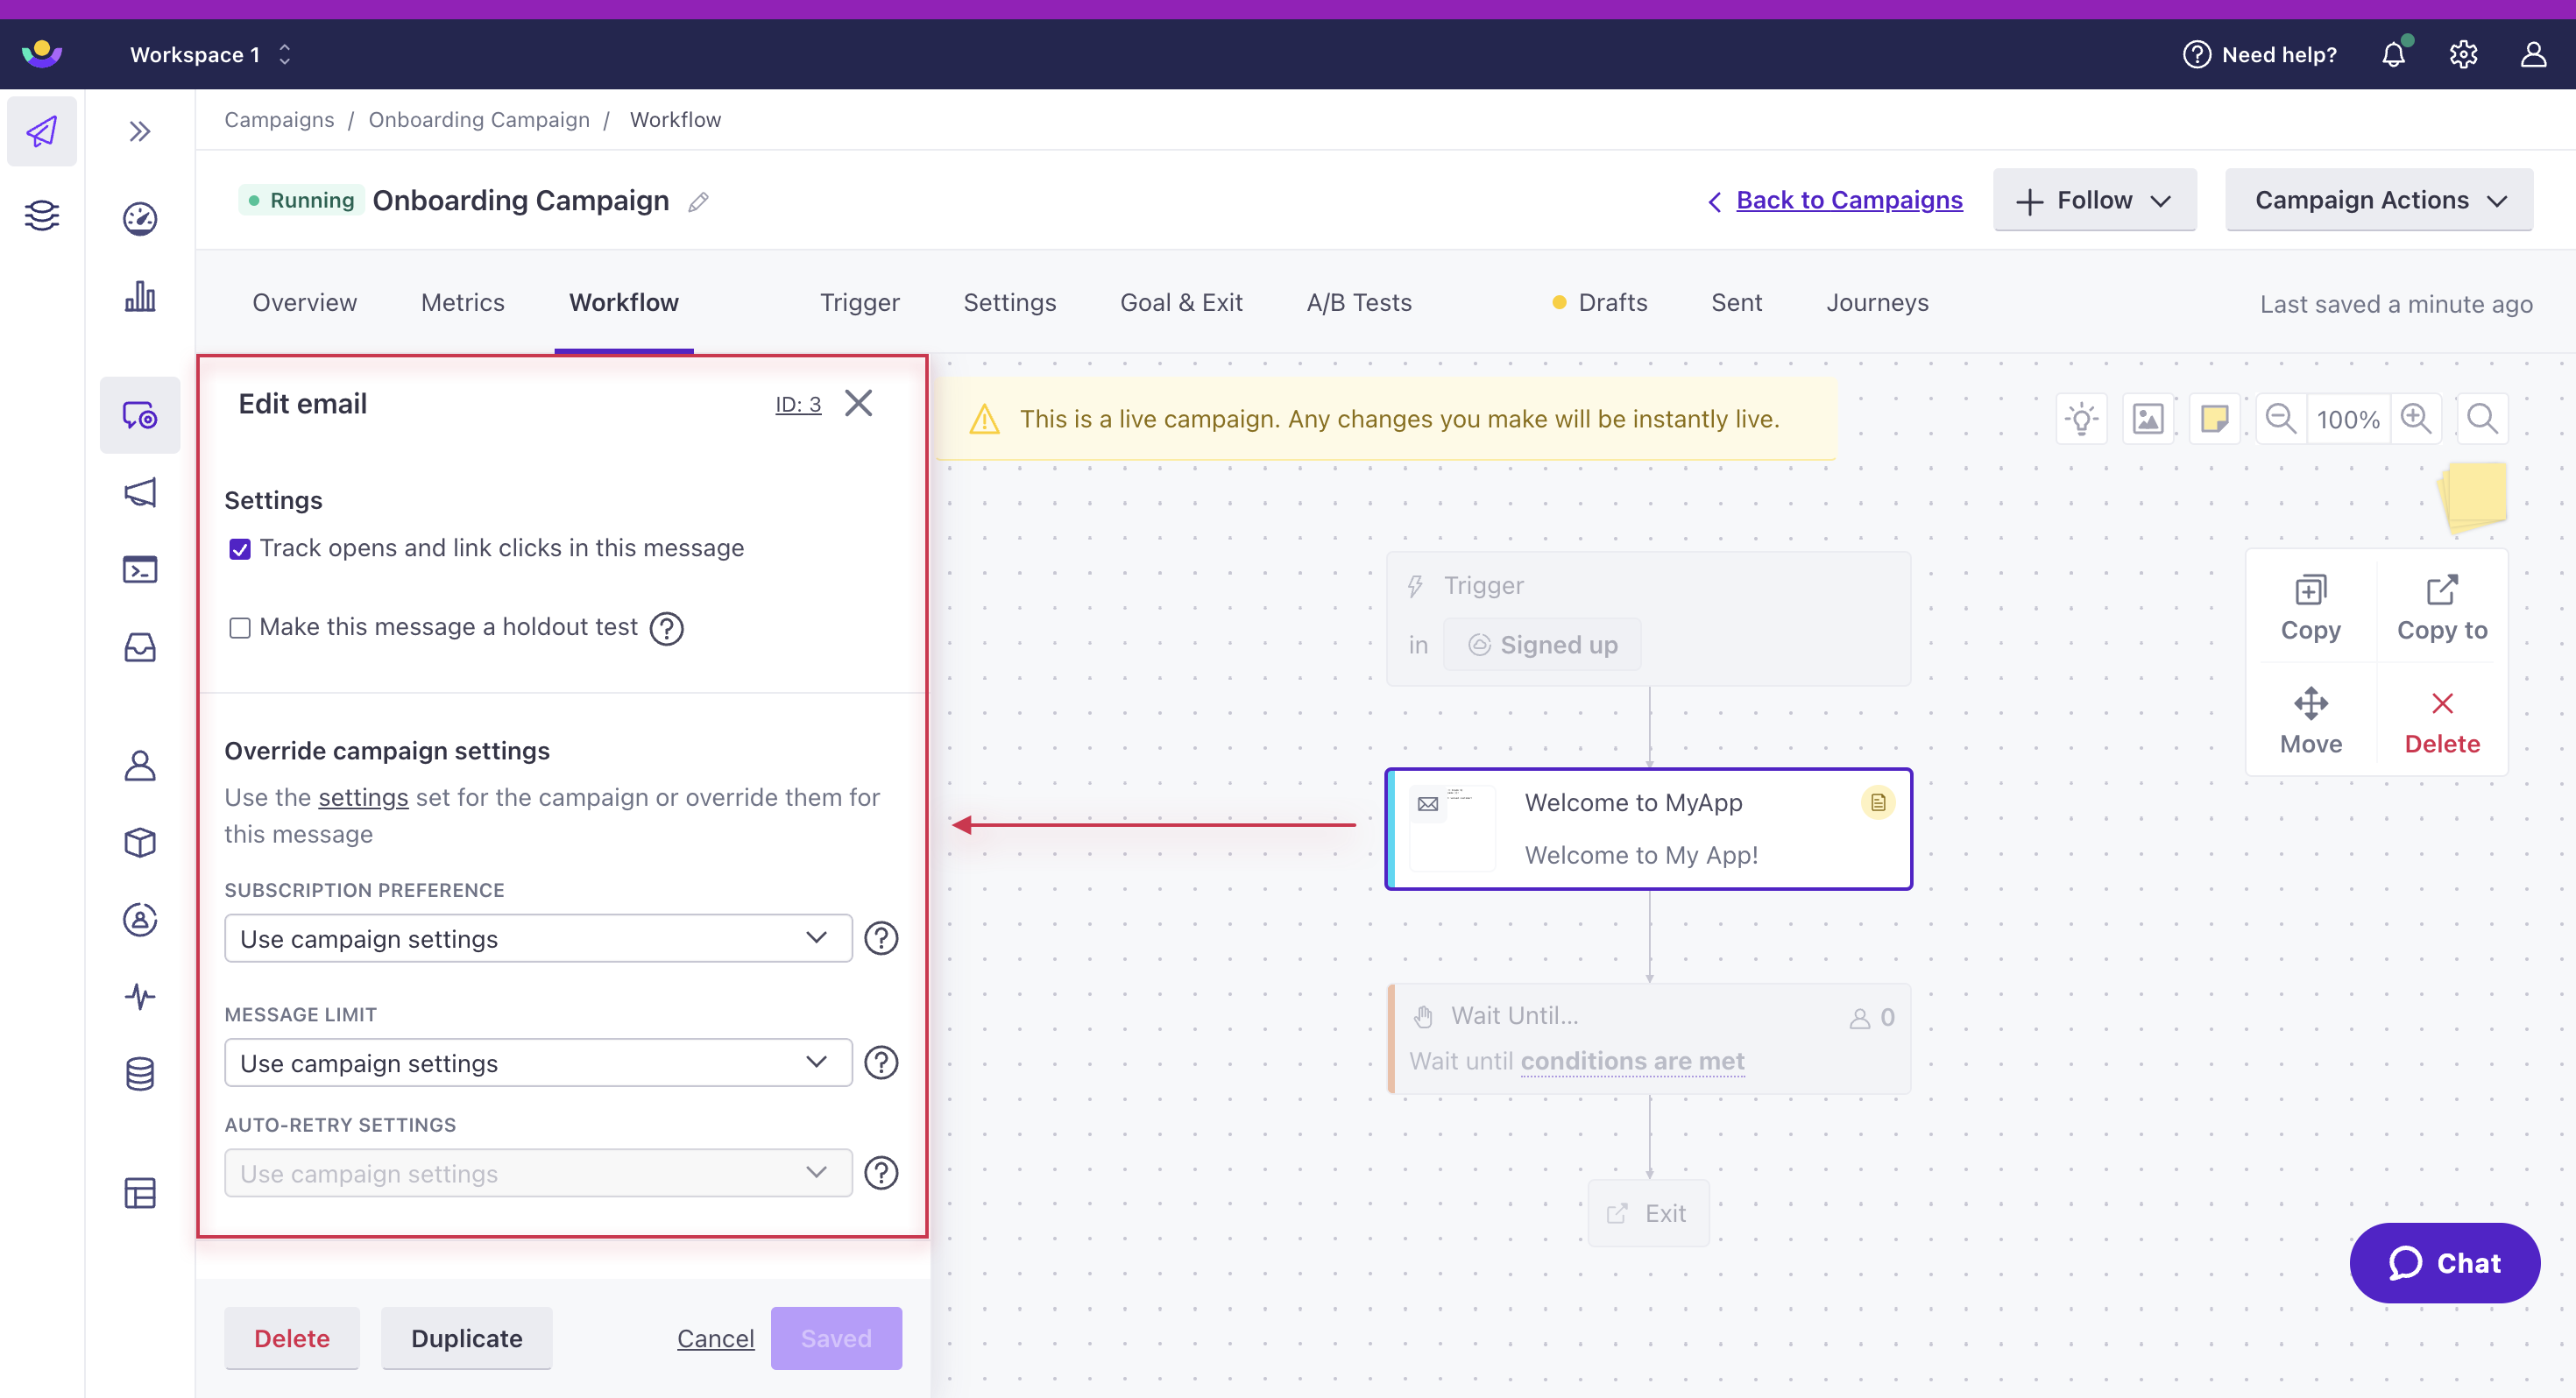
Subscription preference
By default, your messages inherit your campaign settings. But you can change this within a message’s settings:
- If you enabled the subscription center for your workspace, you can change this message to send to people subscribed to a different topic or all people in the campaign regardless of their subscription status.
- If you have not enabled the subscription center, you can change this to send to all subscribed or all people regardless of their subscription status.
Abide by your audience’s local laws
Review your campaign
After you’ve set up your campaign, the Review page will allow you to look over all of your settings once more before you get started. We’ll also surface any errors here.

It can take a few minutes for us to process changes to your snippet.
This means your customers may receive outdated content if, for instance, your campaign is active, you update a snippet in an email, then 30 seconds later we send that email. This could also happen if the message is at the beginning of your workflow, you update a snippet in the message, then immediately activate a campaign or trigger a broadcast, newsletter, or transactional message that contains it.
In the case of segment-triggered campaigns, you can send to people who already match your campaign trigger criteria or just to people who match the criteria in the future. For other trigger types, this is not the case.
Who should match?
Depending on the type of campaign you’re building, you can decide whether current people and future additions or only future additions should trigger your campaign.
- Current people and future additions: this means people who matched your trigger criteria more than 24 hours before you start the campaign and those who matched after will enter your campaign.
- Future additions only: this only includes people who match your trigger criteria after you start the campaign.
When you start a segment-triggered campaign, you can choose either option:
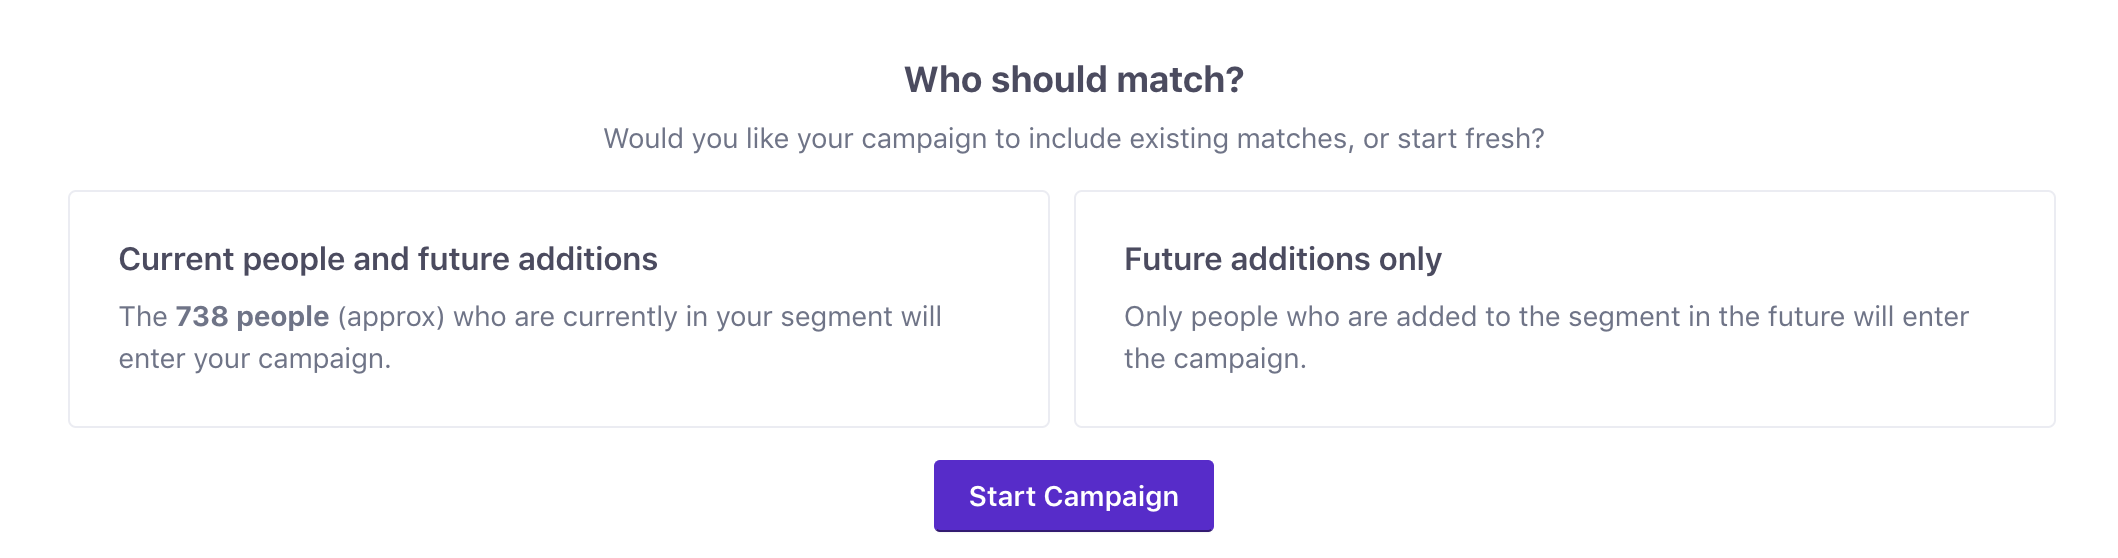
Date-triggered campaigns always trigger for both current matches and future additions.
For event-triggered campaigns, people only enter the campaign when they perform the event after you start the campaign. Similarly, object and relationship-triggered campaigns only trigger for future matches.
You can create a campaign triggered by a segment based on a specific event so you can include current matches, but keep in mind, you won’t be able to include any event attributes in the content of the workflow.
Metrics & Reporting
Once a campaign is running, you can view reports and export them to CSV from the Metrics tab.
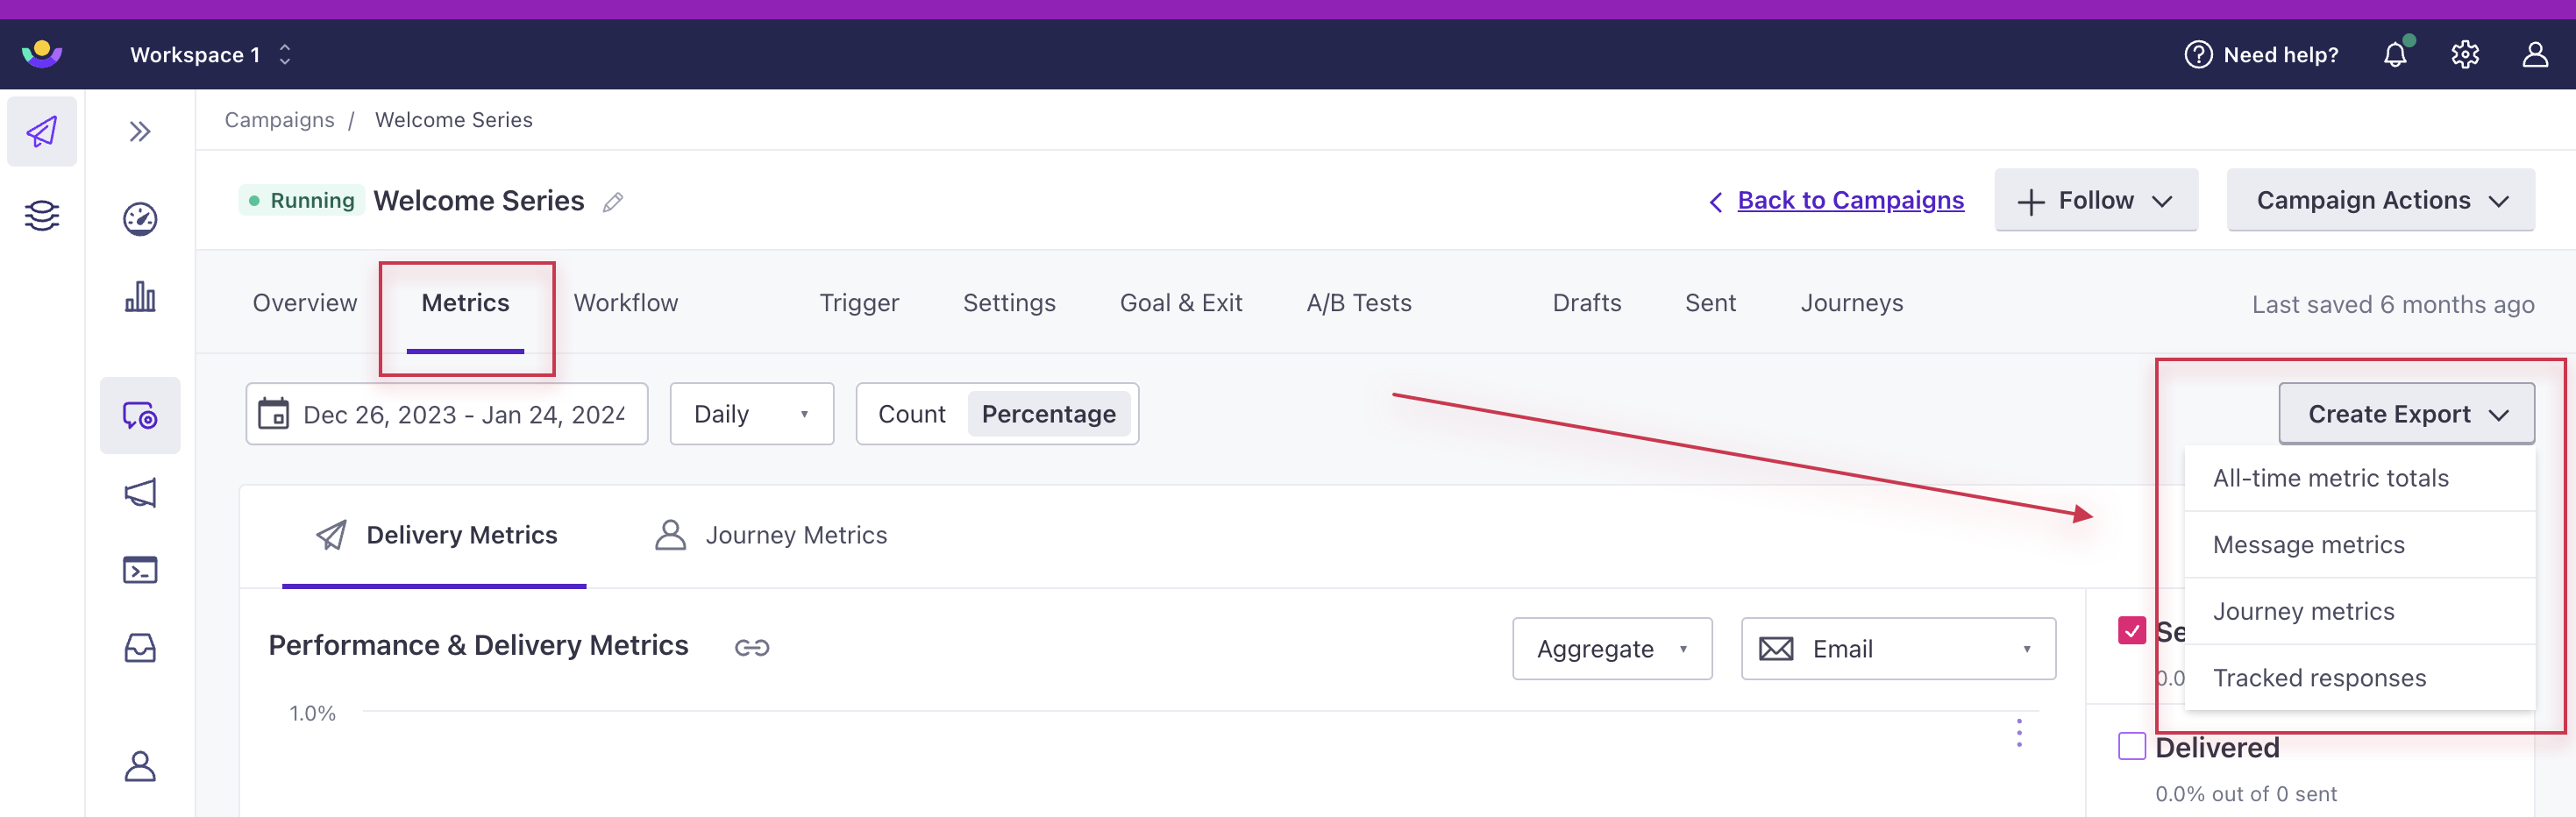
The export will reflect the dropdown selection:
- All-time metric totals
- Message metrics
- Journey metrics or
- Tracked responses for in-app messages
It will also include any filters you selected. For instance, if you select “Email” for the “Last 30 days” under Delivery Metrics, that would filter the data exported.
We can also send reporting webhooks with performance data to a URL you specify so you can receive information about events as they occur in real-time. Customer.io sends the information as JSON in an HTTP POST. Read more about setup here.
Check out our Data-out integrations overview for more options.
Liquid and customer data in campaigns
You can personalize data in messages using liquidA syntax that supports variables, letting you personalize messages for your audience. For example, if you want to reference a person’s first name, you might use the variable {{customer.first_name}}.. Reference people’s data in this format:
{{customer.<attribute_name>}}
For example, if you’re sending us a customer’s name using the attribute full_name, you can utilize it like this:
Hi, {{customer.full_name}}!
You can also perform more complex operations using the data you send; we have more comprehensive information here.
Event attributes
A few things to remember when using event attributes:
- They can be used in message content
You can use all of the data you send with an event in your messages. For example, if you send us a purchase event with the following data:
{"name":"purchase","data":{"price": "9.99", "product": "socks", "color":"blue"}}then you can send a receipt email (or push notification, or SMS, or any other action) with the product’s name, price, and color in it. Whatever you send in the event attributes is available to you; you can learn more about using event data here. - They can override certain email headers
If you send any of these attributes as part of your event, they will override your campaign settings:
from_address,recipient,reply_toFor example: If a purchase event triggers an email to send, but that purchase event contains recipient = wile.e.coyote@example.com as an attribute, then all emails triggered by that campaign will go to wile.e.coyote@example.com, no matter the settings in the campaign itself. They can include attachmentsDeprecated. Use the Transactional API to send emails with attachments. Here’s an example using a calendar .ics file.
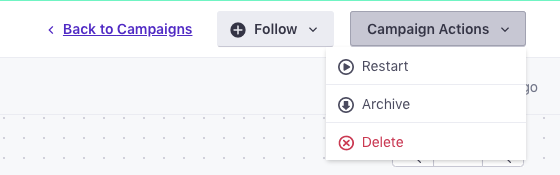
Change the status of a campaign
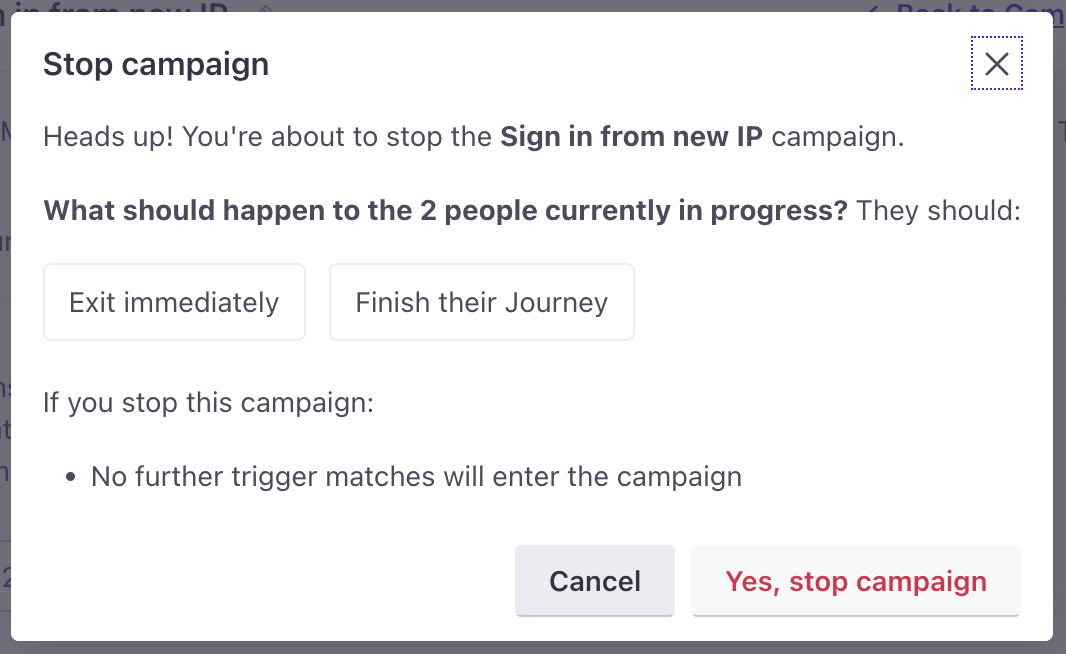
Stop a campaign
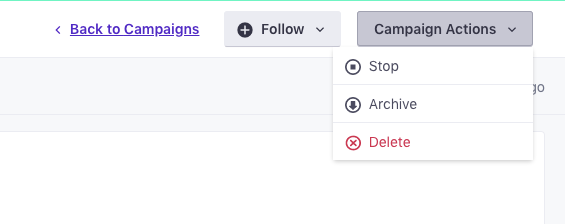
To stop a campaign, click into the individual campaign and select “Stop” from the “Campaign Actions” dropdown menu near the top right corner of the page.

Stopping a campaign prevents users from entering the campaign. While the campaign’s stopped, you can edit it. And messages that were already sent from the campaign will continue to generate metrics normally.
If the campaign has active journeys in progress, you can either:
- Force people to exit immediately. In this case, we stop sending messages to anybody who was already in the journey and recall in-app messages that haven’t been seen (opened) yet. See What happens to messages when people exit immediately? for more information.
- Allow people to finish their journey and exit the campaign naturally. Your campaign will sit in a Stopping state until all people have exited the campaign, and then it’ll switch to Stopped.
What happens to messages when people exit immediately?
When you stop a campaign using the Exit immediately option, we’ll stop sending messages immediately. But all emails, SMS messages, push notifications, webhooks, and Slack messages that are already Sent are likely to be delivered to your audience. We don’t control the delivery providers for these message types, so we can’t recall these messages after they’re sent.
In-app messages native to Customer.io are an exception to this rule: any in-app message that has been “Sent” but not “Opened” is recalled. We control the delivery mechanism for these messages, so we can stop them before they make it to your audience.
immediately?} b-.->|no|c(People with an active journey
keep receiving messages) b-->|yes|d{Will sent messages
be delivered?} d-->|email, push, SMS,
Slack, and webhooks|e(Normal delivery) d-.->|In-app messages|f(Cancelled)
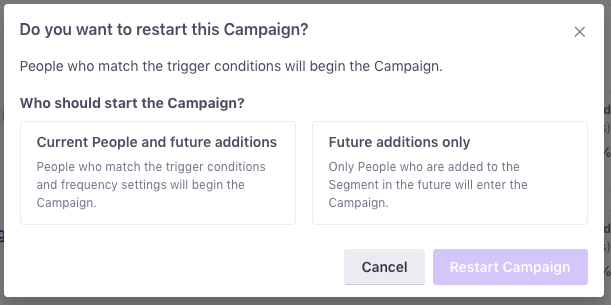
Restart a campaign
To restart a campaign, click into the individual campaign and select “Restart” from the “Campaign Actions” dropdown menu near the top right corner of the page.
When restarting a segment-triggered campaign, there are two options for determining which people will enter the campaign:
- Current people and future additions Choose this one if all people who currently match the trigger conditions should enter. This includes any people currently in the trigger segment but will also take your campaign frequency settings into account.
- Future additions only Choose this option if only people who match your campaign trigger conditions after the campaign is restarted should enter.
Archive a campaign
To archive a campaign, click into the campaign and select “Archive” from the “Campaign Actions” dropdown menu near the top right corner of the page.
Once a campaign is archived,
- Users will no longer enter the campaign.
- Any users currently in the workflow will be forced out of the campaign.
- Any unsent drafts in the campaign will be removed.
- A/B tests will automatically be paused.
- The campaign workflow, triggers, goals, and exit conditions will no longer be editable.
Emails from archived campaigns will still appear in the “Existing Emails” section when adding new email content. Campaign workflows from archived campaigns will still be searchable and copy-able into new campaigns. To remove archived content and prevent archived workflows from being reused in the future, delete the campaign instead.
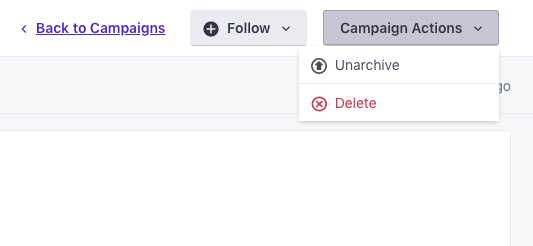
Unarchive a campaign
To unarchive a campaign, click into the campaign and select “Unarchive” from the “Campaign Actions” dropdown menu near the top right corner of the page.
When a campaign is unarchived,
- The campaign will move to the Active tab and be updated to “Stopped.”
- Any archived segments used in the campaign triggers, filters, goals, and exit conditions will be unarchived along with the campaign.
Delete a campaign
To delete a campaign, click into the individual campaign and select “Delete” from the “Campaign Actions” dropdown menu near the top right corner of the page.
When deleting a campaign, all message content, settings, and report data will be removed.
Deleting a campaign is a permanent action
Deleting a campaign cannot be undone. Make sure to save any important data or content before deleting a campaign.

