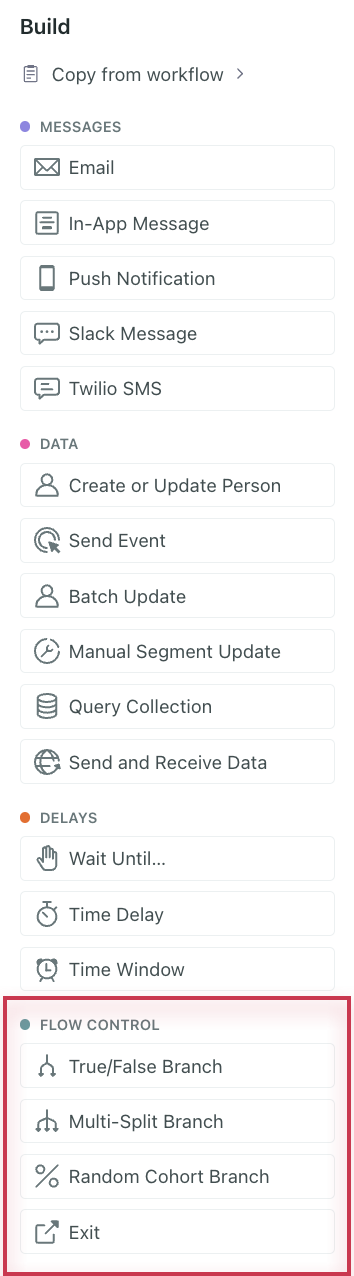
Branches
Add branches to workflows to personalize campaigns for your audience. We offer three branch types that you can place anywhere in a workflow— a True/False Branch, a Multi-Split Branch, and a Random Cohort Branch. They appear on the left hand of your workflow under Flow Control.
You can use JSON dot notation in condition logic
If you store attributes or event data in JSON objects or arrays, you can use JSON dot notation in your branch conditions to evaluate these properties. Use array[] to represent any item in an array or array[0] to represent the first item in the array. See Storing and using JSON for more information about dot notation in Customer.io.
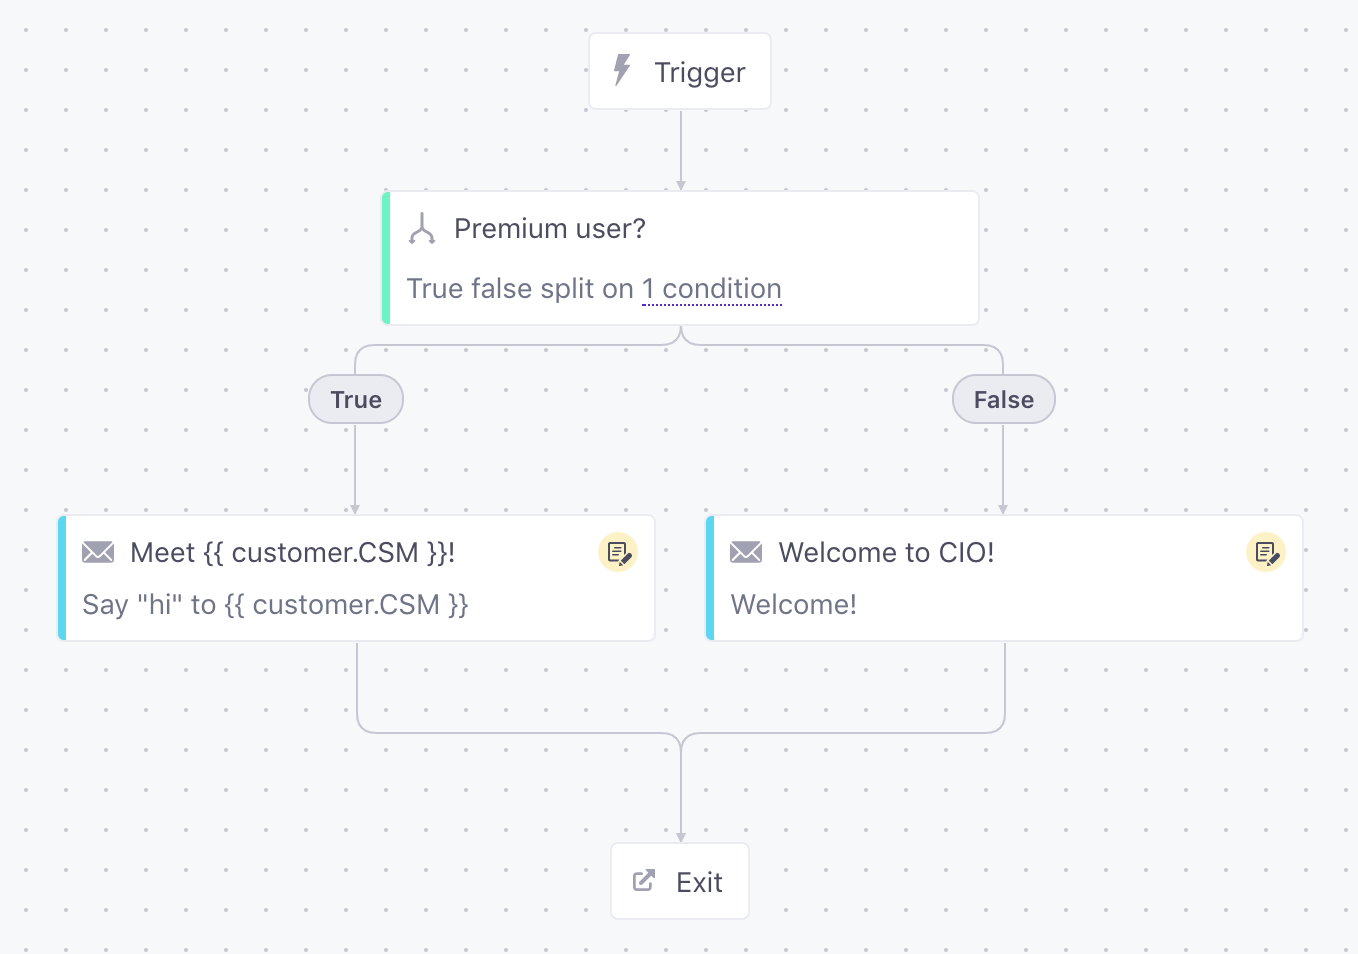
True/False Branch
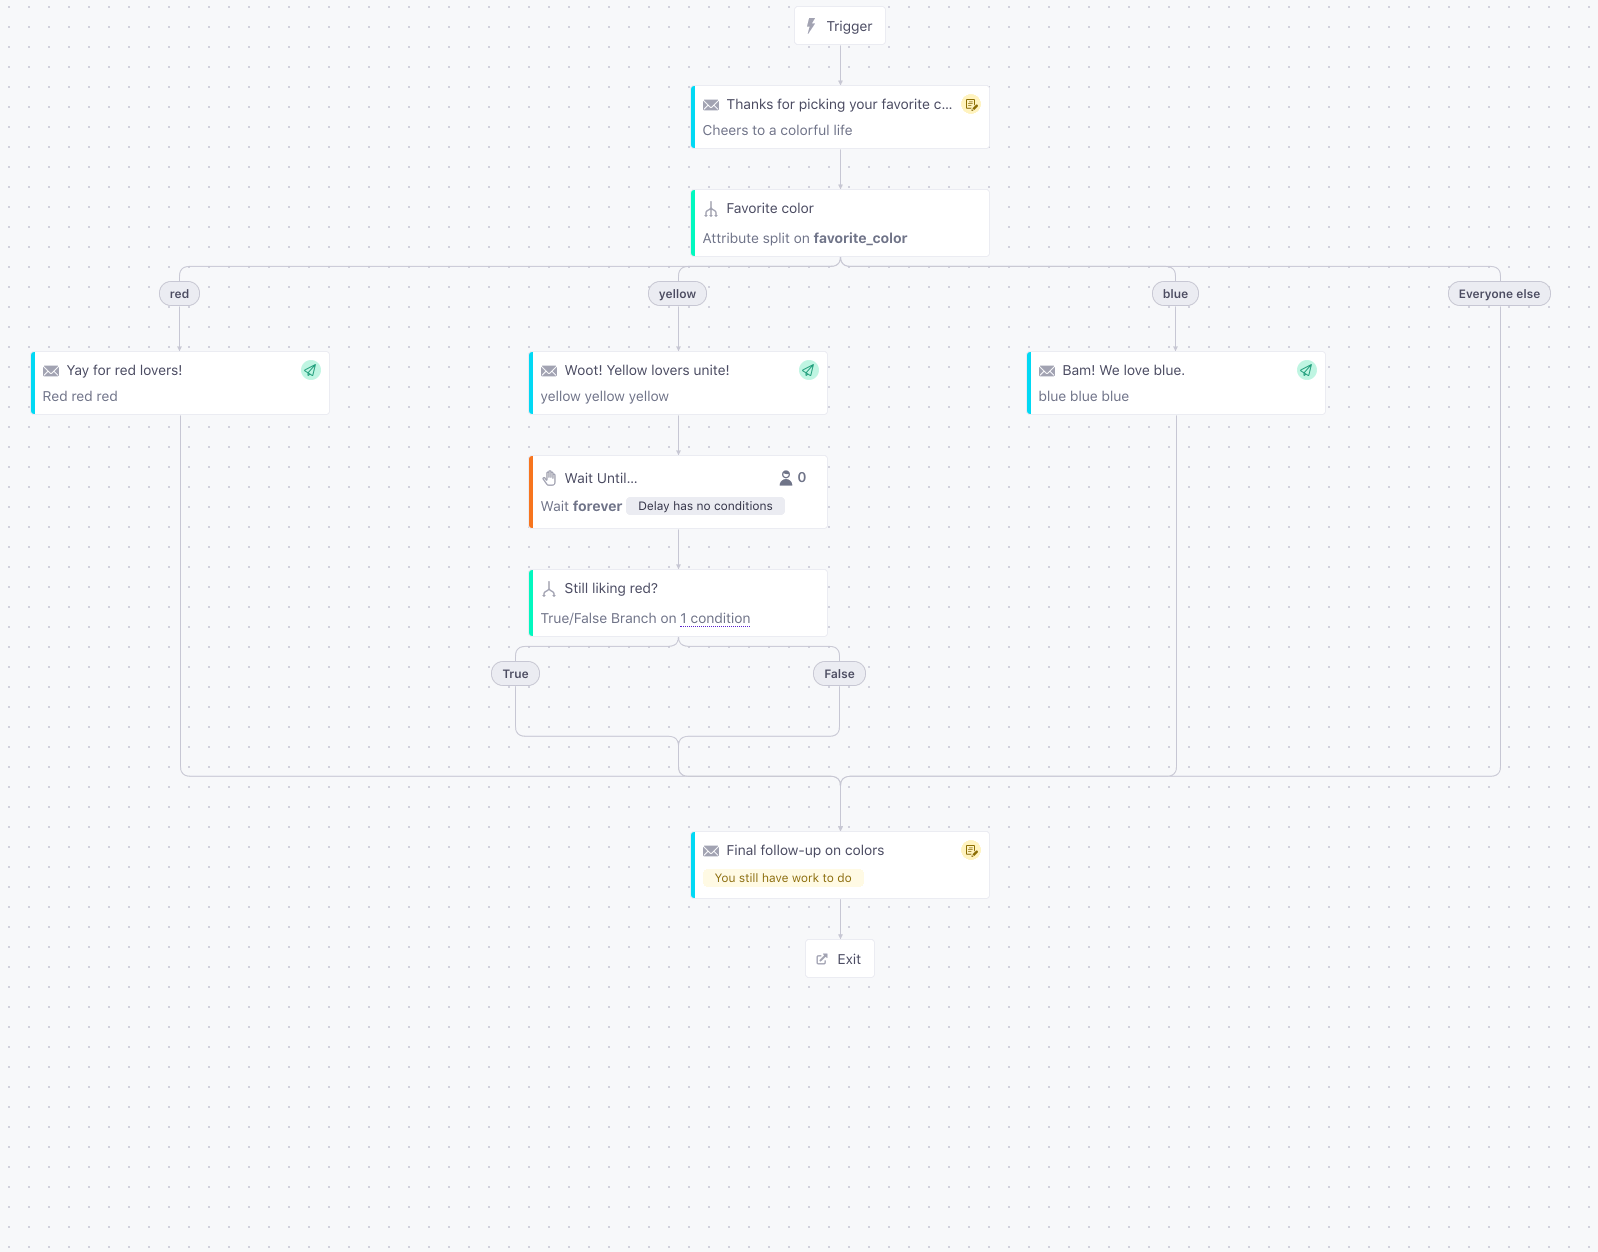
A true/false branch sends your audience down different paths based on conditions. Customers matching the conditions go down one path; customers who don’t match the conditions go down the other.
You can create a true/false branch based on:
- profile attributes
- segment membership
- events
- messages (like if a certain email has ever been clicked)
- object attributes (only for object or relationship-triggered campaigns)
- relationship attributes (only for object or relationship-triggered campaigns)
To add a True/False Branch to the workflow, drag it onto the canvas just like you would any other workflow item. You can insert them anywhere in the workflow.
When dropped into the workflow, the True/False Branch will have no conditions defined.
Note: a True/False Branch with no conditions defined will default to false.
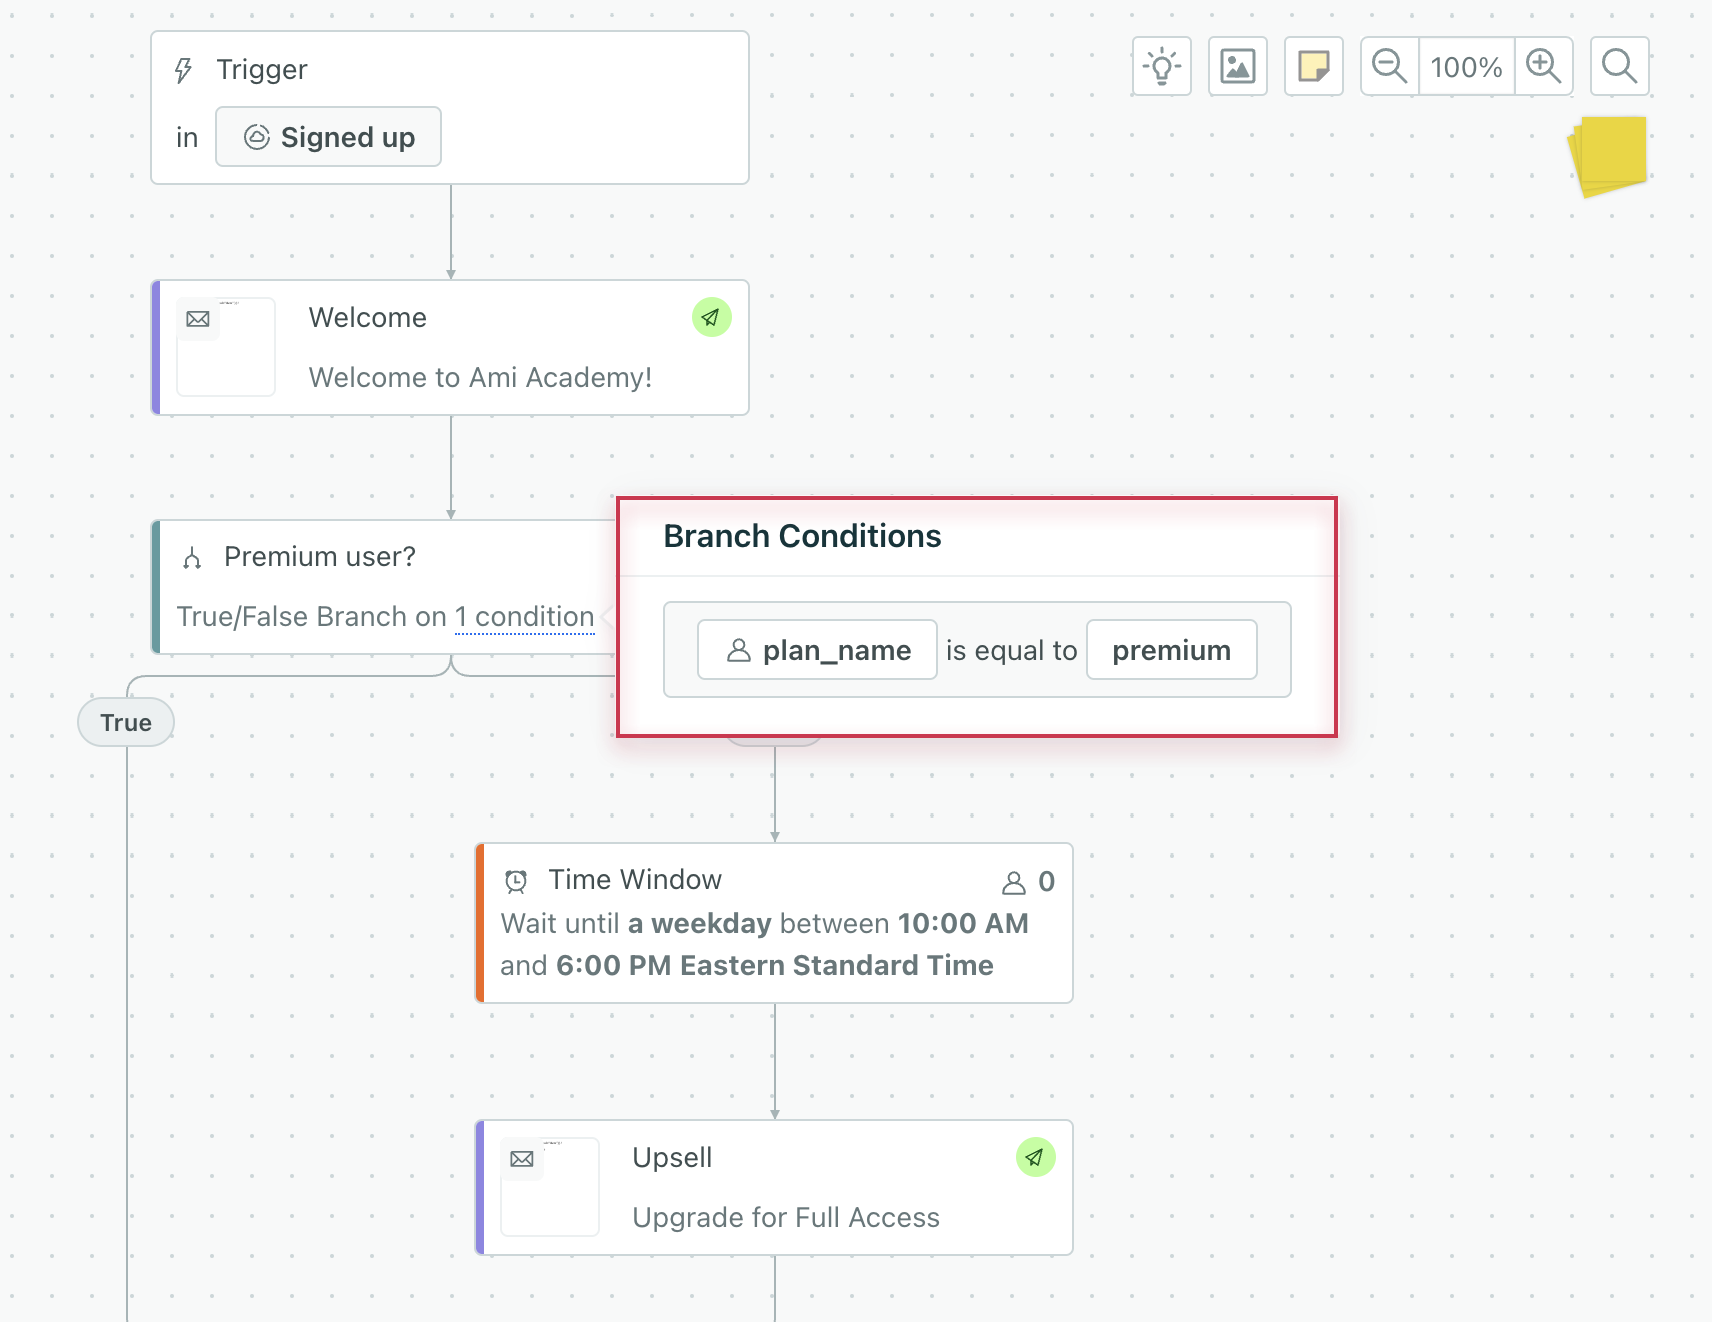
To define conditions, click on the branch in your workflow.
- Name your branch in a way that makes sense to you and your teammates.
- Then click the Add condition dropdown and choose to add an attribute, event, segment, or message condition. If you’re creating an object or relationship-triggered campaign, you can also add a relationship or object attribute condition.
- Define the details of the condition and click Add.

Follow the same process to add other conditions. Then click Save. When you hover over your branch, you’ll see the branch condition(s) you’ve set.
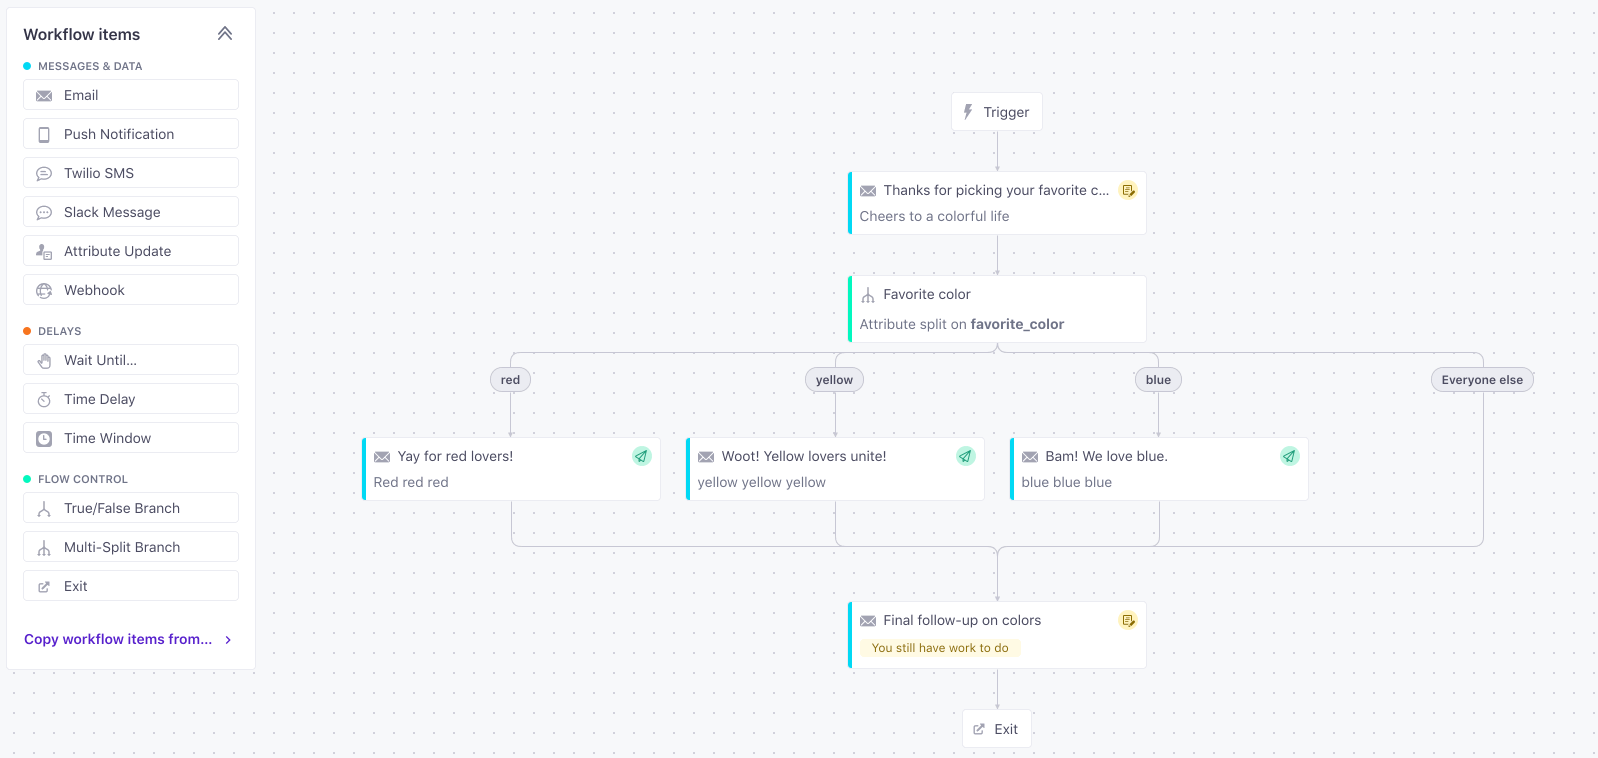
Multi-Split Branch
A multi-split branch lets you send people down paths based on one or more conditions:
- profile attributes
- segment membership
- events
- object attributes (only for object or relationship-triggered campaigns)
- relationship attributes (only for object or relationship-triggered campaigns)
During a campaign, a person will flow down the first path they match moving from left to right. If they do not match any path, they will flow down the default “All others” path on the right.
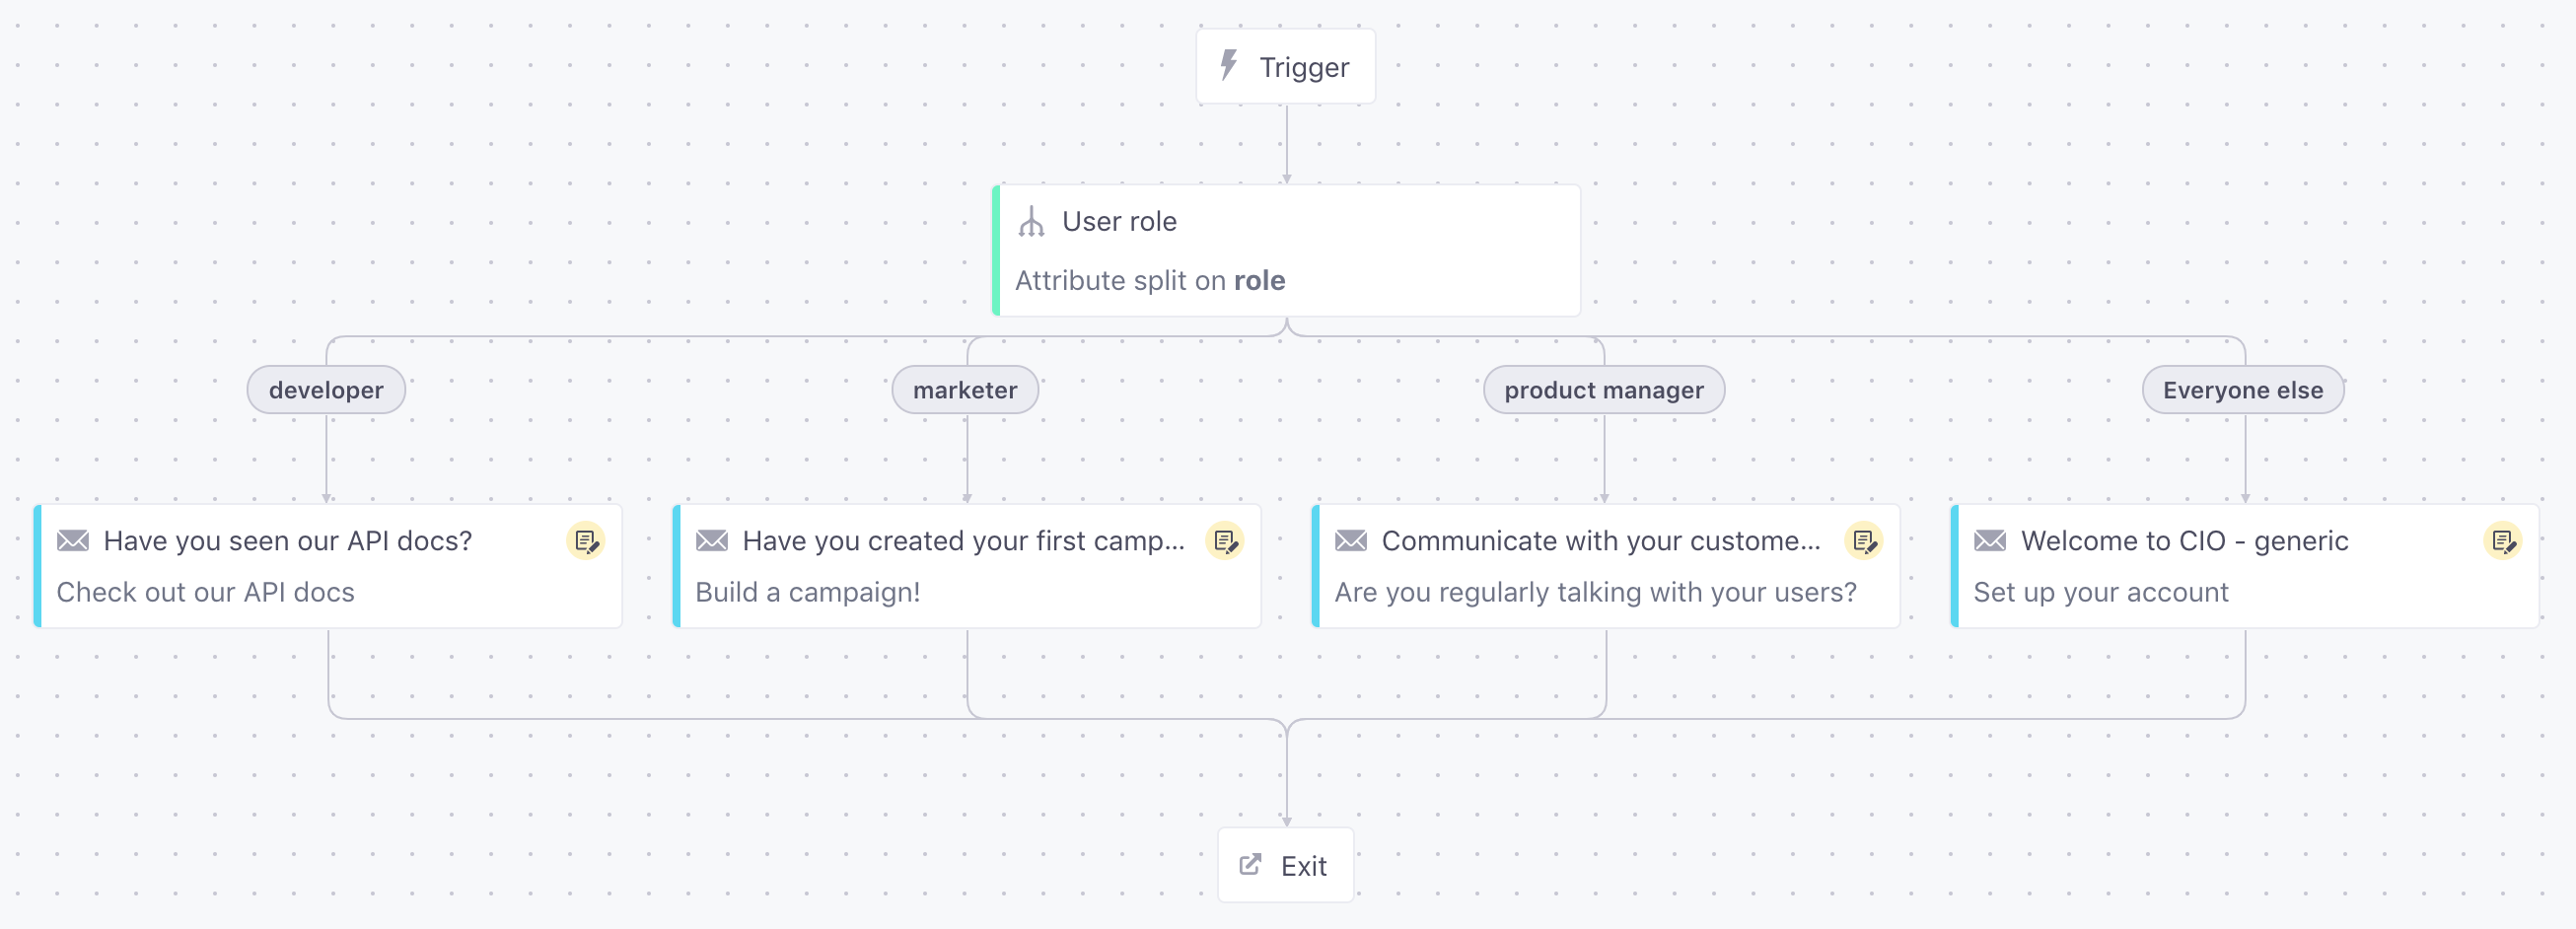
To add a multi-split branch to the workflow, drag it onto the canvas just like you would any other workflow item. You can insert branches anywhere in the workflow.
By default, the multi-split branch has two, empty paths and a third “All others” path.
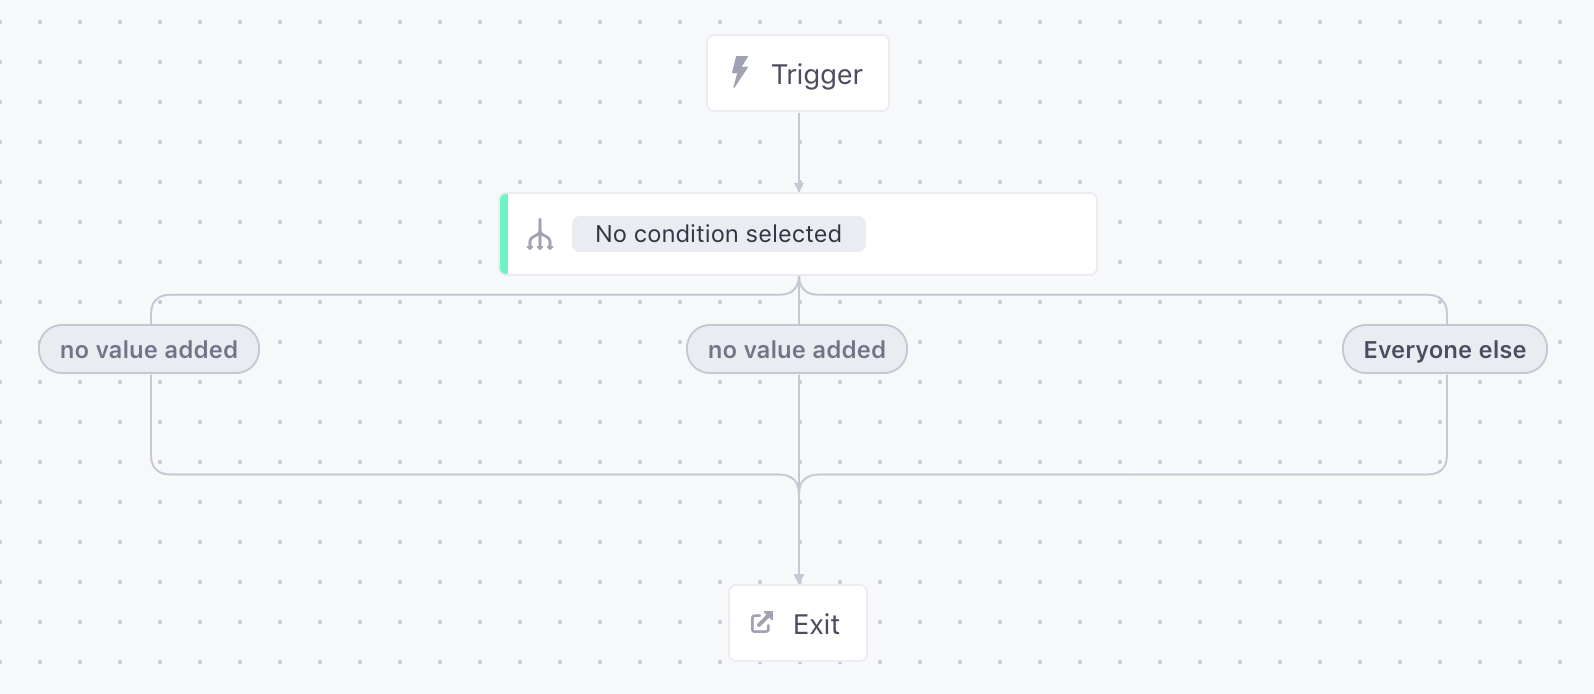
A path with no conditions defined will default to false. In other words, people will always skip a path with no conditions.
To define path values, click on the branch, then edit the fields on the sidebar.
- Give your branch a Name.
- Choose the Data Type to split based on. The options change depending on the type of campaign trigger. You can only use event attributes for even-triggered campaigns. Similarly, you can only use object or relationship attributes in campaigns triggered by objects or relationships.
- Define your paths - choose your attributes or segments. Add more paths if you need.
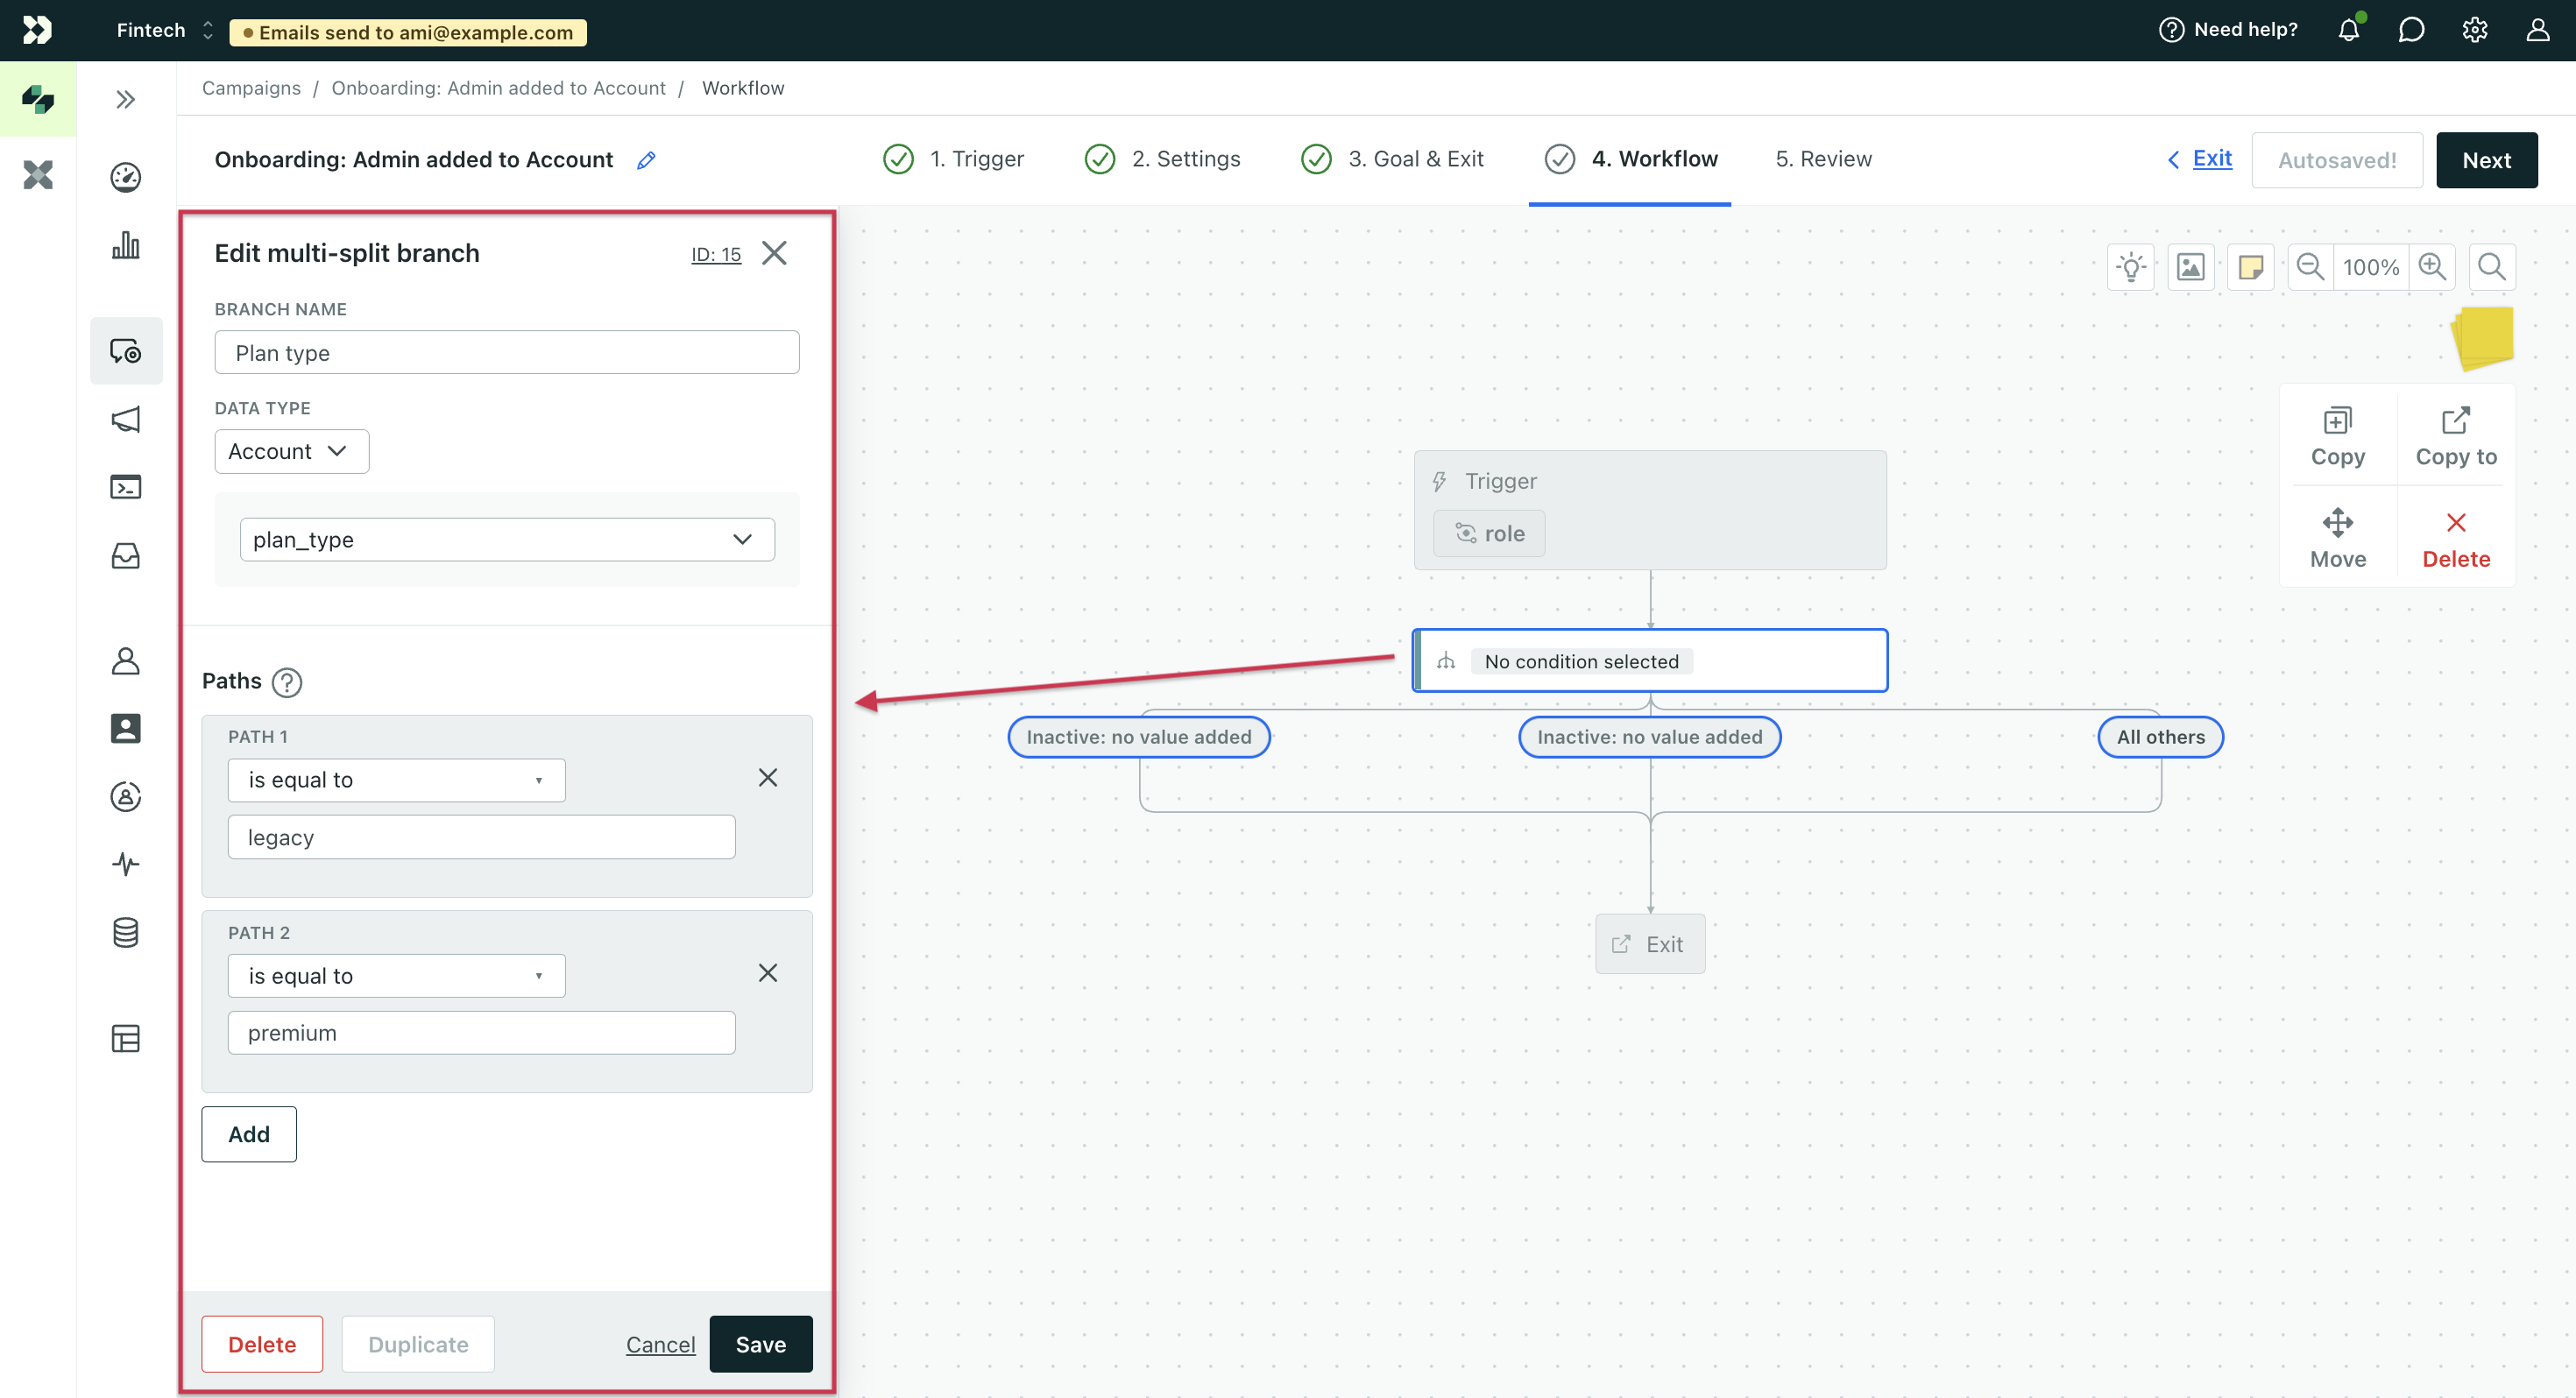
- Click Save and you’ll see the paths on your canvas update to match.
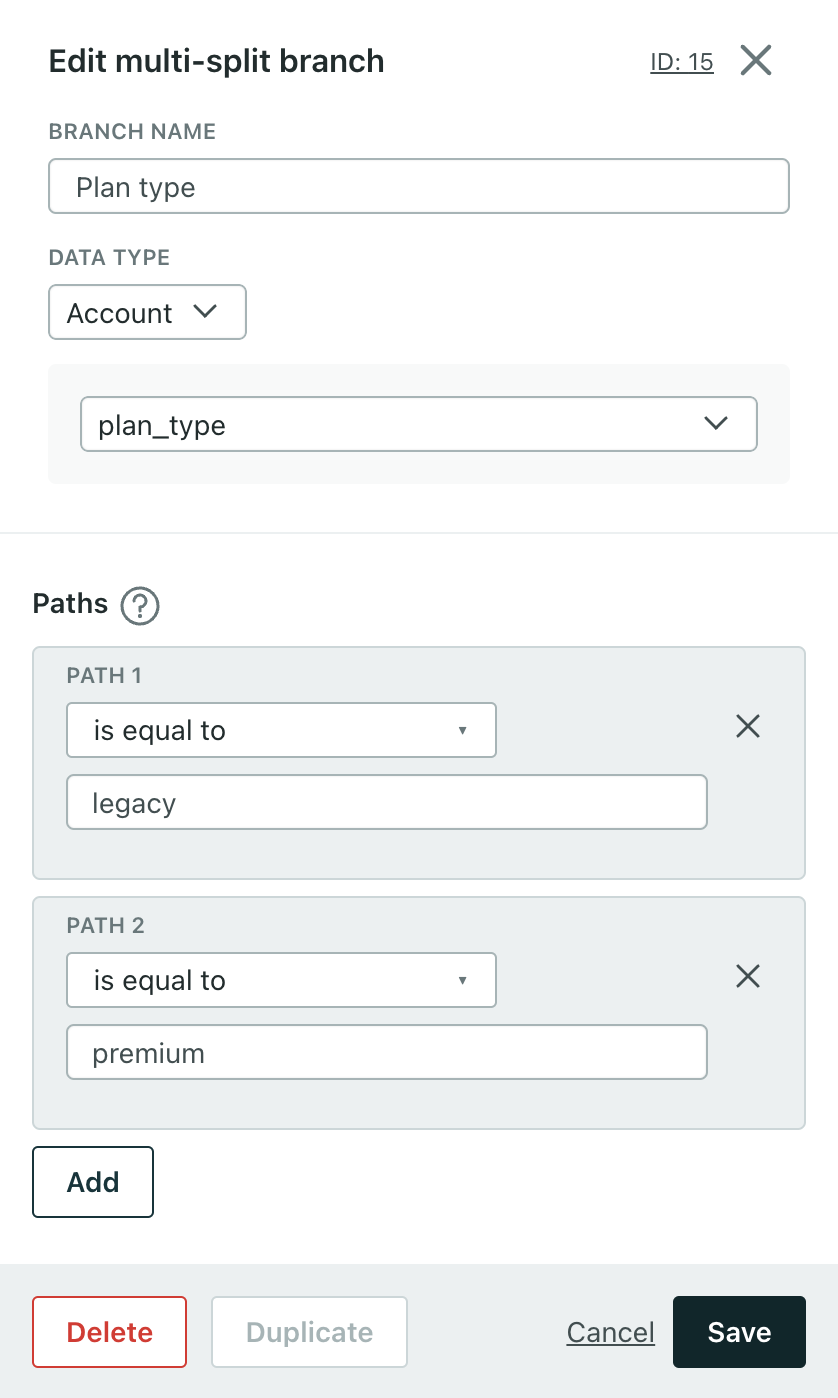
Split based on people’s attributes
To split based on the value of a single attribute, click ‘Attribute’ in the ‘Choose type’ dropdown. Select the attribute you’d like to split on in the ‘Attribute name’ dropdown that just appeared. And finally, enter the values of the attribute that you’d like to split on in each of the ‘Path’ text fields. To add another path, click the ‘Add’ button. Click the ‘is equal to’ dropdown if you’d like to split based on a range of values.
Note: splits are evaluated from left to right, so make sure your conditional logic works in that order.
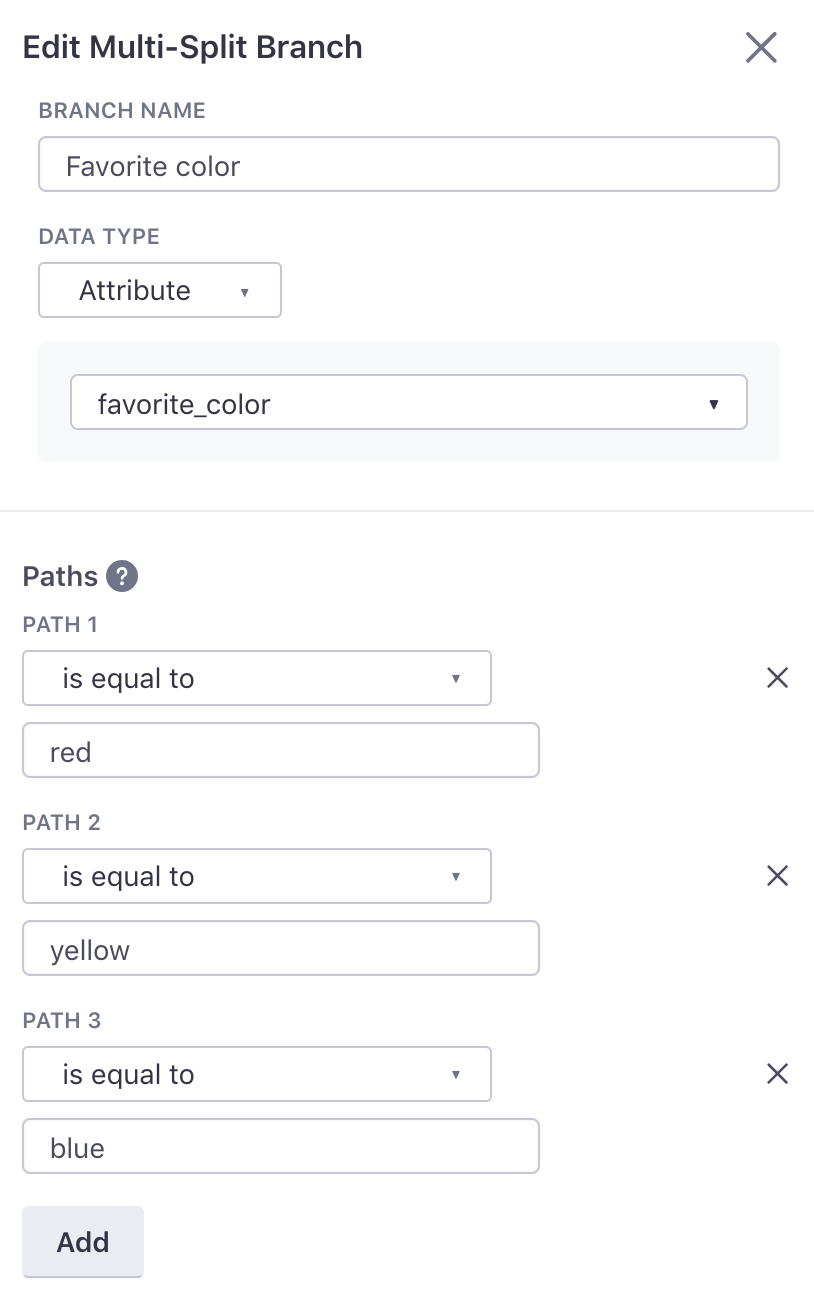
Add up to 20 paths if wanted and click ‘Save’ to save the paths and collapse the sidebar.
Split based on event attributes
Note: This option is only available for campaigns triggered by events.
To split based on the value of an event attribute, click ‘Event attribute’ in the ‘Choose type’ dropdown. The event that triggered the campaign will appear in the group box along with a text field to specify which event attribute you would like to split on. Enter the event attribute name in the text field. Finally, enter the values of the event attribute that you’d like to split on in each of the ‘Path’ text fields. To add another path, click the ‘Add’ button. Click the ‘is equal to’ dropdown if you’d like to split based on a range of values.
Note: splits are evaluated from left to right, so make sure your conditional logic works in that order.
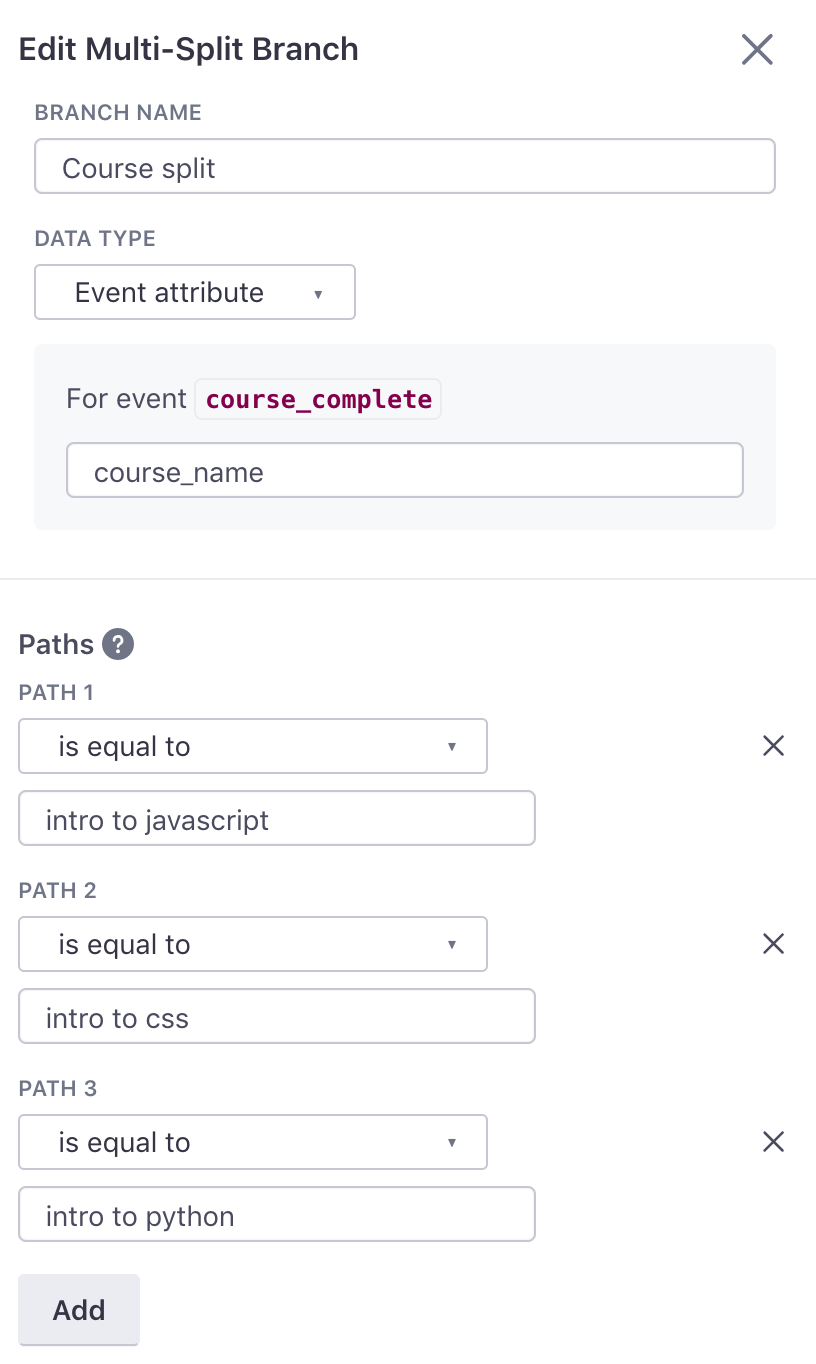
Add up to 20 paths if wanted and click ‘Save’ to save the paths and collapse the sidebar.
Split based on object or relationship attributes
To split based on the value of a single object or relationship attribute, click “Object type name” or “Relationship” from the Data Type dropdown. Select the attribute you’d like to split on. Then enter the value for each pathway. To create another path, click Add.
Note: splits are evaluated from left to right, so make sure your conditional logic works in that order.
Object attribute
Relationship attribute
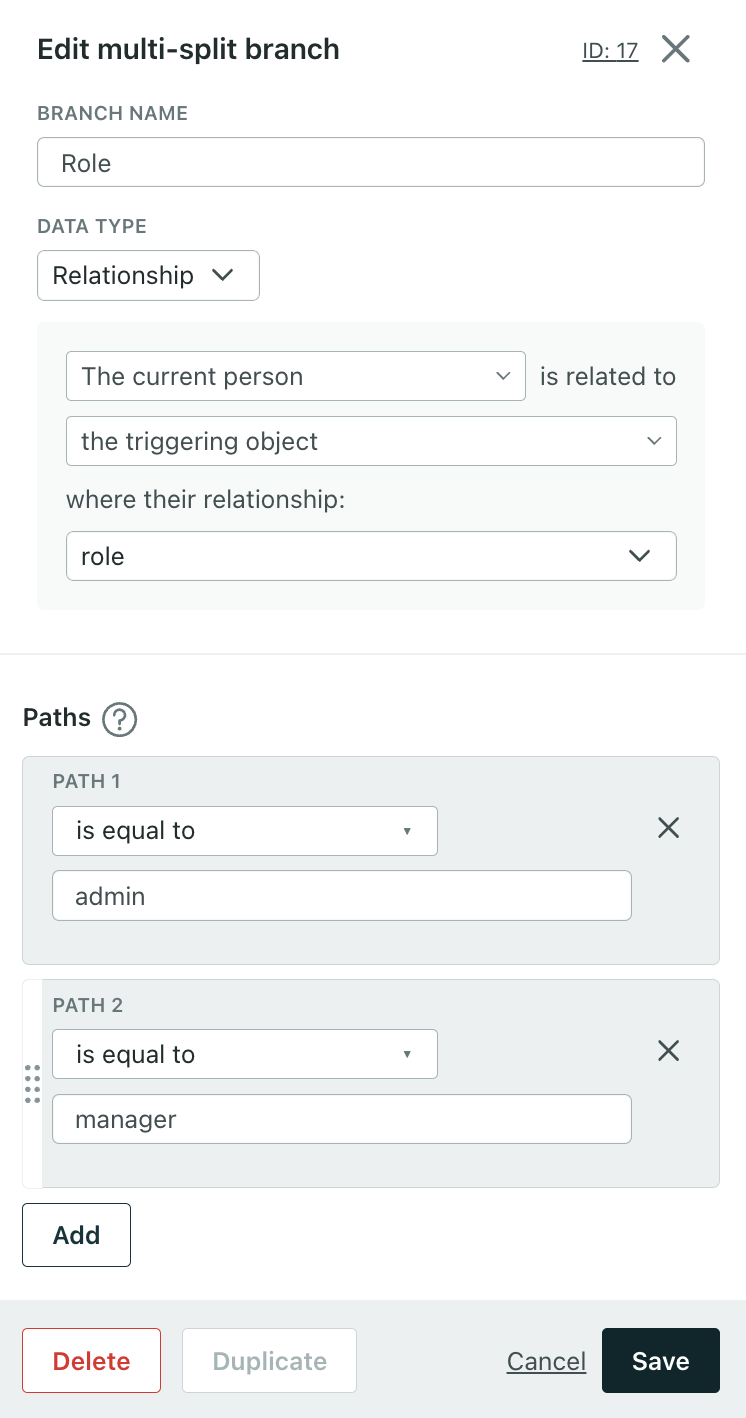
Add up to 20 paths if wanted and click Save to save the paths and collapse the sidebar.
Split based on segment membership
To split based on a segment match, click ‘Segment’ in the ‘Choose type’ dropdown. Select the segment that you’d like to split on in each of the ‘Path’ dropdowns. To add another path, click the ‘Add’ button.
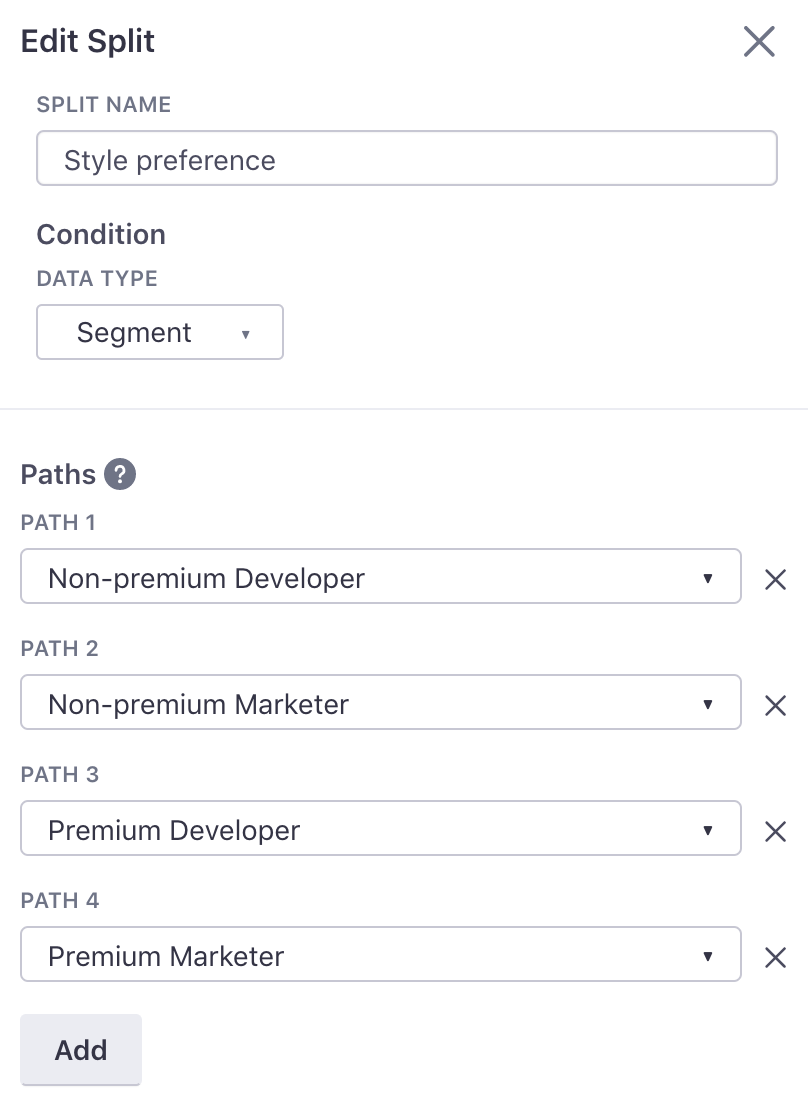
Add up to 20 paths if wanted and click ‘Save’ to save the paths and collapse the sidebar.
Random Cohort Branch
The Random Cohort Branch will randomly distribute people down its paths based on the percentage allotted.
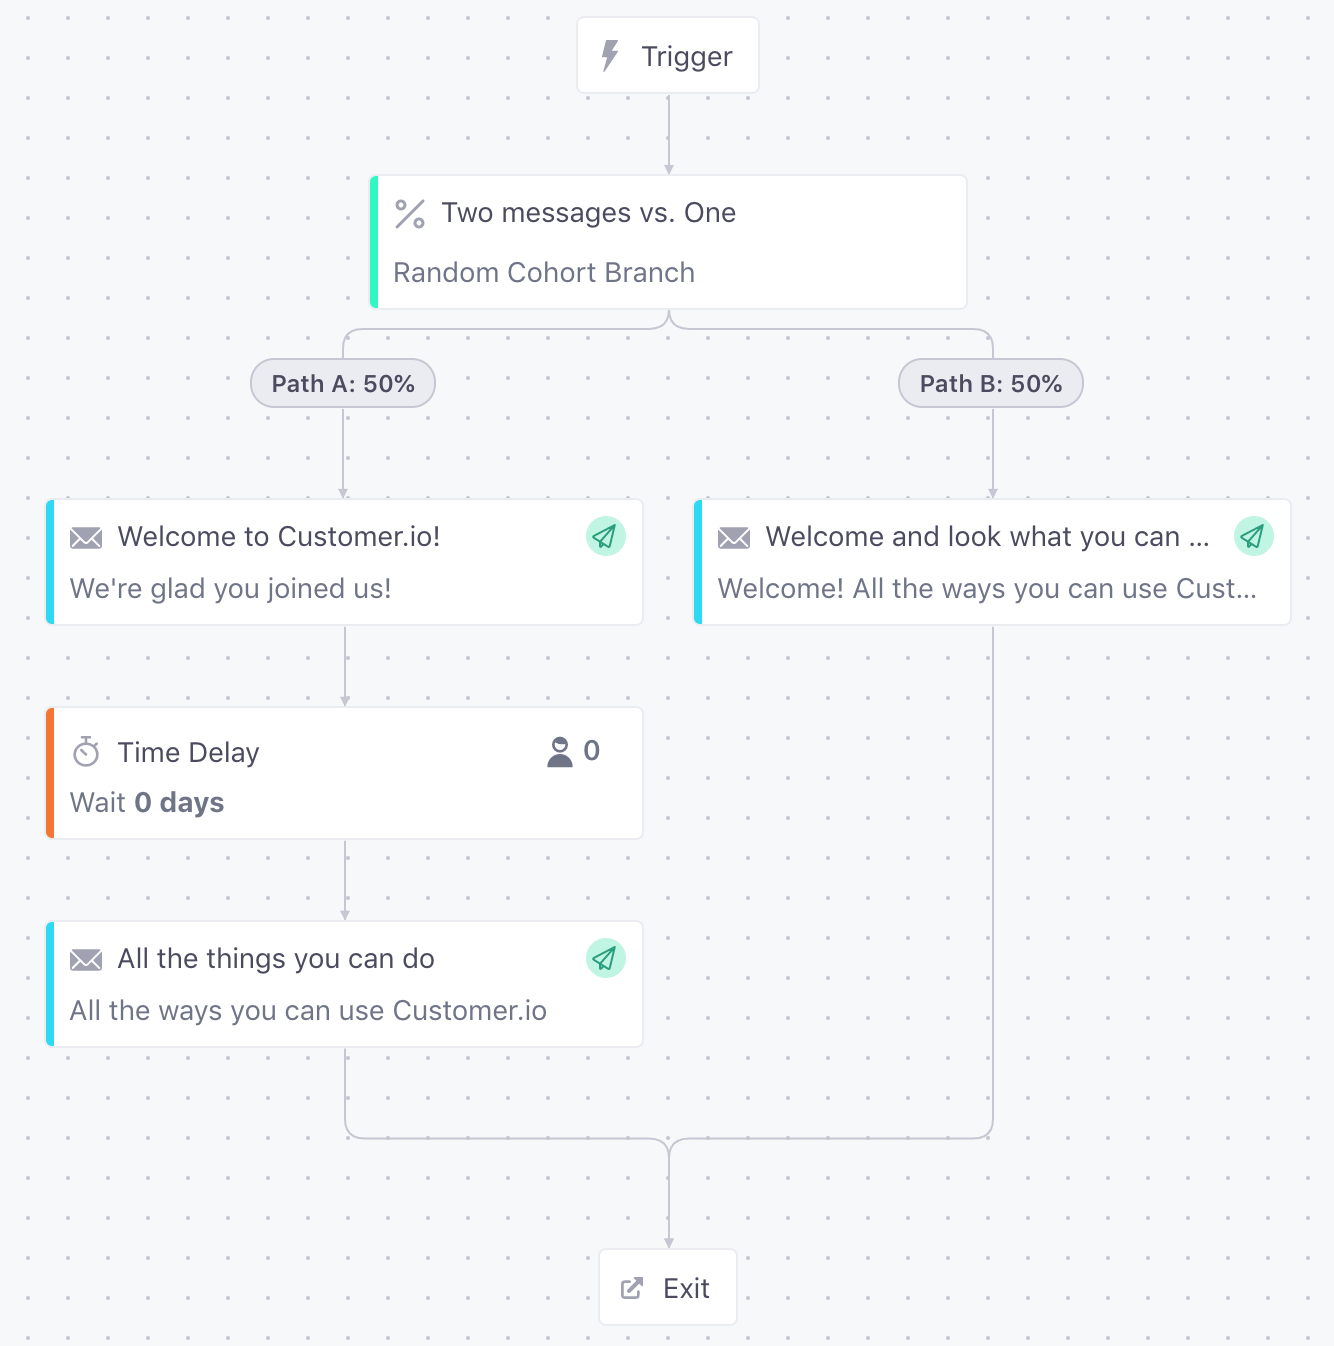
To add a Random Cohort Branch to the workflow, drag it onto the canvas just like you would any other workflow item. Branches can be inserted anywhere in the workflow.
When dropped into the workflow, the Random Cohort Branch will have two paths. These will default to be split 50/50 when placed in an inactive campaign. For an active campaign, one path will default to 100% and the other to 0%. This allows you to edit the 0% path without people flowing through it right away.
To add paths or change the distribution, click on the branch item just placed. The sidebar for editing items will appear. Click the ‘Add path’ button for a new path. The new path will default to 0% unless you’ve previously set the paths to be evenly distributed by clicking the ‘Distribute evenly’ button. To modify the distribution of each path, use the sliders or text inputs next to the sliders. The total distribution must add up to 100% before changes can be saved.
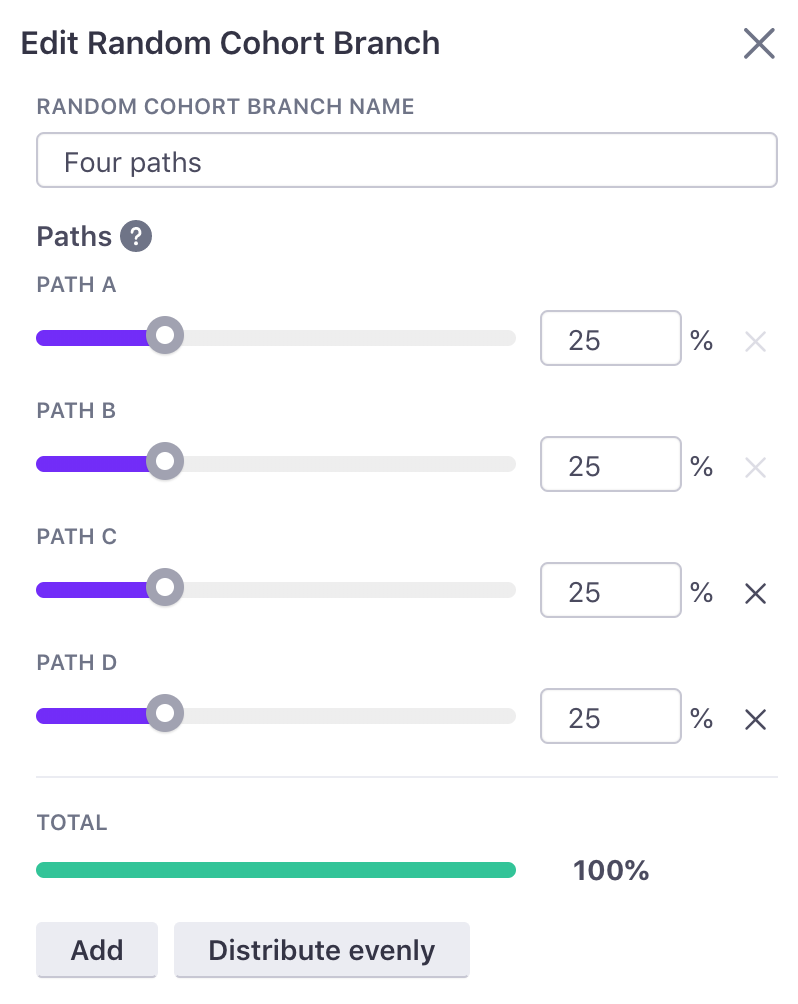
Note: the distribution of people into each path is truly random. This means that for small sample sizes, the distribution of people might not be exactly what was set. The larger the sample size, the closer to the exact distribution of people it will become.
Add up to 20 paths if wanted and click ‘Save’ to save the changes and collapse the sidebar.
Exit Block
Exit blocks allow you to force a set of users who are following a given path to exit the campaign wherever you place the Exit block. Exit blocks can be placed anywhere in a workflow that will not orphan another workflow item. In other words, they can only be placed at the end of a branch.
Let’s assume that you have a Multi-Split Branch configured to send to anyone whose favorite color is red, yellow, or blue, but you want to make sure that everyone else does not receive messages from this campaign. Drag an Exit block into the ‘Everyone else’ branch and anyone who does not match red, yellow, or blue will flow down the ‘Everyone else’ path and exit the workflow.
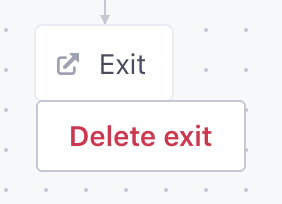
Delete an Exit block
To delete an exit and reconnect the path to the workflow, click the Exit block and click the ‘Delete’ option that appears.
The ‘+’ icons will appear in all the places that the path can be reconnected to its parent branch. Click one of the reconnect points.

Moving branches
Branches can be moved like any other items in the workflow. Every item on all branch paths will move along with the branch. In other words, everything between the branch block being moved and the place where all paths reconnect will move together.
Moving delays
If a branch contains a delay that currently has people waiting in it, the people will be moved with the delay. You will get a warning before completing the move when there are people waiting in a delay that is being moved.
Deleting branches
Branches cannot be deleted until all items in the branch have been removed from it. If you need to delete a branch, first delete or move all items on every one of the branch’s paths. Then, click the branch and click ‘Delete’ in the lower-left corner of the sidebar.
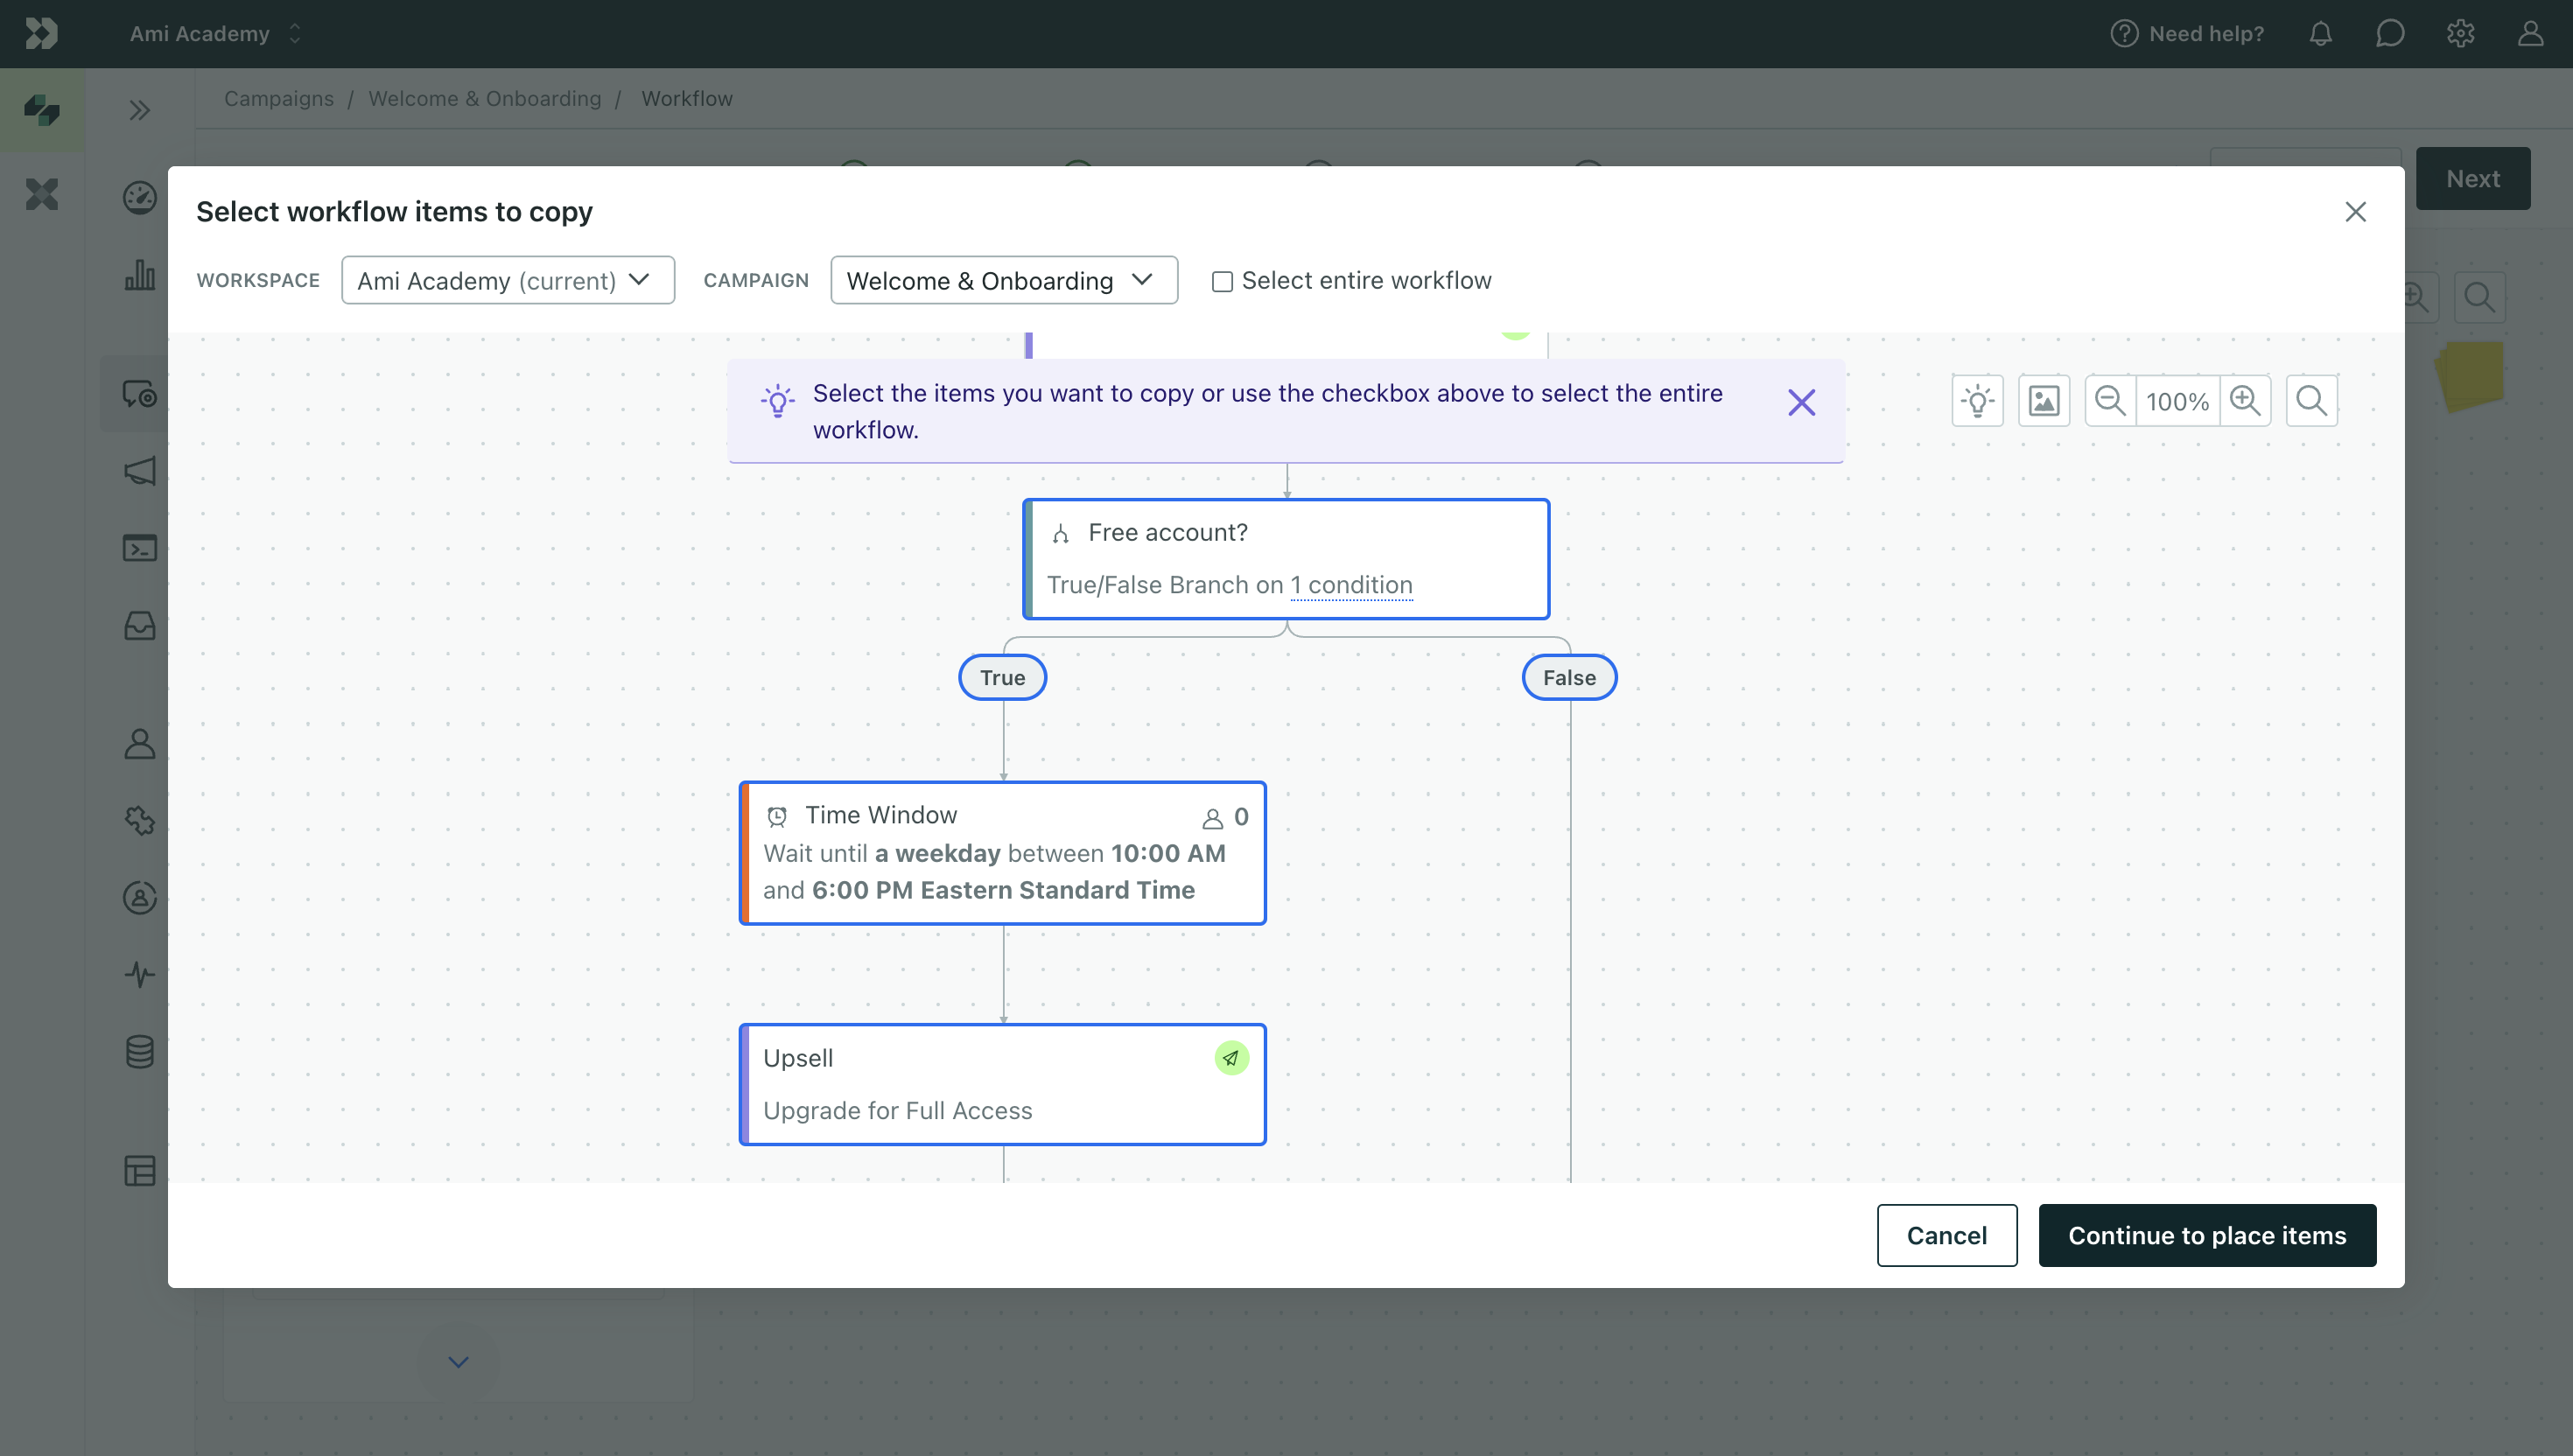
Copying branches
You can copy branches like any other workflow item by clicking Copy workflow items from… at the top of the the build menu. Decide which blocks to copy into your campaign. Select a T/F branch and its items by clicking the branch or clicking then dragging on the canvas to highlight what you want to copy.