Domain Authentication
You will need to add certain records to your DNS provider to allow Customer.io to send emails using your domain.
Why we require domain authentication
Creating great copy means nothing if your messages don’t make it to the People you’re trying to reach. Although it’s just one piece of the deliverability puzzle (along with your copy and overall reputation), authenticating the domains you use for sending email from Customer.io will help your messages reach your users. Check out our post on Email Deliverability to know more about how it works.
In addition to improving email deliverability, authenticating your sending domains in Customer.io will also let you control the appearance of your tracked links. How about Universal Links? If you need to enable them for your mobile app, HTTPS domain authentication is required as well.
We will not take over your root domain
In order to verify and authenticate your domain for sending in Customer.io, you will place our required DNS records in your account-specific subdomain (like: cio#####.yourdomain.com and krs._domainkey.cio#####.yourdomain.com) rather than the root domain.
Because our authentication records are stored in a subdomain, there won’t be any conflict with your existing email configurations that are already setup in your DNS host. By using a subdomain for authentication, we can ensure that:
- our SPF record is valid, will pass DMARC alignment, and will not count towards the lookup limit of your existing SPF record
- our MX record will not disrupt incoming email to your domain’s email server
- our DKIM record has the correct public-key needed to sign the emails that you send from our servers
Do not remove your domain’s DNS records
When adding your Customer.io DNS records, make sure you don’t delete any records for your own domain! If you do, you won’t be able to receive emails.
Set up DMARC on your root domain
In your hosting provider, make sure you only include _dmarc as a subdomain on your root domain, like _dmarc.root-domain.com. You should not add it to any of your subdomains.
Add a sending domain
A sending domain defines who and where your emails are from. You must set up at least one sending domain before you can send emails from your workspace.
If you’re setting up a new workspace, you can configure your domain during the set up process. We show you how that works in the Domain Authentication section below.
If you did not configure your email messaging channel when you set up your workspace, or you just want to add new sending domains, you can:
- Go to Settings > Workspace Settings > Email and click Add Sending Domain.
- Enter the Domain, Display Name, and Email Address that you want to send messages from, and click Add Domain.
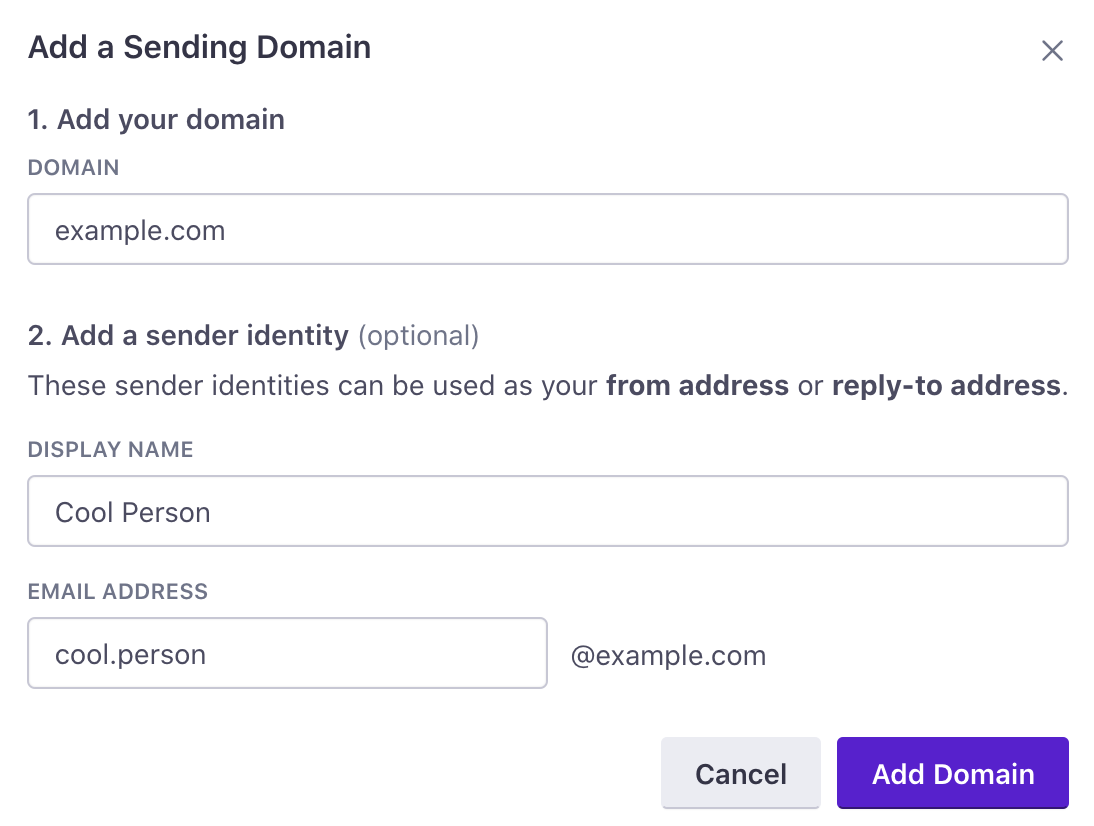
Email address is optional at this stage, but necessary for domain verification.
A from address is required to finish domain authentication. While you do not need to add it in this step, you will need to before finishing set up.
Unless you use a custom SMTP server, you must authenticate your sending domain before you can use your new sender.
Set up domain authentication
Add DNS records to hosting provider
After you’ve added a sending domain and included a From address, click Verify domain to locate the DNS records:
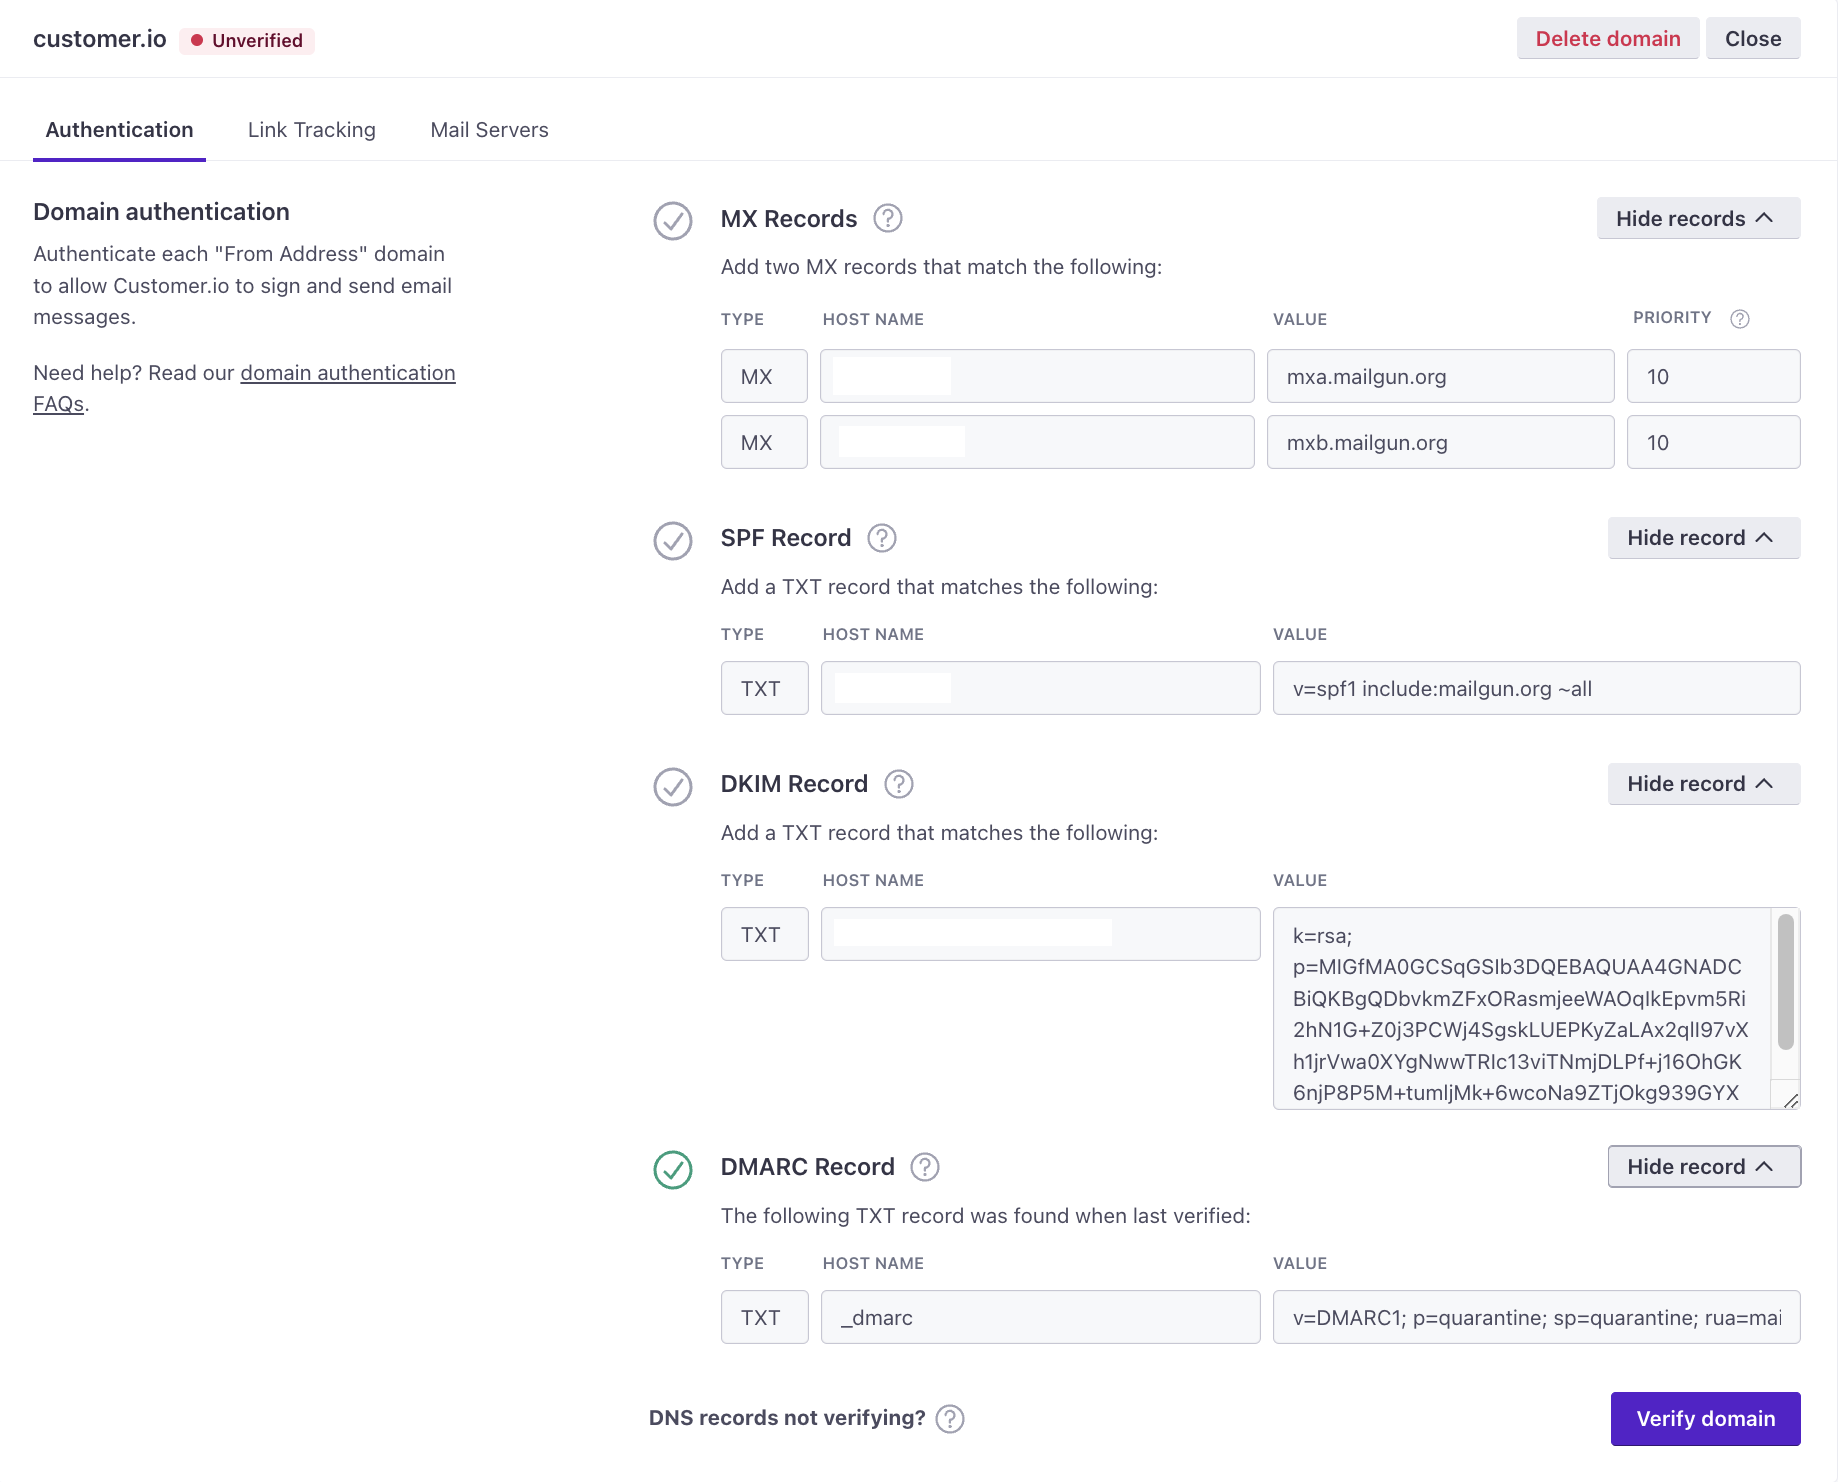
To authenticate your domain, you’ll need to add four DNS records to your DNS hosting provider for each domain you’ll send from:
- MX Record: One MX record with two hostnames are required for delivering email from your domain. MX (Mail Exchange) records, in this case, have a specialized purpose which is to create a custom return-path using your subdomain. This is specifically for receiving bounce and spam feedback. This not only helps improve deliverability, but also allows your Customer.io emails to pass DMARC alignment.
- SPF Record: One TXT record that allows Customer.io to sign your emails as an authorized sender. SPF (Sender Policy Framework) records are used to identify which IP addresses are allowed to send email using your domain.
- DKIM Record: One TXT record that allows Customer.io to create an encrypted signature on emails sent on your behalf. DKIM (Domain Keys Identified Mail) signatures ensure that the message that arrives at the inbox provider is identical to the message that you sent.
- DMARC Record:
- As of Feb 1, 2024, we now check whether your DMARC policy meets new sending requirements from Gmail and Yahoo.
- One TXT record that allows you to specify how you want to handle email that fails authentication. DMARC (Domain-based Message Authentication, Reporting, and Conformance) records specify how to handle email that fails SPF and DKIM checks. The minimum requirement is
v=DMARC1; p=none. If a DMARC policy is already in place in your hosting provider, we will surface your record, rather than our minimum requirement. - Make sure you only add
_dmarcas a subdomain on your root domain, like_dmarc.root-domain.com. You should not add it to any of your subdomains.
Next, click Verify domain for the domain you want to authenticate. Note, it may take up to 72 hours to complete the verification process.
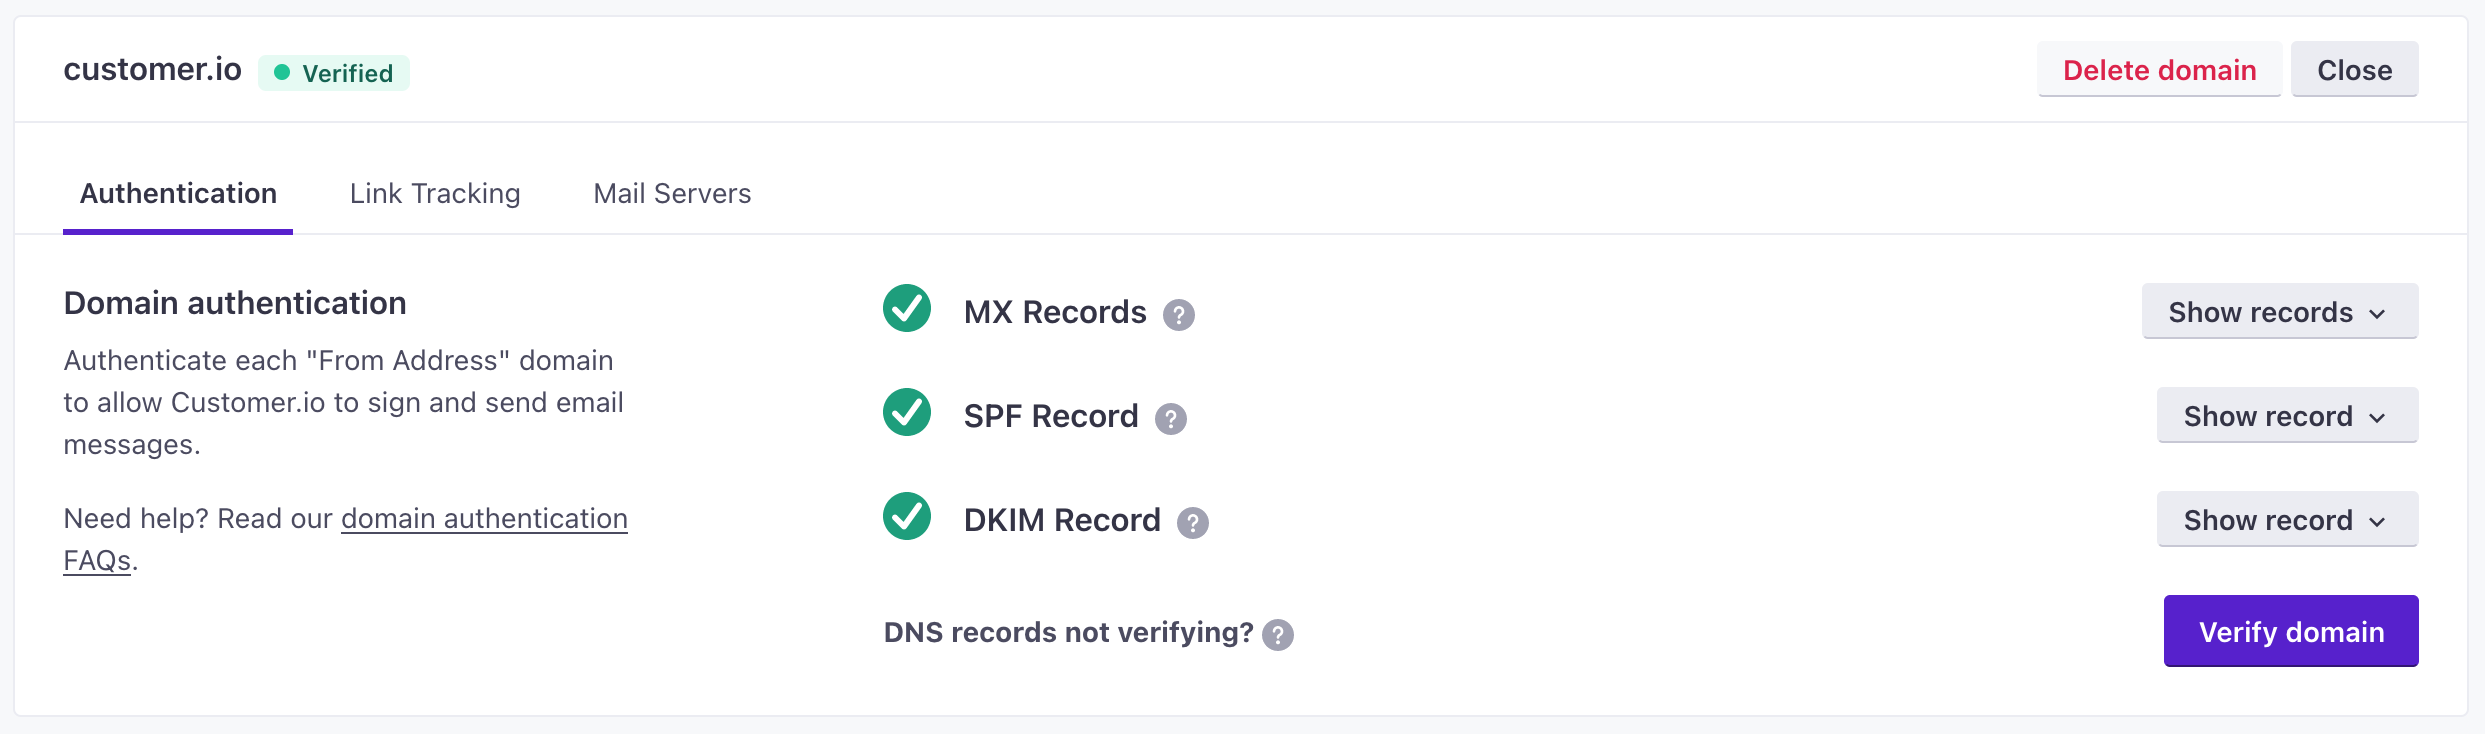
Verify domain
After you’ve added these records to your DNS host, and they’ve had time to propagate, you will need to come back to the Authentication tab of your domain and click Verify domain again. If all three records show green checkmarks, then you’ve successfully verified your domain and are all set to start sending from it! You will need to repeat this process for any other domains you want to send from.
Your domain will remain unverified until we are able to process that all three records have the expected values. It can take anywhere from seconds to hours for verification to come through. We recommend double-checking your DNS configuration for typos and spaces before attempting to verify again. If you aren’t sure how to proceed, you’re welcome to reach out to us at win@customer.io for assistance.
DMARC policies
DMARC stands for Domain-based Message Authentication, Reporting and Conformance. It is an email authentication protocol that provides a way for email domain owners to protect their domain from unauthorized use, such as phishing or email spoofing.
As of Feb 1, 2024, we now check whether your DMARC policy meets new sending requirements from Gmail and Yahoo.
DMARC works by allowing domain owners to publish policies that specify which email messages are authorized to come from their domain. When an email is received, the recipient’s email server checks the message’s authenticity by verifying the email’s alignment with the published DMARC policies.
If the email passes the authentication checks, it is delivered to the recipient’s inbox. If it fails, the email may be quarantined or rejected, depending on the DMARC policy settings.
DMARC also provides reporting capabilities that allow domain owners to receive feedback on email authentication results. This information can be used to monitor email security and identify any attempts to impersonate their domain.
In summary, DMARC is a protocol that enables domain owners to protect their domain from email spoofing and provides reporting capabilities to monitor email authentication results. By using DMARC, organizations can improve email security, protect their brand reputation, and reduce the risk of phishing attacks.
Relax your aspf and adkim tags
If your domain is utilizing your DMARC policy and you plan to send your emails through Customer.io’s built-in delivery servers, you will need to ensure that your DMARC policy is using r (or relaxed) values for the aspf and adkim tags. If your policy doesn’t specify aspf or adkim tags, then they are already relaxed by default and no changes to your policy are necessary.
The reason for this requirement is because Customer.io uses an account-specific subdomain of your verified domain (ex. cio#####.yourdomain.com) for signing the return-path, SPF, and DKIM headers in the emails our servers send from.
Under the default, relaxed policy, the emails you send from Customer.io will pass DMARC alignment because of the parent/child match of your mail-from domain (from address) and header-from subdomain (return-path) we sign to your emails.
For context, a strict (s) policy for these tags would require an identical match of the domains in these headers, which would result in your Customer.io emails failing to pass alignment. Failing DMARC alignment could then cause your emails to either bounce back (p=reject) or filter to spam (p=quarantine), depending on your DMARC policy.
Set up link tracking for your domain
Customer.io provides link tracking by default, but you can also track links on your own subdomain.
Resources
For your convenience, here is a list of links to the instructions for adding DNS records at commonly used hosts:
- 123 Reg - MX | TXT | CNAME
- bluehost - MX | TXT and CNAME
- DNS Made Easy - MX | TXT | CNAME
- DNSimple - TXT | CNAME
- Dreamhost - MX | TXT | CNAME
- DYN - MX, TXT, and CNAME
- GoDaddy* - MX | TXT | CNAME
- Hostgator - MX | TXT and CNAME
- Hover - MX, TXT, and CNAME
- Media Temple - MX, TXT, and CNAME
- Namecheap - MX | TXT and CNAME
- Network Solutions - MX | TXT and CNAME
- Register.com - MX | TXT | CNAME
*Instead of entering the full hostname (ie cio12345.yourdomain.com), these providers automatically append your domain to the record. Enter just the front portion of the hostname (ie cio12345) when adding records to these providers. See FAQ below for screenshot examples.
FAQs
Do I need to authenticate my domain if I’m using a custom SMTP?
When using custom SMTP, you do not need to authenticate your domain in Customer.io. However, you should check your custom SMTP provider’s documentation to see if you still need to add DNS records (such as SPF and DKIM) to your domain to use their services successfully.
Branded link tracking with custom SMTP
If you want to use branded custom link tracking in Customer.io (using your domain instead of “customeriomail.com” when generating tracked links), you must verify the domain and add the CNAME record shown in the Domain Settings section of your workspace.
The CNAME record will not validate your domain for branded link tracking if your domain has a HSTS policy, but does not currently have SSL coverage. Please see our HTTPS Link Tracking documentation for more information on getting this set up.
How do I verify my records are there?
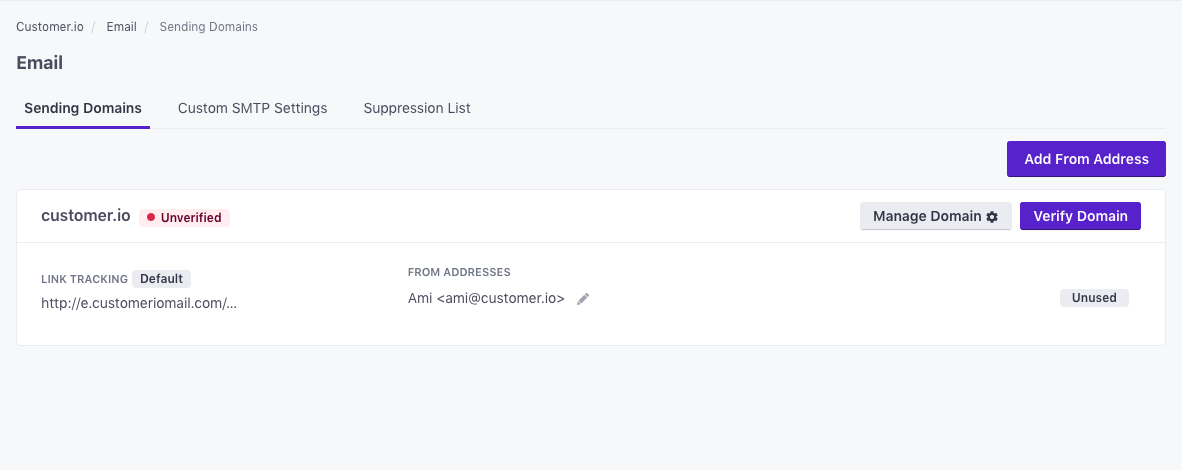
On the Sending domains page, we’ll show you the verification status of any domains you’ve added.
Domains will have one of the following statuses:
- Verified: The domain’s DNS records have been verified and the domain can be used to send signed emails.
- Unverified: The domain’s DNS records have not been verified and the domain cannot be used to send emails.
- Undetermined: The domain’s status cannot be determined because the From Address uses liquid code.
Note: We will not be able to send your emails until you verify your domain.
How do I add another “From Address”?
The domain list is made up of domains used in the from addresses that are configured in your account. If you want to add another from address, navigate to Workspace Settings in the left-hand menu, choose Email, then select Add From Address beside the appropriate domain name.
What if I don’t add the DNS records? What happens?
If you are setting up a new sending domain through our built-in delivery server, you must add all three required DNS authentication records. This not only verifies the domain’s ownership, but also authorizes Customer.io to send from the domain. If you do not add the DNS records and verify the domain, you will not be able to send from it.
If you have already verified a domain but the DNS records are removed at a later point, this can result in your emails bouncing back or being filtered to spam due to lack of authorization.
Do I need to add both SPF and DKIM?
Yes. Our email server requires that both SPF and DKIM are verified in order for us to send email from your domain. If either record is missing, you may see your deliveries fail to send due to the domain no longer being verified.
The SPF record is correct, but it’s not verifying.
Make sure you’re using a TXT record as indicated in our instructions, and not a SPF type record.
It’s also required that your SPF record is placed inside of the Customer.io-specific subdomain, rather than your existing SPF record in your root domain. If the record is still not verified, get in touch and we’ll troubleshoot the issue with you!
I’m hosting my DNS with Cloudflare. The CNAME record is correct, yet remains unverified.
Cloudflare CNAME records won’t be verified if their DNS proxy feature is enabled. Disable this setting in Cloudflare first, and then you can verify your tracking domain in Customer.io.
I’m using GoDaddy and my DNS records are still not verifying.
GoDaddy already adds your domain when creating DNS records, so it’s likely that your domain is being posted twice to the records. Simply update the record to be only the subdomain value (as shown below) and re-verify after a few minutes.
GoDaddy MX Record example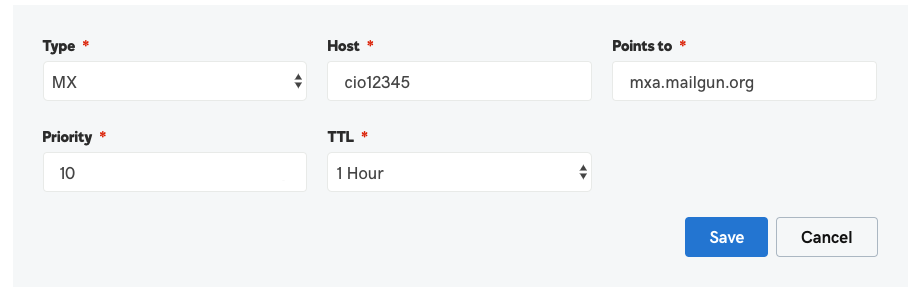
GoDaddy SPF example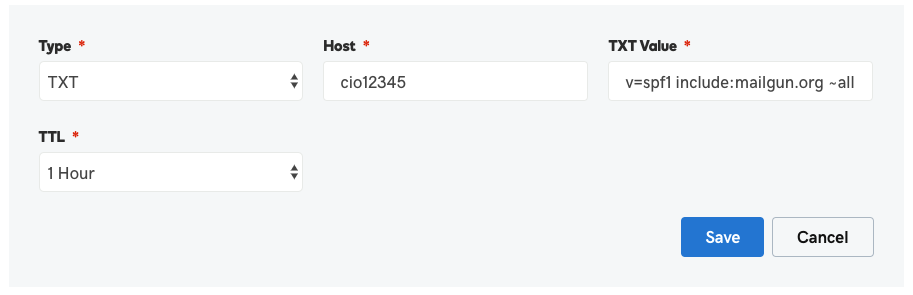
GoDaddy DKIM example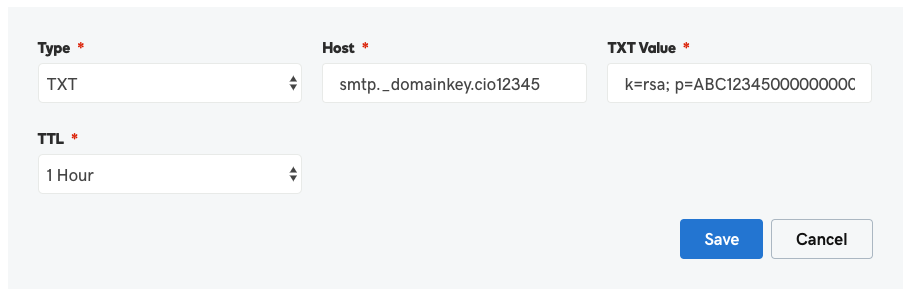
You can confirm this by checking your DNS using a free online tool like viewDNS.info and testing the full hostname URL listed in your Customer.io email settings (ie cio12345.yourdomain.com). If the DNS records don’t appear, then double check that your records are set up correctly.
I’m getting an error in my DNS panel when trying to add the records, what can I do?
Underscores: Some hosts do not support underscores (_) in DNS records, and adding the DKIM record can cause an error. The underscore is required and you’ll want to contact your host to see if they disallow underscores entirely or if they can manually add the record for you.
Semicolons: Some hosts require that you escape semicolons in records. If you’re getting an error try replacing ; with \;.
Will adding authentication affect my regular email?
No. The records are written specifically to allow our servers to send for you but not to disallow other servers.
My host doesn’t support TXT records. What do I do?
Some DNS hosts won’t allow you to add records yourself, but will add them for you. As a first step we recommend you talk to your hosting company to see if they can help.
If you aren’t able to add our DNS records for authentication, you may need to consider moving your DNS hosting to a separate provider (i.e. DNSimple, DigitalOcean, Cloudflare, etc). This would allow you to set up custom records while likely still being able to point your domain to the website hosting provider you’re using. If you do consider this, make sure your current website hosting provider supports this.
Why can’t I verify my domain with Wix?
Wix doesn’t allow you to add a sub-domain in an MX record, preventing you from verifying your domain. If you use Wix, you might consider setting up a custom SMTP server.
How do I add multiple MX records for my AWS-hosted domain?
AWS doesn’t allow you to set multiple MX records per hostname. To get around this issue, add a single record that has both MX values on separate lines. For example:
10 	mxa.mailgun.org.
10 	mxb.mailgun.org.

