Quick start guide
Welcome to Customer.io! While the platform offers plenty of features and options, this guide provides a basic setup path to get you started quickly and demonstrate some of the things you can do with Customer.io. You’ll create a workspace, import at least one person, and set up your messaging channels!
Get started
This guide is designed to walk you through the most common parts of the setup path and introduce you to the major parts of our platform. When you start setting up Customer.io, we provide you with a Setup List on your Workspace’s Dashboard. You don’t have to do everything on the list, but you must do the following things before you can really take advantage of Customer.io:
- Create an account and a workspace.
- Set up the types of messages you want to send. On this page, we’ll set up email.
- Add people to your workspace. As a part of this guide, you’ll add yourself as a test person.
- Start sending messages!
In this guide, we’ll have you add a test person and send your test person message, demonstrating how you’ll use your data to automate and personalize messages.
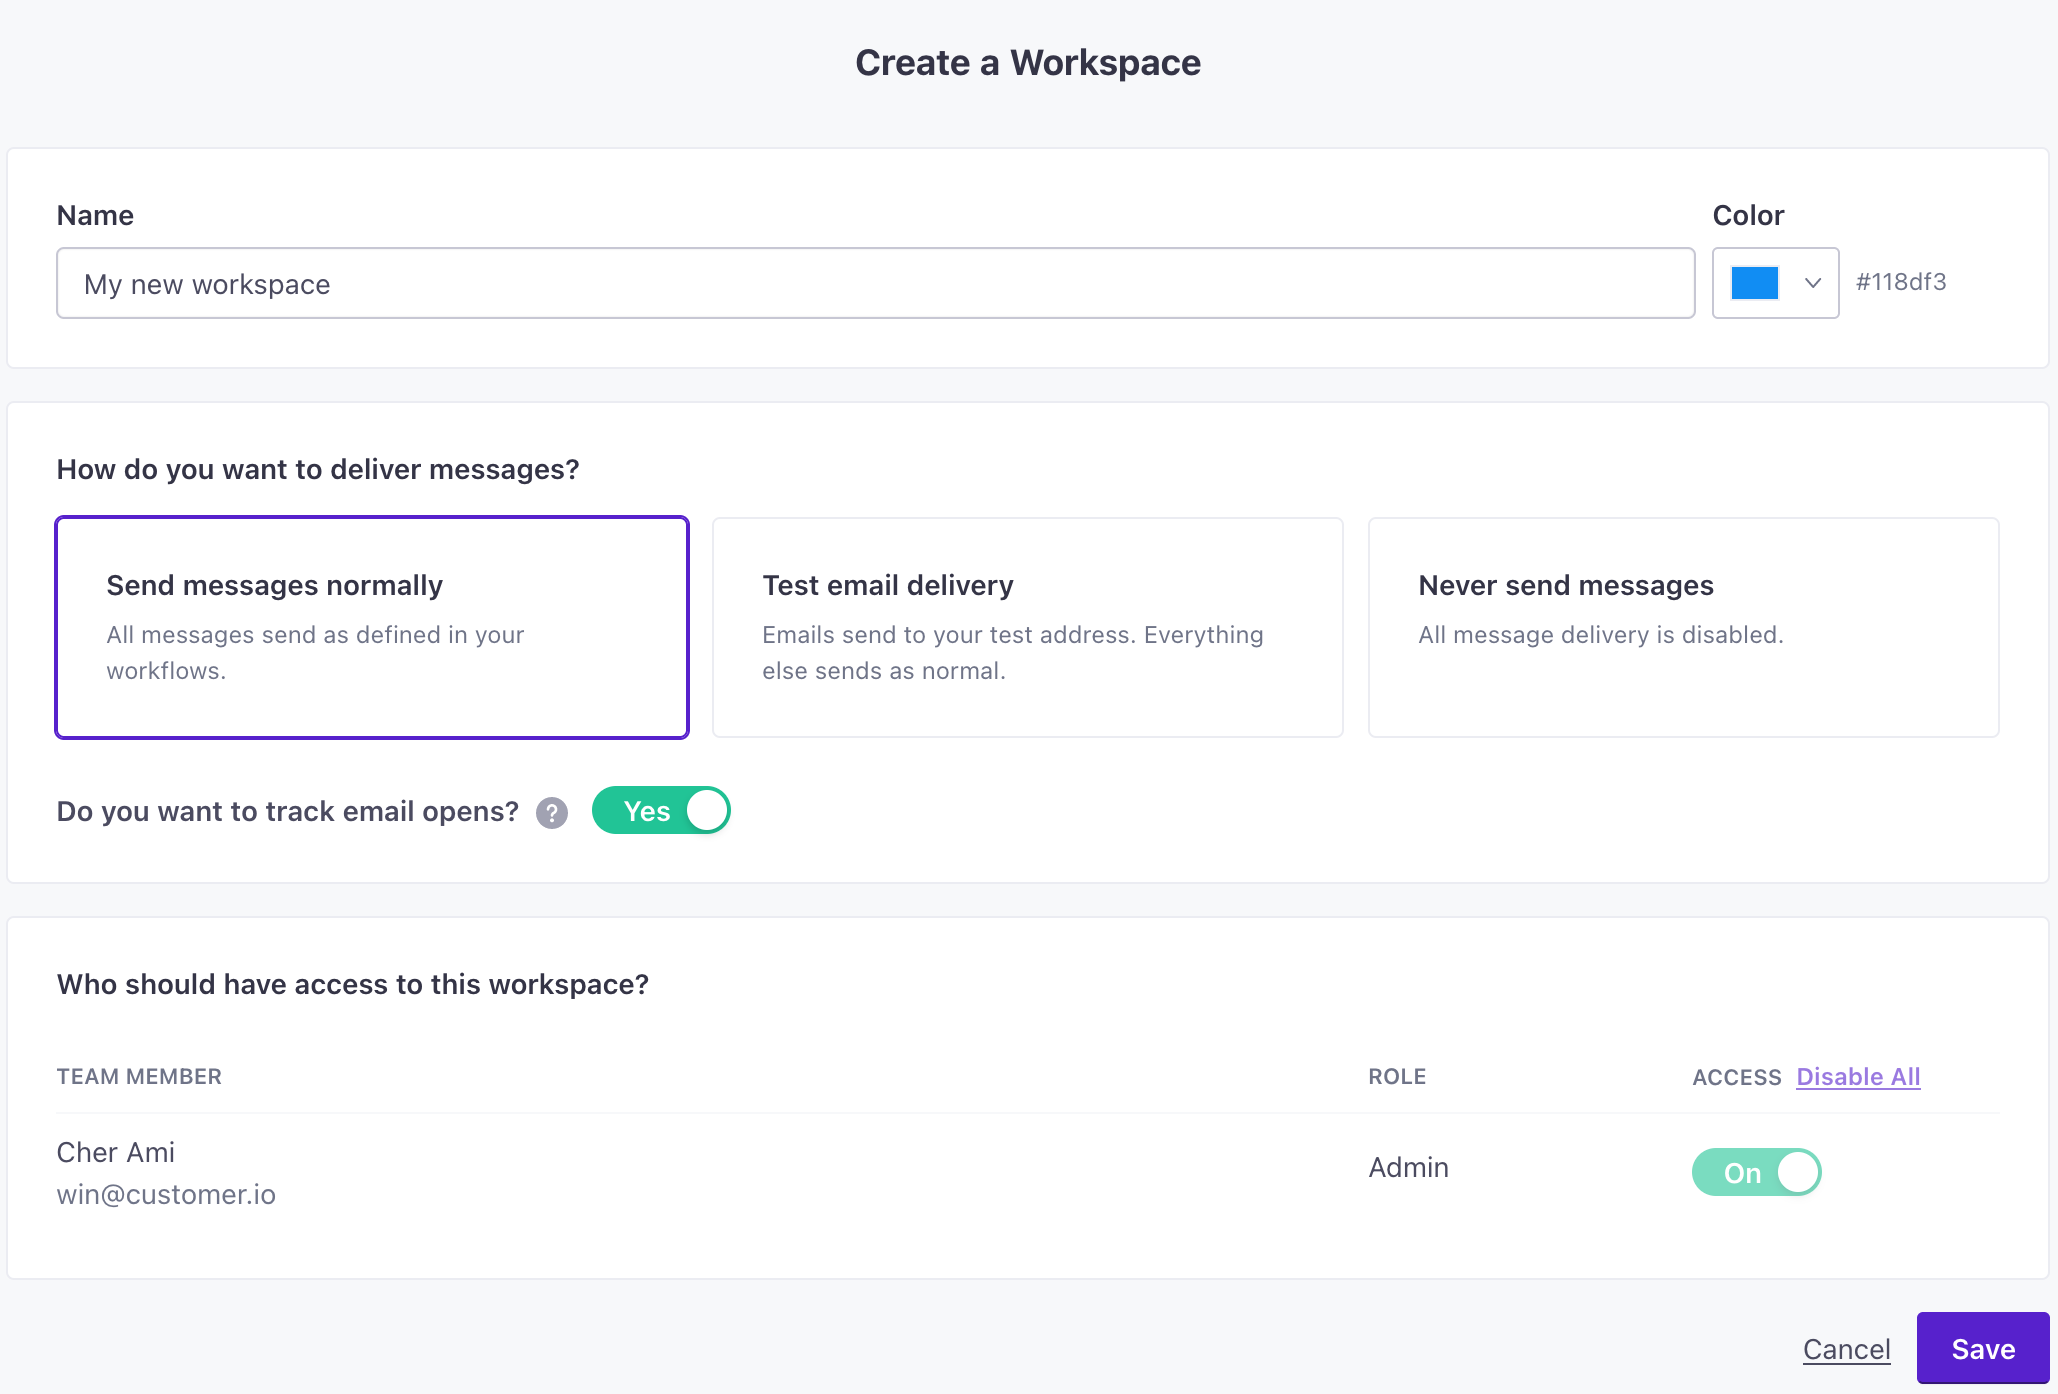
Create your workspace
After you create your account, you’ll make a workspace. You can think of a workspace as a container for your people, data, messages, etc. You can have more than one workspace, but, in general, you won’t share information across workspaces.
In general, we encourage you to use the default settings. They support most use cases and you can change them later!
Set up your email channel
You can set up and send messages over different channels, but email is our most common—and one of the easiest to set up.
Before you can send messages, you need to configure the types of messages you want to send: email, push, in-app, Twilio SMS, or Slack. You can start with just one channel and add new ones later by going to Settings > Workspace Settings and clicking Get Started on the channel(s) you want to add.
- Enter your domain—like
example.com.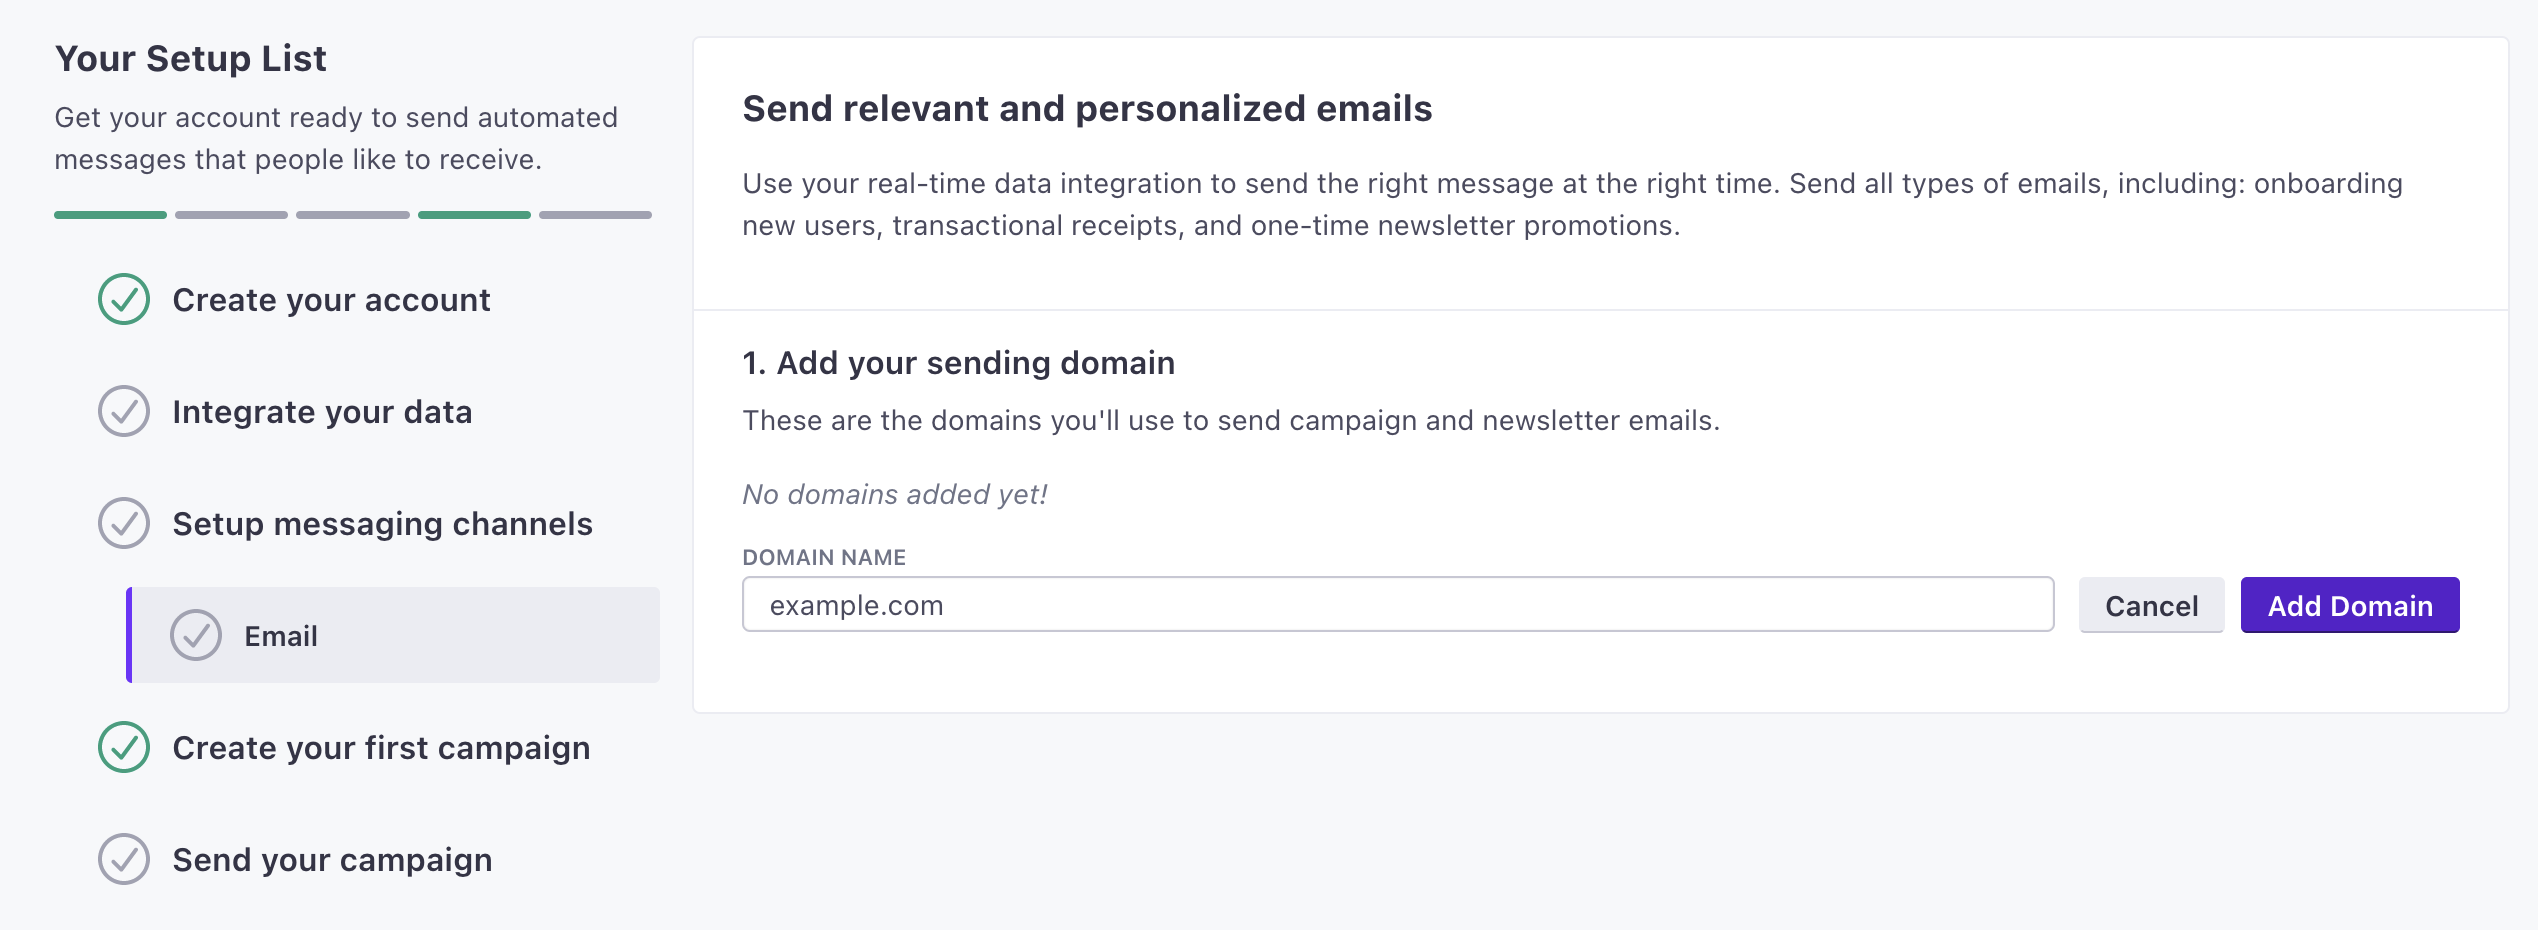
- Enter your From address(es). These are the addresses that your messages will come from.

- Verify and authenticate your domain(s). This involves adding some records to your domain host.
- (Recommended) Set up link tracking so you can record the links that people click in your messages. This involves adding a CNAME record to your domain host(s).
Start sending emails slowly!
If you’re just getting started with Customer.io, you’ll need to start slowly. Sending a large number of emails right away can hurt your domain reputation and deliverability. See our guide to sending slowly for more information.
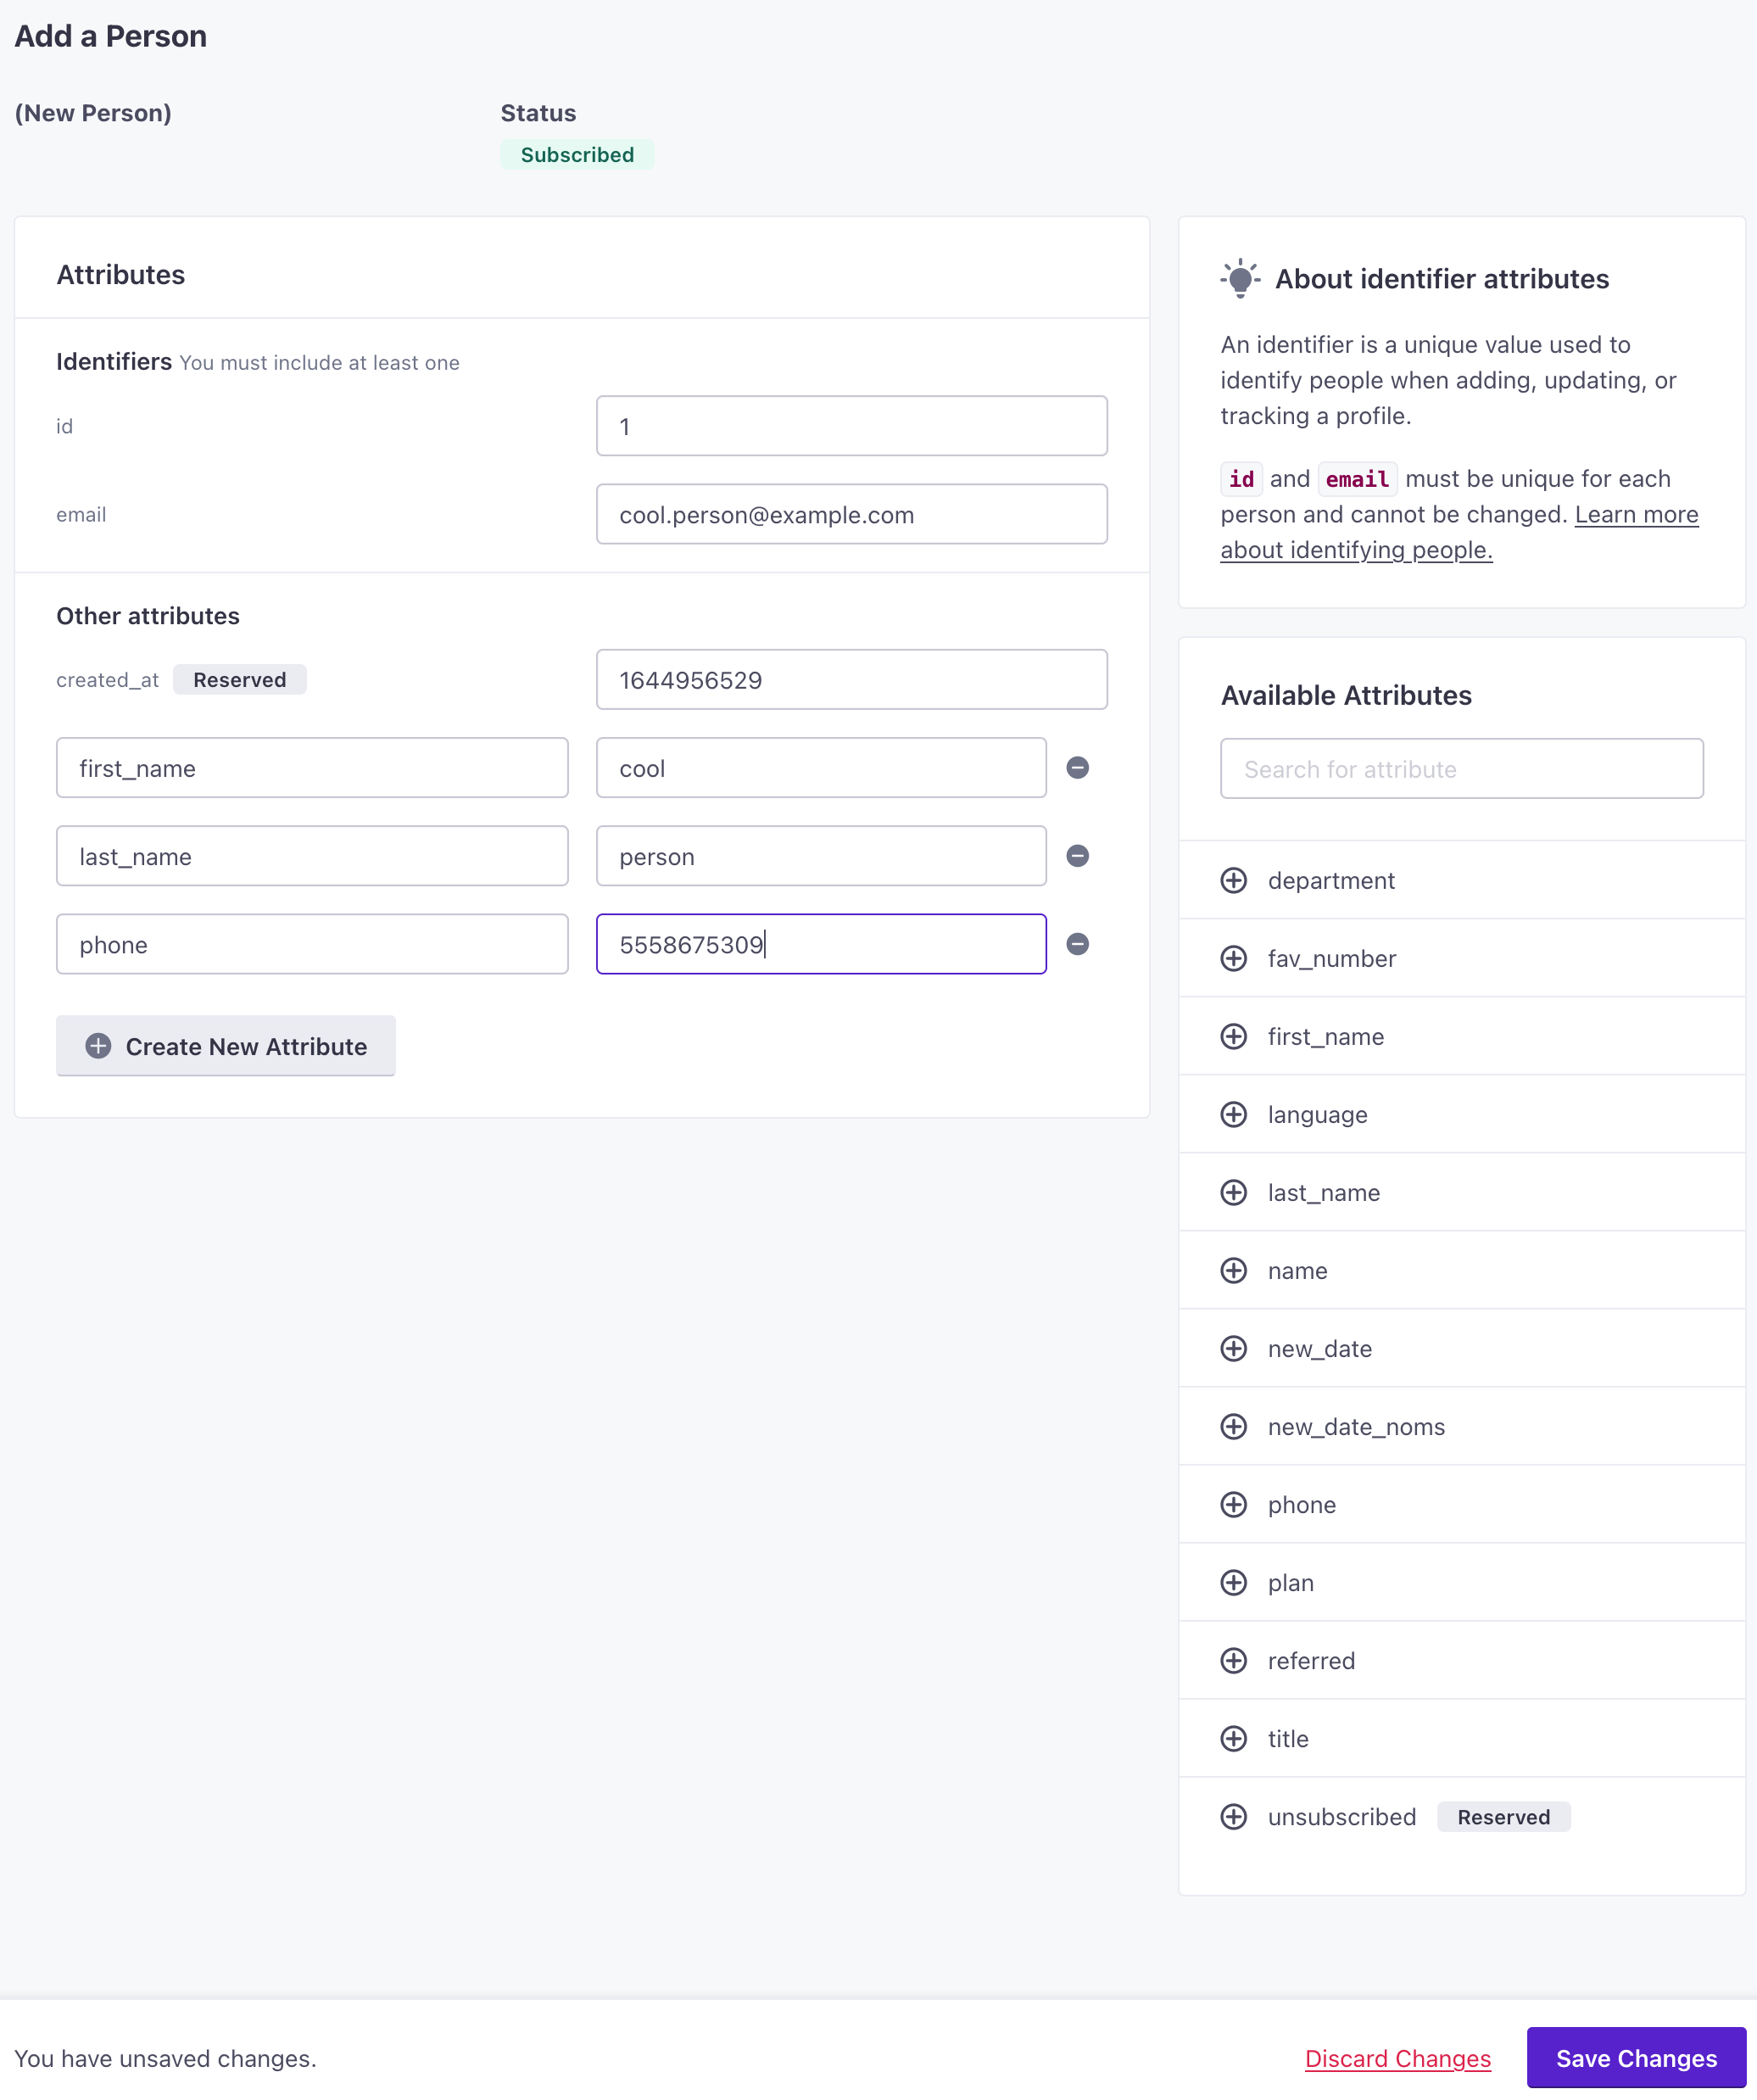
Add a test person to your workspace
To get started quickly, you can go to the People page in your workspace and add a person with a few attributes to test with.
In this case, you might want to add yourself to your workspace, so you can test a campaign against yourself and get a feel for Customer.io without inadvertently messaging your customers or users. Later in this guide, we’ll use your test person in a live segment and campaign.
- Go to the People page, click Add People and select Add a Person.
- Set your ID and email address. To make it easy, you might assign your test user an ID of
1. - Add first_name and last_name attributesA key-value pair that you associate with a person or an object—like a person’s name, the date they were created in your workspace, or a company’s billing date etc. Use attributes to target people and personalize messages. Attributes are analogous to traits in Data Pipelines. to your person. These are the values you’ll use to target your test person and personalize messages! You can add as many other attributes as you want, and we’ll show you how to take advantage of them later on this page.
- Click Save Changes when you’re done.
There are plenty of ways to add people
This process shows the easiest way to add a single person, but it’s not efficient for adding your whole audience. When you’re ready, you can learn more about adding people programmatically or by uploading CSVs.
What is a person in Customer.io?
It might help to understand what we mean by a “person”. In Customer.io, you’ll represent a person with data, the most important three data points being identifiers, attributes, and events.
- IdentfiersThe attributes you use to add, modify, and target people. Each unique identifier value represents an individual person in your workspace.: the values that make people unique in your system—like a database
idoremailaddress. - AttributesA key-value pair that you associate with a person or an object—like a person’s name, the date they were created in your workspace, or a company’s billing date etc. Use attributes to target people and personalize messages. Attributes are analogous to traits in Data Pipelines.: the things you know about people, like their names, interests, etc.
- EventsSomething that a person in your workspace did. Events can trigger campaigns, add people to segments, etc. You can access event properties in liquid with
{{event.<property>}}: the things that people do. You can use events to trigger campaigns in response to your audience’s activity in your system.
You can associate other data with people, like their relationships to objectsNot to be confused with a JSON object, an object in Customer.io is a non-person entity that you can associate with one or more people—like a company, account, or online course. You can use objects to message people based on changes to their company, account, or course itinerary. (e.g. companies, accounts, etc) and their mobile devices, but the three things you’ll work with most often are identifiers, attributes, and events.
Before you add people, think about the attributes and events you want to track
You’ll use attributes and events to group people into segmentsA segment is a group of people in your audience that you want to target with campaigns, messages, etc. You can join groups of people manually, or by attribues and event data., determining who goes through your campaignsA series of actions that you perform for each person who matches criteria. Campaigns typically send people a series of messages, but you can also use campaigns to send webhooks, update attributes, etc. and who you send messages to. Plan out your “groups” of people and the types of messages you want to send to make sure that you gather the right data in Customer.io!
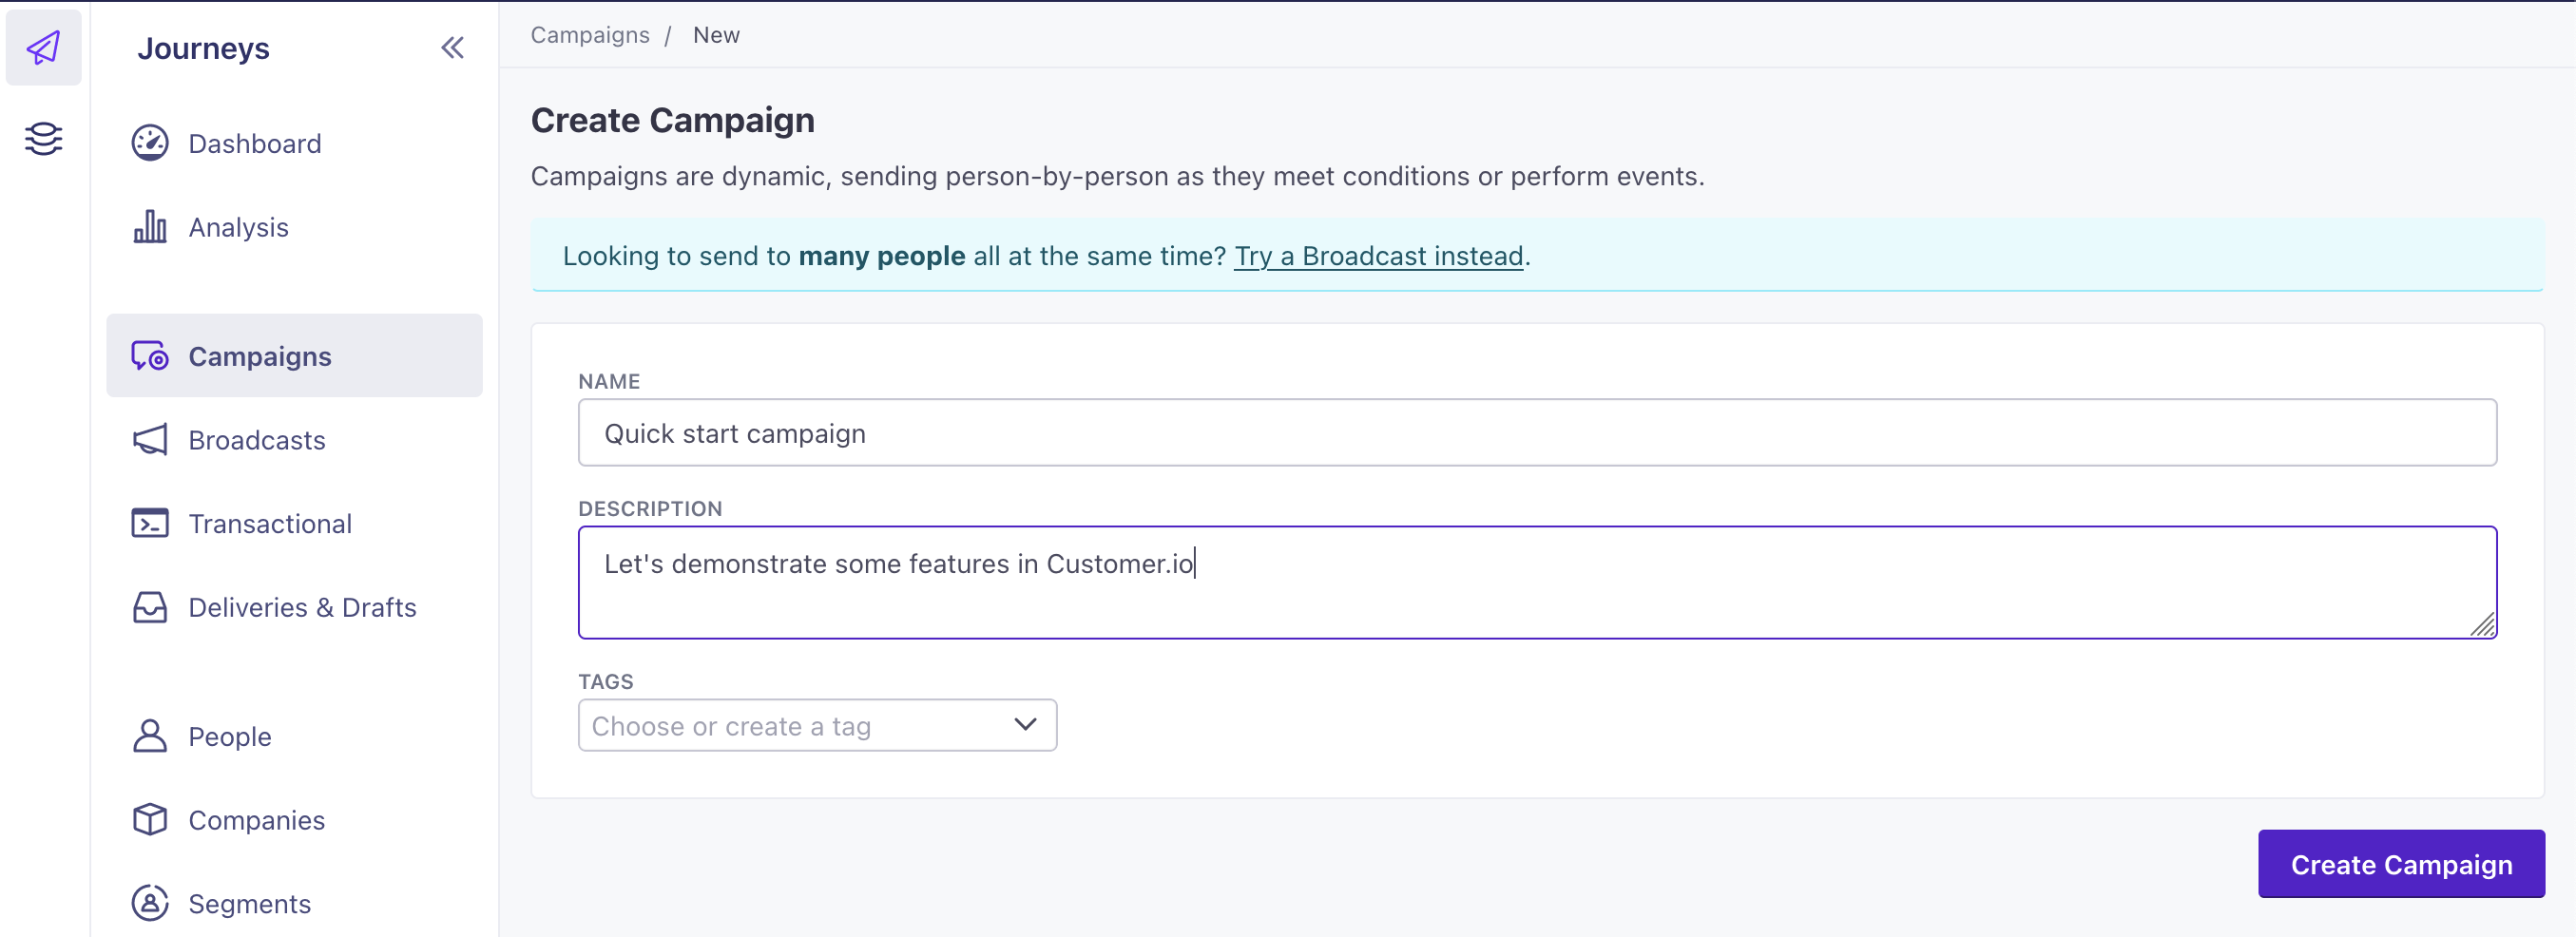
Create a campaign and send your person a message
Now that you’ve added a person and set up a message channel, you can set up a campaign to send your person a message.
- Go to Campaigns and click Create Campaign.
- Give your campaign a Name and Description, then click Create Campaign. The name and description can help you find your campaign from the campaign list—which will be helpful when you set up more campaigns!
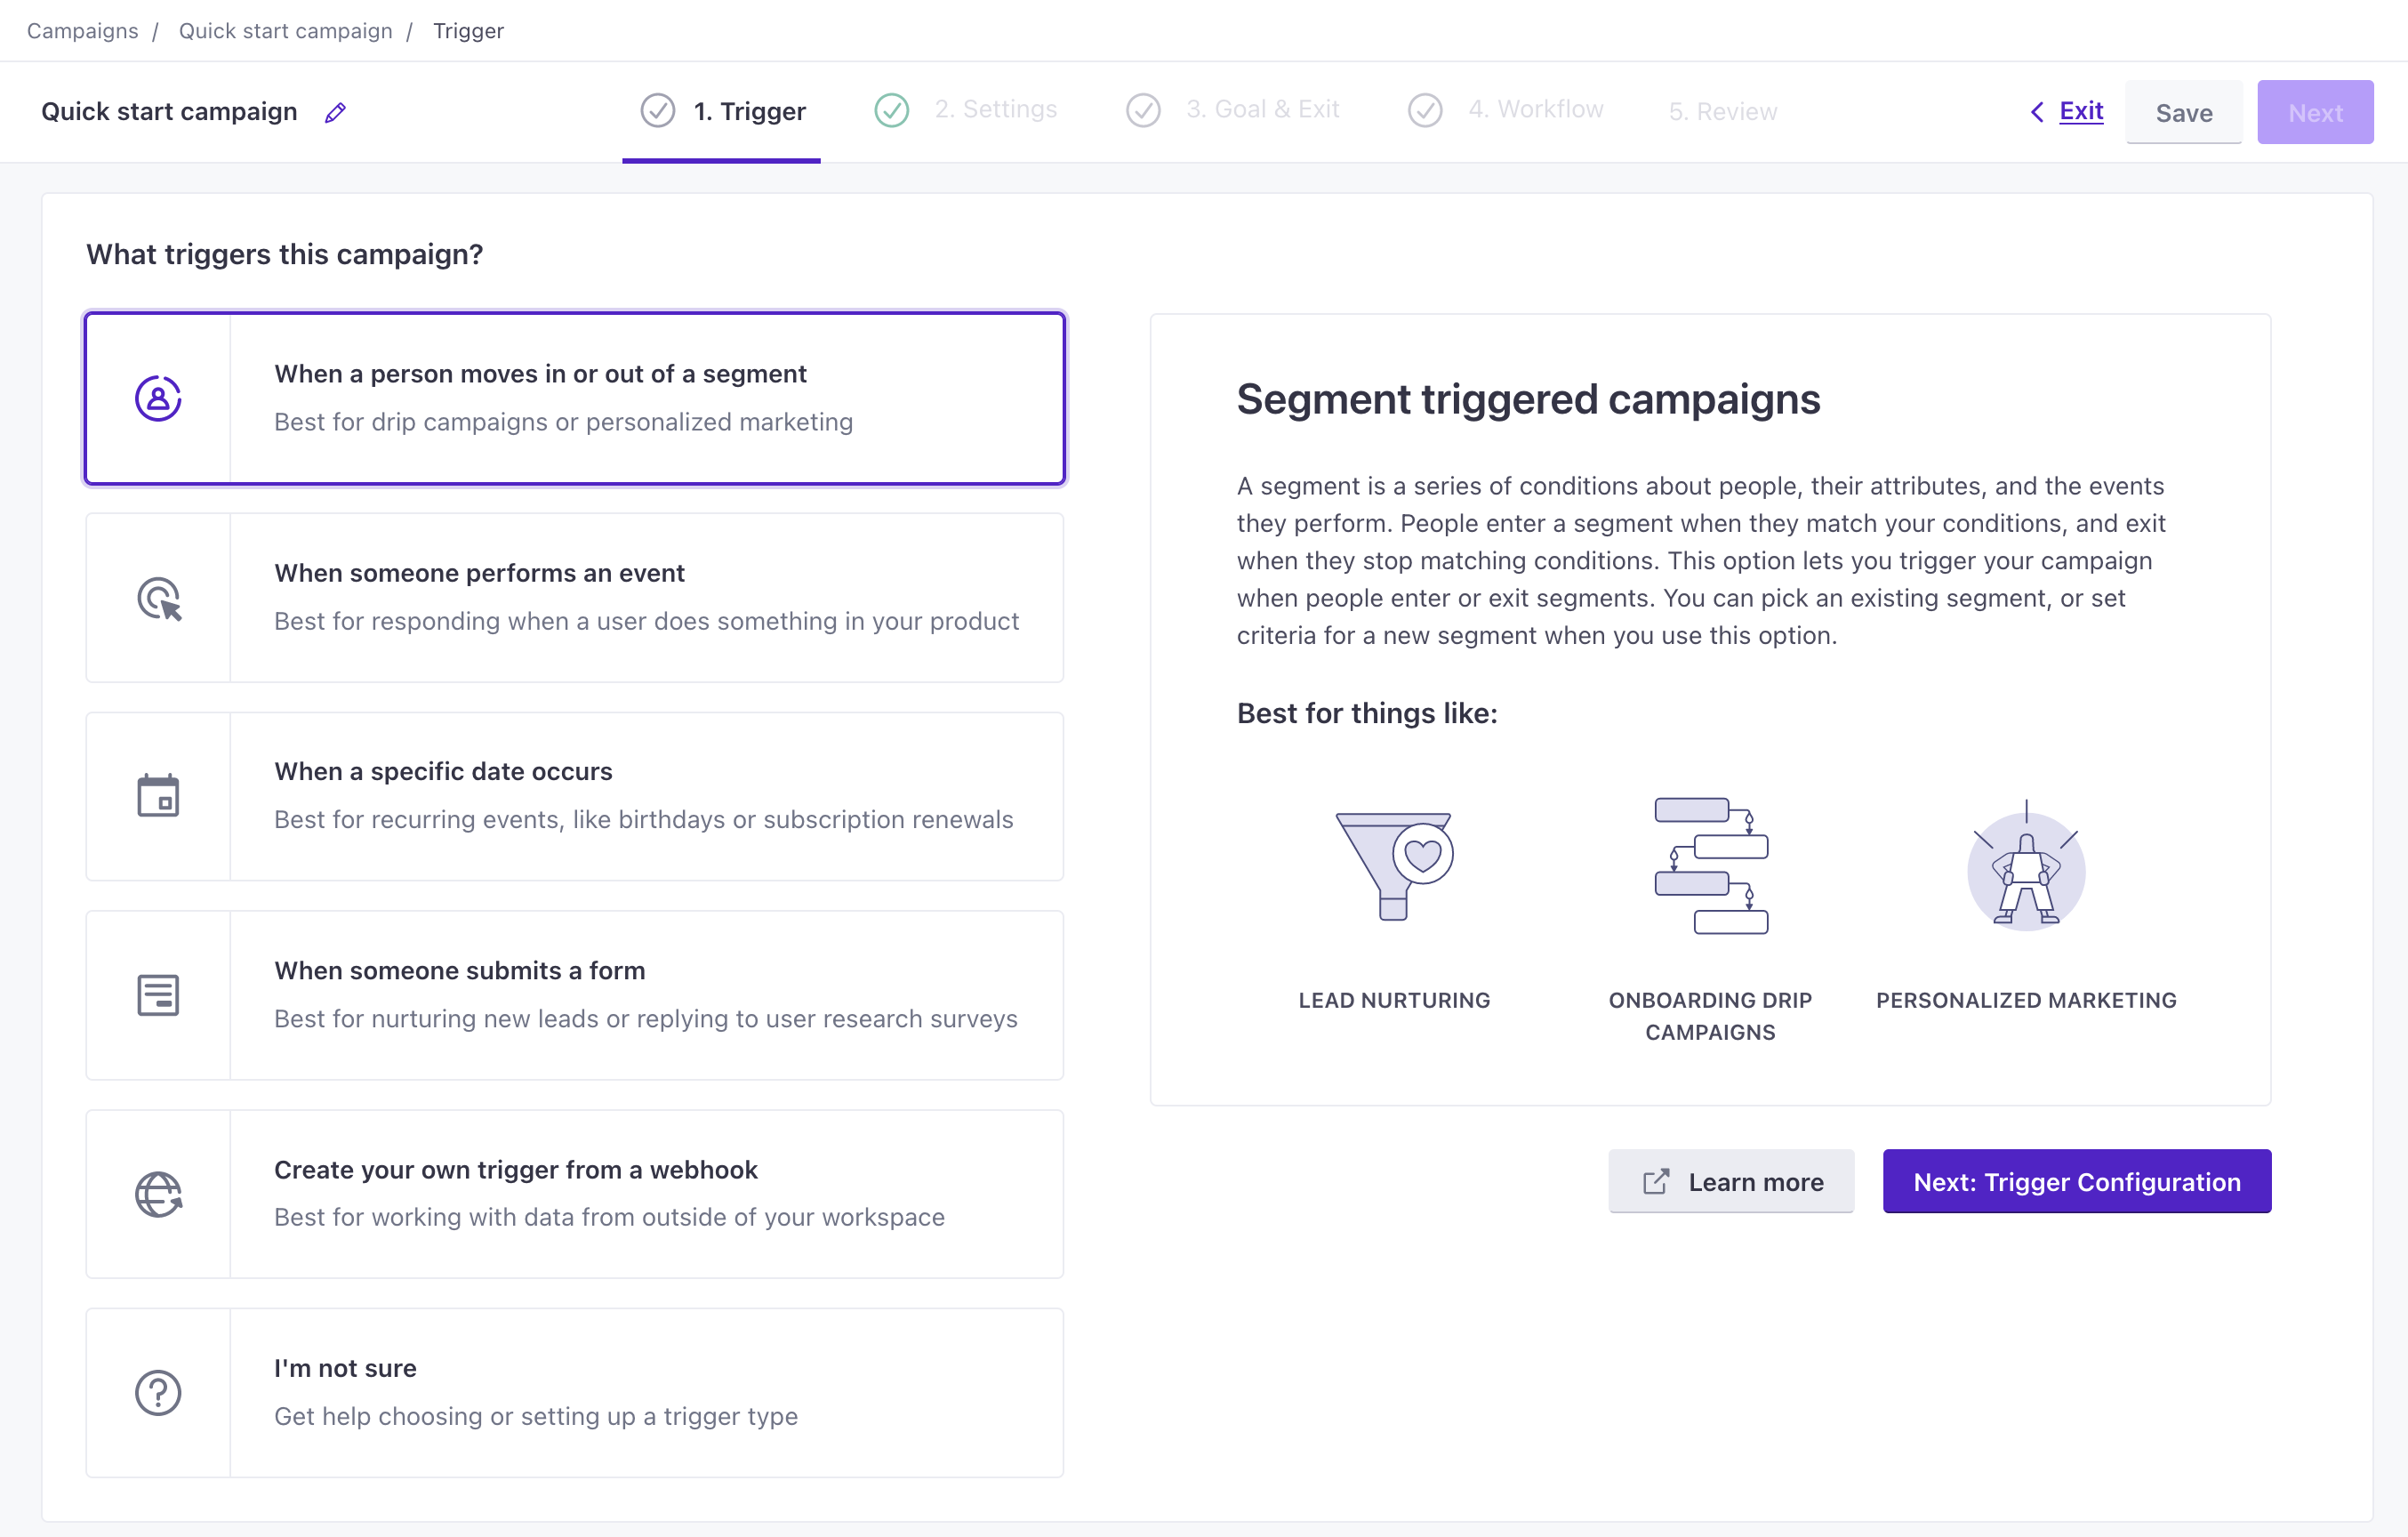
- Select When a person moves in or out of a segment as your trigger.
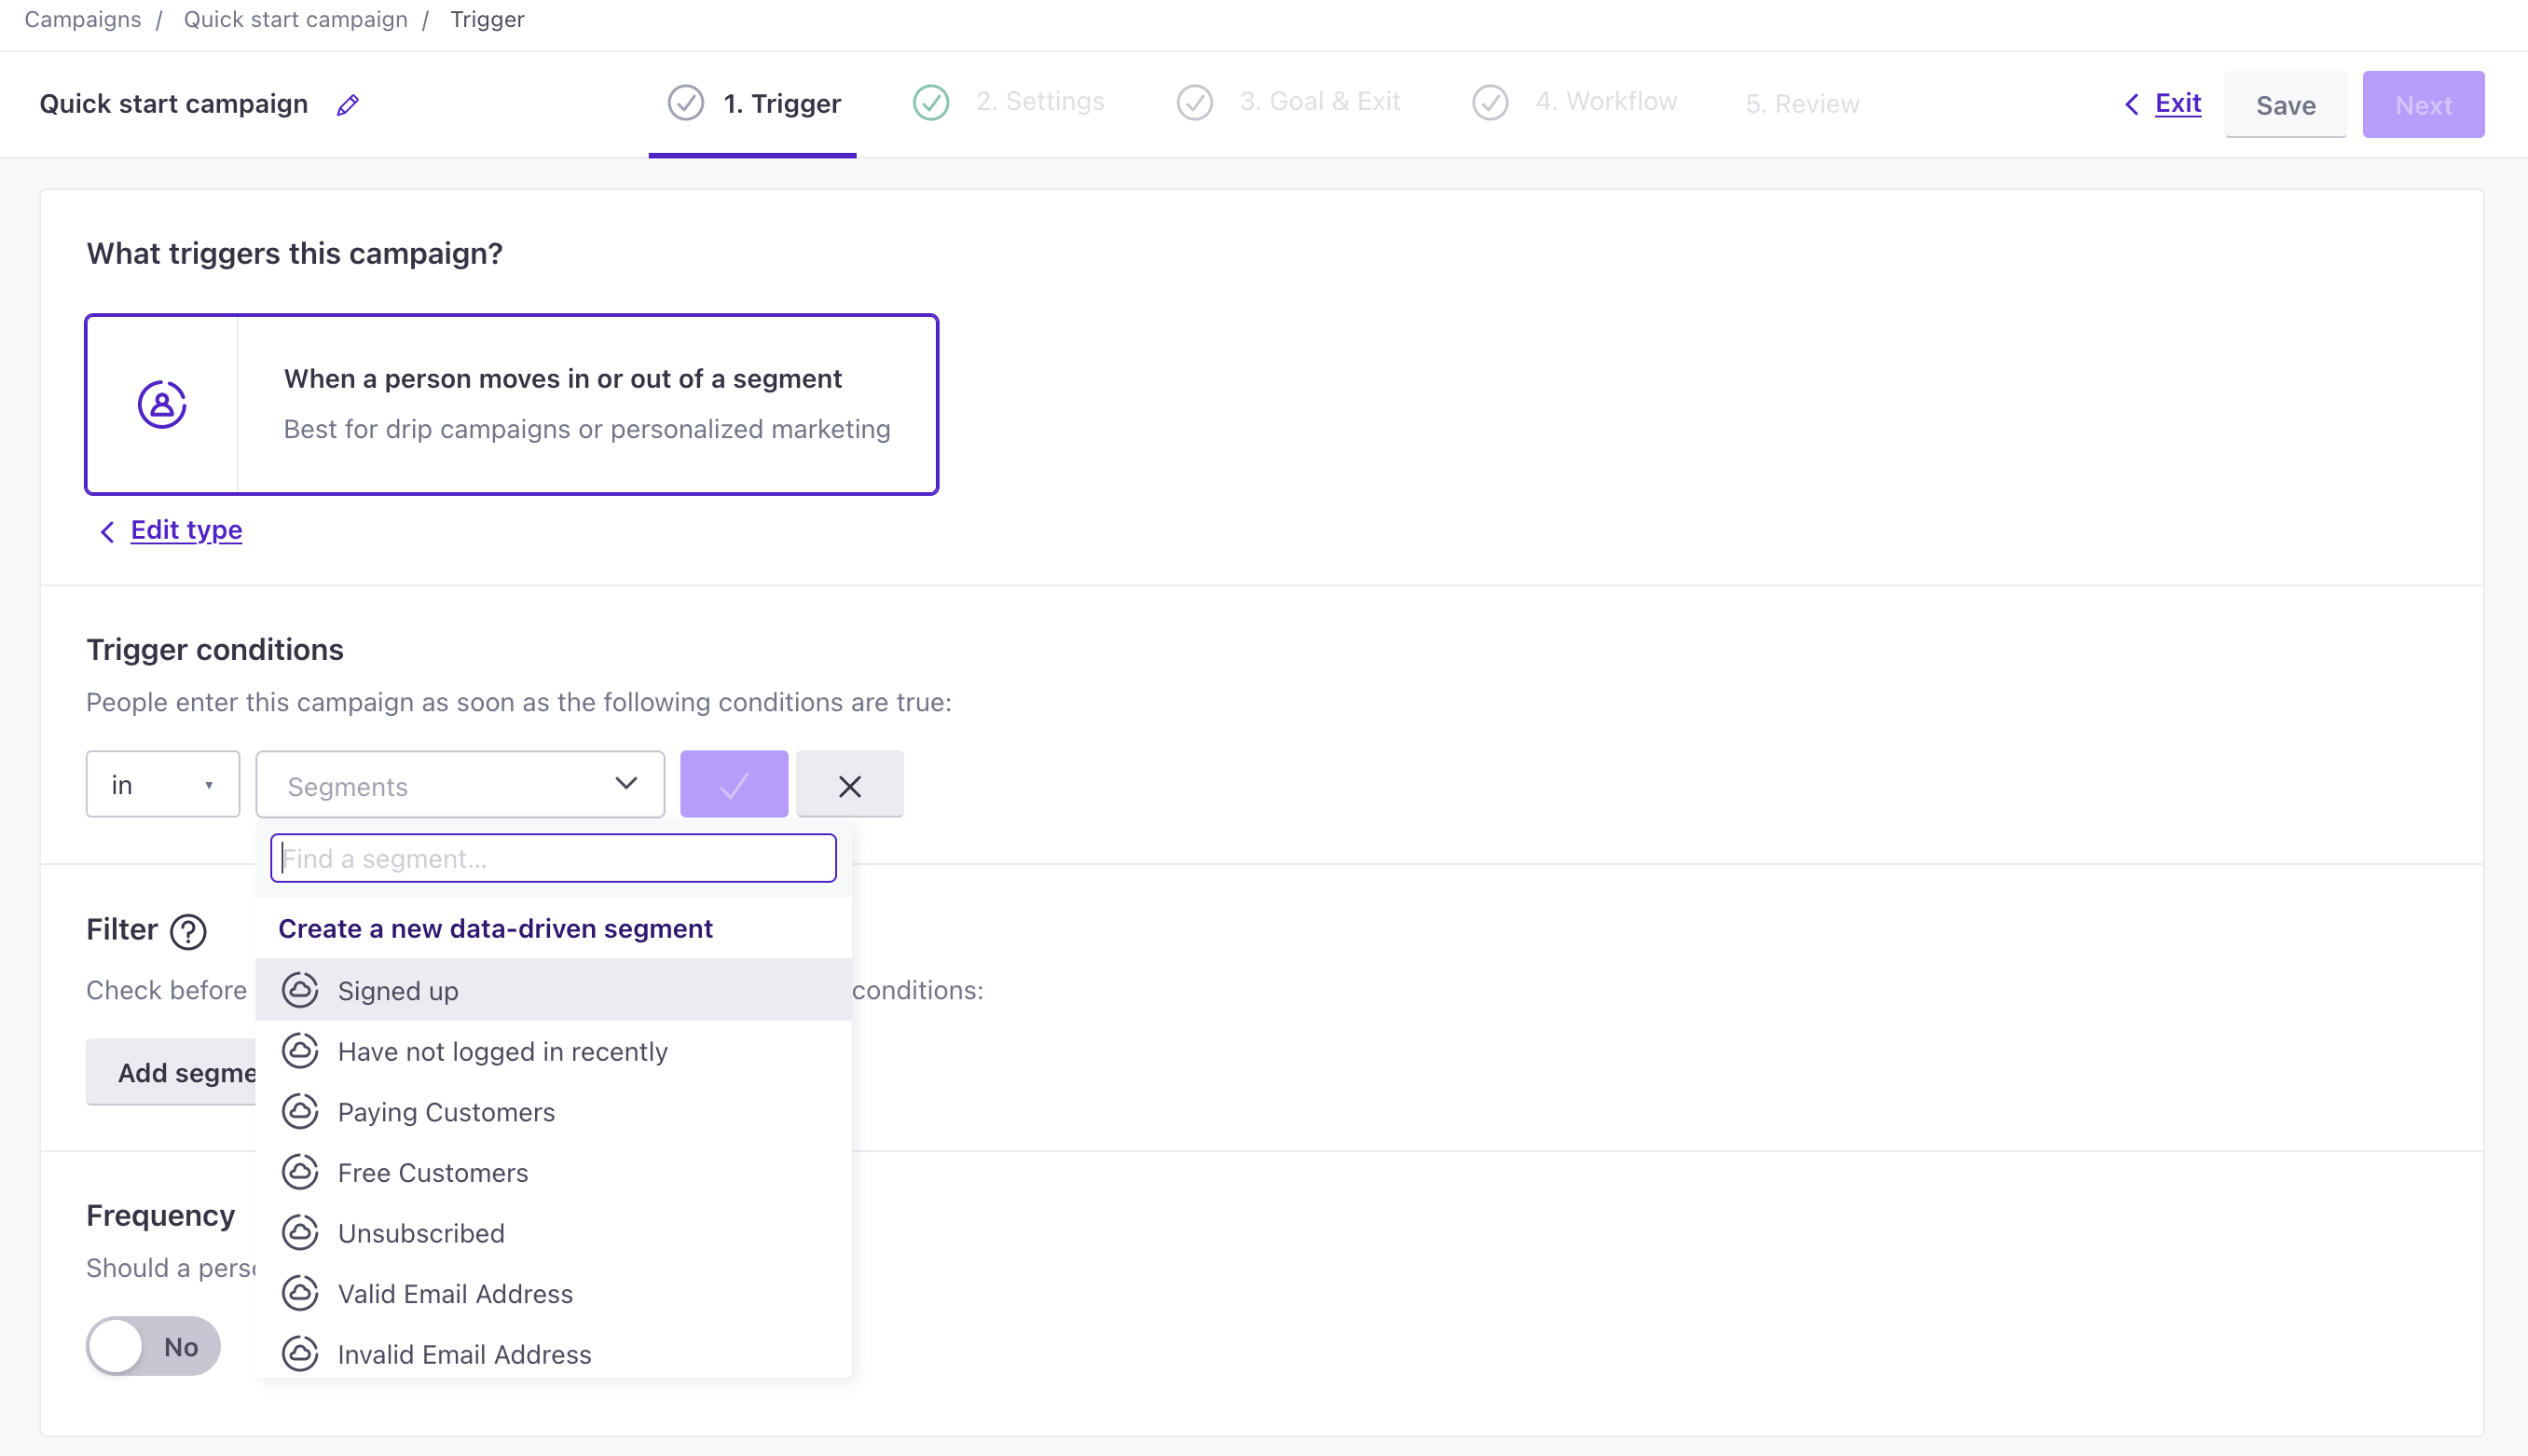
- Under Trigger conditions, click Add Segment Condition and Create a new data-driven segment.
- Under conditions, select Attribute, use the
first_nameattribute for your test person, and set their first name. Now you’ll only send this message to your test person—and anybody who has the samefirst_nameas your test person. Click Create Segment and then click Next.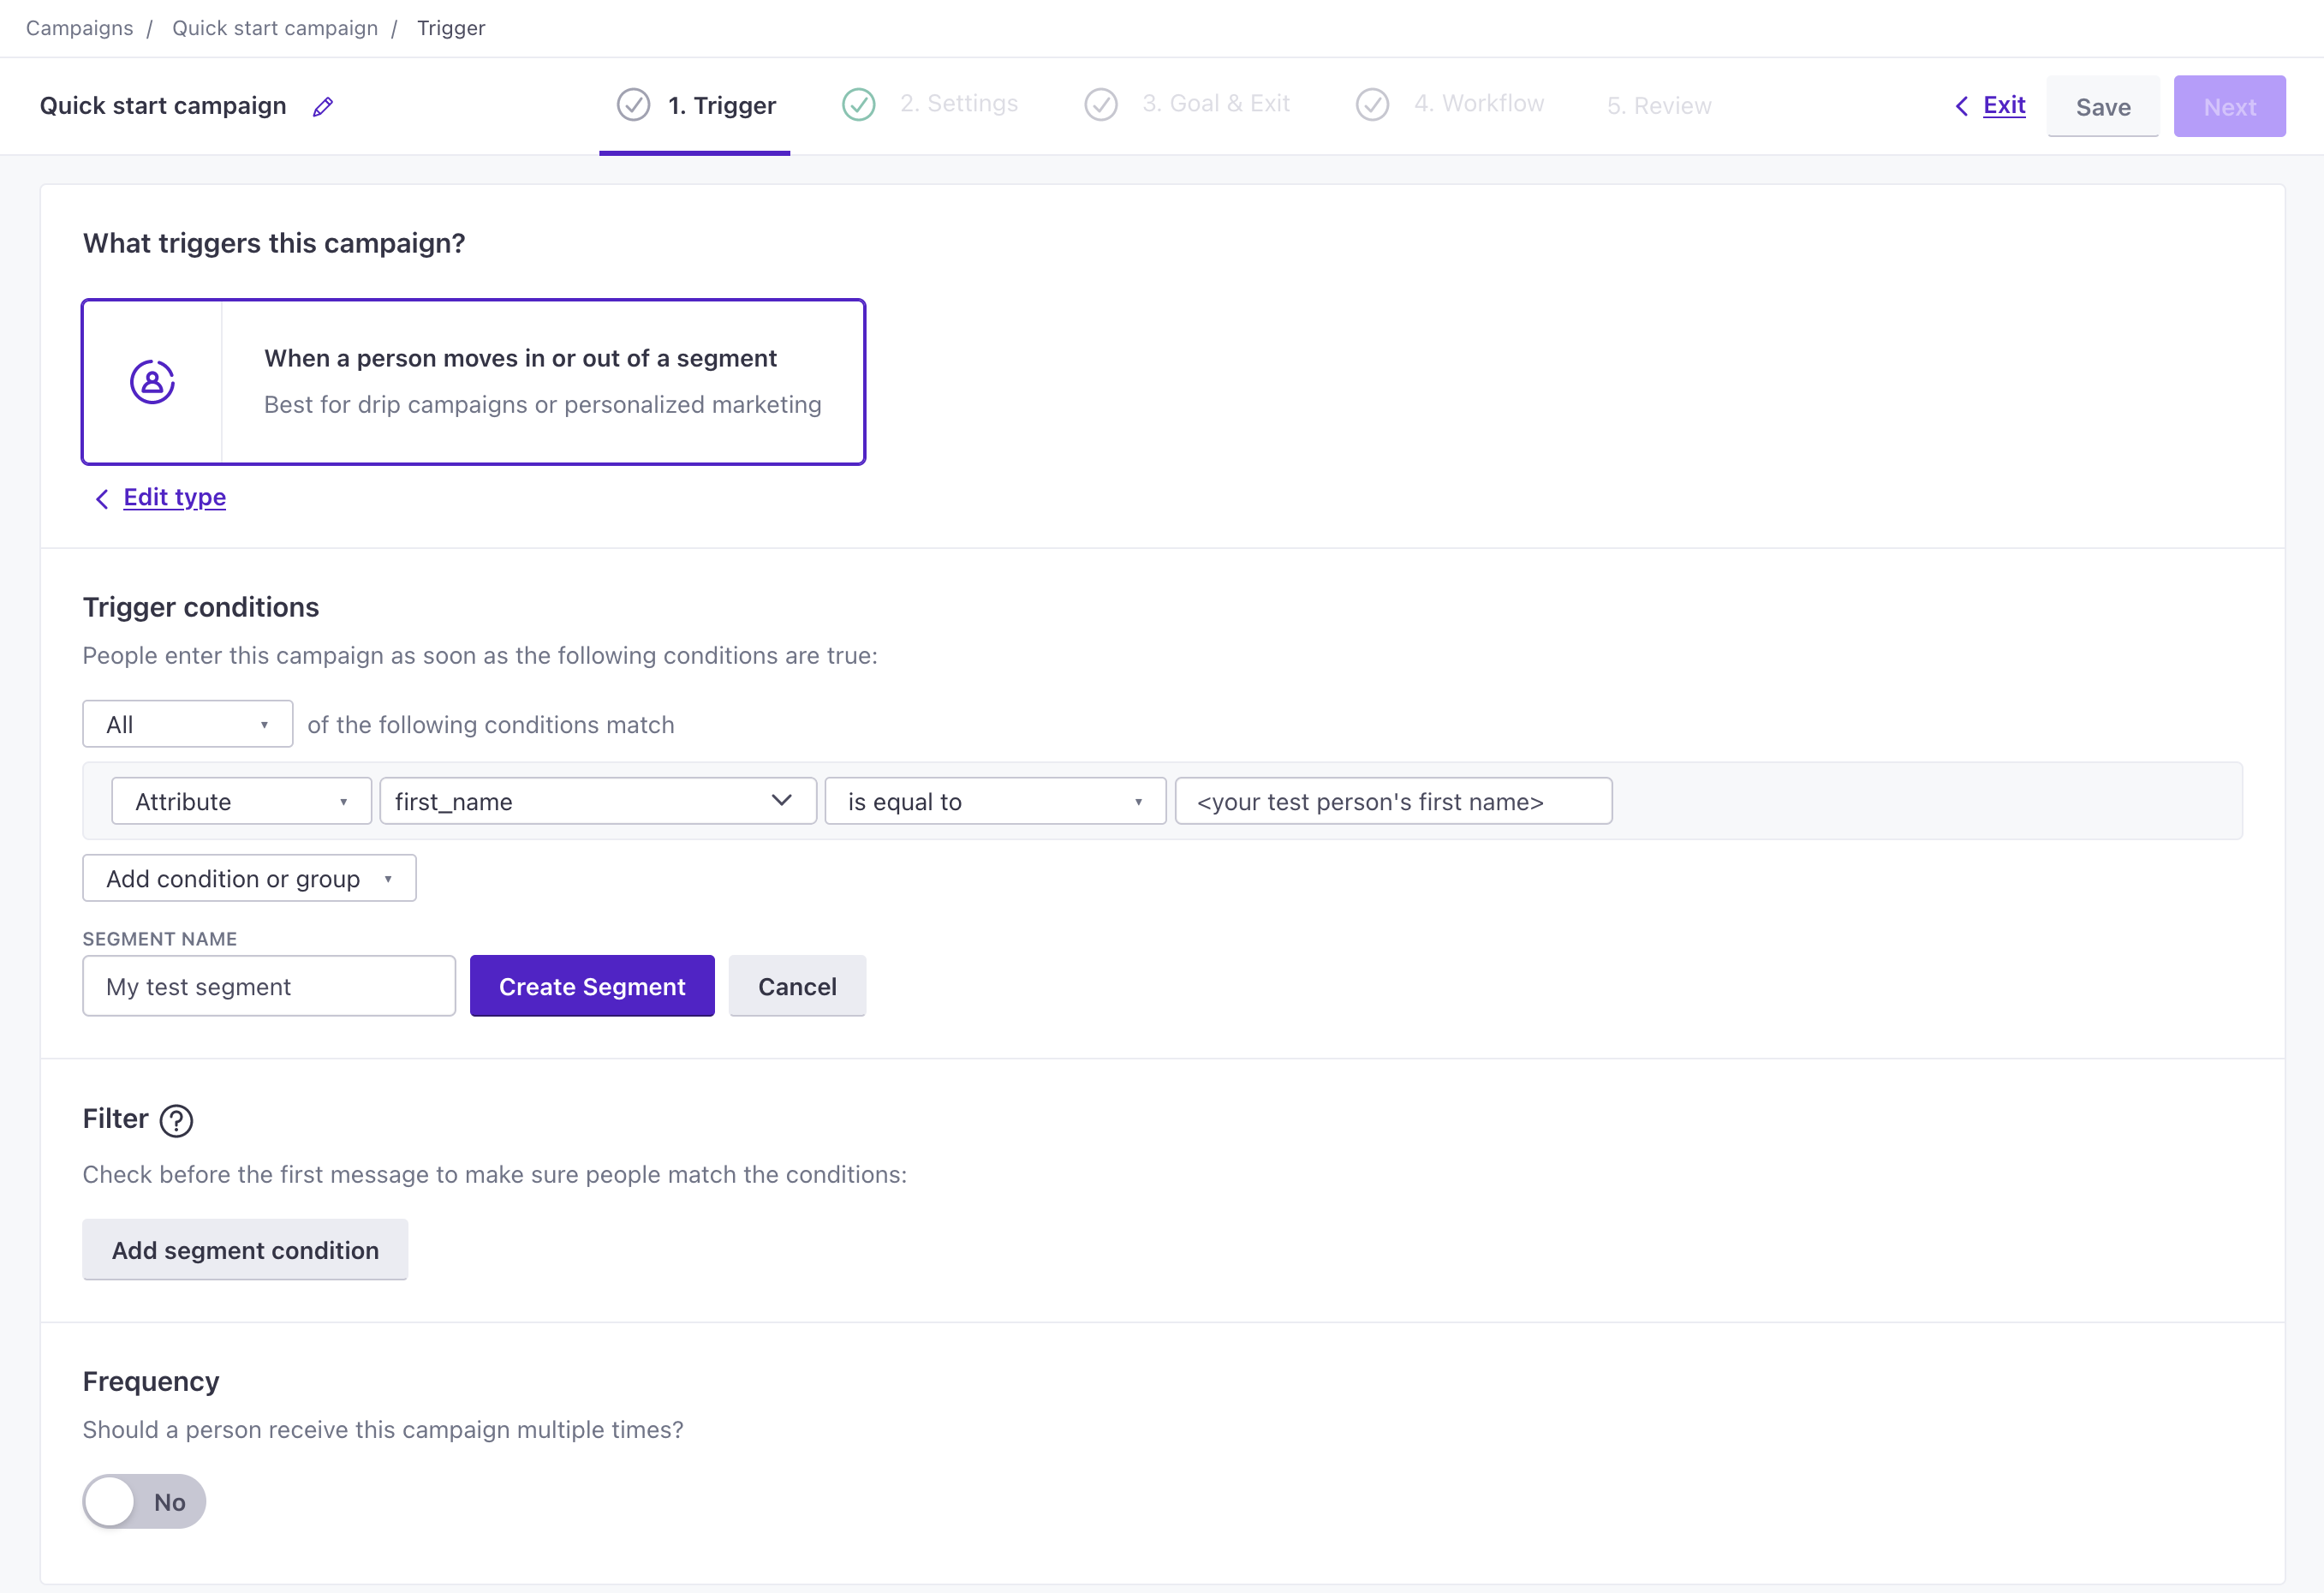
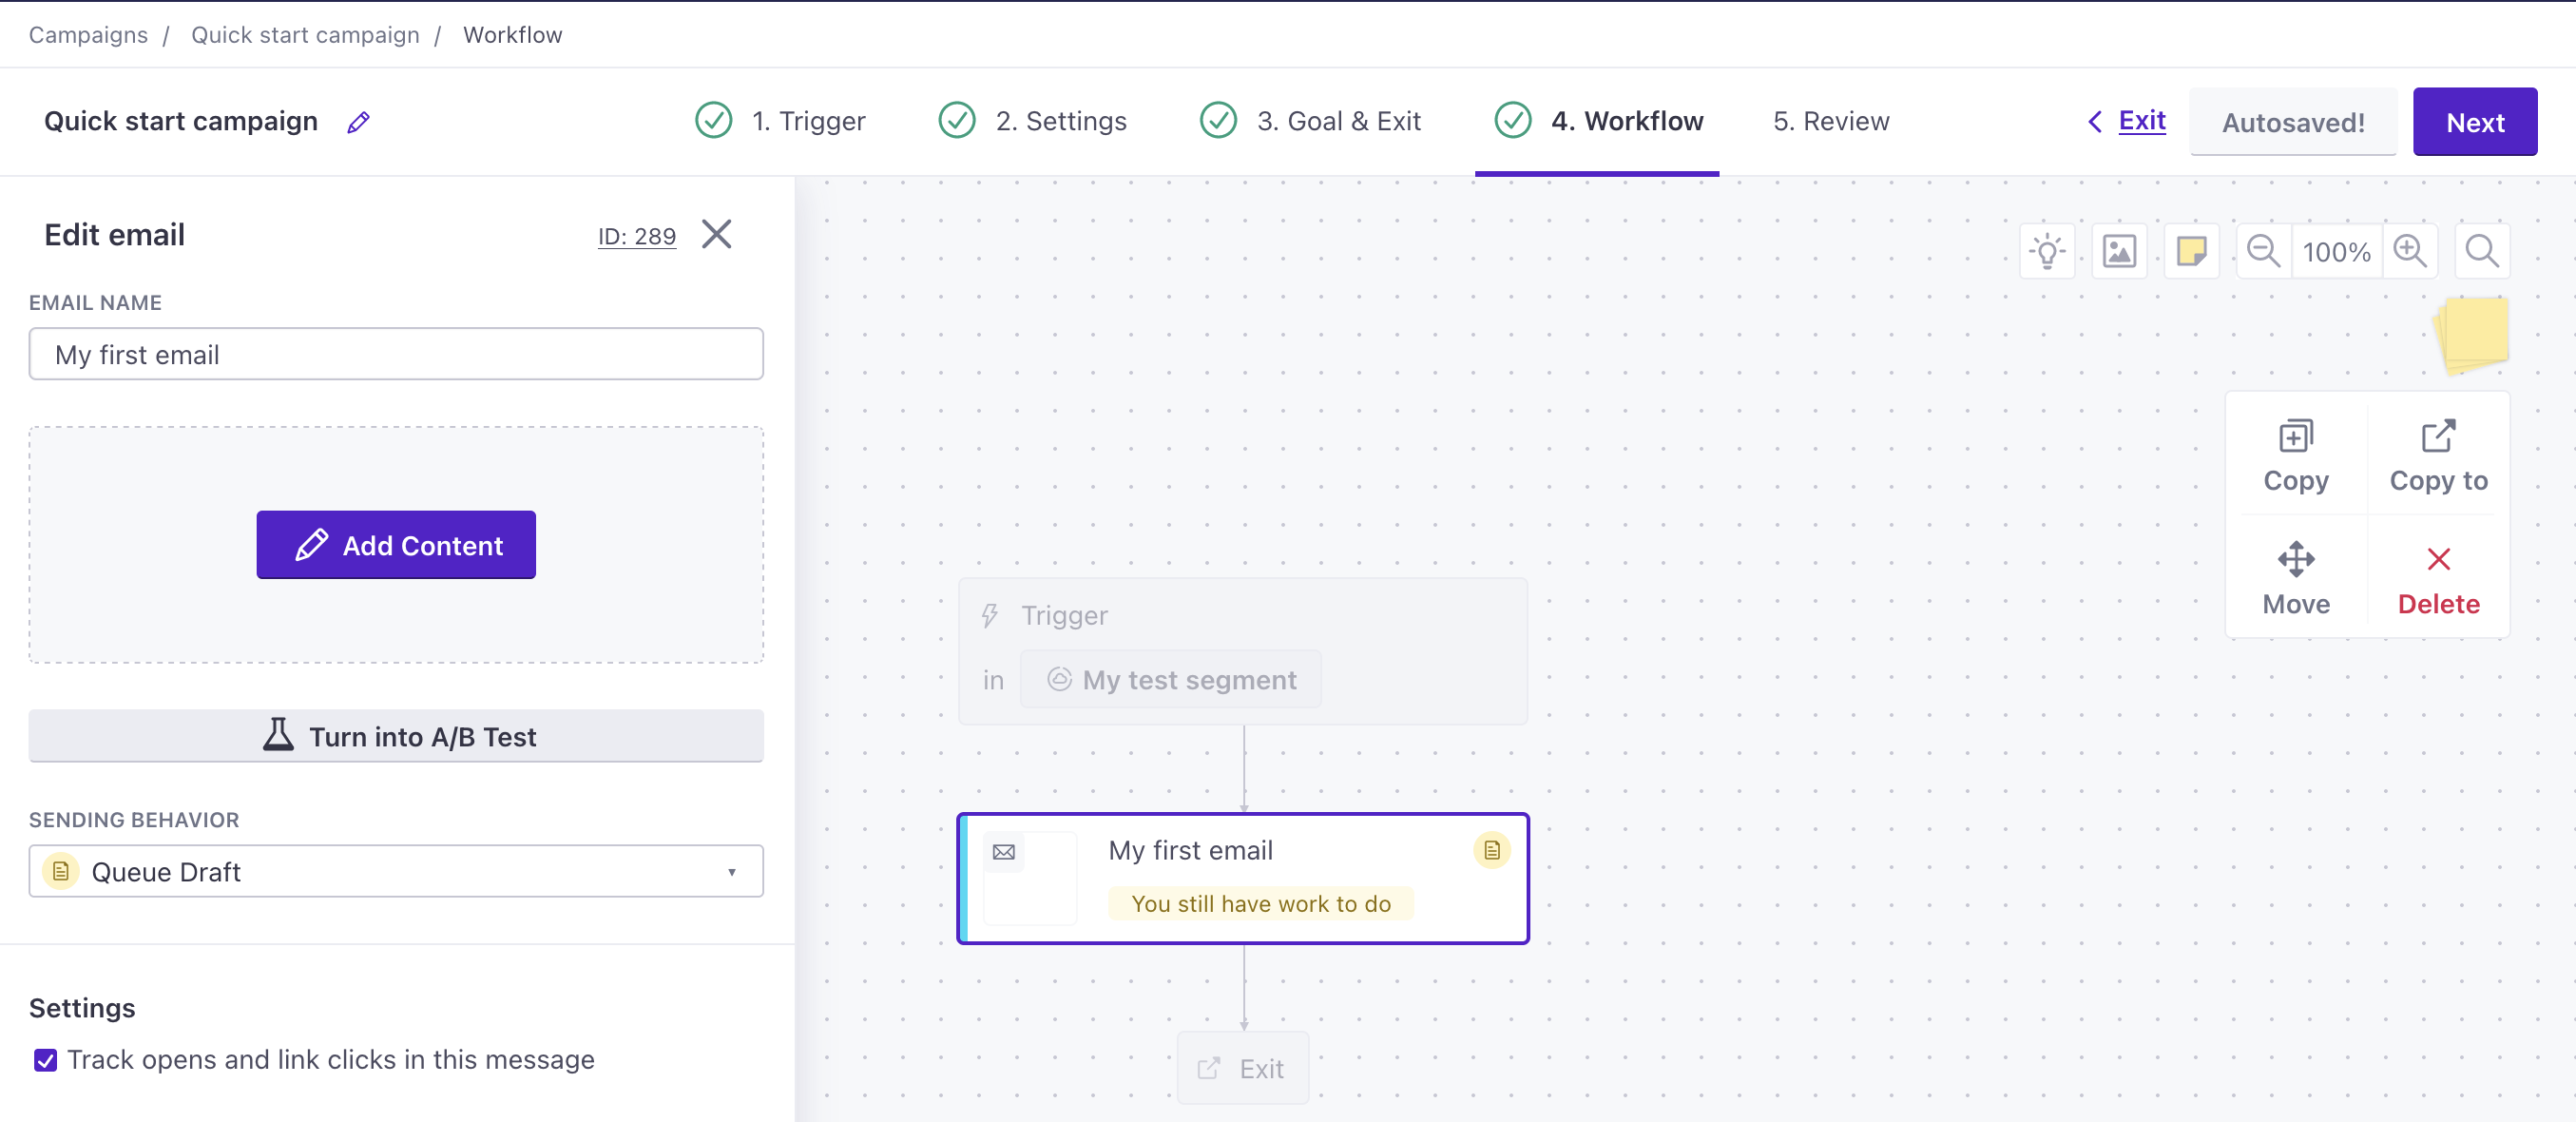
- Now let’s add an email to your workflow.
- Drag the Send an email action to the workflow.
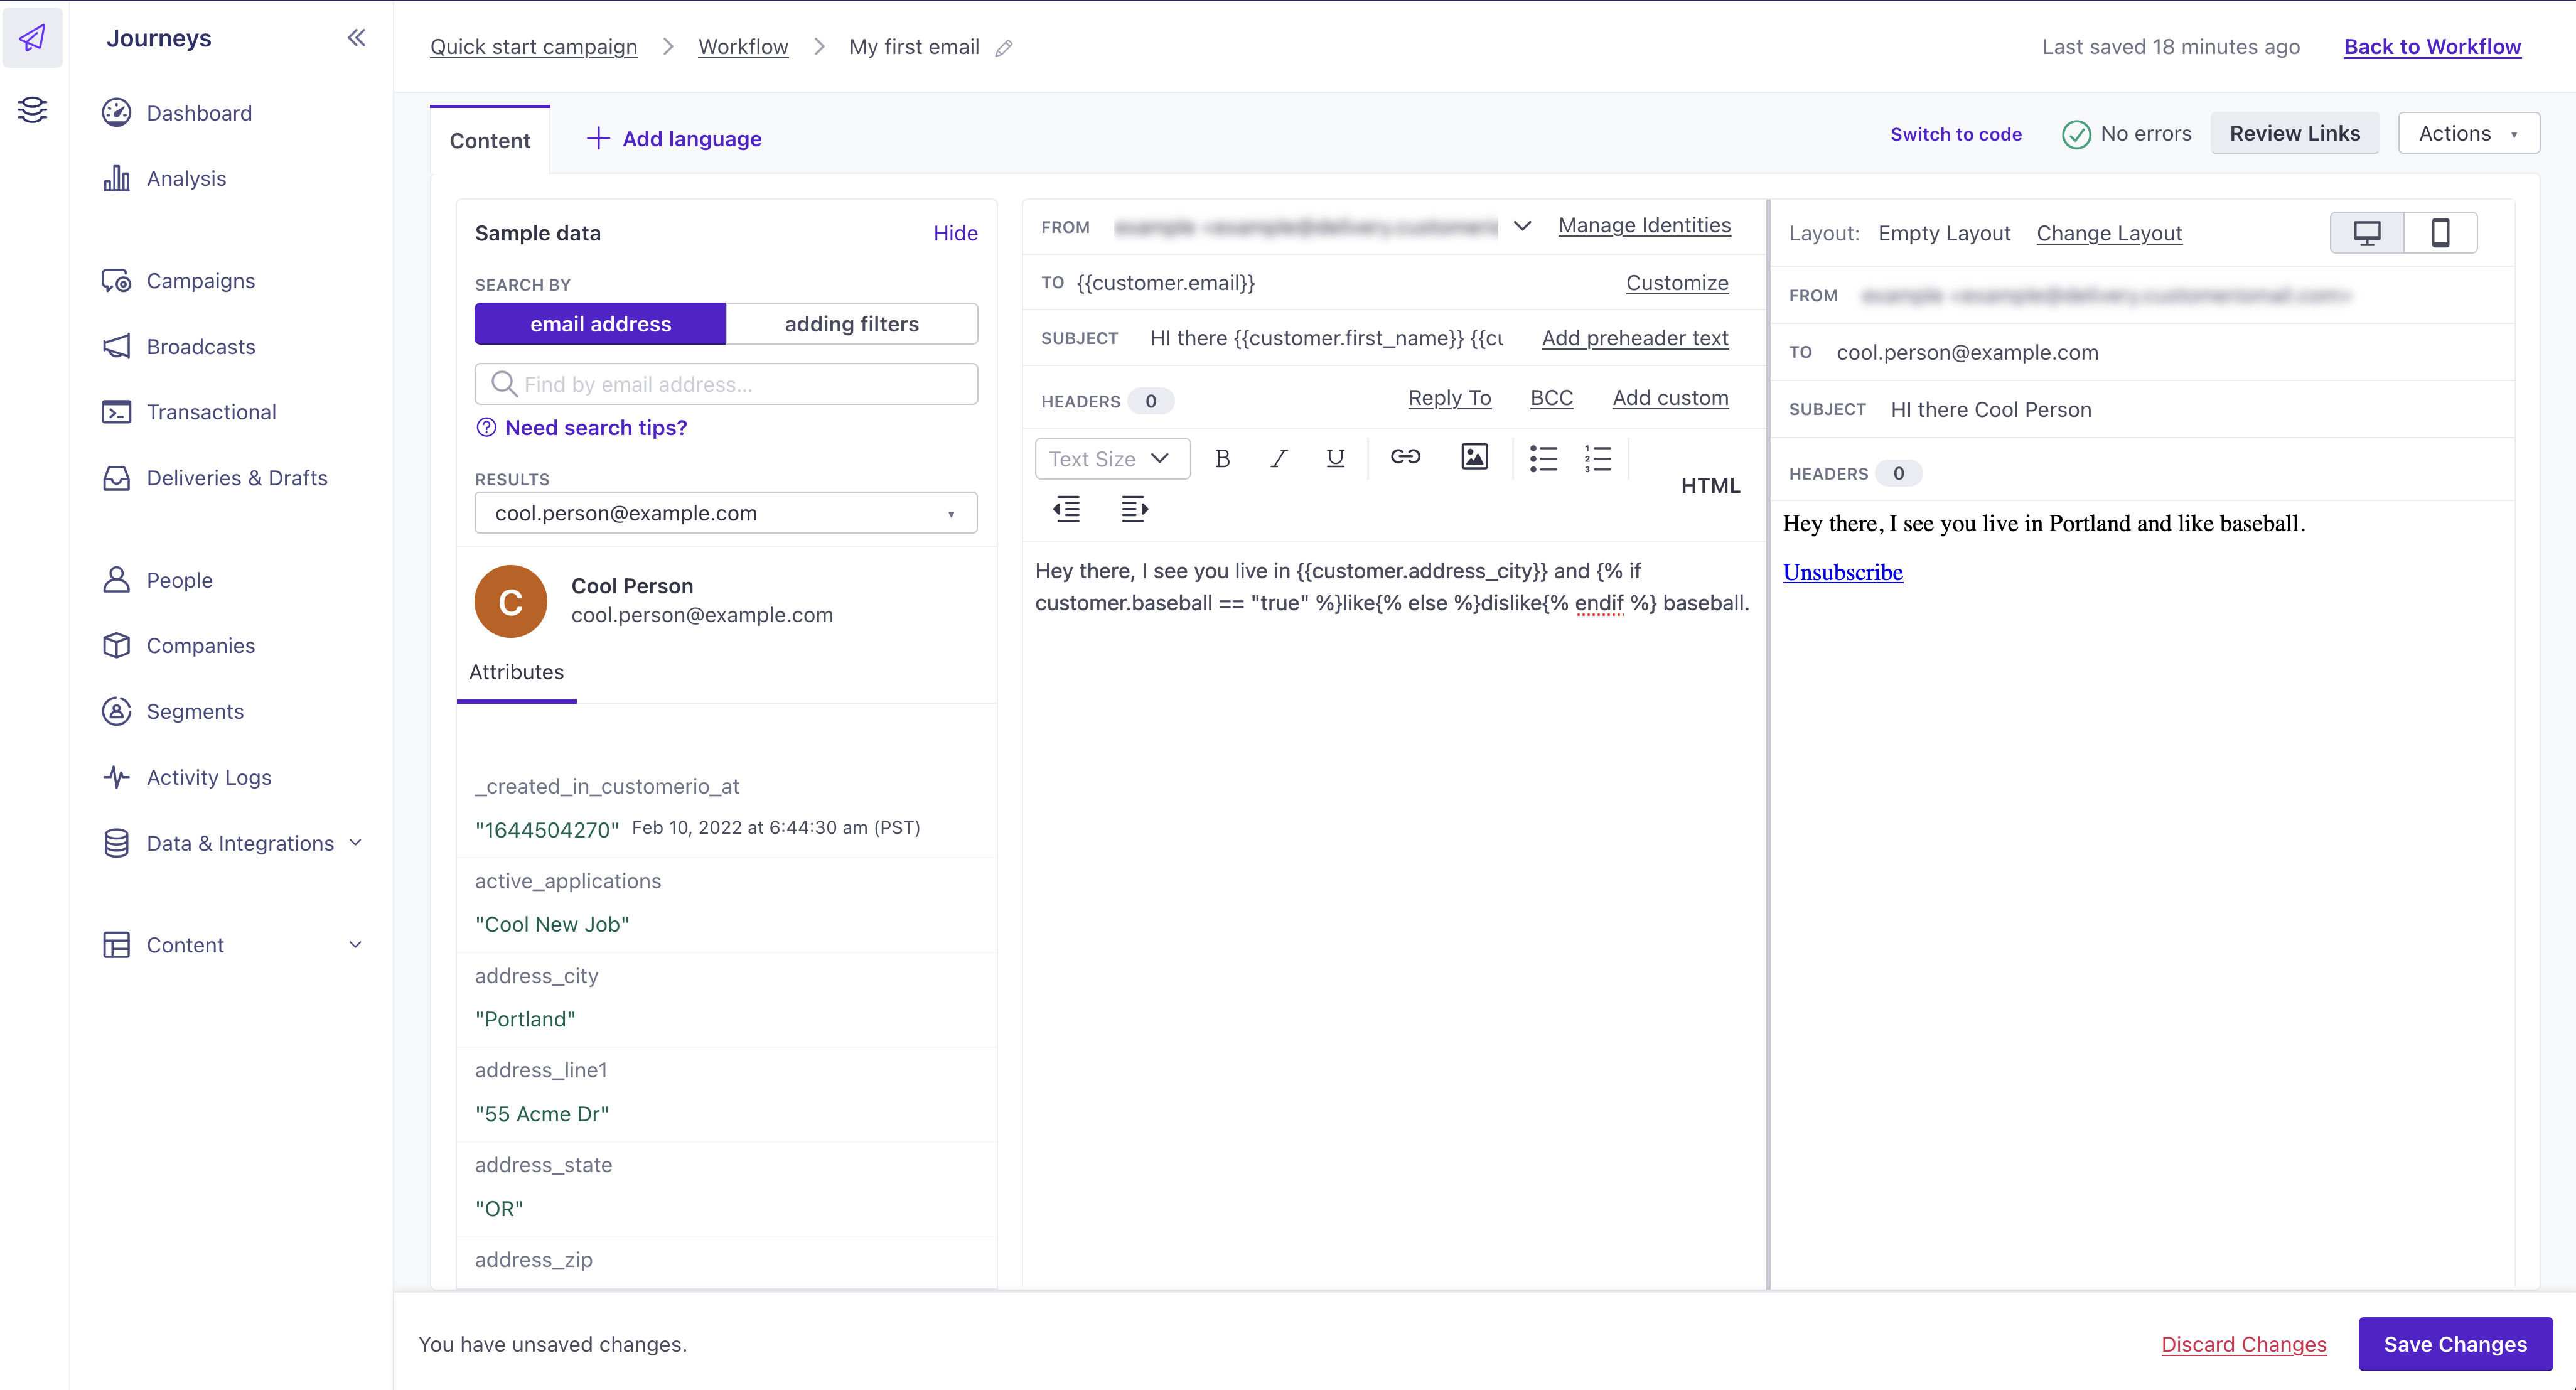
- Give your email a Name, and click Add Content.
- Pick one of the editors. In most demonstrations, we use the Drag and Drop editor to send stylized messages that resonate with your audience. But, for this example, we’re using the rich text editor because it’s easier to show off the personalization features of Customer.io.

- Select your Sender. This is who your email is from.
- Add a subject line. We customized ours with a person’s first and last name using liquidA syntax that supports variables, letting you personalize messages for your audience. For example, if you want to reference a person’s first name, you might use the variable
{{customer.first_name}}.. - Create your email. In the example below, you’ll see that we referenced a few more attributesA key-value pair that you associate with a person or an object—like a person’s name, the date they were created in your workspace, or a company’s billing date etc. Use attributes to target people and personalize messages. Attributes are analogous to traits in Data Pipelines.. You can use
{{customer.<attribute_name>}}to reference any attribute value associated with your audience. You can also useifstatements like the one in the example below to check that attributes exist, or shape your message based on your audience’s attribute values. - When you’re done, click Save and Back to Workflow.
- Click Next to review your campaign. Scroll down to the bottom of the page and, under Who should match, select Current people and future additions. This ensures that you’ll send your message to your test person.
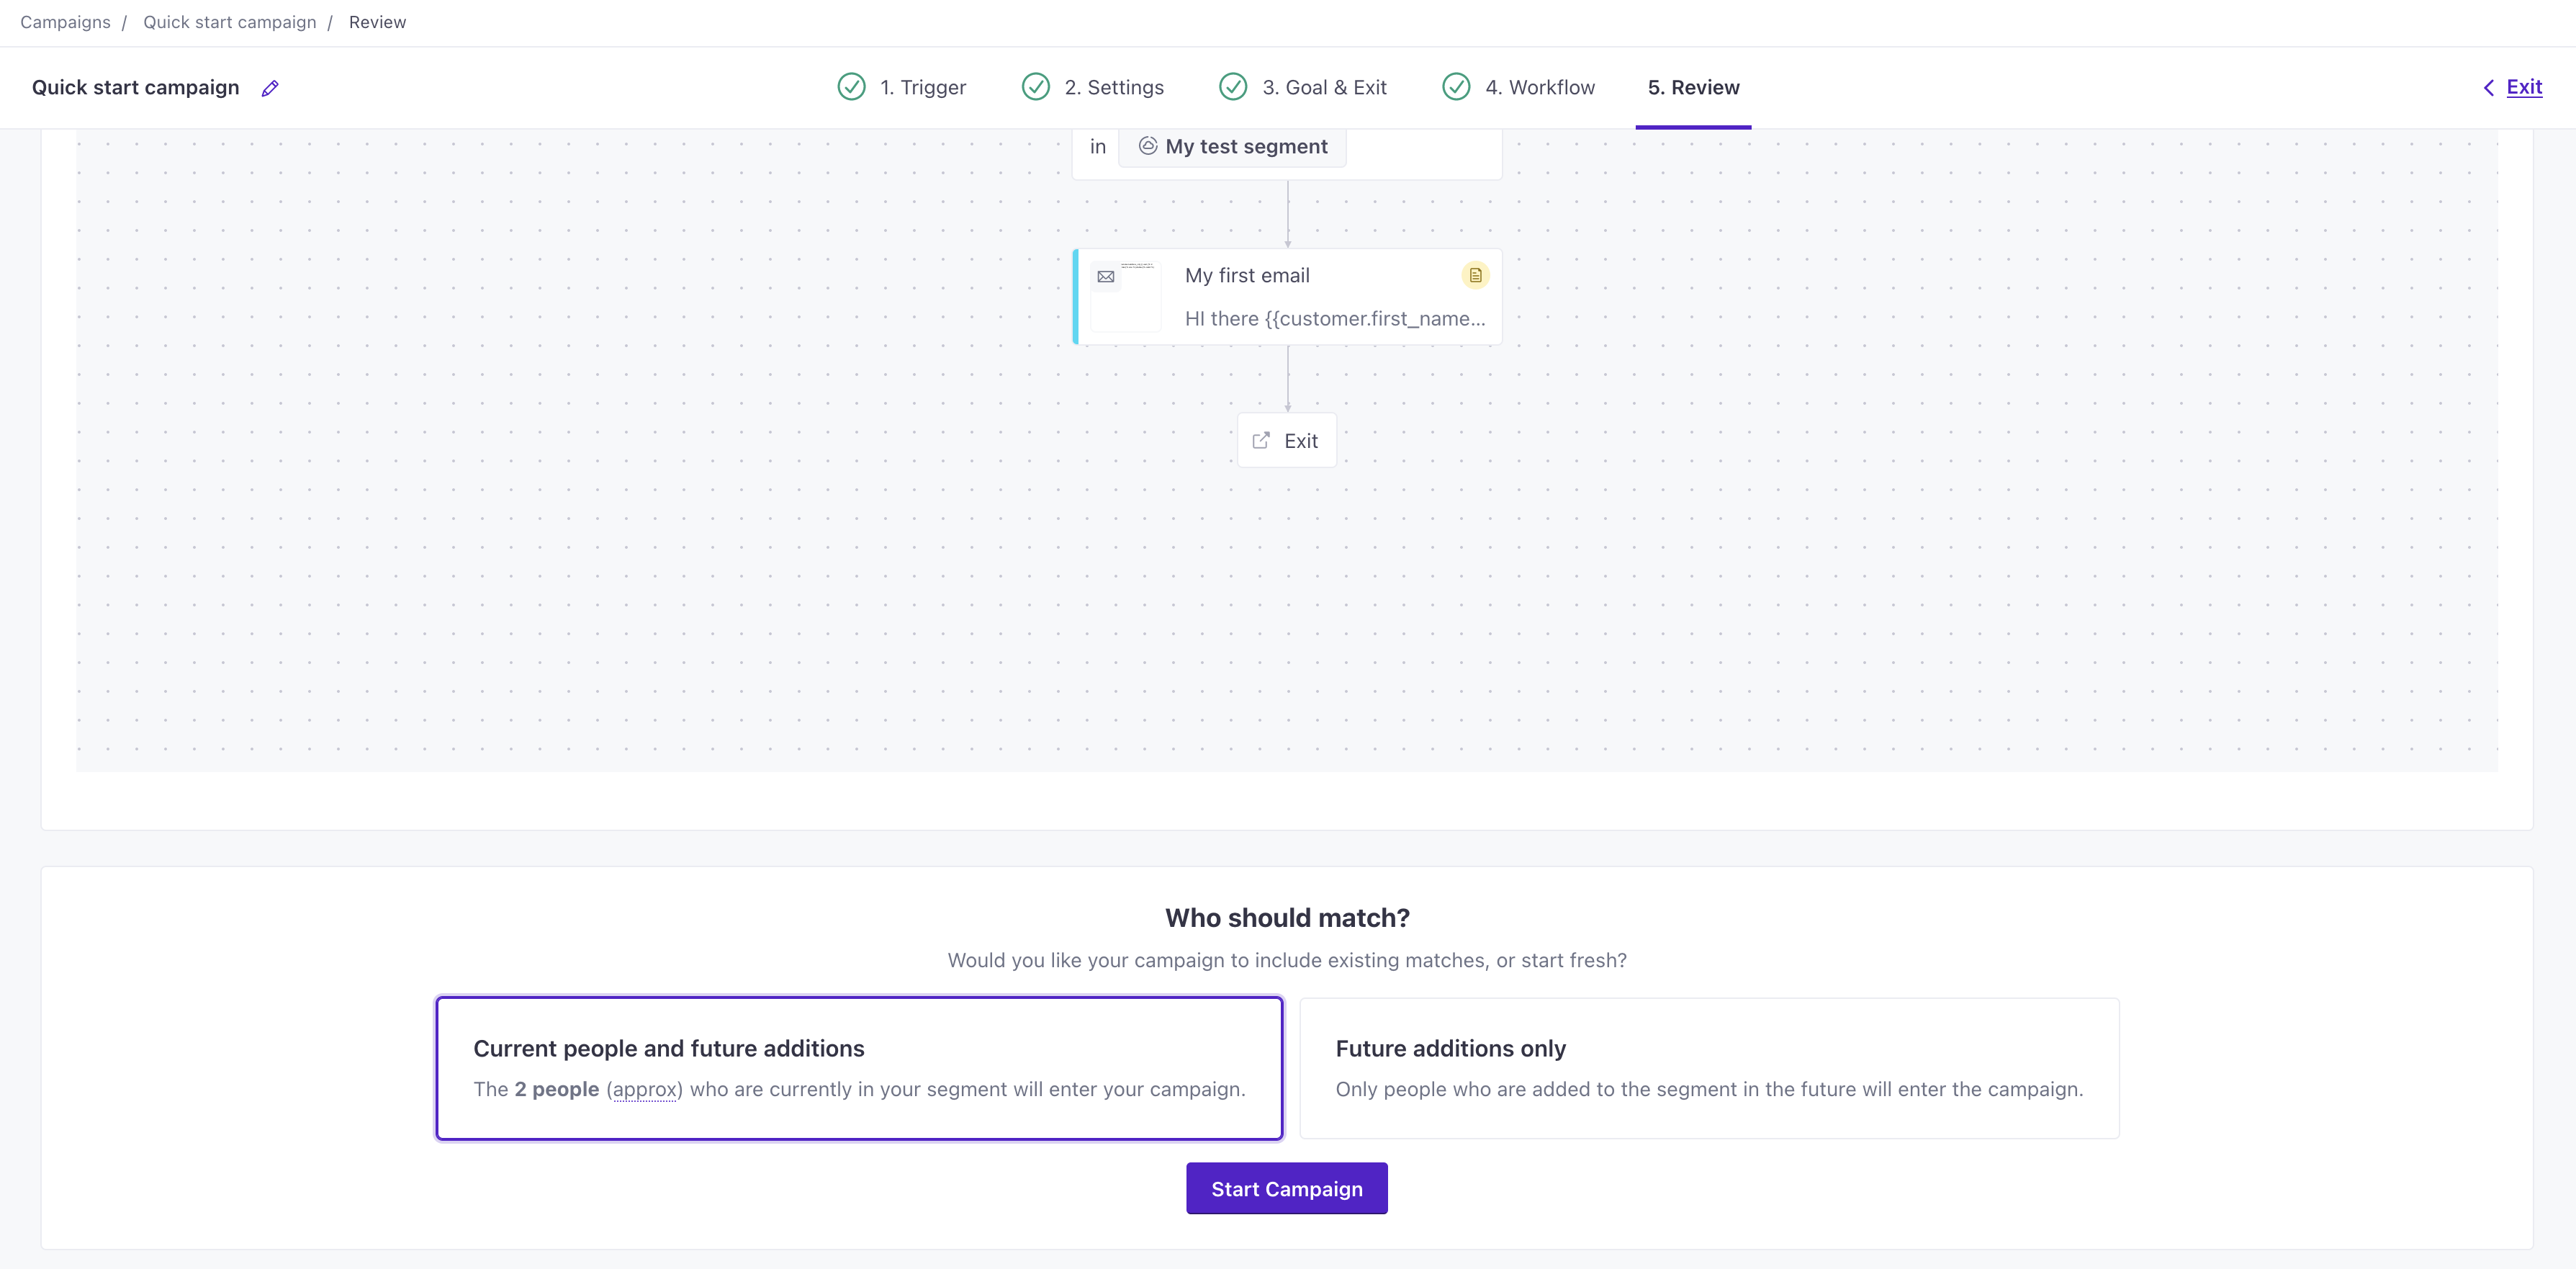
- Click Start Campaign.
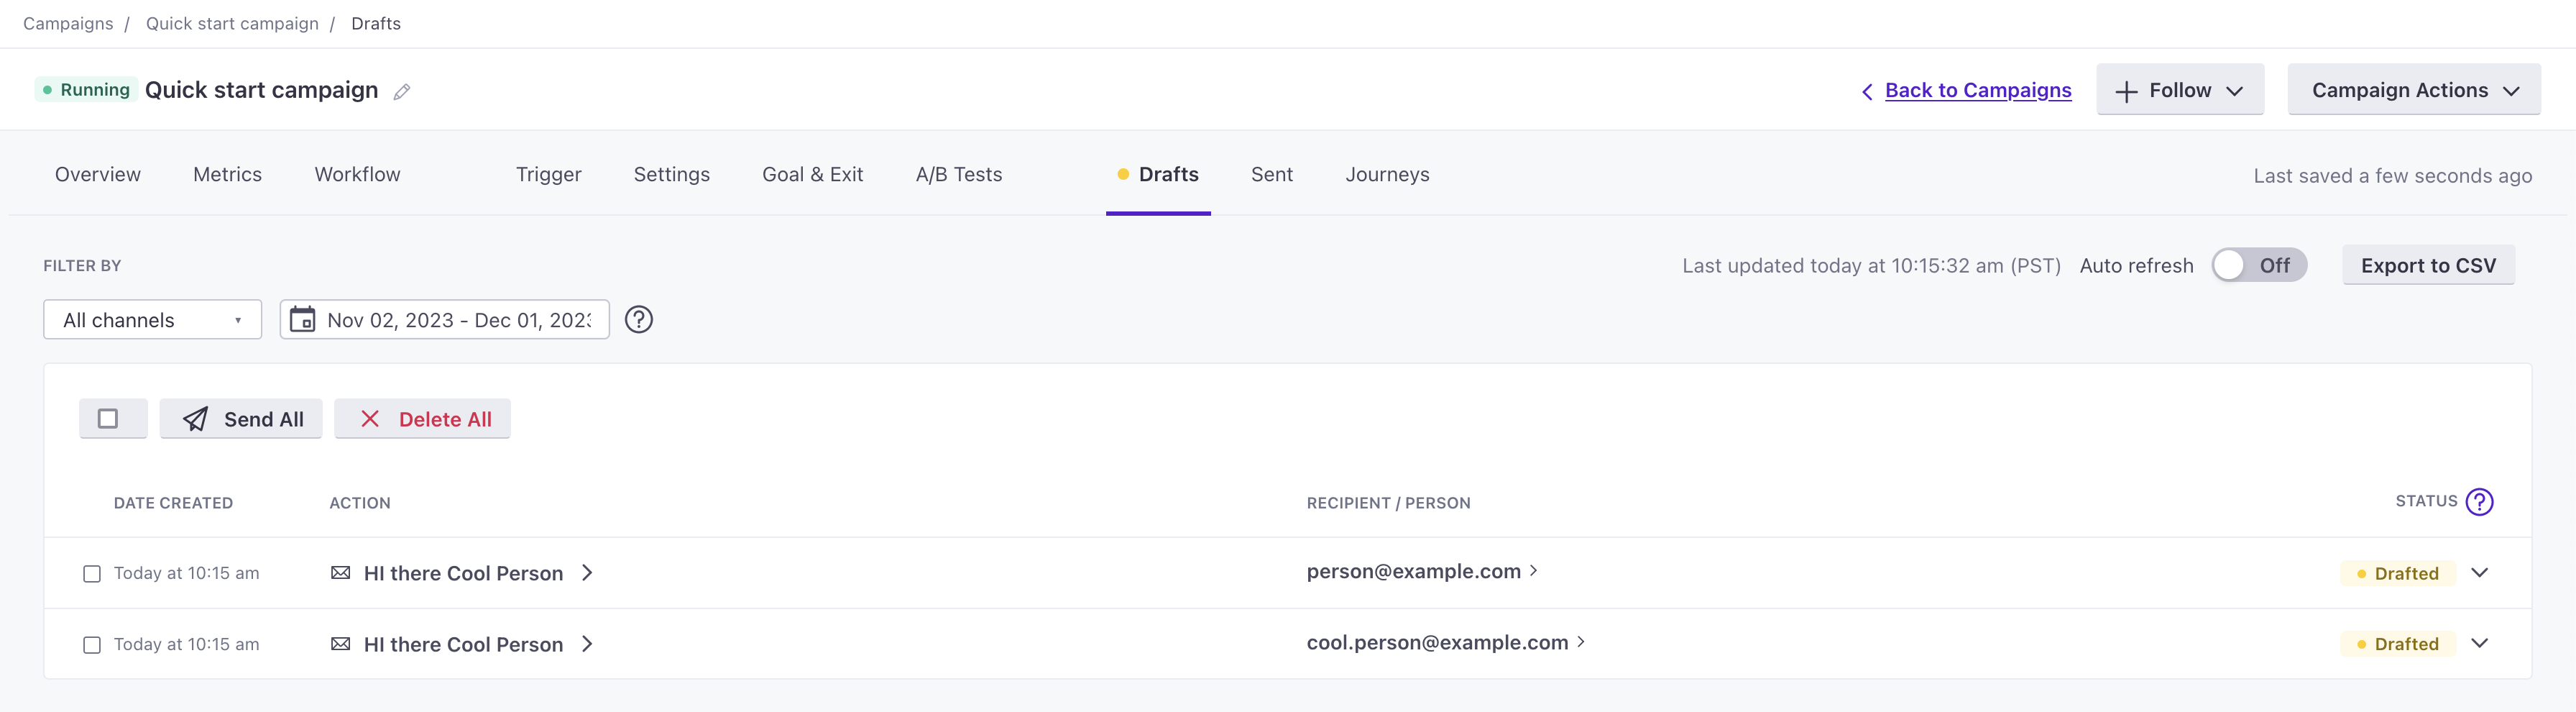
Within a minute, you should get your first email. If messages in your workspace are set to Queue Draft rather than sending automatically, you won’t see emails in your inbox! Rather, you’ll see your new messages in your campaign under the Drafts tab.
This was quick. Is it really that easy?
This guide walks you through the most common parts of Customer.io so you can start sending messages as quickly as possible. But it’s not comprehensive. You’ll get the most out of Customer.io when you carefully plan your implementation, capture the right data, and automate your messaging strategy.
That all takes time.
So, while we can get you started in just a few minutes, and demonstrate some common features of Customer.io, it’ll take more than this quick start to get you over the finish line!

