JavaScript Source: Getting Started
Add our JavaScript library to your website or app to send events representing your website visitors and users to one or more destinations. This library makes it easy—and in some cases, automatic—to send events into Customer.io and other destinations.
How it works
Our JavaScript source library helps you send data from your website to any of our destinations. This is our most versatile and necessary source, supporting all of our destinations—whether they’re in cloud or direct-connection modes.
When people visit your website, you’ll want to identify them. The identify method is fundamental to Data Pipelines, providing a unique identity for a person that we can use across sources and destinations. After you identify a person, subsequent calls reference the identified person for the remainder of the client’s session on your site.
You can still generate events before you identify someone. These events are anonymous. When you identify a person, we’ll automatically associate the identified person and their anonymous activity, giving you a complete view of your audience’s activity on your site.
Want to learn more? Check out the our API reference.
visits site)-->|generate
anonymousId|z subgraph z [anonymous activity] direction TB b(visit
a page) b-->|page|c(add item
to cart) c-->|track|d(person
logs in) end subgraph y [identified activity] direction TB e(person initiates
checkout)-->|track|f(person finishes
transaction) f-->|track|g(person logs out) end d-->|identify|e g-->|reset|h(person is
anonymous again)
What can I do with the JavaScript snippet?
When you add the JavaScript snippet, it’ll begin tracking anonymous pageviews. This is similar to the way Google Analytics works.
However, you’ll need to identify your audience to take advantage of most analytics and marketing tools. You can do that with the identify method described below. This is enough to use most basic CRM functionality—like in Salesforce or Intercom.
But, lots of analytics can do more than record identities. You can get the most out of platforms by recording the actions that people perform on your website. that’s what you can do with the track call.
Set up your JavaScript Source
You can import this source as a package
If you use a framework like Vue or Next.js, you might want to import the JavaScript source as a package. See Install the JavaScript source via package for more information.
As a part of this process, you’ll need to copy some code into the head tag of your website. You don’t have to do this right away, but your source won’t begin capturing information until you copy this tag to your website. You’ll also want to remove third party code for any destinations that you want to connect to your website source, otherwise you’ll send duplicate information to your destination—once through Data Pipelines and once with native code!
If you’re in our EU region and using our snippet, you don’t need to update anything. The code you copy from our UI will automatically use the EU region.
Go to the tab and click Sources.
Click Add Source, pick JavaScript, and click Next.
Give the source a Name and click Submit. The name is simply a friendly name to help you find and recognize your source in Customer.io.
(Optional) If you want to use in-app messaging, you’ll need to copy a Site IDEquivalent to the user name you’ll use to interface with the Journeys Track API; also used with our JavaScript snippets. You can find your Site ID under Settings > Workspace Settings > API Credentials from your Journeys Track APIThe Journeys Track API is one of the ways you can identify people, send events, and so on. This API is superseded by the Data Pipelines API, which can both add data (people, events, etc) to your workspace and supports other downstream destinations. credentials. You’ll add the Site ID to your snippet in the next step.
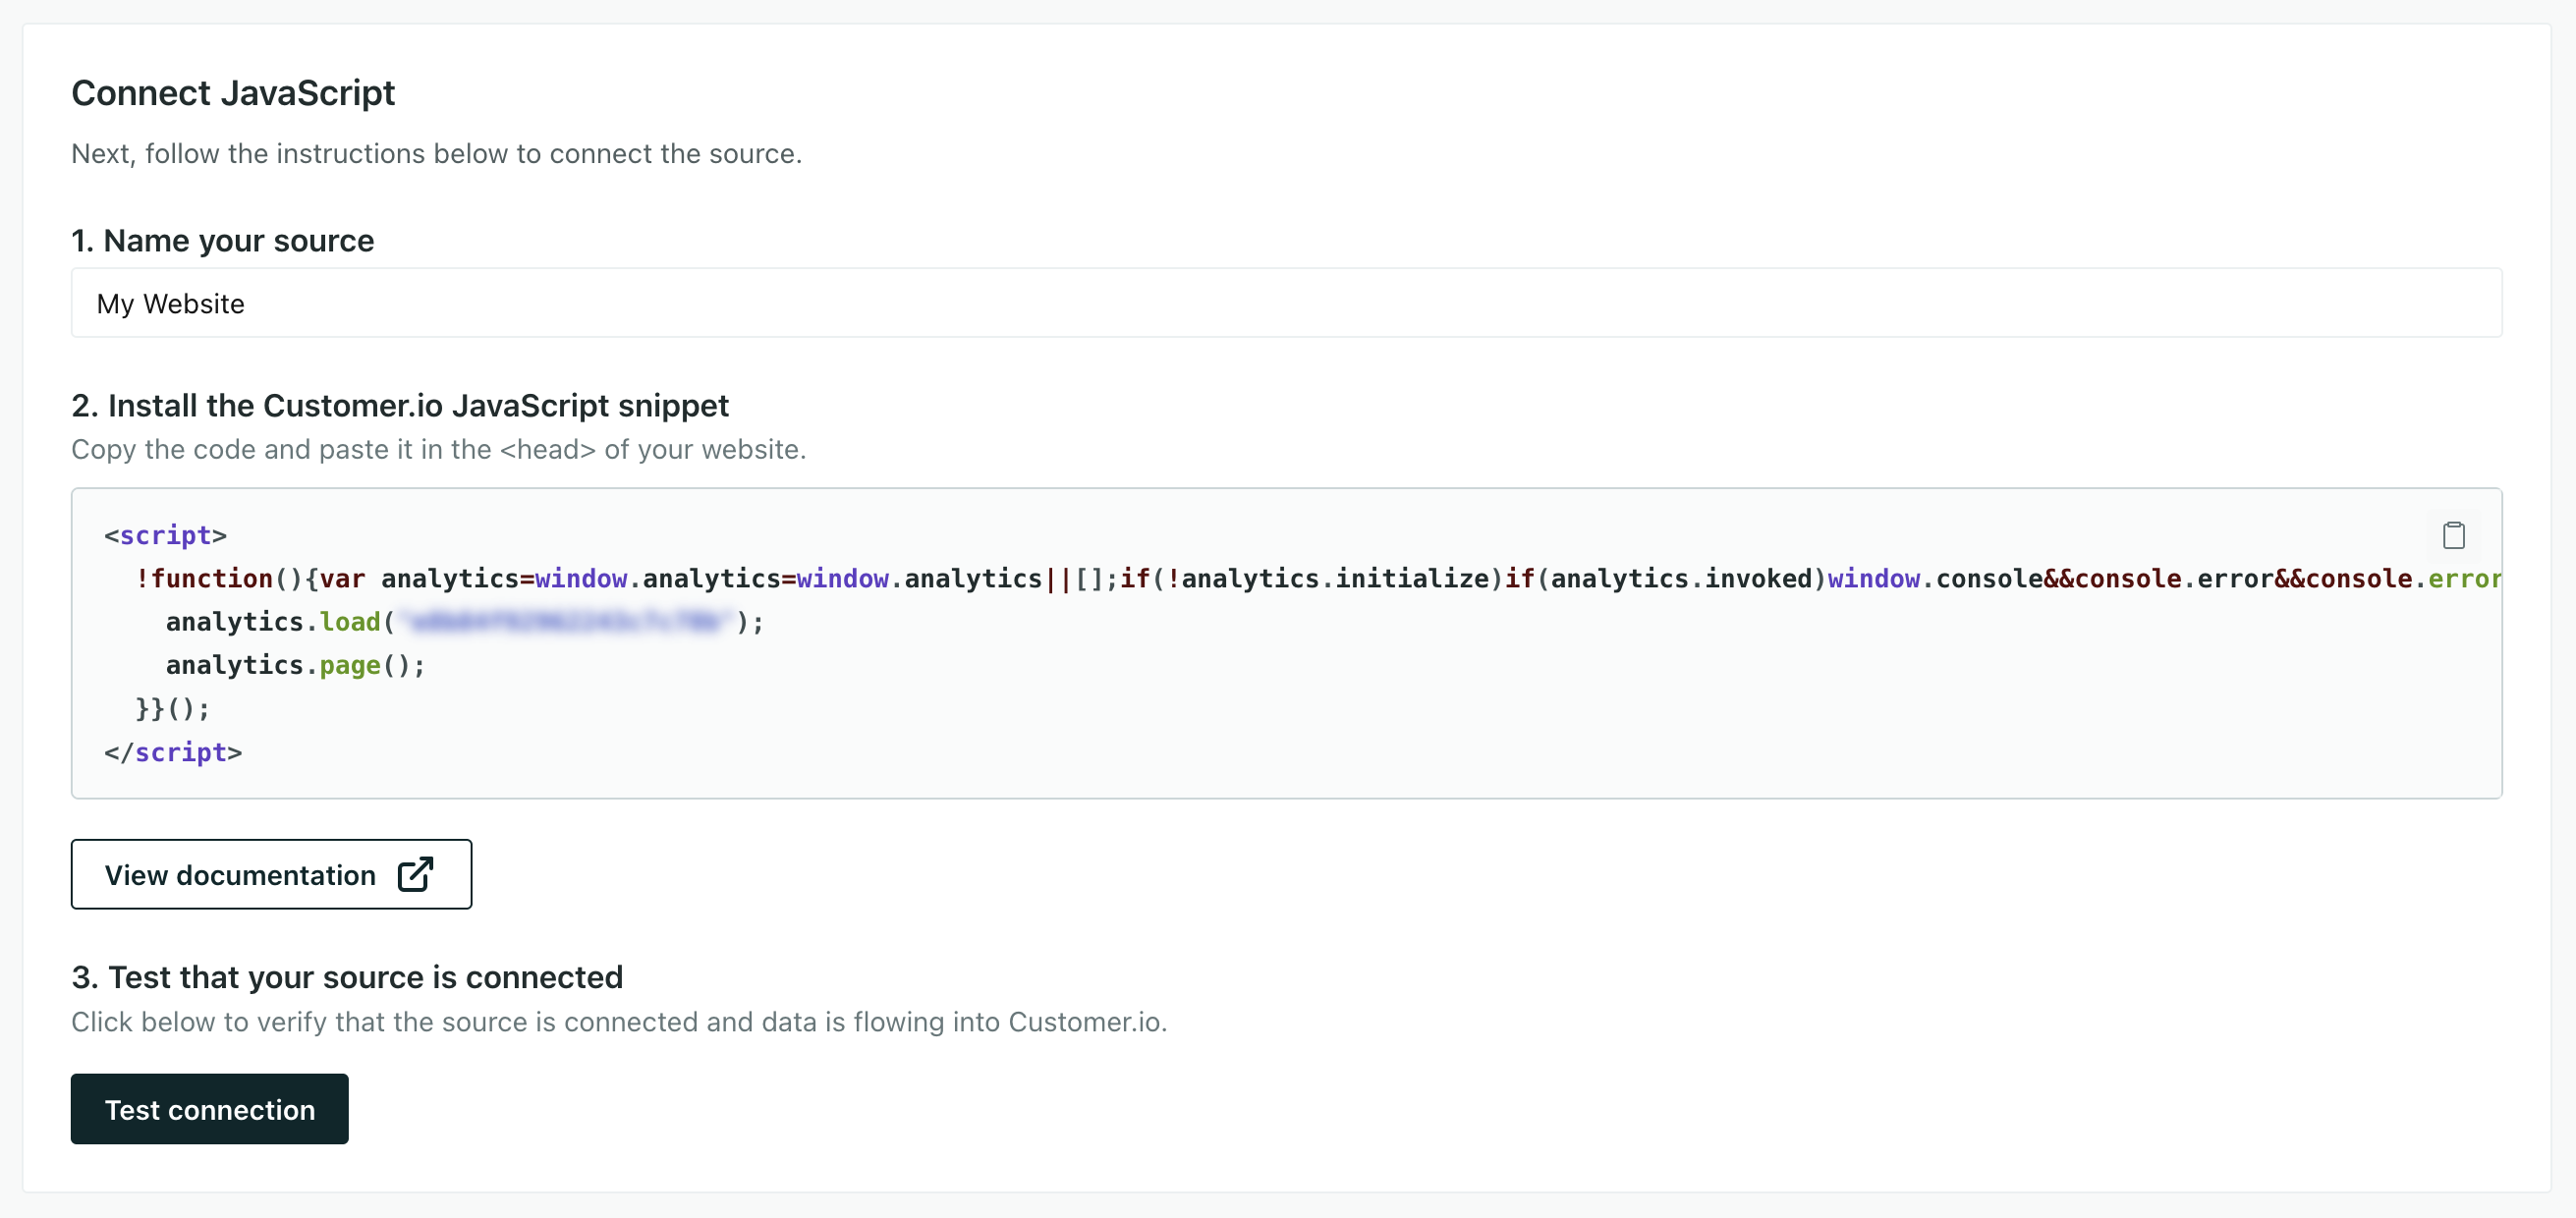
In your new source, under Installation instructions, copy the Sample Code. If you’re in our EU region, make sure that
t.srccontains our EU url (https://eu-api.customer.io/v1/analytics-js/snippet/).Your code looks like this, though yours will have a real Write Key in the
analytics.loadstatement. We have two versions of our client-side JavaScript snippet below: one with in-app messaging support, and one without. If you add in-app support, you’ll need to add a Journeys site ID to the snippet. See our in-app documentation for more information about using in-app messages.<script> !function(){var analytics=window.analytics=window.analytics||[];if(!analytics.initialize)if(analytics.invoked)window.console&&console.error&&console.error("Snippet included twice.");else{analytics.invoked=!0;analytics.methods=["trackSubmit","trackClick","trackLink","trackForm","pageview","identify","reset","group","track","ready","alias","debug","page","once","off","on","addSourceMiddleware","addIntegrationMiddleware","setAnonymousId","addDestinationMiddleware"];analytics.factory=function(e){return function(){var t=Array.prototype.slice.call(arguments);t.unshift(e);analytics.push(t);return analytics}};for(var e=0;e<analytics.methods.length;e++){var key=analytics.methods[e];analytics[key]=analytics.factory(key)}analytics.load=function(key,e){var t=document.createElement("script");t.type="text/javascript";t.async=!0;t.src="https://cdp.customer.io/v1/analytics-js/snippet/" + key + "/analytics.min.js";var n=document.getElementsByTagName("script")[0];n.parentNode.insertBefore(t,n);analytics._writeKey=key;analytics._loadOptions=e};analytics.SNIPPET_VERSION="4.15.3"; analytics.load("YOUR_WRITE_KEY"); analytics.page(); }}(); </script><script> !function(){var analytics=window.analytics=window.analytics||[];if(!analytics.initialize)if(analytics.invoked)window.console&&console.error&&console.error("Snippet included twice.");else{analytics.invoked=!0;analytics.methods=["trackSubmit","trackClick","trackLink","trackForm","pageview","identify","reset","group","track","ready","alias","debug","page","once","off","on","addSourceMiddleware","addIntegrationMiddleware","setAnonymousId","addDestinationMiddleware"];analytics.factory=function(e){return function(){var t=Array.prototype.slice.call(arguments);t.unshift(e);analytics.push(t);return analytics}};for(var e=0;e<analytics.methods.length;e++){var key=analytics.methods[e];analytics[key]=analytics.factory(key)}analytics.load=function(key,e){var t=document.createElement("script");t.type="text/javascript";t.async=!0;t.src="https://cdp.customer.io/v1/analytics-js/snippet/" + key + "/analytics.min.js";var n=document.getElementsByTagName("script")[0];n.parentNode.insertBefore(t,n);analytics._writeKey=key;analytics._loadOptions=e};analytics.SNIPPET_VERSION="4.15.3"; analytics.load( "YOUR_WRITE_KEY", // Optional: support in-app messaging { "integrations": { "Customer.io In-App Plugin": { siteId: "YOUR_JOURNEYS_SITE_ID" } } } ); analytics.page(); }}(); </script>Go to your website and paste this code directly before the closing
</head>tag. Or, add your script in accordance with the framework you use.
Now you’re ready to use the snippet to identify people and send events to destinations!
Your write key is exposed
When you use our JavaScript source, your write key is exposed on the client side. This key is only used to send data into Customer.io. But, if you’re concerned about security, you might want to use our Node.js package instead.
Install the JavaScript source via a tag manager
You can use our JavaScript source with a tag manager like Google Tag Manager. This might be a good option if you don’t have direct access to your website’s codebase.
Follow the process above to install the JavaScript source. But, instead of adding the code to your website, you’ll add it as a tag in your tag manager.
In general, the tag manager approach is perfectly fine. But, you should understand that a tag manager can lead to additional latency between your source and Customer.io. It can also make it tougher to trace, troubleshoot, and diagnose problems.
Import the JavaScript source
If you want to install our client-side script in your JavaScript app, you’ll use our @customerio/cdp-analytics-browser package.
Install the package with your favorite package manager, for example:
npm install @customerio/cdp-analytics-browser.Add the following code to your app. You’ll probably want to expose
AnalyticsBrowseron every page your audience uses. You’ll find your write key in your JavaScript source’s settings.
We have two versions of the import below: one with in-app messaging support, and one without. If you add in-app support, you’ll need to add a Journeys site ID to the snippet. See our in-app page for more about in-app messages.
import { AnalyticsBrowser } from '@customerio/cdp-analytics-browser'

const analytics = AnalyticsBrowser.load({ writeKey: '<YOUR_WRITE_KEY>' })
import { AnalyticsBrowser } from '@customerio/cdp-analytics-browser'

const analytics = AnalyticsBrowser.load(
   { writeKey: '<YOUR_WRITE_KEY>' },
   // Optional: Add in-app messaging support
   {
     integrations: {
       "Customer.io In-App Plugin": {
         siteId: "YOUR_SITE_ID",
       },
     },
   },
)
Now you can add analytics calls to identify people and send events to destinations!
Pages are not automatically tracked when you use this method
When you import the JavaScript source this way, you’ll need to send your own .page() calls.
If you’re in our EU data center
If you’re using cdp-analytics-browser instead of our snippet and you’re in our EU data center, you’ll need to update your code to use our EU regional endpoint.
Note that our EU regional endpoints account for the location of your data in Customer.io; they don’t account for the locations of your sources and destinations.
import { AnalyticsBrowser } from '@customerio/cdp-analytics-browser'

const analytics = AnalyticsBrowser.load({
  cdnURL: 'https://cdp-eu.customer.io',
  writeKey: '<YOUR_WRITE_KEY>'
});
Install the JavaScript source in Vue.js
If you want to install our client-side script in your Next.js app, you’ll use our @customerio/cdp-analytics-browser package
Install the package with NPM or Yarn:
npm install @customerio/cdp-analytics-browser.Add the following code to your
main.jsfile (or your application’s entrypoint, if you’ve changed it). This exposes$analyticson every page your audience uses, so you don’t have to add an import statement to all your files.import { AnalyticsBrowser } from '@customerio/cdp-analytics-browser' app.config.globalProperties.$analytics = AnalyticsBrowser.load( { writeKey: '<YOUR_WRITE_KEY>' } );
Now you can use all our methods via $analytics. For example, if you wanted to make a track call in an event handler, you’d use:
<button @click="$analytics.track('my-event')">Track!</button>
Install the JavaScript source in Next.js
These instructions are for our client-side component
If you want to use the server-side library, see our Node.js library instructions.
Install the package with your favorite package manager, for example:
npm install @customerio/cdp-analytics-browser.Optionally, add the following to your next.config.js to suppress warnings for the optional
encodingdependency:
webpack: config => {
  /* On `node-fetch` v2 the `encoding` package was optionally required.
  See: https://github.com/node-fetch/node-fetch/issues/412.
  Since `encoding` is not part of the deps by default, when using with webpack,
  it will raise a warning message which can be safely ignored. */
  config.ignoreWarnings = [
    { module: /node_modules\/node-fetch\/lib\/index\.js/ },
    { file: /node_modules\/node-fetch\/lib\/index\.js/ },
  ];

  return config;
}
Add
NEXT_PUBLIC_ANALYTICS_WRITE_KEY=<your-write-key>to your.envfile.Create an analytics component in
./components/analytics.js(or.ts, if you’re using TypeScript!):'use client'; import { AnalyticsBrowser } from '@customerio/cdp-analytics-browser'; export const analytics = AnalyticsBrowser.load( { writeKey: "<YOUR_WRITE_KEY>" } ); export default function Analytics() { return null; }You can load this component into every page by placing it in your
./app/layout.tsxfile:import './globals.css' import Analytics from '../components/analytics' export default function RootLayout({ children, }: { children: React.ReactNode }) { return ( <html lang="en"> <Analytics /> <body className={inter.className}>{children}</body> </html> ) }Use the component in your pages. For example, you can track an event when a button is clicked:
 import { analytics } from '../components/analytics'

 export default function Home() {
   return (
     <main>
       <button onClick={() => analytics.track('my-event')}>Track!</button>
     </main>
   )
 }
Identifying Users
The identify method tells Data Pipelines who the current website visitor is, and lets you assign unique traitsA key-value pair that you associate with a person or an object—like a person’s name, the date they were created in your workspace, or a company’s billing date etc. Use attributes to target people and personalize messages. Attributes are analogous to traits in Data Pipelines. to a person.
You should call identify when a user creates an account, logs in, etc. You can also call it again whenever a person’s traits change. We’ve shown a typical call with a traits object, but we’ve listed all the fields available in an identify call below.
You can send an identify call with an anonymousId and/or userId.
anonymousIdonly: This assign traits to a person before you know who they are.userIdonly: Identifies a user and sets traits.- both
userIdandanonymousId: Associates the data sent in previous anonymouspage,track, andidentifycalls with the person you identify byuserId.
Before you identify someone, their activity is anonymous. We’ll automatically assign unidentified people an anonymousId so you can still send page and track events. But when you identify a person, we’ll automatically associate the identified person with their anonymous activity, so you have a more complete view of your audience’s activity.
analytics.identify('f4ca124298', {
  email: 'cool.person@example.com',
  first_name: 'cool',
  last_name: 'person'
});
That identifies Cool Person by their unique User ID (f4ca124298—the value you know this person by in your database) and sets their first_name, last_name and email traits. Traits are information that you want to record about your audience in your various destinations.
In general, we recommend that you inject an identify call into the footer of every page of your site where a user is logged in. That way, no matter what page the user first lands on, they are always identified.
Identifying people by their email address
In Customer.io and some other destinations, you can identify people by their email address. If you use these destinations, you can send identify calls without a userId as long as your request includes an email trait.
Stop identifying people (logout)
When someone comes to your website, we’ll assign them an anonymousId. When they log in or provide information you can use to identify them, you’ll use the identify method. This stores their identity to a cookie and local storage, so you’ll recognize them when they come back to your website.
When they log out of your website, you’ll call the reset method to reset their identity. This anonymizes their data again, respecting your audience’s right to privacy.
Tracking events
The track method tells us about actions people take—the events people perform—on your site. Every track call represents an event.
You should track your audience’s activities with events both as performance indicators and so you can respond to your audience’s activities with campaignsA series of actions that you perform for each person who matches criteria. Campaigns typically send people a series of messages, but you can also use campaigns to send webhooks, update attributes, etc. in Journeys. For example, if your audience performs a Video Viewed or Item Purchased event, you might respond with other videos or products the person might enjoy.
You can send events with an anonymousId or a userId. Calls that you make with an anonymousId are associated with a userId when you identify someone by their userId.
Track calls require an event name describing what a person did. And they generally include a series of properties, providing additional information about the event. Beyond that, we’ve provided a complete schema for writable event fields below, and you can find more information in our API documentation.
For example, imagine that you want to send an event when someone begins an online course. You’d send a call that looks something like this:
analytics.track('class_started', {
  title: 'How to use Customer.io',
  progress: '2%',
  category: 'getting started'
});
In this case, the event is called class_started. That event contains the title, progress and category properties that tell you more information about the class the person started and why.
If you’re just getting started, some of the events you should track are events that indicate the success of your site, like Signed Up, Item Purchased or Article Bookmarked. You can get started with just a few events and add more later!
Querystring Methods
You can trigger an identify and a track method based on query strings in your URL. This can help you execute calls when tracking visitors from email click-throughs, social media clicks, and digital advertising.
| Parameter | Description | Triggers |
|---|---|---|
ajs_uid | The userId for an identify call. | This triggers an identify call. |
ajs_event | The event name for a track call. | This triggers a track call. |
ajs_aid | The anonymousId for the current user. | If you don’t pass a value, this returns the current anonymousId. If you pass a value, it sets the value as the user’s anonymousId. |
ajs_prop_<property> | A property you want to pass to a track call. | This won’t implicitly trigger an event and is dependent on you also passing ajs_event. This property is included in the resulting track call. |
ajs_trait_<trait> | A trait for the person in the identify call. | This won’t implicitly trigger a call. It’s dependent on you also passing ajs_uid. This trait is included in the resulting identify call. |
For example, this URL:
http://example.com/?ajs_uid=123456789abcd&ajs_event=Clicked%20Email&ajs_aid=abc123&ajs_prop_emailCampaign=First+Touch&ajs_trait_name=Karl+Jr.
would create the following events on the page.
analytics.identify('123456789abcd', { name: 'Karl Jr.' });
analytics.track('Clicked Email', { 'emailCampaign': 'First Touch' });
analytics.user().anonymousId('abc123');
Frequently Asked Questions
Will the snippet slow things down for users?
No. Our JavaScript snippet loads code asynchronously, so it won’t affect your page load speed. When the snippet is running on your site, you can enable destinations in your workspace and we’ll start sending data to them automatically.
What should I do with third party destination code?
When you use our JavaScript snippet, you should remove third party destinations from your site, so that you don’t record duplicate information. For example, if you want to send data from your JavaScript source to Google Analytics, you’ll want to remove Google Analytics tracking code from your site otherwise you may double-count visitors and events!
Do I need to update the snippet to support new destinations?
No! You don’t have to do anything to support new destinations.
When you add a new destination in Customer.io, we’ll automatically route it to the correct destinations—including direct-mode destinations.
When you create (or change!) a Source, we generate a new API Key for that source. You use the API Key in your code to tell our servers where the data comes from, so we can route it to your destinations and other tools.

