Google Analytics Destination
About this integration
Google Analytics 4 replaces the older Universal Analytics platform and provides insights about visitor activity for both websites and applications. Google analytics helps you gain a more comprehensive understanding of your audience, so you can make data-driven improvements to your app and website.
Getting started: cloud mode
Go to the Data Pipelines tab and click Connections.
Click Add New under Destinations.
Select the Google Analytics destination.
(Optional) Select the sources that you want to connect to this destination. You can always connect sources to your destination later. We’ll only show you eligible sources.
Configure your destination.
Measurement Id: The Measurement ID associated with a stream. Found in the Google Analytics UI under: Admin > Data Streams > choose your stream > Measurement ID. Required for web streams.
Firebase App Id: The Firebase App ID associated with the Firebase app. Found in the Firebase console under: Project Settings > General > Your Apps > App ID. Required for mobile app streams.
Api Secret: An API SECRET generated in the Google Analytics UI, navigate to: Admin > Data Streams > choose your stream > Measurement Protocol > Create
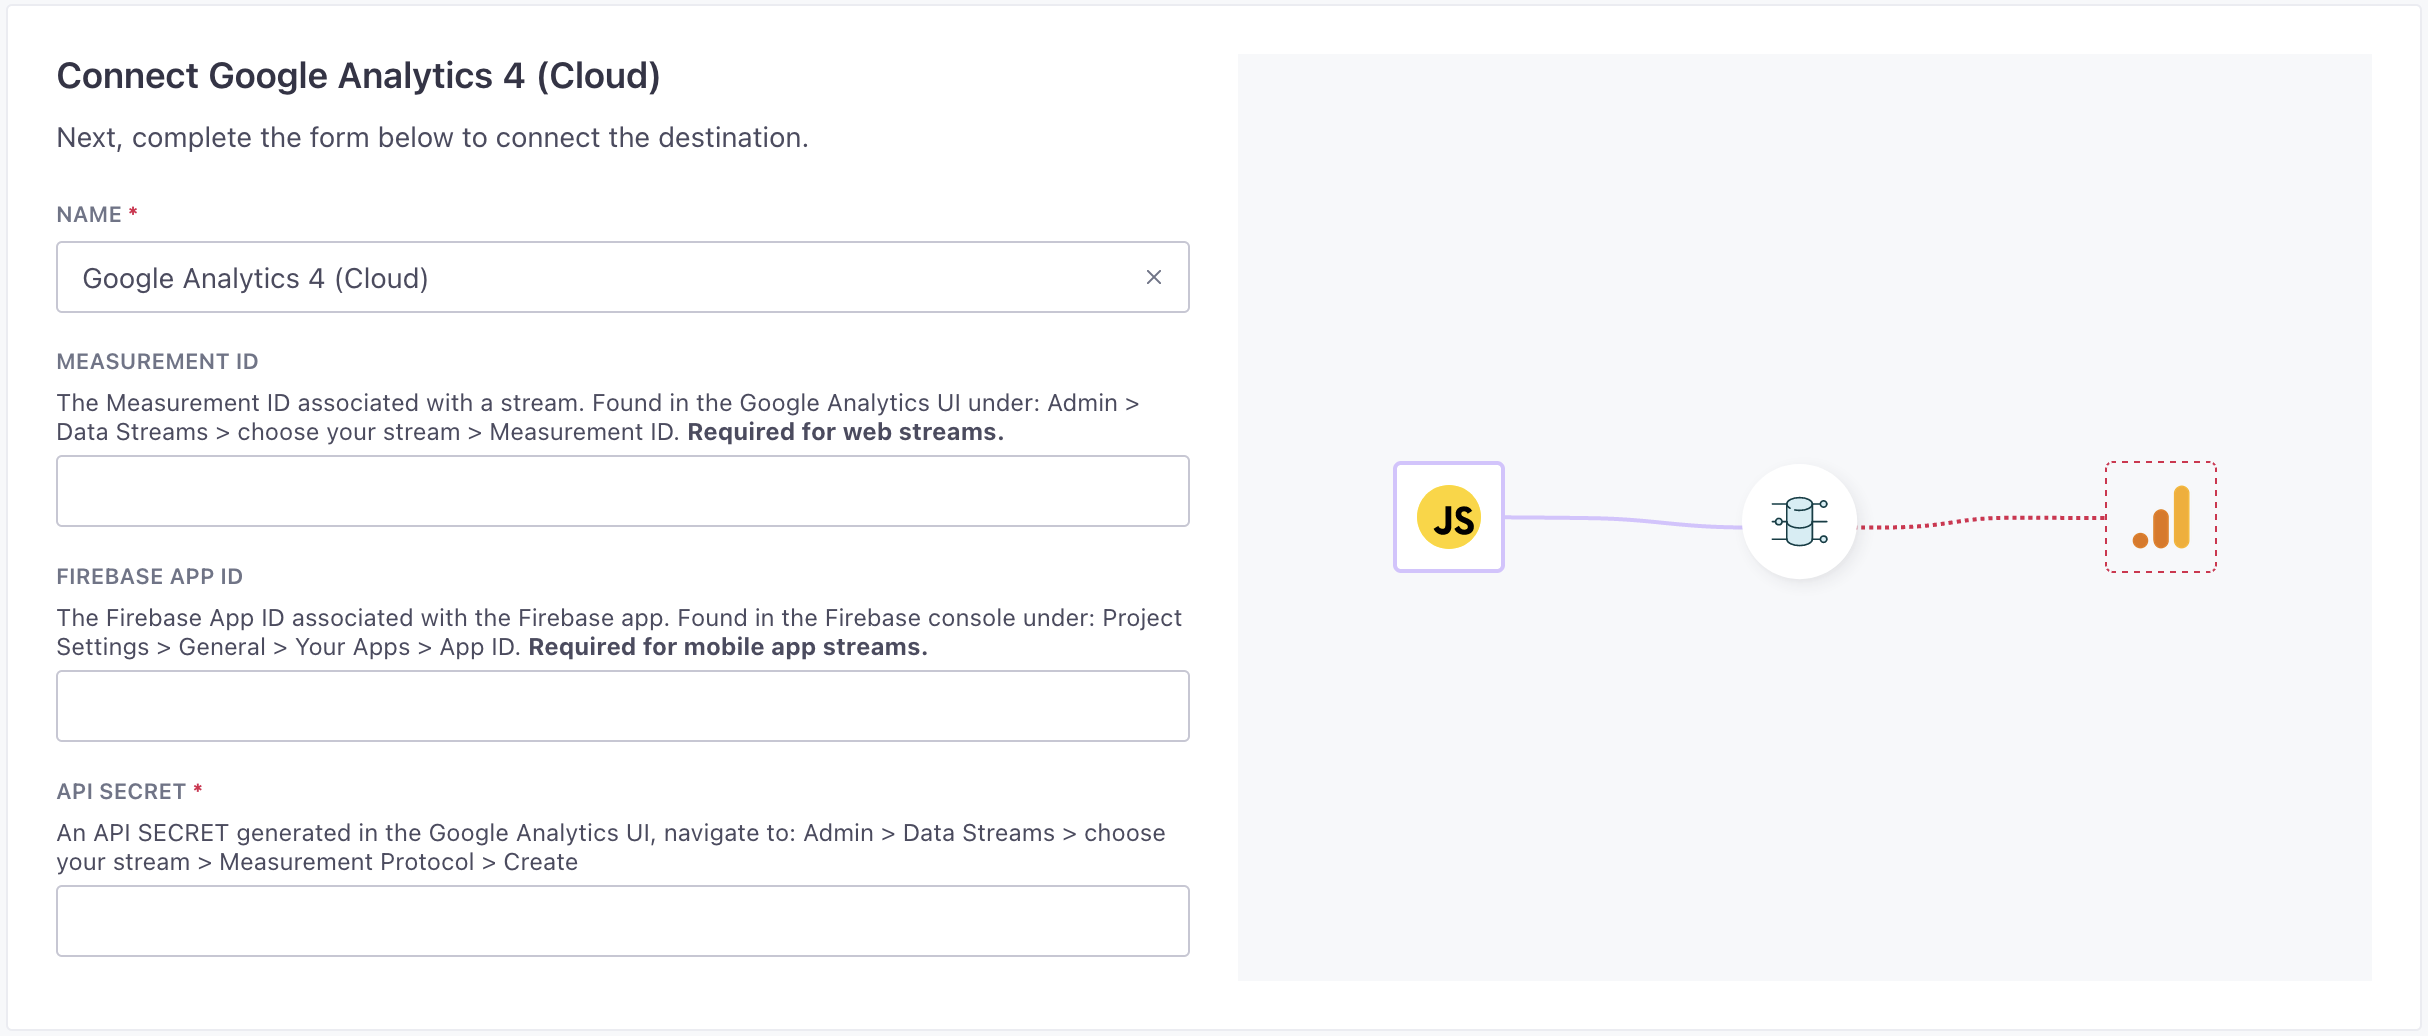
Click Enable Destination.
When you’re done, you’ll need to add actions. While we have a number of out-of-the-box actions for Google Analytics, we don’t enable any actions by default.
Cloud mode actions
When you’re done setting up your destination, you can go to the Actions tab to see how we map source events to your destination.
You may need to add actions for this destination
While we often have default triggers for actions, we don't always add those actions as defaults. You may need to add actions to make sure that you're sending all the data that you want to send to your destination. See our actions page for help setting up actions.
| Action | Default Trigger | Description |
|---|---|---|
| Purchase |
| Send event when a user completes a purchase |
| Add to Cart |
| Send event when a user adds items to a cart |
| Page View |
| Send page view when a user views a page |
| Custom Event |
| Send any custom event |
| Select Item |
| Send event when a user selects an item from a list |
| Begin Checkout |
| Send event when a user begins checkout |
| Select Promotion |
| Send event when a user selects a promotion |
| View Item |
| Send event when a user views an item |
| Remove from Cart |
| Send event when a user removes items from a cart |
| View Cart |
| Send event when a user views their cart |
| Search |
| Send event when a user searches your content |
| View Item List |
| Send event when a user views a list of items or offerings |
| Sign Up |
| Send event when a user signs up to measure the popularity of each sign-up method |
| View Promotion |
| Send event when a promotion is shown to a user |
| Add Payment Info |
| Send event when a user submits their payment information |
| Refund |
| Send event when a refund is issued |
| Login |
| Send event when a user logs in |
| Generate Lead |
| Send event when a user submits a form or request for information |
| Add to Wishlist |
| Send event when a user adds items to a wishlist |
Learn about managing consent for data collection and ad personalization below.
Getting started: direct mode
Go to the Data Pipelines tab and click Connections.
Click Add New under Destinations.
Select the Google Analytics destination.
(Optional) Select the sources that you want to connect to this destination. You can always connect sources to your destination later. We’ll only show you eligible sources.
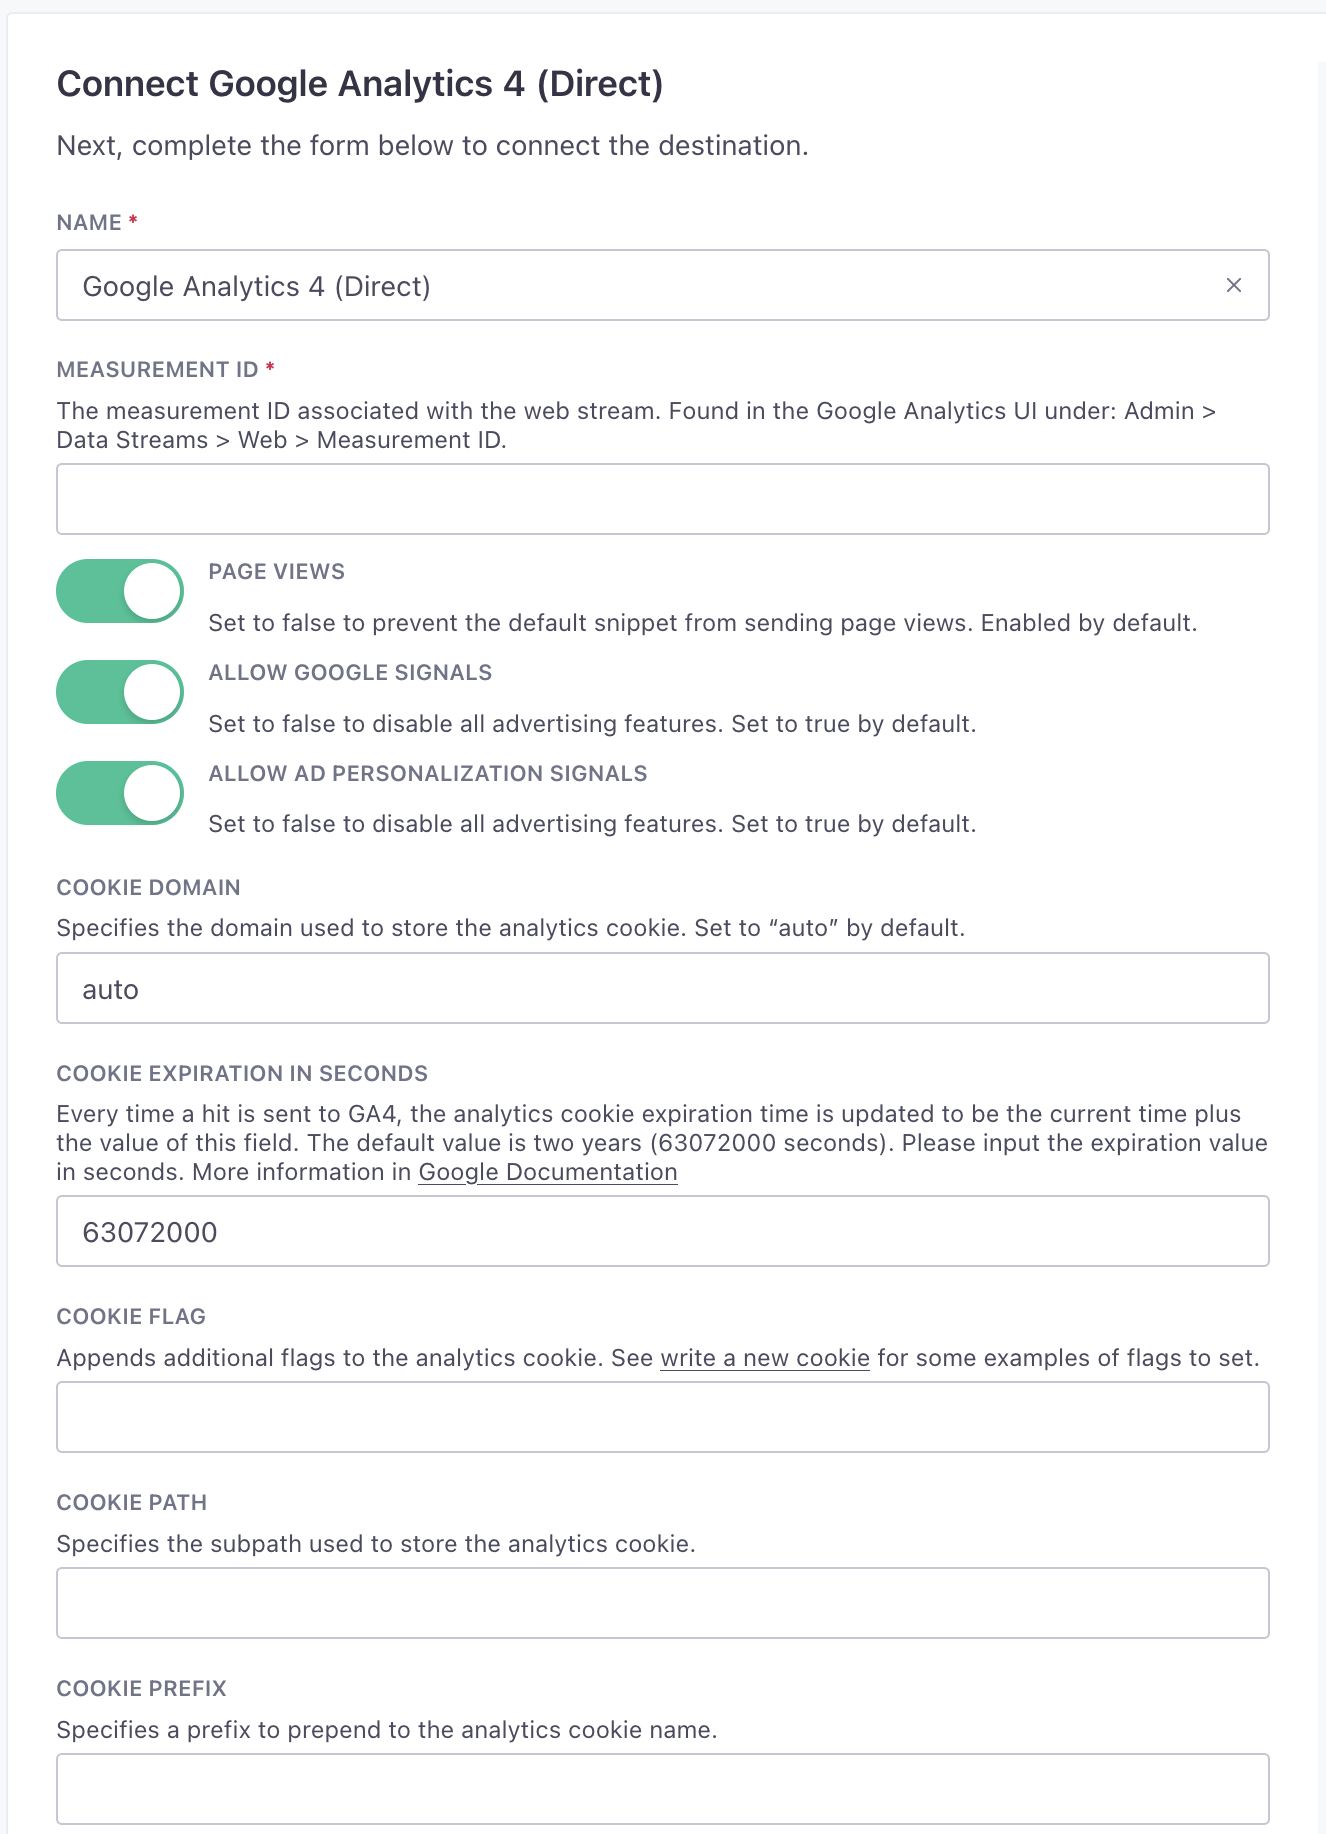
Configure your destination.
Measurement ID: The measurement ID associated with the web stream. Found in the Google Analytics UI under: Admin > Data Streams > Web > Measurement ID.
Page View: Set to false to prevent the default snippet from sending page views. Enabled by default.
Allow Google Signals: Set to false to disable all advertising features. Set to true by default.
Allow Ad Personalization Signals: Set to false to disable all advertising features. Set to true by default.
Cookie Domain: Specifies the domain used to store the analytics cookie. Set to “auto” by default.
Cookie Expiration In Seconds: Every time a hit is sent to GA4, the analytics cookie expiration time is updated to be the current time plus the value of this field. The default value is two years (63072000 seconds). Please input the expiration value in seconds. More information in Google Documentation
Cookie Flags: Appends additional flags to the analytics cookie. See write a new cookie for some examples of flags to set.
Cookie Path: Specifies the subpath used to store the analytics cookie.
Cookie Prefix: Specifies a prefix to prepend to the analytics cookie name.
Cookie Update: Set to false to not update cookies on each page load. This has the effect of cookie expiration being relative to the first time a user visited. Set to true by default so update cookies on each page load.
Enable Consent Mode: Set to true to enable Google’s Consent Mode. Set to false by default.
Default Ads Storage Consent State: The default value for ad cookies consent state. This is only used if Enable Consent Mode is on. Set to “granted” if it is not explicitly set. Consent state can be updated for each user in the Set Configuration Fields action.
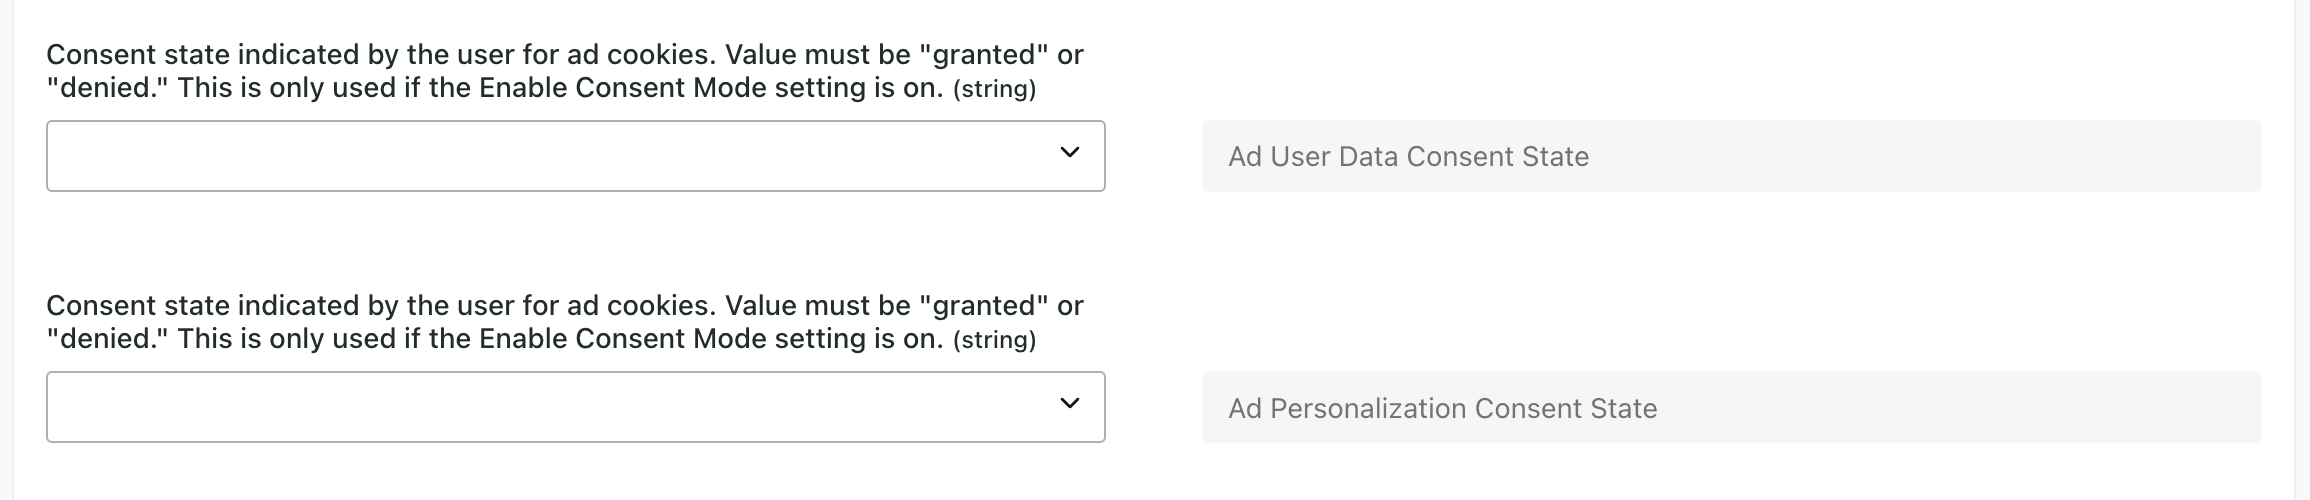
Ad User Data Consent State: The default value for ad cookies consent state. This is only used if Enable Consent Mode is on. Set to “granted” if it is not explicitly set. Consent state can be updated for each user in the Set Configuration Fields action.
Ad Personalization Consent State: Consent state indicated by the user for ad cookies. Value must be "granted" or "denied." This is only used if the Enable Consent Mode setting is on.
Default Analytics Storage Consent State: The default value for analytics cookies consent state. This is only used if Enable Consent Mode is on. Set to “granted” if it is not explicitly set. Consent state can be updated for each user in the Set Configuration Fields action.
Wait Time To Update Consent Stage: If your CMP loads asynchronously, it might not always run before the Google tag. To handle such situations, specify a millisecond value to control how long to wait before the consent state update is sent. Please input the wait_for_update in milliseconds.
Click Enable Destination.
Direct mode actions
When you’re done setting up your destination, you can go to the Actions tab to see how we map source events to your destination.

| Action | Default Trigger | Description |
|---|---|---|
| Add Payment Info |
| Send event when a user submits their payment information |
| Login |
| Send event when a user logs in |
| Sign Up |
| The method used for sign up. |
| Search |
| The term that was searched for. |
| Add to Cart |
| This event signifies that an item was added to a cart for purchase. |
| Add to Wishlist |
| The event signifies that an item was added to a wishlist. Use this event to identify popular gift items in your app. |
| Remove from Cart |
| This event signifies that an item was removed from a cart. |
| Select Item |
| This event signifies an item was selected from a list. |
| Select Promotion |
| This event signifies a promotion was selected from a list. |
| View Item |
| This event signifies that some content was shown to the user. Use this event to discover the most popular items viewed. |
| View Promotion |
| This event signifies a promotion was viewed from a list. |
| Begin Checkout |
| This event signifies that a user has begun a checkout. |
| Purchase |
| This event signifies when one or more items is purchased by a user. |
| Refund |
| This event signifies when one or more items is refunded to a user. |
| View Cart |
| This event signifies that a user viewed their cart. |
| View Item List |
| Log this event when the user has been presented with a list of items of a certain category. |
| Generate Lead |
| Log this event when a lead has been generated to understand the efficacy of your re-engagement campaigns. |
| Custom Event |
| Send any custom event |
| Set Configuration Fields |
| Set custom values for the GA4 configuration fields. |
Learn about managing consent for data collection and ad personalization below.
User Identification
Your source calls must include a client ID or Firebase App Instance ID to send data to Google Analytics 4. The client ID is the web equivalent of a device identifier and uniquely identifies a given user instance of a web client. By default, we set the *client ID to the our userId, falling back on anonymousId. You can change this mapping in your actions if you use a different field for the client ID.
The Firebase App Instance ID is the mobile equivalent of a device identifier and uniquely identifiers a given Firebase app instance. We don’t set a default for the Firebase App Instance ID, because you need to retrieve this value through the Firebase SDK.
You can also send a User-ID—not to be confused with our userId—with your events. The User-ID lets you associate your own identifiers with individual users so you can connect their behavior across different sessions on various devices and platforms. For more information on user IDs, see Google’s Measure activity across platforms and Reporting: deduplicate user counts pages.
Sending a User-ID can be helpful in some situations. For example, if you integrate with Google Analytics 4 client-side (either with our Google Analytics 4 destination or outside of Customer.io) and also use our Google Analytics 4 destination in cloud mode to send events through the API, you might want to take the following approach:
Use the Gtag-generated client ID. Gtag sets a client ID automatically. It stores the client ID in a cookie and can be fetched on the web client. To tie data between client-side and server-side integrations, you’ll pass the client ID to Customer.io as a property and use that value as the client ID in actions for your the Google Analytics 4 cloud-mode destination.
Use Customer.io’s
userIdfor User-ID. OuruserIdshould be your canonical user identifier. By setting Google’s User-ID to theuserId, client-side and server-side, you’ll benefit from cross-platform analytics. If you use Firebase to send mobile data to Google Analytics 4, using the same User-ID across web and mobile also ensures that your users are stitched together across devices.
Recommended events
Google Analytics 4 has recommended events and properties that power built-in reports. Our Google Analytics 4 cloud destination provides prebuilt actions that automatically map incoming events using our ecommerce specification to the corresponding Google Analytics 4 events and properties. If your source events don’t follow the ecommerce spec exactly, you can change the way we map properties to actions. For example, we map “Order Completed” events to the Google Analytics 4 “Purchase” event by default. If your company uses a different name for purchase events, like “Order Finished,” you could change the Purchase action to trigger off incoming “Order Finished” events.
While we recommend that you use our default actions and mapped properties when possible, our ecommerce spec doesn’t have an equivalent for all the recommended Google Analytics 4 events. You can use the Custom Event action to cover Google Analytics events outside our default actions.
Track user sessions
Engagement Time in Milliseconds
In Google Analytics 4, you can only see active users. An active user is someone who engages with your site for a non-zero amount of time. Therefore, by default, we set the parameter engagement_time_msec equal to 1 for anyone you send to this Data Pipelines destination. You can override this value in Actions by mapping the event field Engagement Time in Milliseconds to a field in your source data.
Event Parameters and Client ID
Another option is to capture session_id and session_number in your source events and map them as event properties in your Actions.
If you integrate with both direct mode and cloud mode GA 4 destinations, you can pass a session_id to ensure the user/session is preserved across both integrations, too. To do that, you’ll need to add some javascript to fetch the session_id and pass it along to your events.
const [sessionId, sessionNumber, clientId] = await Promise.all([
  new Promise(resolve => gtag('get', 'G-xxxxxxxxxx', 'session_id', resolve)),
  new Promise(resolve => gtag('get', 'G-xxxxxxxxxx', 'session_number', resolve)),
  new Promise(resolve => gtag('get', 'G-xxxxxxxxxx', 'client_id', resolve))
]);

analytics.track('Order Completed', { sessionId, sessionNumber, clientId });
Be sure to replace G-xxxxxxxxxx with your Google Analytics 4 Measurement ID.
You can then use sessionId, sessionNumber and clientId for the Event Parameters and Client ID fields under in your Action under Data Structure:
![]()
![]()
![]()
![]()
Custom dimensions and metrics
To generate reports based on the custom data you send to Google Analytics 4, you’ll need to create custom dimensions and metrics and link parameters in your incoming data to the corresponding dimensions or metrics.
You can set up dimensions or metrics based on event parameters (or user properties) in your incoming source events. However, Google Analytics silently drops events that include nested parameters. Make sure that you flatten the key-value pairs in your event data or it won’t make it to Google Analytics.
Consent management
Beginning March 6, 2024, Google requires your users’ consent to collect their data and personalize ads in conformance with the Digital Markets Act.
When you set up the Upload Click Conversion or Upload Call Conversion actions, Google includes two different fields for consent. Your users must consent to both for Google Ads to accept the conversion:
- User Data
- Ad Personalization
Direct mode
Cloud mode

If you don’t have customers in the European Economic Area (EEA), or you do not need to follow EEA regulations, you can simply set these fields to Granted.
If you have customers in the EEA, and you gather consent by way of a terms of service (TOS) or store consent outside of conversion events, you can set these fields to hardcode a Granted value.
Otherwise, you’ll need to gather consent from your customers and map it to a value in your source events. For example, if your source events have a consent property, you can map that property to consent fields in your destination. You must gather consent as Granted, Unknown or Denied.
- Granted: results in a successful upload of the conversion
- Unknown or Denied: prevents successful upload, respecting your audience’s right to privacy
Make sure you use the casing required for direct vs cloud mode, as indicated in the UI.
FAQ & troubleshooting
Why don’t I see my data in Google Analytics?
If you don’t see your data in Google Analytics, ensure that you’ve configured and enabled at least one action for an event you want to send to Google Analytics. This destination won’t send data to Google until you configure at least one action.
Google can take 24-48 hours to process data. As a result, your Google Analytics dashboards may not reflect the most current data. The Google Analytics Realtime report page displays activity on your site as it happens.
How do I attribute events to a particular source?
Due to limitations in the Google Analytics 4 Measurement Protocol API, our cloud-mode destination can’t pass certain reserved fields—including attribution data like UTM parameters—to Google. If you rely on attribution reporting, you can send attribution data as custom dimensions or set up a parallel direct-mode integration to collect this data.
Debug Mode
Google Analytics 4 has a debug mode that displays your events and the user properties your sources collect in real-time. This can help you troubleshoot your implementation.
Reserved event names and properties
Google reserves certain event names, parameters, and user properties. Google silently drops events that include these reserved names. Google doesn’t accept events in the following conditions:
- event or user property names have spaces in them
- fields with
nullvalues - events or properties that use reserved names
Why do I see an error Param [PARAM] has unsupported value?
Google has requirements/limitations imposed by their Measurement Protocol API. If an event contains null/object/array parameters, GA4 silently drops the event, so we don’t forward these events to Google Analytics. Rather, we return Invalid Type errors that you’ll find in the Data Out tab.
To find out if an event will return this error, you can test it against GA4’s debug endpoint with a tool like Postman.
Custom Event Naming
Google Analytics 4 does not accept custom event names that include spaces. To prevent errors, we automatically convert custom event names that contain spaces to snake case (e.g. event_name).
Event names are case sensitive. If you want event names to be lowercased, use the Lowercase Event Name setting when you set up Custom Event actions. If you disable this setting, Google will treat event names with different cases as distinct events. See Google Analytics 4 Event name rules for more information.
Send events from both the browser and the server
We support this destination in both cloudA cloud destination receives data from Customer.io. In cloud mode, data travels from your sources to Customer.io’s servers, where we transform your data and forward it to your destination. and directA direct destination (sometimes known as a web destination) receives data directly from your sources, bypassing Customer.io’s servers. Direct mode destinations only support our JavaScript source. modes. In some cases, you might want to use this destination in both modes.
In direct mode, the Analytics.js snippet sends client-side events from the browser to GA4. If you use this destination in cloud mode as well to tie in server-side events representing your audience members, you’ll need to pass the same Client ID for both client and server-side events.
To do this, you’ll need to fetch the Gtag-generated clientId and pass it as a property in events. See User Identification on this page for more information.
GA4 collects some events that aren’t mapped to actions
Google Analytics 4 collects events triggered by basic interactions with your site. See Google’s documentation for more information.
Data can take up to 48 hours to appear in Google’s reports
Google can take 24-48 hours to process data sent to Google Analytics. As a result, your Google Analytics dashboards may not reflect the most current data. The Google Analytics Realtime report page displays activity on your site as it happens.
Deduplicating page views
In direct Mode, we include a Page Views advanced setting. This setting is disabled by default, preventing Google’s gtag.js snippet from capturing its normal page_view event. Because we already send page events with analytics.page(), this prevents duplicate page events from appearing in Google Analytics.
If you see duplicate page_view events in your GA4 dashboard, you need to either:
- Disable the Page Views advanced setting (set it to False)
analytics.page()sends to the GA4 SDK. Or, - Edit or disable the preset Set Configuration Fields mapping so only the
page_viewincluded in the gtag.js snippet sends to the GA4 SDK.

