Facebook Conversions Destination
About this integration
The Facebook Conversions API enables businesses to send events that are linked to a pixel and processed in the same manner as browser pixel events directly to Facebook. These events help you measure, report, and optimize activities so you gain valuable insights into user behavior and can improve the effectiveness of your Facebook marketing efforts.
Getting started
To set up the Facebook Conversions API destination, you’ll need a Facebook user access token from your business account. See the section below for help creating or getting a token.
Go to the Data Pipelines tab and click Connections.
Click Add New under Destinations.
Select the Facebook Conversions API destination.
(Optional) Select the sources that you want to connect to this destination. You can always connect sources to your destination later. We’ll only show you eligible sources.
Configure your destination.
Pixel Id: Your Facebook Pixel ID
System User Access Token: The access token for the system user, obtained in the Facebook Business account. Learn more about obtaining the access token
Test Event Code: Use this field to specify that events should be test events rather than actual traffic. You can find your Test Event Code in your Facebook Events Manager under the "Test events" tab. You'll want to remove your Test Event Code when sending real traffic through this integration.
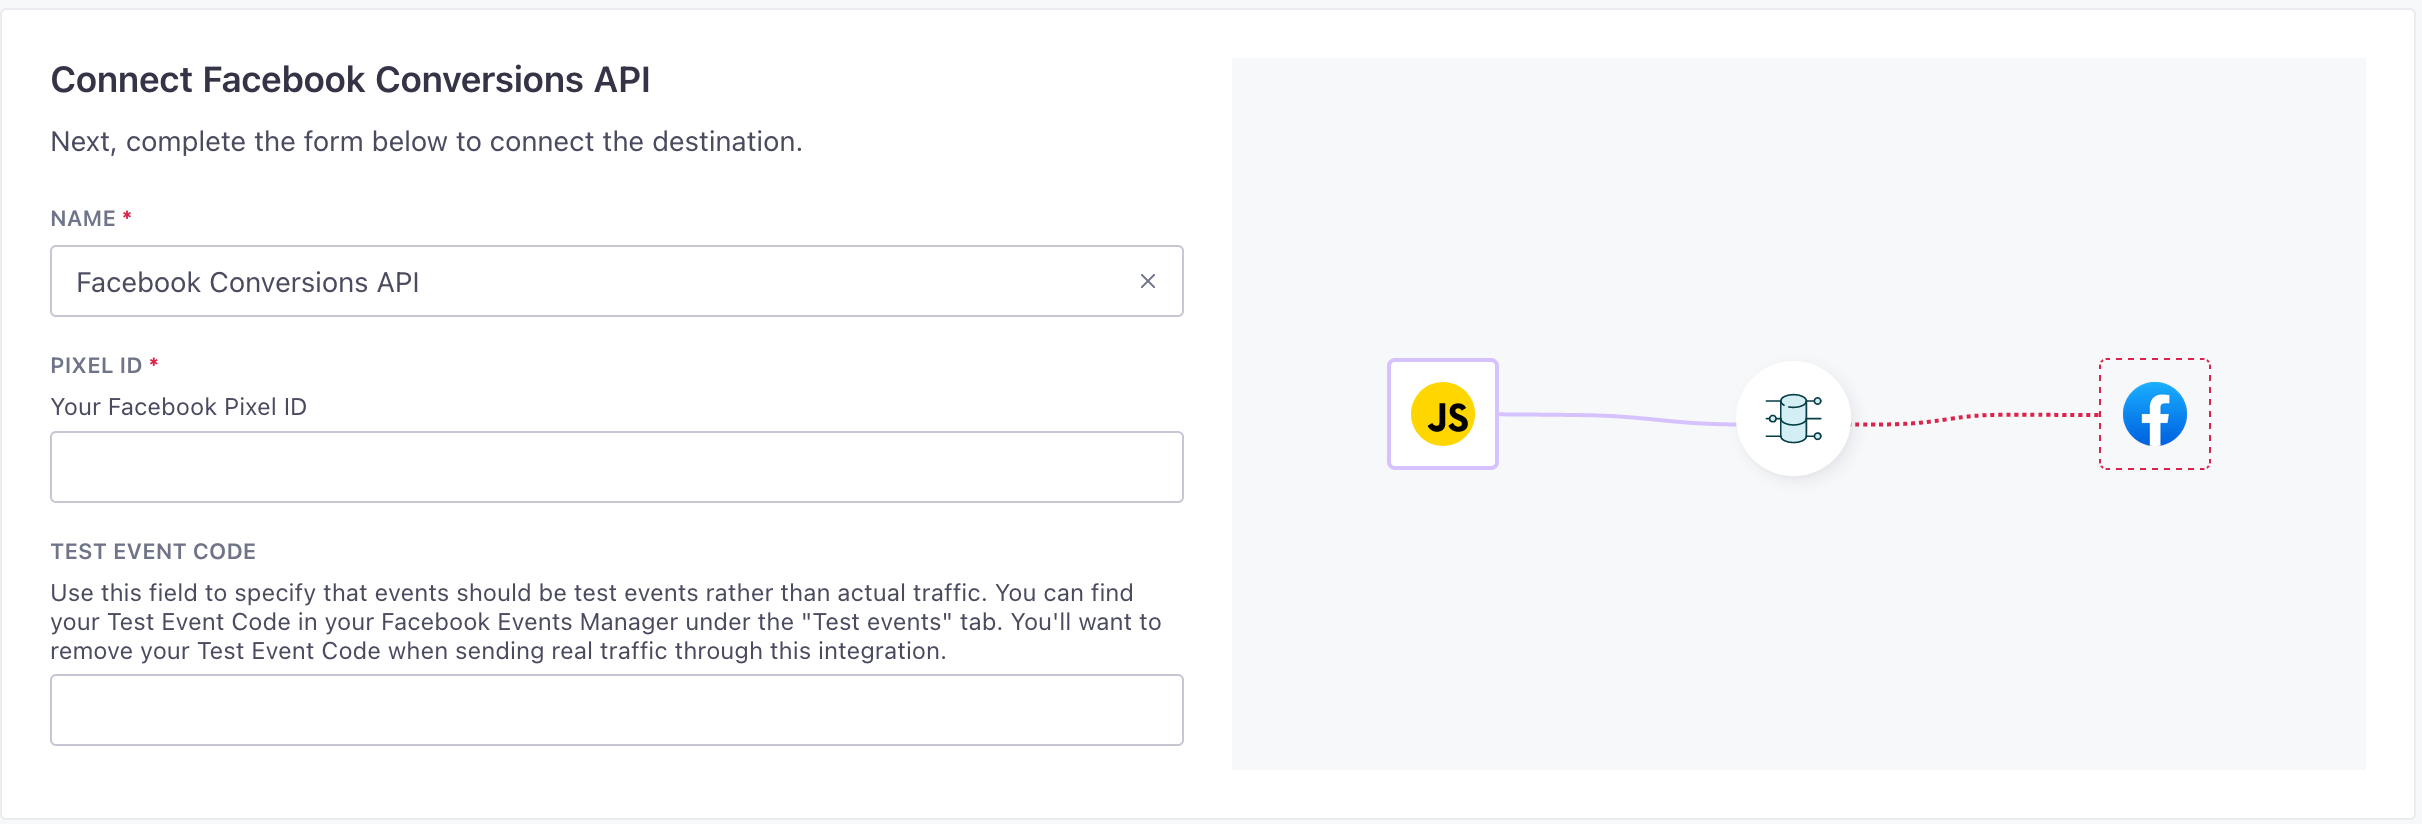
Click Enable Destination.
Get your Facebook system user access token
To send offline conversions with a system user access token, you must first create a system user in Facebook. You can create a system user in the Business Settings section of your Facebook Business Manager account.
- Go to your Facebook Business account.
- Go to Business Settings > Users > System users.
- Click Generate New Token, select your app from the dropdown, and select the ads_management permission.
- Click Generate Token
- Copy this token to the System User Access Token field in your destination settings.
Actions
When you’re done setting up your destination, you can go to the Actions tab to see how we map source events to your destination.
You may need to add actions for this destination
While we often have default triggers for actions, we don't always add those actions as defaults. You may need to add actions to make sure that you're sending all the data that you want to send to your destination. See our actions page for help setting up actions.
| Action | Default Trigger | Description |
|---|---|---|
| Purchase |
| Send event when a user completes a purchase |
| Initiate Checkout |
| Send event when a user enters the checkout flow |
| Add to Cart |
| Send event when a user adds a product to the shopping cart |
| View Content |
| Send event when a user views content or a product |
| Search |
| Send event when a user searches content or products |
| Page View |
| Send a page view event when a user lands on a page |
| Custom Event | Send a custom event |
Data Structure
You’ll need to set up the data structure you will send with each action. On an action page, locate the section titled Data Structure. The first field you need to map is called Action Source.
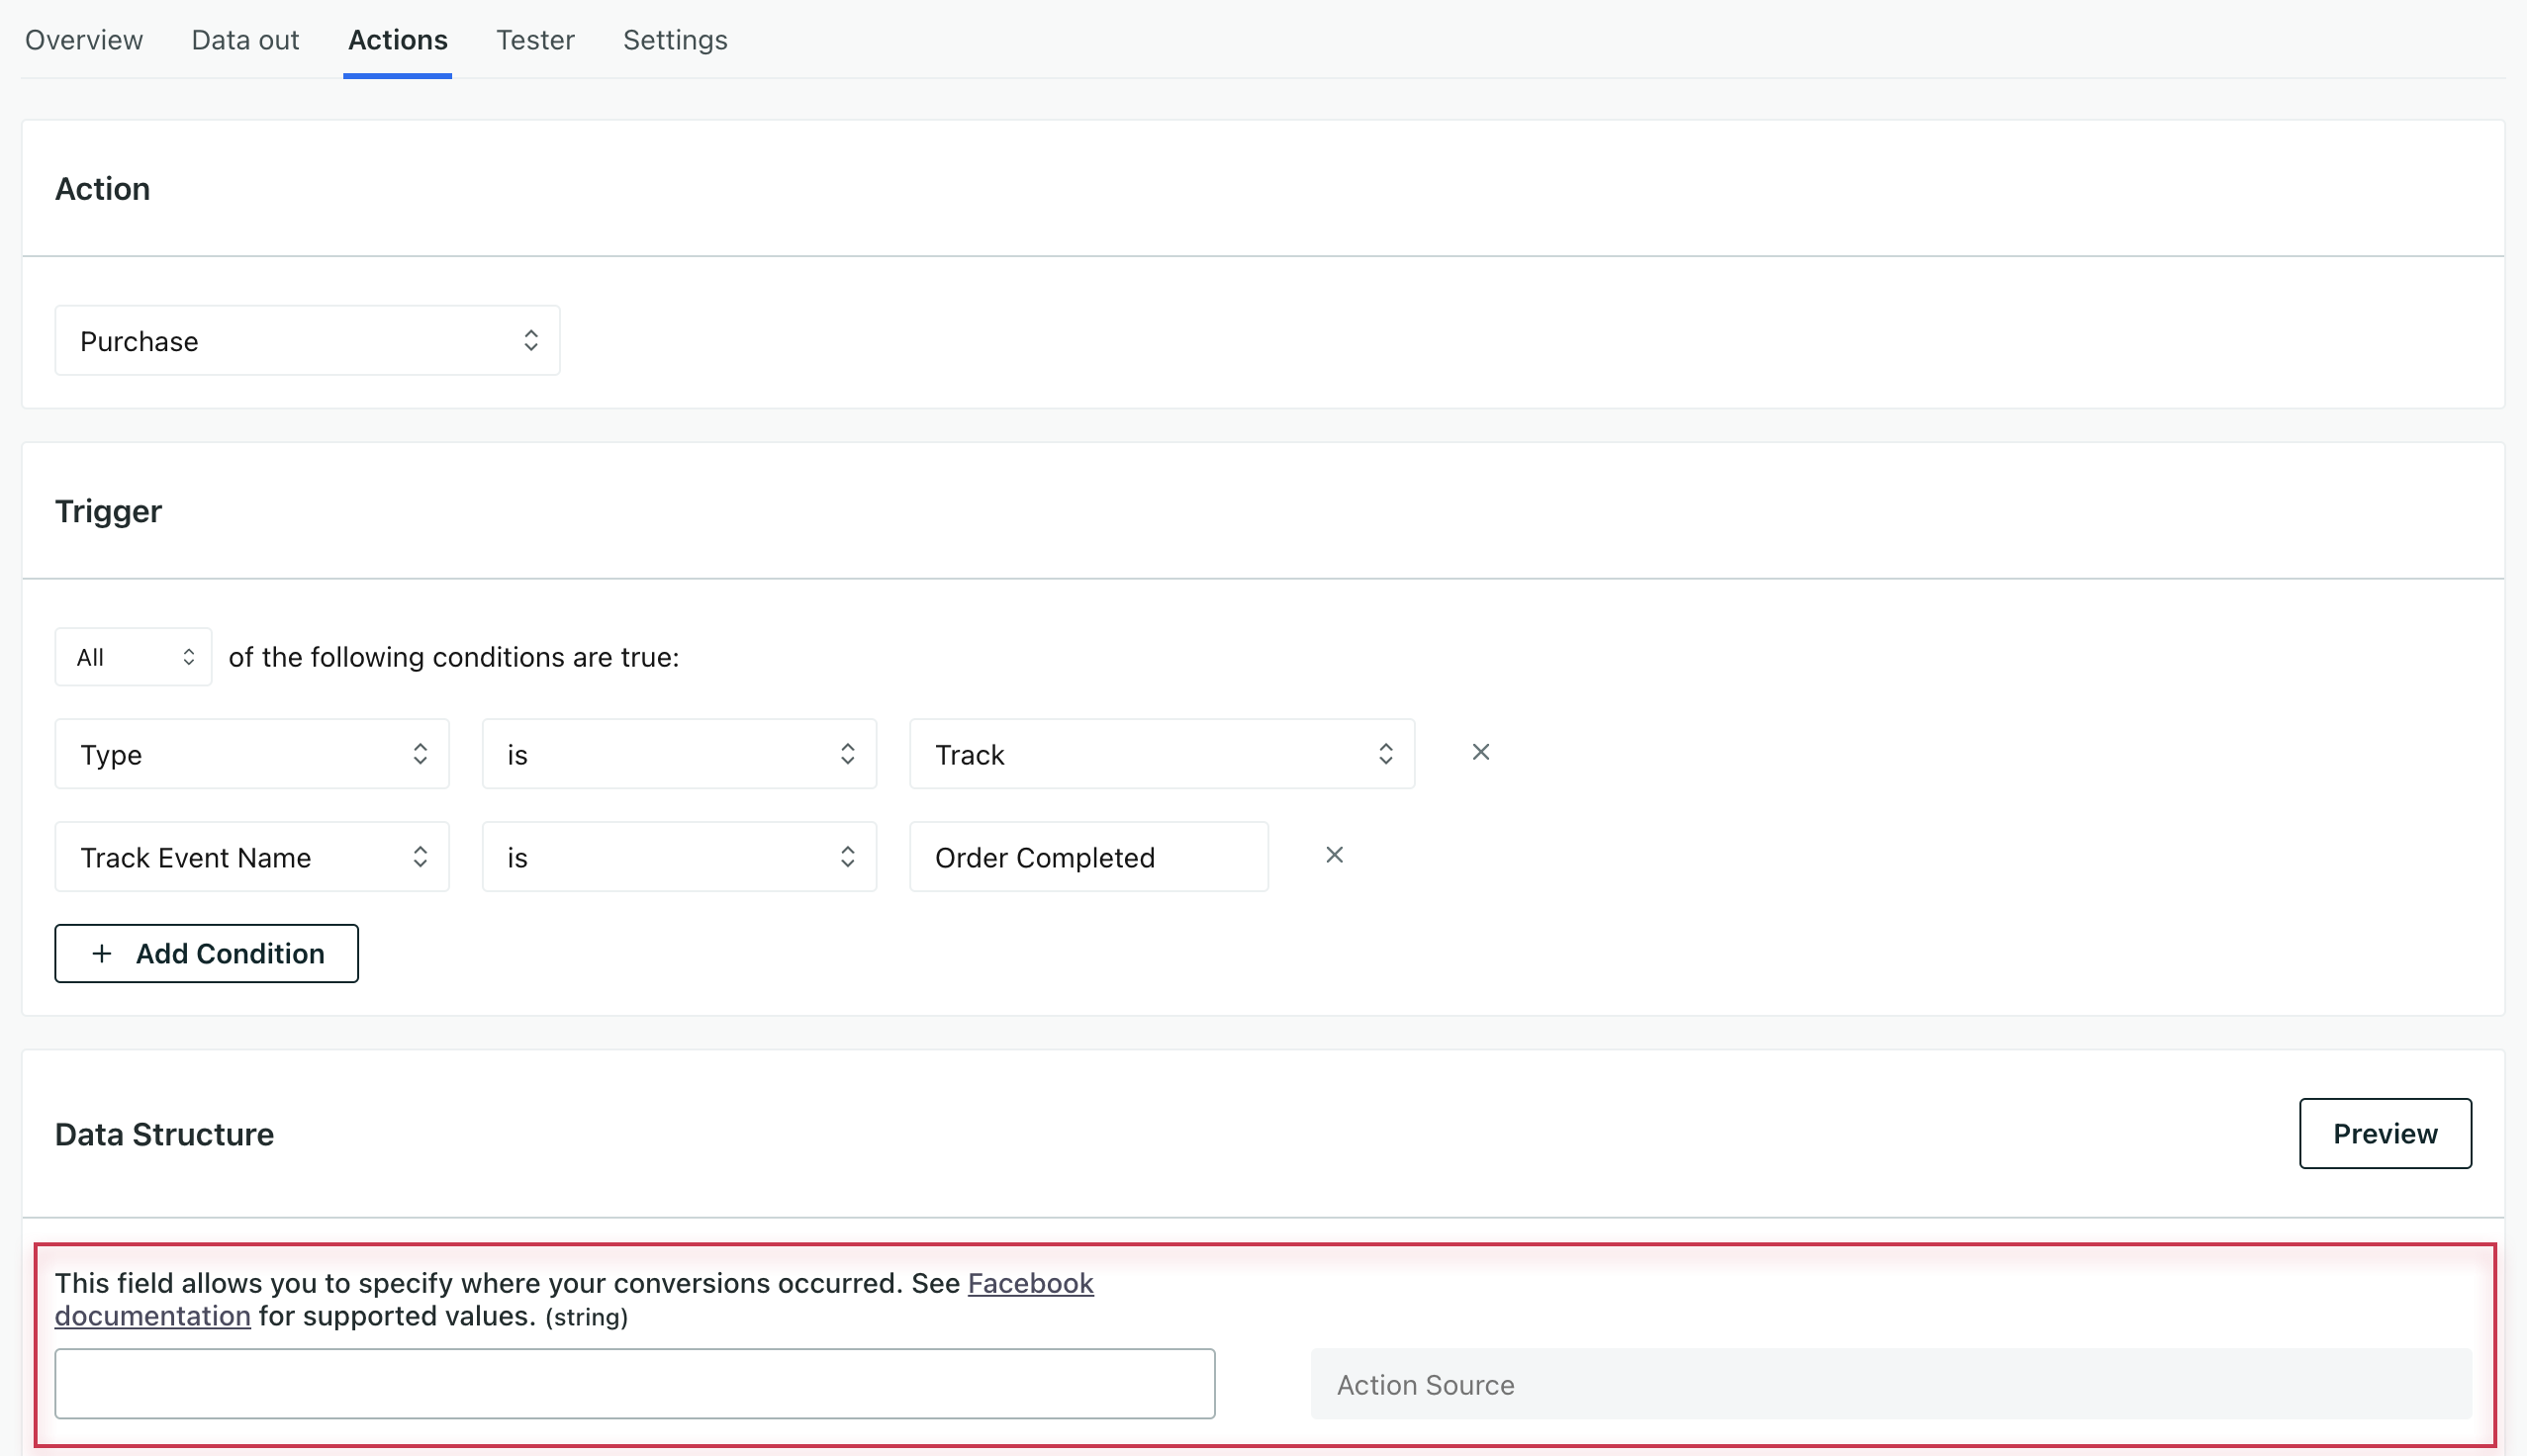
The Action Source takes a variety of values, like app or website (Scroll down to action_source for options). Each source requires a different set of parameters for you to send data to Facebook’s Conversion API. For instance, if your action source is app, you’ll need to configure these fields. You can find required fields for all sources in Facebook’s Conversion API docs.
FAQ & Troubleshooting
Other Standard Events
If you want to send Facebook standard events that we don’t have ready-made actions for, you can use the Custom Event action. For example, if you want to send a CompleteRegistration event, you would create a custom event action, set up your trigger criteria for completed registrations, and enter “CompleteRegistration” as the Event Name. When you set up custom actions, you can add fields you expect to send in events, like content_name and currency.
Mapped Data and Automatically Hashed Fields (PII)
We automatically map user data fields to their corresponding parameters as expected by the Conversions API before we send data to Facebook. Facebook uses shorthands for these fields in their API. We use the full names for clarity, but we map to the appropriate fields in Facebook. For example we use Email to represent em in Facebook.
Facebook (Meta) requires that you hash personally identifiable information (PII) before sending it to the Conversions API. We automatically hash appropriate data for you before we send data to Facebook.
| Customer.io Data Field | Facebook Conversions API Parameter | Automatically Hashed |
|---|---|---|
| External ID | external_id | ✅ |
| em | ✅ | |
| Phone | ph | ✅ |
| Gender | ge | ✅ |
| Date of Birth | db | ✅ |
| Last Name | ln | ✅ |
| First Name | fn | ✅ |
| City | ct | ✅ |
| State | st | ✅ |
| Zip Code | zp | ✅ |
| client_ip_address | client_ip_address | |
| client_user_agent | client_user_agent | |
| fbc | fbc | |
| fbp | fbp |
We automatically hash the External ID
Facebook recommends that you hash external IDs, so that external IDs match across Facebook Pixel and Facebook Conversions API if you use external IDs for deduplication.
Server Event Parameter Requirements
Facebook requires the action_source event parameter, which specifies where conversions occur, for all events sent to the Facebook Conversions API. If action_source is set to website, then the client_user_agent and the event_source_url parameters are also required. Events sent to the Conversions API that don’t meet this requirement may not be available for optimization, targeting, or measurement.
Verify Events in Facebook
When you start sending events, you should start seeing them within twenty minutes. To confirm that Facebook received your events:
- Go to the Events Manager.
- Click the pixel corresponding to your conversion events.
- In the Overview tab, look for events where the Connection Method is Server.

